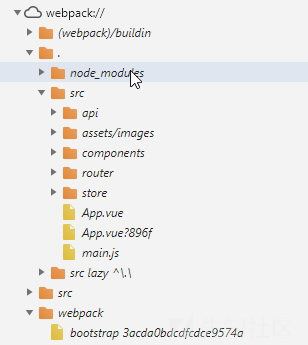
在在测试一个目标站点的过程中发现请求包参数只要有一点点变化,就无法正常走应用流程,观察参数名,发现其中可疑参数 signature 。 于是开启了signature 生成机制的探索之路,并最终实现一个代理脚本保证参数fuzz可以继续走下去。
实际请求包参数如下
token=o5z2z6f0U9X6T1x4T3Z1O685N5K0z6A2D8B37675p2k3h5c889e9q253b42243q985f9006526q1o929k3j605q80731&
time=1559801535&
version=2&
signature=5af79f46836aa9d935615bee565ba9ab&
md5str=time1559801535tokeno5z2z6f0U9X6T1x4T3Z1O685N5K0z6A2D8B37675p2k3h5c889e9q253b42243q985f9006526q1o929k3j605q80731version2
开始看js代码 找signature 生成代码 (这段太垮了 。。绕了一大圈) 直接跳到下一部分吧
以为直接是 md5str 做一次md5 生成 signature,然而并不是。 开始寻找
前端由 vue 制作,在app.js 中发现下面这段代码
{ token: e.token, time: t, version: 2, signature: l, md5str: f }
function(e, t, n) {
    "use strict";
    Object.defineProperty(t, "__esModule", {
        value: !0
    });
    var r = n("mtWM"),
    i = n.n(r),
    o = n("mw3O"),
    s = n.n(o),
    a = n("vaVw"),
    u = n("c03J"),
    c = n("wtEF"),
    l = i.a.create({
        baseURL: "/api.n/index.php",
        timeout: 3e4,
        headers: {
            "Content-Type": "application/x-www-form-urlencoded;charset=utf-8"
        }
    });
    l.interceptors.request.use(function(e) {
        return Object.assign(e, {
            data: function(e) {
                var t = Date.parse(new Date) / 1e3,
                n = {},
                r = [];
                for (var i in e.time = t,
                e.version = 2,
                e) if ("key" !== i) {
                    n[i] = e[i];
                    var o = {
                        key: i,
                        value: e[i]
                    };
                    r.push(o);
                    for (var u = 0; u < r.length; u++) for (var c = u + 1; c < r.length; c++) r[u].key > r[c].key && (r[u] = [r[c], r[c] = r[u]][0])
                }
                var l = "";
                r.map(function(e) {
                    "" !== e.value && (l += "" + e.key + e.value)
                });
                var f = l;
                return l += e.key,
                l = Object(a.hexMd5)(l),
                n = Object.assign({
                    token: e.token,
                    time: t,
                    version: 2,
                    signature: l,
                    md5str: f
                },
                n),
                s.a.stringify(n)
            } (e.data)
        })
    }
最后有一句 l += e.key, , signature 由 md5str + e.key md5 得到
上面纯属走了弯路 .... chrome 会自动解析 webpack(目标配置失误导致)
更新:不是解析 是由于目标配置错误,将xxxx.js文件对应的 xxxxx.js.map放上去了,在map文件里可以看见具体的代码

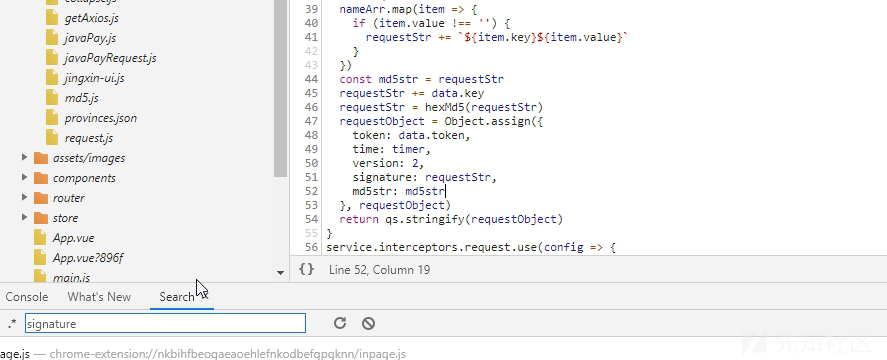
搜索关键词 signature 找到操作过程
requestStr 是遍历参数 拼接字符串形成( js 在遍历时会按key 对参数进行排序,故requestStr 是固定的)
requestStr += data.key
md5str可以从请求包参数中生成了,现在还差找到key

继续搜索 找到 getTokenKey 函数 直接post 请求
export function getTokenKey (data) {
  return request({
    url: '?vcode/key',
    method: 'post',
    data
  })
}


getTokenKey({}).then(response => {
        if (response.data.status === 200) {
          const { token } = response.data
          const { key, siteCode } = response.data.data
          this.SET_ONEFRIST(true)
          this.SET_TOKEN(token)
          this.SET_KEY(key)
          this.getGameList({token, key})
          this.SET_SITECODE(siteCode)
          this.getBannerData({token, key})
          this.getqqService({token, key})
          this.getappDownload({token, key})
          this._getBullentin({token, key}) // 获取跑马灯信息
          this.getRegisterShow({token, key}) // 获取初始化注册信息配置
        }
      })


请求包如下

POST /xx/index.php/?vcode/key HTTP/1.1
Host: xxxxxxx
User-Agent: Mozilla/5.0 (Windows NT 10.0; Win64; x64; rv:67.0) Gecko/20100101 Firefox/67.0
Accept: application/json, text/plain, */*
Accept-Language: zh-CN,zh;q=0.8,zh-TW;q=0.7,zh-HK;q=0.5,en-US;q=0.3,en;q=0.2
Accept-Encoding: gzip, deflate
Content-Type: application/x-www-form-urlencoded;charset=utf-8
Content-Length: 0
Connection: close


HTTP/1.1 200 OK
Date: Sun, 09 Jun 2019 13:11:36 GMT
Content-Type: text/html; charset=utf-8
Connection: close
Server: nginx
Vary: Accept-Encoding
Access-Control-Allow-Origin: *
Set-Cookie: PHPSESSID=5dv7o0nffsks0m161i5bg24es7; path=/
Expires: Thu, 19 Nov 1981 08:52:00 GMT
Cache-Control: no-store, no-cache, must-revalidate
Pragma: no-cache
Content-Length: 233

{"status":200,"data":{"key":"08e95876b4d844789c00b350c1dc3e5d","siteCode":"hervu"},"token":"q7c2z319g3H1d8v5w8X7c2a0z7T6k9d8x2D9O2Z5d75275v100o7f2n3s2f8s2k9m1056915i618b15425g4e54370s4","errorMsg":"(token\u65e0\u6548)","cache":false}
多次请求发现 其 key并不会变化,key只是最后进行hash 的扰乱,token 会变换
key=08e95876b4d844789c00b350c1dc3e5d
signature=5af79f46836aa9d935615bee565ba9ab
md5str=time1559801535tokeno5z2z6f0U9X6T1x4T3Z1O685N5K0z6A2D8B37675p2k3h5c889e9q253b42243q985f9006526q1o929k3j605q80731version2
验证了请求包中的signature
hexmd5(time1559801535tokeno5z2z6f0U9X6T1x4T3Z1O685N5K0z6A2D8B37675p2k3h5c889e9q253b42243q985f9006526q1o929k3j605q80731version208e95876b4d844789c00b350c1dc3e5d)
自动测试
每个fuzz请求都需要进行重新计算一次signature,为了适应已有的扫描工具(sqlmap 或 burp 通过使用代理,继续对应用进行fuzz)考 虑将 signature 的计算做到一个http/https 代理中。
考虑到以后遇到不同站点的 signature 可能使用不同的算法,github 上参考下面项目,用 tornado 实现了功能。
signature 生成代码如下
def upadte_post_body(body):
    '''
    token=o5z2z6f0U9X6T1x4T3Z1O685N5K0z6A2D8B37675p2k3h5c889e9q253b42243q985f9006526q1o929k3j605q80731&
    time=1559801535&
    version=2&
    signature=5af79f46836aa9d935615bee565ba9ab&
    md5str=time1559801535tokeno5z2z6f0U9X6T1x4T3Z1O685N5K0z6A2D8B37675p2k3h5c889e9q253b42243q985f9006526q1o929k3j605q80731version2
    '''
    key = '08e95876b4d844789c00b350c1dc3e5d'

    paramlist = body.split('&')

    paramlist.sort()  # Simulate js key field sorting

    paramdic = {}

    new_md5str = ''
    old_md5str = ''

    new_sign = ''
    old_sign = ''

    for i in paramlist:
        _ = i.split('=')
        if _[0] != 'md5str' and _[0] != 'signature':
            new_md5str = new_md5str + _[0] + _[1]
        elif _[0] == 'md5str':
            old_md5str = _[1]
        elif _[0] == 'signature':
            old_sign = _[1]

    md5 = hashlib.md5()
    hashstring = new_md5str + key
    md5.update(hashstring.encode('utf-8'))
    new_sign = md5.hexdigest()

    body = body.replace(old_sign,new_sign)
    body = body.replace(old_md5str,new_md5str)

    logger.debug('new_sign %s new_md5str %s',new_sign, new_md5str)
    return body
完整项目地址
proxy_add_sign 使用说明
针对不同站点前端signature 的生成机制,修改 upadte_post_body 函数。
常规情况下 运行 python proxy_add_sign.py -p 8080 即可在 8080 端口开启一个http代理
https 的问题
由于仅仅为了测试,sqlmap、burp 不必了解目标站点是否为https,就没有实现自签名证书的 https 代理。仅将sqlmap、burp发来的http包,以https的方式请求至源站,对工具来说目标只是一个正常的http服务。
如下命令测试目标站为https 的情况
python proxy_add_sign.py -p 8080 -s True
如有侵权请联系:admin#unsafe.sh