
Table of contentsIntroductionFeaturesInstallationUsageConfiguration via CLI flags 2026-9-18 16:7:40 Author: kitploit.com(查看原文) 阅读量:10 收藏








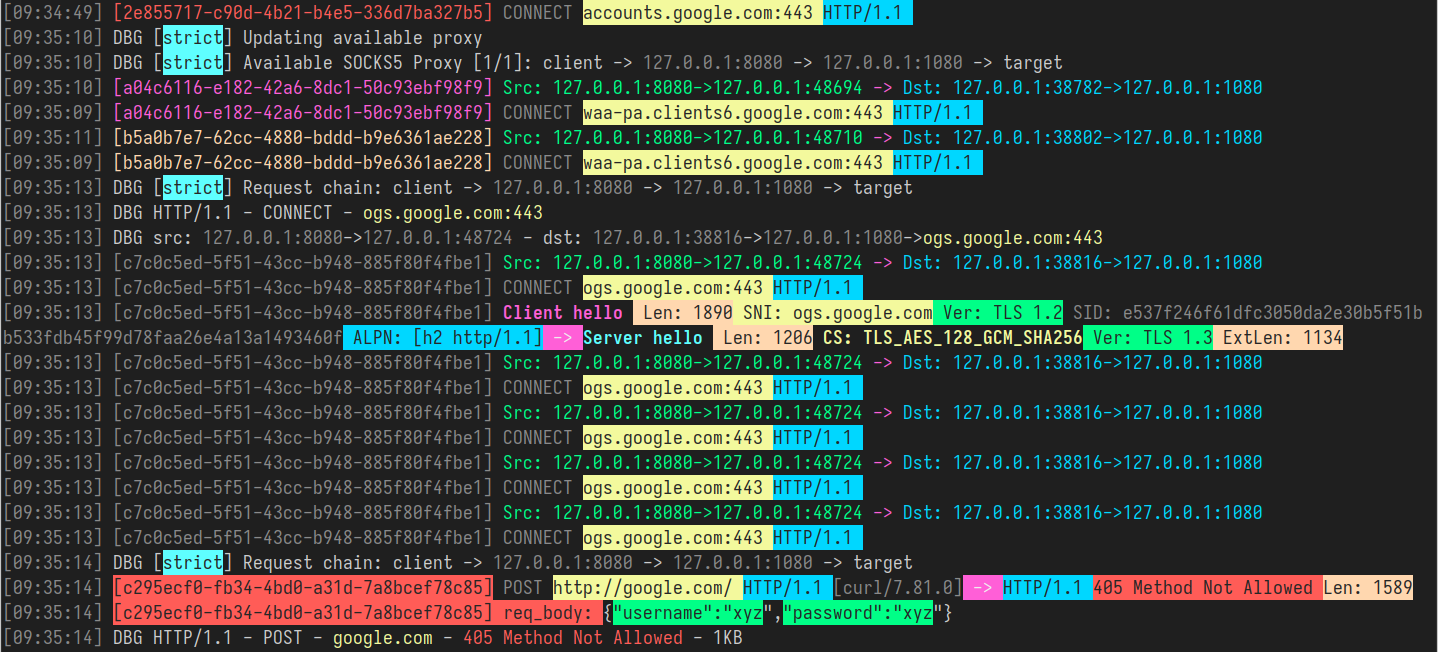
Table of contents
- Introduction
- Features
- Installation
- Usage
- Transparent proxy
- Traffic sniffing
- HTTP2 and HTTP3 support
- IPv4 and IPv6 support
- ARP spoofing
- NDP spoofing
- DNS spoofing
- Packet Capture
- Network Namespaces
- Mixed Server
- Links
- Contributing
- License
Introduction
GoHPTS CLI tool is a bridge between HTTP clients and a SOCKS5 proxy server or multiple servers (chain). It listens locally as an HTTP proxy, accepts standard HTTP
or HTTPS (via CONNECT) requests and forwards the connection through a SOCKS5 proxy. Inspired by http-proxy-to-socks and Proxychains
Possible use case: you need to connect to external API via Postman, but this API only available from some remote server. The following commands will help you to perform such a task:
Create SOCKS5 proxy server via ssh:
ssh <remote server> -D 1080 -Nf
Create HTTP-to-SOCKS5 connection with gohpts
Specify http server in proxy configuration of Postman
Features
-
Proxy Chain functionality
Supportsstrict,dynamic,random,round_robinchains of SOCKS4/SOCKS5 proxy -
Transparent proxy
Supportsredirect(SO_ORIGINAL_DST) andtproxy(IP_TRANSPARENT) modes -
IPv4 and IPv6 support
Operates inIPv4-only,IPv6-onlyordual stackmodes -
TCP and UDP Transparent proxy
tproxyandtlocal(IP_TRANSPARENT) handle TCP and UDP traffic -
Traffic sniffing
Proxy is able to parse HTTP headers, TLS handshake, DNS messages and more -
ARP spoofing
Proxy entire subnets with ARP spoofing approach -
NDP spoofing
Proxy IPv6 connections using Router/Neighbor Advertisement and RDNSS injections. -
DNS spoofing
Redirect clients to arbitrary domains using DNS records manipulation -
Packet Capture
Capture traffic into txt/pcap/pcapng files and analyze with Wireshark -
DNS Leak Protection
DNS resolution occurs on SOCKS5 server side. -
CONNECT Method Support
Supports HTTP CONNECT tunneling, enabling HTTPS and other TCP-based protocols. -
HTTP2/HTTP3 Support
Supports modern HTTP/2 and HTTP/3 transport, enabling efficient multiplexed connections over TLS 1.3 -
Network Namespaces support
Supports custom Linux network namespaces for listening sockets and outbound connections -
Trailer Headers Support
Handles HTTP trailer headers -
Chunked Transfer Encoding
Handles chunked and streaming responses -
SOCKS5 Authentication Support
Supports username/password authentication for SOCKS5 proxies. -
HTTP Authentication Support
Supports username/password authentication for HTTP proxy server. -
Lightweight and Fast
Designed with minimal overhead and efficient request handling. -
Cross-Platform
Compatible with all major operating systems.
Installation
-
Arch Linux/CachyOS/EndeavourOS
Or using
paru: -
Download the binary for your platform from Releases page:
GOHPTS_RELEASE=v1.15.6; wget -v https://github.com/shadowy-pycoder/go-http-proxy-to-socks/releases/download/$GOHPTS_RELEASE/gohpts-$GOHPTS_RELEASE-linux-amd64.tar.gz -O gohpts && tar xvzf gohpts && mv -f gohpts-$GOHPTS_RELEASE-linux-amd64 gohpts && ./gohpts -h -
Install using
go installcommand (requires Go 1.26 or later):CGO_ENABLED=0 go install -ldflags "-s -w" -trimpath github.com/shadowy-pycoder/go-http-proxy-to-socks/cmd/gohpts@latestThis will install the
gohptsbinary to your$GOPATH/bindirectory. -
Build from source:
git clone https://github.com/shadowy-pycoder/go-http-proxy-to-socks.git cd go-http-proxy-to-socks make build ./bin/gohpts -
Run in docker:
docker run -it --privileged --network host -v "$PWD/gohpts.yaml:/config.yaml" shadowypycoder/gohpts:latest -f config.yaml
Usage
gohpts -h
   _____       _    _ _____ _______ _____
  / ____|     | |  | |  __ \__   __/ ____|
 | |  __  ___ | |__| | |__) | | | | (___
 | | |_ |/ _ \|  __  |  ___/  | |  \___ \
 | |__| | (_) | |  | | |      | |  ____) |
  \_____|\___/|_|  |_|_|      |_| |_____/

GoHPTS: HTTP(S) Proxy to SOCKS4/SOCKS5 proxy by shadowy-pycoder
GitHub: https://github.com/shadowy-pycoder/go-http-proxy-to-socks
Codeberg: https://codeberg.org/shadowy-pycoder/go-http-proxy-to-socks

Usage: gohpts [OPTIONS]
OPTIONS:
  General:
  -h         Show this help message and exit
  -v         Show version and build information
  -D         Run as a daemon (provide -logfile to see logs)
  -I         Display list of network interfaces and exit
  -f         Path to proxy configuration file in YAML format

  Proxy:
  -l         Address of HTTP proxy server (Default: "127.0.0.1:8080" for IPv4, "[::1]:8080" for IPv6)
  -s         Address of SOCKS proxy server (Default: "127.0.0.1:1080" for IPv4 "[::1]:1080" for IPv6)
  -c         Path to certificate PEM encoded file
  -k         Path to private key PEM encoded file
  -U         User for HTTP proxy (basic auth). This flag invokes prompt for password (not echoed to terminal)
  -u         User for SOCKS proxy authentication. This flag invokes prompt for password (not echoed to terminal)
  -i         Bind proxy to specific network interface (either by interface name or index)
  -4         Force IPv4 stack for TCP and UDP (Default: dual stack)
  -6         Force IPv6 stack for TCP and UDP (Default: dual stack)
  -socks4    Use SOCKS4/SOCKS4a protocol for upstream proxy and mixed server (default: SOCKS5/SOCKS5h)
  -nohttp    Disable HTTP proxy server
  -nosocks   Disable SOCKS upstream proxy
  -dns       Use custom DNS server (Example: "8.8.8.8" or "2001:4860:4860::8888")
  -mixed     Accept SOCKS connections on HTTP proxy server address

  Logs:
  -d         Show logs in DEBUG mode
  -j         Show logs in JSON format
  -logfile   Log file path (Default: stdout)
  -nocolor   Disable colored output for logs (no effect if -j flag specified)
  -pprof     Address of pprof server with profiling data

  Sniffing:
  -sniff     Enable traffic sniffing for HTTP and TLS
  -snifflog  Sniffed traffic log file path (Default: the same as -logfile)
  -body      Collect request and response body for HTTP traffic (credentials, tokens, etc)

  TProxy:
  -T         Address of transparent proxy server
  -Tu        Address of transparent UDP proxy server
  -M         Transparent proxy mode: (redirect, tproxy, tlocal)
  -w         Number of instances of transparent proxy server (Default: number of CPU cores)
  -wu        Number of instances of transparent UDP proxy server (Default: number of CPU cores)
  -auto      Automatically setup iptables and kernel parameters for transparent proxy (requires elevated privileges)
  -mark      Set mark for each packet sent through transparent proxy (Default: redirect 0, tproxy 100, tlocal 100)
  -A         Comma separated list of allowed ip addresses for proxying (Example: "8.8.8.8,2001:4860:4860::8888,192.168.1.0/24")
  -P         Comma separated list of ports to ignore when proxying traffic (Example: "22,80,443,9092")
  -dump      Dump iptables rules and other system settings generated by -auto flag

  Spoofing:
  -arpspoof  Enable ARP spoof proxy for selected targets (Example: "targets 10.0.0.1,10.0.0.5-10,192.168.1.*,192.168.10.0/24;fullduplex false;debug true;interval 10s")
  -ndpspoof  Enable NDP spoof proxy for selected targets (Example: "ra true;na true;targets fe80::3a1c:7bff:fe22:91a4;fullduplex false;debug true;interval 10s")

  Packet Capture:
  -pcap      Enable packet capture (Example: "promisc true;expr ip proto tcp;snaplen 65535;timeout 10s;packet_count 100;packet_buffer 8192;exts txt,pcap,pcapng")

  Namespaces:
  -in-netns  Name or path of network namespace for inbound listeners (Default: default namespace)
  -out-netns Name or path of network namespace for outbound connections (Default: default namespace)
Configuration via CLI flags
gohpts -s 1080 -l 8080 -d -j
Output:
{"level":"info","time":"2025-05-28T06:15:18+00:00","message":"SOCKS5 Proxy: :1080"}
{"level":"info","time":"2025-05-28T06:15:18+00:00","message":"HTTP Proxy: :8080"}
{"level":"debug","time":"2025-05-28T06:15:22+00:00","message":"HTTP/1.1 - CONNECT - www.google.com:443"}
Specify username and password for SOCKS5 proxy server:
gohpts -s 1080 -l 8080 -d -j -u user
SOCKS5 Password: #you will be prompted for password input here
Specify username and password for HTTP proxy server:
gohpts -s 1080 -l 8080 -d -j -U user
HTTP Password: #you will be prompted for password input here
When both -u and -U are present, you will be prompted twice
Run http proxy over TLS connection
gohpts -s 1080 -l 8080 -c "path/to/certificate" -k "path/to/private/key"
Run proxy as a daemon (logfile is needed for logging output, otherwise you will see nothing)
gohpts -D -logfile /tmp/gohpts.log
# output
gohpts pid: <pid>
# kill the process
kill <pid>
#or
kill $(pidof gohpts)
-u and -U flags do not work in a daemon mode (and therefore authentication), but you can provide a config file (see below)
Configuration via YAML file
Configuration files are useful when you want to preconfigure your proxy without messing with CLI too much or just want multiple profiles for different needs.
Run http proxy in SOCKS5 proxy chain mode (specify server settings via YAML configuration file)
gohpts -f "~/gohtps.yaml" -d -j
Config example:
# bind proxy to specific network interface (either by interface name or index)
interface: "eth0" # if specified, overrides http server IP address
disable_http: false # disable http proxy (default: false)
disable_socks: false # disable upstream socks proxy (default: false)
# if ipv4 and ipv6 are both false or both true, dual stack is assumed
ipv4: false # this must be enabled for arpspoof (default: false)
ipv6: false # this must be enabled for ndpspoof (default: false)
socks4: false # use SOCKS4/SOCKS4a protocol (tcp only protocol, no udp tproxy or http3 possible) (default: false)
dns: 8.8.8.8 # custom DNS server (used in direct dialer, namespaces, spoofing)

http_server:
  address: 127.0.0.1:8080
  # username and password for adding basic authentication (comment out to disable auth)
  username: username
  password: password

# list of socks5 proxy
# if proxy_chain is disabled, uses first server in a list as upstream
proxy_list:
  - address: 127.0.0.1:1080
  - address: 127.0.0.1:1081
  - address: :1082 # empty host means localhost

proxy_chain:
  enabled: false
  # Explanations for chains taken from /etc/proxychains4.conf

  # strict - Each connection will be done via chained proxies
  # all proxies chained in the order as they appear in the list
  # all proxies must be online to play in chain

  # dynamic - Each connection will be done via chained proxies
  # all proxies chained in the order as they appear in the list
  # at least one proxy must be online to play in chain
  # (dead proxies are skipped)

  # random - Each connection will be done via random proxy
  # (or proxy chain, see  chain_len) from the list.
  # this option is good to test your IDS :)

  # round_robin - Each connection will be done via chained proxies
  # of chain_len length
  # all proxies chained in the order as they appear in the list
  # at least one proxy must be online to play in chain
  # (dead proxies are skipped).
  # the start of the current proxy chain is the proxy after the last
  # proxy in the previously invoked proxy chain.
  # if the end of the proxy chain is reached while looking for proxies
  # start at the beginning again.
  # These semantics are not guaranteed in a multithreaded environment.
  type: strict # dynamic, strict, random, round_robin
  length: 2 # maximum number of proxy in a chain (works only for random chain and round_robin chain)

logging:
  debug: true
  json: false
  # defaults to standard output
  #logfile: /tmp/gohpts.log
  # use colored output in logs (no effect if json enabled)
  nocolor: false
  # profiling data
  pprof: 127.0.0.1:8081
You can override almost any settings specified in configuration file by providing corresponding CLI flags:
gohpts -l :6969 -f "~/gohtps.yaml" -nocolor
Proxy takes all the settings specified in ~/gohpts.yaml but spins up http server on 127.0.0.1:6969 insted of 127.0.0.1:8080 and also disables colored output in logs.
Some settings (e.g. proxy_chain and dns filters) can only be configured via file.
Full version of config can be found here: example_gohpts.yaml
To learn more about proxy chains visit Proxychains Github
Transparent proxy
Also known as an
intercepting proxy,inline proxy, orforced proxy, a transparent proxy intercepts normal application layer communication without requiring any special client configuration. Clients need not be aware of the existence of the proxy. A transparent proxy is normally located between the client and the Internet, with the proxy performing some of the functions of a gateway or router-- From Wiki
This functionality available only on Linux systems and Android (arm64) and requires additional setup (iptables, ip route, etc)
-T address flag specifies the address of transparent proxy server
There are three modes redirect, tproxy and tlocal (same as tproxy but also intercepts local traffic) that can be specified with -M flag
redirect (via NAT and SO_ORIGINAL_DST)
In this mode proxying happens with iptables nat table and REDIRECT target. Host of incoming packet changes to the address of running redirect transparent proxy, but it also contains original destination that can be retrieved with getsockopt(SO_ORIGINAL_DST)
To run GoHPTS in this mode you use -T flag with -M redirect
Example
# run the proxy
gohpts -s 1080 -T 1090 -M redirect -d
# run socks5 server on 127.0.0.1:1080
ssh remote -D 1080 -Nf
Setup your operating system:
# commands below require elevated privileges (you can run it with `sudo -i`)

#enable ip forwarding
sysctl -w net.ipv4.ip_forward=1

# create `GOHPTS` nat chain
iptables -t nat -N GOHPTS

# set no redirection rules for local, http proxy, ssh and redirect proxy itself
iptables -t nat -A GOHPTS -d 127.0.0.0/8 -j RETURN
iptables -t nat -A GOHPTS -p tcp --dport 8080 -j RETURN
iptables -t nat -A GOHPTS -p tcp --dport 1090 -j RETURN
iptables -t nat -A GOHPTS -p tcp --dport 22 -j RETURN

# redirect traffic to transparent proxy
iptables -t nat -A GOHPTS -p tcp -j REDIRECT --to-ports 1090

# setup prerouting by adding our proxy
iptables -t nat -A PREROUTING -p tcp -j GOHPTS

# intercept local traffic for testing
iptables -t nat -A OUTPUT -p tcp -j GOHPTS
Test connection:
#traffic should be redirected via 127.0.0.1:1090
curl http://example.com
#traffic should be redirected via 127.0.0.1:8080
curl --proxy http://127.0.0.1:8080 http://example.com
Undo everything:
sysctl -w net.ipv4.ip_forward=0
iptables -t nat -D PREROUTING -p tcp -j GOHPTS
iptables -t nat -D OUTPUT -p tcp -j GOHPTS
iptables -t nat -F GOHPTS
iptables -t nat -X GOHPTS
Auto configuration for redirect mode
To configure your system automatically, run the following command:
sudo env PATH=$PATH gohpts -d -T 8888 -M redirect -auto
Please note, automatic configuration requires sudo and is very generic, which might not be suitable for your needs.
You can optionally specify -mark <value> to prevent possible proxy loops
sudo env PATH=$PATH gohpts -d -T 8888 -M redirect -auto -mark 100
tproxy (via MANGLE and IP_TRANSPARENT)
In this mode proxying happens with iptables mangle table and TPROXY target. Transparent proxy sees destination address as is, it is not being rewrited by the kernel. For this to work the proxy binds with socket option IP_TRANSPARENT, iptables intercepts traffic using TPROXY target, routing rules tell marked packets to go to the local proxy without changing their original destination.
This mode requires elevated privileges to run GoHPTS. You can do that by running the follwing command:
sudo setcap 'cap_net_admin+ep' ~/go/bin/gohpts
To run GoHPTS in this mode you use -T flag with -M tproxy
Example
# run the proxy
gohpts -s 1080 -T 0.0.0.0:1090 -M tproxy -d
# run socks5 server on 127.0.0.1:1080
ssh remote -D 1080 -Nf
Setup your operating system:
ip netns add ns-client
ip link add dev veth0 type veth peer name veth1 netns ns-client
ip addr add 10.0.0.1/24 dev veth0
ip link set dev veth0 up
ip netns exec ns-client ip addr add 10.0.0.2/24 dev veth1
ip netns exec ns-client ip link set dev lo up
ip netns exec ns-client ip link set dev veth1 up
ip netns exec ns-client ip route add default via 10.0.0.1
sysctl -w net.ipv4.ip_forward=1

iptables -t mangle -A PREROUTING -i veth0 -p tcp -j TPROXY --on-port 1090 --tproxy-mark 0x1/0x1

ip rule add fwmark 1 lookup 100
ip route add local 0.0.0.0/0 dev lo table 100
Test connection:
ip netns exec ns-client curl http://1.1.1.1
Undo everything:
sysctl -w net.ipv4.ip_forward=0
iptables -t mangle -F
ip rule del fwmark 1 lookup 100
ip route flush table 100
ip netns del ns-client
Auto configuration for tproxy mode
To configure your system automatically, run the following command (for example, on a separate VM):
ssh remote -D 1080 -Nf
sudo env PATH=$PATH gohpts -d -T 8888 -M tproxy -auto -mark 100
Run the following on your host:
ip route show default > /tmp/default-route.txt

ip route add 0.0.0.0/1 via 192.168.0.1 # change with ip of your VM
ip route add 128.0.0.0/1 via 192.168.0.1
Test connection:
curl http://example.com #check logs on your VM
Undo everything:
ip route del 0.0.0.0/1 via 192.168.0.1 2>/dev/null || true
ip route del 128.0.0.0/1 via 192.168.0.1 2>/dev/null || true

if [[ -f /tmp/default-route.txt ]]; then
    eval $(awk '{print "ip route add "$0}' /tmp/default-route.txt)
    rm -f /tmp/default-route.txt
else
    echo "Something went wrong"
fi
UDP support
GoHPTS has UDP support that can be enabled in tproxy and tlocal modes. For this setup to work you need to connect to a socks5 server capable of serving UDP connections (UDP ASSOCIATE). For example, you can use https://github.com/wzshiming/socks5 to deploy UDP capable socks5 server on some remote or local machine. Once you have the server to connect to, run the following command:
sudo env PATH=$PATH gohpts -s remote -Tu :8989 -M tproxy -auto -mark 100 -d
This command will configure your operating system and setup server on 0.0.0.0:8989 address.
To test it locally, you can combine UDP transparent proxy with -arpspoof flag. For example:
- Setup VM on your system with any Linux distributive that supports
tproxy(Kali Linux, for instance). - Enable
bridgednetwork so that VM could access your host machine. - Move
gohptsbinary to VM (viassh, for instance) or build it there in case of different OS/arch. - On your VM run the following command:
# Do not forget to replace <socks5 server> and <your host> with actual addresses
sudo ./gohpts -s <socks5 server> -T 8888 -Tu :8989 -M tproxy -sniff -body -auto -mark 100 -d -arpspoof "targets <your host>;fullduplex true;debug false"
- Check connection on your host machine, the traffic should go through Kali machine.
Android support
Transparent proxy can be enabled on Android devices (arm64) with root access. You can install Termux and run GoHPTS as a CLI tool there:
# you need to root your device first
pkg install tsu iproute2
# Android support added in v1.10.2
GOHPTS_RELEASE=v1.10.2; wget -v https://github.com/shadowy-pycoder/go-http-proxy-to-socks/releases/download/$GOHPTS_RELEASE/gohpts-$GOHPTS_RELEASE-android-arm64.tar.gz -O gohpts && tar xvzf gohpts && mv -f gohpts-$GOHPTS_RELEASE-android-arm64 gohpts && ./gohpts -h
# use your phone as router for LAN devices redirecting their traffic to remote socks5 server
sudo ./gohpts -s remote -T 8888 -Tu :8989 -M tproxy -sniff -body -auto -mark 100 -d -arpspoof "fullduplex true;debug false"
YAML configuration
transparent_proxy:
  tcp:
    enabled: true
    address: 0.0.0.0:8888
    # number of instances of transparent proxy server (Default: number of CPU cores)
    workers: 1
  udp:
    enabled: true
    address: 0.0.0.0:8889
    # number of instances of transparent UDP proxy server (Default: number of CPU cores)
    workers: 1
  mode: "tproxy" # available modes are "redirect", "tproxy" and "tlocal" (udp requires tproxy or tlocal mode)
  # automatically setup iptables and kernel parameters for transparent proxy (requires elevated privileges)
  auto: true
  # dump iptables rules and other system settings generated by auto setting
  dump_rules: false
  # list of ports to ignore when proxying traffic (Example: [22,80,443,9092])
  ignored_ports: []
  # set mark for each packet sent through transparent proxy (Default: redirect 0, tproxy 100, tlocal 100)
  mark: 100
Traffic sniffing

GoHPTS proxy allows one to capture and monitor traffic that goes through the service. This procces is known as traffic sniffing, packet sniffing or just sniffing. In particular, proxy tries to identify whether it is a plain text (HTTP) or TLS traffic, and after identification is done, it parses request/response metadata and writes it to the file or console. In the case of GoHTPS proxy a parsed metadata looks like the following (TLS Handshake):
JSON format
[
  {
    "connection": {
      "tproxy_mode": "redirect",
      "src_local": "127.0.0.1:8888",
      "src_remote": "192.168.0.107:51142",
      "dst_local": "127.0.0.1:56256",
      "dst_remote": "127.0.0.1:1080",
      "original_dst": "216.58.209.206:443"
    }
  },
  {
    "tls_request": {
      "sni": "www.youtube.com",
      "type": "Client hello (1)",
      "version": "TLS 1.2 (0x0303)",
      "session_id": "2670a6779b4346e5e84d46890ad2aaf7a53b08adcfe0c9f6868c2d9882242e39",
      "cipher_suites": [
        "TLS_AES_128_GCM_SHA256 (0x1301)",
        "TLS_CHACHA20_POLY1305_SHA256 (0x1303)",
        "TLS_AES_256_GCM_SHA384 (0x1302)",
        "TLS_ECDHE_ECDSA_WITH_AES_128_GCM_SHA256 (0xc02b)",
        "TLS_ECDHE_RSA_WITH_AES_128_GCM_SHA256 (0xc02f)",
        "TLS_ECDHE_ECDSA_WITH_CHACHA20_POLY1305_SHA256 (0xcca9)",
        "TLS_ECDHE_RSA_WITH_CHACHA20_POLY1305_SHA256 (0xcca8)",
        "TLS_ECDHE_ECDSA_WITH_AES_256_GCM_SHA384 (0xc02c)",
        "TLS_ECDHE_RSA_WITH_AES_256_GCM_SHA384 (0xc030)",
        "TLS_ECDHE_ECDSA_WITH_AES_256_CBC_SHA (0xc00a)",
        "TLS_ECDHE_ECDSA_WITH_AES_128_CBC_SHA (0xc009)",
        "TLS_ECDHE_RSA_WITH_AES_128_CBC_SHA (0xc013)",
        "TLS_ECDHE_RSA_WITH_AES_256_CBC_SHA (0xc014)",
        "TLS_RSA_WITH_AES_128_GCM_SHA256 (0x9c)",
        "TLS_RSA_WITH_AES_256_GCM_SHA384 (0x9d)",
        "TLS_RSA_WITH_AES_128_CBC_SHA (0x2f)",
        "TLS_RSA_WITH_AES_256_CBC_SHA (0x35)"
      ],
      "extensions": [
        "server_name (0)",
        "extended_master_secret (23)",
        "renegotiation_info (65281)",
        "supported_groups (10)",
        "ec_point_formats (11)",
        "session_ticket (35)",
        "application_layer_protocol_negotiation (16)",
        "status_request (5)",
        "delegated_credential (34)",
        "signed_certificate_timestamp (18)",
        "key_share (51)",
        "supported_versions (43)",
        "signature_algorithms (13)",
        "psk_key_exchange_modes (45)",
        "record_size_limit (28)",
        "compress_certificate (27)",
        "encrypted_client_hello (65037)"
      ],
      "alpn": ["h2", "http/1.1"]
    }
  },
  {
    "tls_response": {
      "type": "Server hello (2)",
      "version": "TLS 1.2 (0x0303)",
      "session_id": "2670a6779b4346e5e84d46890ad2aaf7a53b08adcfe0c9f6868c2d9882242e39",
      "cipher_suite": "TLS_AES_128_GCM_SHA256 (0x1301)",
      "extensions": ["key_share (51)", "supported_versions (43)"],
      "supported_version": "TLS 1.3 (0x0304)"
    }
  }
]
And HTTP request with curl:
[
  {
    "connection": {
      "tproxy_mode": "redirect",
      "src_local": "127.0.0.1:8888",
      "src_remote": "192.168.0.107:45736",
      "dst_local": "127.0.0.1:37640",
      "dst_remote": "127.0.0.1:1080",
      "original_dst": "96.7.128.198:80"
    }
  },
  {
    "http_request": {
      "host": "example.com",
      "uri": "/",
      "method": "GET",
      "proto": "HTTP/1.1",
      "header": {
        "Accept": ["*/*"],
        "My": ["Header"],
        "User-Agent": ["curl/7.81.0"]
      }
    }
  },
  {
    "http_response": {
      "proto": "HTTP/1.1",
      "status": "200 OK",
      "content-length": 1256,
      "header": {
        "Cache-Control": ["max-age=2880"],
        "Connection": ["keep-alive"],
        "Content-Length": ["1256"],
        "Content-Type": ["text/html"],
        "Date": ["Tue, 17 Jun 2025 14:43:24 GMT"],
        "Etag": ["\"84238dfc8092e5d9c0dac8ef93371a07:1736799080.121134\""],
        "Last-Modified": ["Mon, 13 Jan 2025 20:11:20 GMT"]
      }
    }
  }
]
Usage as simple as specifying -sniff flag along with regular flags
gohpts -d -T 8888 -M redirect -sniff -j
You can also specify a file to which write sniffed traffic:
gohpts -sniff -snifflog ~/sniff.log -j
Colored format
You can see the example of colored output in the picture above. In this mode, GoHPTS tries to highlight import information such as TLS Handshake, HTTP metadata, something that looks line login/passwords or different types of auth and secret tokens. The output is limited comparing to JSON but way easier to read for humans.
To run GoHPTS in this mode you use the following flags:
You can combine sniffing with transparent mode:
./gohpts -T 8888 -M redirect -sniff -body
To disable colors add -nocolor:
gohpts -sniff -body -nocolor
HTTP2 and HTTP3 support
GoHPTS proxy handles HTTP/1.1, HTTP/2, and HTTP/3 requests using the same server address and TLS certificate. This allows clients to automatically choose the best available protocol without changing configuration. TLS certificate can be obtained in several ways: cloud providers (Google, AWS, Cloudflare), free certificate from Let's Encrypt, or you can create self-signed certificate using openssl (Linux/macOS) or New-SelfSignedCertificate (Windows).
Example setup using self-signed certificate
-
Create
key.pemandcert.pemfiles:openssl req -x509 -newkey rsa:2048 \ -keyout key.pem \ -out cert.pem \ -sha256 \ -days 365 \ -nodes \ -subj "/C=XX/ST=StateName/L=CityName/O=CompanyName/OU=CompanySectionName/CN=127.0.0.1" \ -addext "subjectAltName=IP:127.0.0.1" -
Prepare socks5 server with UDP ASSOCIATE support
git clone https://github.com/wzshiming/socks5.git && cd socks5 go build -o socks5_server ./cmd/socks5/main.go ./socks5_server -a 0.0.0.0:1080 -
Open another terminal and install
GoHPTSproxy:go install github.com/shadowy-pycoder/go-http-proxy-to-socks/cmd/gohpts@latestYou can use other methods described in Installation section.
-
Finally:
- Create minimal config for your proxy
# gohpts_config.yaml
http_server:
  address: 127.0.0.1:8080
  cert_file: ./cert.pem
  key_file: ./key.pem

proxy_list:
  - address: 127.0.0.1:1080

logging:
  debug: true

sniffing:
  enabled: true
  body: true
Run the proxy:
gohpts -f ./gohpts_config.yaml- Or if you prefer command line arguments:
gohpts -l :8080 -s 1080 -c ./cert.pem -k ./key.pem -d -sniff -bodyYou should see something like that:
  [15:20:32] INF SOCKS5 Proxy: 127.0.0.1:1080
  [15:20:32] INF HTTPS Proxy: 127.0.0.1:8080
  [15:20:32] INF HTTP3 Proxy (QUIC): 127.0.0.1:8080
Test connection
-
For HTTP/2 proxy server you can use
curl:curl -Nvk --http2 --proxy-insecure --proxy-http2 --proxy https://localhost:8080 "https://stream.wikimedia.org/v2/stream/recentchange"Press
Ctrl+Cto stop running stream. -
For HTTP/3 it is different since (at the time of writing)
curldoesn't support HTTP3 proxy, so I will use my custom client I created for testing purposes.Download and install Simple HTTP3 to SOCKS5 proxy example:
git clone https://github.com/shadowy-pycoder/http3-socks-proxy.git && cd http3-socks-proxy
make
Run the following command:
./bin/client -a 127.0.0.1:8080 www.google.comYou should see some gibberish resembling HTML page.
Go to terminal tab with
GoHPTSproxy and check logs, you should see all your requests there.
Test connection in a browser
-
Create proper self-signed ceritificate for browser:
git clone https://github.com/shadowy-pycoder/go-http-proxy-to-socks.git
cd go-http-proxy-to-socks
cp ./resources/makecert.sh makecert.sh && chmod +x makecert.sh
./makecert.sh
More information can be found here: Creating a browser trusted, self signed, SSL certificate
-
Add newly created
rootCA.crtto system trust store:- Debian/Ubuntu:
sudo cp rootCA.crt /usr/local/share/ca-certificates/rootCA.crt sudo update-ca-certificates- Arch Linux/CachyOS/EndeavourOS:
sudo trust anchor rootCA.crt -
Run the proxy using
server.crtandserver.key:gohpts -l :8080 -s 1080 -c ./server.crt -k ./server.key -d -sniff -body -
Run the browser and go to any website:
chromium --proxy-server="https://127.0.0.1:8080"
IPv4 and IPv6 support
In terms of network layer handling, GoHPTS can operate in three modes: dual stack, IPv4-only and IPv6-only. User can control the mode by specifying -4 and -6 flags. When one of the flags is set, proxy starts in corresponding mode, when both flags are present or both omitted, dual stack is assumed. Please note that in "only" modes, only IP addresses of specific version are allowed, all domains get resolved to specific IP version (if possible), all listening addresses require using the same version, etc.
To enable IPv4-only mode just add -4 flag:
sudo ./gohpts -sniff -body -d -4
To test proxy in IPv4 mode you can use any Linux VM:
- On your virtual machine:
# add your host machine as gateway for VM
export GATEWAY="<host IPv4 address>"
ip route add 0.0.0.0/1 via "$GATEWAY"
ip route add 128.0.0.0/1 via "$GATEWAY"
- On your host:
# run proxy on your host
sudo ./gohpts -T 8888 -Tu 8889 -M tproxy -sniff -body -auto -d -4
- Visit any website on your virtual machine and see traffic in proxy logs
To enable IPv6-only mode just add -6 flag, for example when using with transparent proxy:
sudo ./gohpts -T 8888 -M redirect -sniff -body -auto -mark 100 -d -6
For this to work, your ISP and remote socks5 proxy should have active IPv6 support, you can visit https://test-ipv6.com/ to find out you can access IPv6 addresses. To test proxy in IPv6 mode you can use any Linux VM:
- On your virtual machine:
# add your host machine as gateway IPv6 for VM
export GATEWAY6="<host IPv6 address>"
ip -6 route add ::/1 via "$GATEWAY6" dev eth0
ip -6 route add 8000::/1 via "$GATEWAY6" dev eth0
- On your host:
# run proxy on your host
sudo ./gohpts -T 8888 -Tu 8889 -M tproxy -sniff -body -auto -d -6
- Visit any website on your virtual machine and see traffic in proxy logs
ARP spoofing
GoHPTS has in-built ARP spoofer that can be used to make all TCP talking devices of your LAN to use proxy server to connect to the Internet.
This is achieved by adding -arpspoof flag with couple of parameters, separated by semicolon.
Example:
ssh remote -D 1080 -Nf
sudo env PATH=$PATH gohpts -d -T 8888 -M tproxy -sniff -body -auto -mark 100 -arpspoof "targets 192.168.10.0/24;fullduplex true;debug true"
Proxy will scan for devices in subnet 192.168.10.0/24 and send them ARP packets to pretend to be a gateway, if fullduplex is true,
proxy will send ARP packets to gateway as well to make it believe our proxy has each IP on the subnet.
After proxy is stopped with Ctrl+C, it will automatically unspoof all targets.
GoHPTS can also be used with tools like Bettercap to proxy ARP spoofed traffic.
Run the proxy:
ssh remote -D 1080 -Nf
sudo env PATH=$PATH gohpts -d -T 8888 -M tproxy -sniff -body -auto -mark 100
Run bettercap with this command (see documentation):
sudo bettercap -eval "net.probe on;net.recon on;set arp.spoof.fullduplex true;arp.spoof on"
Check proxy logs for traffic from other devices from your LAN
For more information about arpspoof options see gohpts -h and https://github.com/shadowy-pycoder/arpspoof
NDP spoofing
GoHPTS has in-built functionality to perform NDP spoofing in IPv6 networks with Router Advertisement (RA) and Neighbor Advertisement (NA) packets. It also includes RDNSS option in RA packets to put host as a IPv6 nameserver for affected clients. When combined with transparent proxy mode (TCP/UDP), NDP spoofing allows gohpts to proxy traffic for clients in the local networks. As is the case with ARP spoofing, you can set ndp spoof options with single -ndpspoof flag:
Example:
sudo env PATH=$PATH gohpts -d -T 8888 -M tproxy -sniff -body -auto -mark 100 -ndpspoof "ra true;na true;targets fe80::3a1c:7bff:fe22:91a4;fullduplex false;debug true"
For more information about ndpspoof options see gohpts -h and https://github.com/shadowy-pycoder/ndpspoof
Plese note that some options like rdnss, gateway, interface are set automatically by gohpts itself to properly function as a proxy.
Since gohpts proxies all connections via upstream SOCKS5 server, you need to have a working server with IPv4/IPv6 and TCP/UDP support. Obviously, a remote machine (e.g. VPS) should also have IPv6 connectivity working. Needless to say, the machine on which gohpts should be part of network with IPv6 support.
Example setup for NDP spoofing to work correctly:
- Connect to VPS
- Install dependencies
GO_VERSION=$(curl 'https://go.dev/VERSION?m=text' | head -n1)
cd ~/Downloads/ && wget https://go.dev/dl/$GO_VERSION.linux-amd64.tar.gz
sudo rm -rf /usr/local/go && sudo tar -C /usr/local -xzf $GO_VERSION.linux-amd64.tar.gz
- Setup SOCKS5 server (make sure firewall rules do not block used ports)
git clone https://github.com/wzshiming/socks5.git && cd socks5
go build -o ./bin/socks5_server ./cmd/socks5/*.go
./bin/socks5_server -a :3000
-
Go back to your host machine and install
gohpts(see Installation) -
Run
gohtps:
gohpts -s 203.0.113.10:3000 -T 8888 -Tu 8889 -M tproxy -sniff -body -auto -mark 100 -arpspoof "fullduplex true;debug true" -ndpspoof "ra true;debug true" -4 -6 -d
-
Get another device (phone, tablet, etc) and connect it to the same network. Try to access Internet and check if some traffic appears on your host machine. Check public IP address with some online tools (it should match your VPS address
203.0.113.10in this case or global IPv6 address) -
Stop proxy by hitting Ctrl+C
-
Profit!
DNS spoofing
To enforce DNS filters and spoof targets by changing DNS records, host running GoHPTS should become a default gateway for LAN devices. For this to work, just run transparent proxy with udp enabled and also run ARP/NDP spoofing to make targets use your DNS server.
DNS replies created by GoHPTS look like normal packets coming from router or trusted DNS servers (Google, Cloudflare), which results in clients updating their cache with what you tell them. Keep in mind, however, that it only works for "standard" unencrypted DNS traffic (DOT/DOH not filtered or spoofed).
DNS filters and domains for spoofing can be configured in dns_filter section of yaml file configuration. All lists accept URLs, file paths and entries similar to those usually found in hosts file, see https://en.wikipedia.org/wiki/Hosts_(file)>).
Example:
# dns filters require udp transparent proxy and arpspoof/ndpspoof
# filters accept hosts like entries (use either links, file paths or just plain comma separated lists
dns_filter:
  enabled: true
  whitelist: ["/tmp/whitelisted_domains.txt", "example.com", "*.google.com"] # ip is optional, domains can start with *. to match all subdomains
  blacklist:
    ["https://raw.githubusercontent.com/StevenBlack/hosts/master/hosts"]
  blacklist_all: false # block all non whitelisted domains
  spooflist: ["127.0.0.1 example.com"] # ip address is required here
Use cases:
- Ad and tracker blocker for all LAN devices
- Parental control via blocking specific categories of websites
- Block known phishing and malware domains
- Traffic redirection for analysis
- Credential harvesting via redirection
- Traffic hijacking and manipulation (inject ads, scripts, tracking)
- Surveillance and profiling
Mimimal config for this setup:
# gohpts_dns_spoof.yaml
proxy_list:
  - address: 127.0.0.1:1080 # point to socks5 server supporting TCP/UDP

sniffing:
  enabled: true
  body: true

transparent_proxy:
  tcp:
    enabled: true
    address: 0.0.0.0:8888
  udp:
    enabled: true
    address: 0.0.0.0:8889
  mode: "tproxy"
  auto: true

arpspoof:
  enabled: true
  settings: "fullduplex 1;debug 1;interval 1s"

dns_filter:
  enabled: true
  whitelist: []
  blacklist: [
      "https://raw.githubusercontent.com/StevenBlack/hosts/master/hosts",
    ] # list of domains to filter
  blacklist_all: true
  # all requests for example.com will be redirected to 0.0.0.0 address
  spooflist: ["0.0.0.0 example.com"]
Run:
sudo ./gohpts -f ./gohpts_dns_spoof.yaml
More information can be found here: https://en.wikipedia.org/wiki/DNS_spoofing
Packet Capture
Traffic can be captured into pcap, pcapng or custom txt formats and later analyzed with tools like Wireshark, tcpdump and many others.
First, make sure GoHPTS executable has elevated privileges to be able to capture raw packets, you have two options:
- Run
sudo setcap cap_net_raw+ep ~/go/bin/gohptsone time to give proxy raw traffic access - Run proxy with
sudowhen you need to specify-pcapflag in CLI orpcap.enabledin file configuration.
Configure proxy using CLI:
gohpts -pcap "promisc true;timeout 10s;exts txt,pcap,pcapng"
Configuration file:
pcap:
  enabled: true
  settings: "promisc true;expr ip proto tcp;snaplen 65535;timeout 10s;packet_count 100;packet_buffer 8192;exts txt,pcap,pcapng"
These commands produce three packet capture files with corresponding formats that later can be analyzed by various tools.
For more information about pcap options see gohpts -h and https://github.com/shadowy-pycoder/mshark
Network Namespaces
By default GoHPTS proxy is running within single network namespace but this can be overriden. Listening sockets (e.g. http server or transparent proxy server) and outbound sockets (socks proxy or direct dialer) created by GoHPTS can be isolated with Linux/Android network_namespaces (7). When starting proxy process, users can specify -in-netns (listeners) and -out-netns (dialers) flags with name or path to network namespace to control in which isolated environment to create sockets. If you want to create either listeners or dialers in the current (default) namespace, just omit the flag. To specify host namespace explicitly you can use path /proc/1/ns/net - this allows proxy to correctly identify system nameservers.
GoHPTS supports ip-netns (8) convention for providing network configuration via files located in /etc/netns/NAME/ directory. So, to specify custom nameservers for ns1 network namespace you do the following:
sudo mkdir -p /etc/netns/ns1
sudo tee /etc/netns/ns1/resolv.conf << EOF
nameserver 8.8.8.8
nameserver 2001:4860:4860:0:0:0:0:8888
EOF
If no config is found, Google DNS servers will be used to resolve domain names.
If your system have systemd-resolved.service (8) enabled you may want to disable it temporarily when doing queries via custom network namespaces:
sudo ip netns exec ns1 unshare --mount bash -c '
    mount --bind /dev/null /run/systemd/resolve/io.systemd.Resolve
    curl -Nvk https://example.com'
Or make it persistent for specific shell instance:
sudo ip netns exec ns1 unshare --mount bash -c '
    mount --bind /dev/null /run/systemd/resolve/io.systemd.Resolve
    exec bash --login'
Playground setup
-
Run socks5 server with UDP ASSOCIATE support
git clone https://github.com/wzshiming/socks5.git && cd socks5 go build -o socks5_server ./cmd/socks5/main.go ./socks5_server -a 0.0.0.0:1080 -
Download and install Simple HTTP3 to SOCKS5 proxy example:
git clone https://github.com/shadowy-pycoder/http3-socks-proxy.git cd http3-socks-proxy make -
Clone the repo and compile
git clone https://github.com/shadowy-pycoder/go-http-proxy-to-socks.git cd go-http-proxy-to-socks make -
Create
key.pemandcert.pemfiles:openssl req -x509 -newkey rsa:2048 \ -keyout key.pem \ -out cert.pem \ -sha256 \ -days 365 \ -nodes \ -subj "/C=XX/ST=StateName/L=CityName/O=CompanyName/OU=CompanySectionName/CN=127.0.0.1" \ -addext "subjectAltName=IP:127.0.0.1" -
Create a network namespace
ns1and configure veth networksudo ip netns add ns1 sudo ip link add dev veth0 type veth peer name veth1 netns ns1 sudo ip addr add 10.0.0.1/24 dev veth0 sudo ip -6 addr add fd12:3456:789a::1/64 dev veth0 sudo ip link set dev veth0 up sudo ip netns exec ns1 ip addr add 10.0.0.2/24 dev veth1 sudo ip netns exec ns1 ip -6 addr add fd12:3456:789a::2/64 dev veth1 sudo ip netns exec ns1 ip link set dev lo up sudo ip netns exec ns1 ip link set dev veth1 up -
Determine
wlan0ip address to be able connect to local socks5WLAN_IP=$(ip -4 -c=never route get 8.8.8.8 | awk '{print $7}' | tr -d '\n')
Usage examples
-
HTTP proxy - proxy listeners in
ns1(no default route, no internet access), outbound sockets on hostRun proxy:
sudo ./bin/gohpts -s 0.0.0.0:1080 -l :8083 -4 -6 -d -sniff -body -in-netns ns1Make request via
ns1sudo ip netns exec ns1 curl -Nv --proxy http://127.0.0.1:8083 https://example.comRequest should succeed
-
HTTP2 proxy - proxy listeners in
ns1(no default route, no internet access), outbound sockets on hostRun proxy:
sudo ./bin/gohpts -s 0.0.0.0:1080 -l :8083 -4 -6 -d -sniff -body -in-netns ns1 -c ./cert.pem -k ./key.pemMake request via
ns1sudo ip netns exec ns1 curl -Nvk --http2 --proxy-insecure --proxy-http2 --proxy https://127.0.0.1:8083 https://example.comRequest should succeed
-
HTTP3 proxy - proxy listeners in
ns1(no default route, no internet access), outbound sockets on hostRun proxy:
sudo ./bin/gohpts -s 0.0.0.0:1080 -l :8083 -4 -6 -d -sniff -body -in-netns ns1 -c ./cert.pem -k ./key.pemMake request via
ns1sudo ip netns exec ns1 ./http3-socks-proxy/bin/client -a 127.0.0.1:8083 www.google.comRequest should succeed
-
Redirect transparent proxy (
-M redirect) - proxy listeners inns1(default route, no internet access), outbound sockets on hostRun proxy:
sudo ./bin/gohpts -s 0.0.0.0:1080 -l :8083 -4 -6 -d -sniff -body -in-netns ns1 -nohttp -M redirect -T :8888 -autoMake request via
ns1sudo ip netns exec ns1 curl -Nv https://example.comRequest should fail
Add default route to
ns1sudo ip netns exec ns1 ip route add default via 10.0.0.1 sudo ip netns exec ns1 ip -6 route add default via fd12:3456:789a::1Try again
sudo ip netns exec ns1 curl -Nv https://example.comNow request should succeed
-
HTTP proxy - proxy listeners on host, outbound sockets in
ns1(default route, internet access)Add NAT rules to allow
ns1connect to internet viawlan0sudo iptables -t nat -A POSTROUTING -s 10.0.0.0/24 -o wlan0 -j MASQUERADE sudo ip6tables -t nat -A POSTROUTING -s fd12:3456:789a::/64 -o wlan0 -j MASQUERADERun proxy:
sudo ./bin/gohpts -s :1080 -l :8083 -4 -6 -d -sniff -body -out-netns ns1 -i wlan0Make request via host
curl -Nv --proxy http://$WLAN_IP:8083 https://example.comRequest should succeed
-
HTTP3 proxy - proxy listeners on host, outbound sockets in
ns1(default route, internet access)Run proxy:
sudo ./bin/gohpts -s :1080 -l :8083 -4 -6 -d -sniff -body -out-netns ns1 -i wlan0 -c ./cert.pem -k ./key.pemMake request via host
./http3-socks-proxy/bin/client -a $WLAN_IP:8083 www.google.comRequest should succeed
-
Redirect transparent proxy - proxy listeners on host, outbound sockets in
ns1(default route, internet access)Run proxy (
-autodoes not work with local socks5 server for me, so I use remote one):sudo ./bin/gohpts -s <remote> -4 -6 -d -sniff -body -out-netns ns1 -nohttp -M redirect -T :8888 -autoMake request via host
curl -Nv https://example.comRequest should succeed
-
HTTP proxy - LAN (
ns2(proxy listeners),ns3,ns4), outbound sockets inns1(default route, internet access)Create LAN
sudo ip link add br0 type bridge
sudo ip addr add 10.0.1.1/24 dev br0
sudo ip -6 addr add fd12:3456:789b::1/64 dev br0
sudo ip link set br0 up

sudo ip netns add ns2
sudo ip link add veth2 type veth peer name veth3 netns ns2
sudo ip link set veth2 master br0
sudo ip link set veth2 up
sudo ip netns exec ns2 ip addr add 10.0.1.2/24 dev veth3
sudo ip netns exec ns2 ip -6 addr add fd12:3456:789b::2/64 dev veth3
sudo ip netns exec ns2 ip link set lo up
sudo ip netns exec ns2 ip link set veth3 up
sudo ip netns exec ns2 ip route add default via 10.0.1.1
sudo ip netns exec ns2 ip -6 route add default via fd12:3456:789b::1

sudo ip netns add ns3
sudo ip link add veth4 type veth peer name veth5 netns ns3
sudo ip link set veth4 master br0
sudo ip link set veth4 up
sudo ip netns exec ns3 ip addr add 10.0.1.3/24 dev veth5
sudo ip netns exec ns3 ip -6 addr add fd12:3456:789b::3/64 dev veth5
sudo ip netns exec ns3 ip link set lo up
sudo ip netns exec ns3 ip link set veth5 up
sudo ip netns exec ns3 ip route add default via 10.0.1.1
sudo ip netns exec ns3 ip -6 route add default via fd12:3456:789b::1

sudo ip netns add ns4
sudo ip link add veth6 type veth peer name veth7 netns ns4
sudo ip link set veth6 master br0
sudo ip link set veth6 up
sudo ip netns exec ns4 ip addr add 10.0.1.4/24 dev veth7
sudo ip netns exec ns4 ip -6 addr add fd12:3456:789b::4/64 dev veth7
sudo ip netns exec ns4 ip link set lo up
sudo ip netns exec ns4 ip link set veth7 up
sudo ip netns exec ns4 ip route add default via 10.0.1.1
sudo ip netns exec ns4 ip -6 route add default via fd12:3456:789b::1
Run proxy:
sudo ./bin/gohpts -s $WLAN_IP:1080 -l 0.0.0.0:8083 -4 -6 -d -sniff -body -in-netns ns2 -out-netns ns1Make requests
curl -Nv --proxy http://10.0.1.2:8083 http://example.com
sudo ip netns exec ns2 curl -Nv --proxy http://10.0.1.2:8083 https://example.com
sudo ip netns exec ns3 curl -Nv --proxy http://10.0.1.2:8083 https://example.com
sudo ip netns exec ns4 curl -Nv --proxy http://10.0.1.2:8083 https://example.com
All requests should succeed
-
HTTP3 proxy - LAN (
ns2(proxy listeners),ns3,ns4), outbound sockets inns1(default route, internet access)Run proxy:
sudo ./bin/gohpts -s $WLAN_IP:1080 -l 0.0.0.0:8083 -4 -6 -d -sniff -body -in-netns ns2 -out-netns ns1 -c ./cert.pem -k ./key.pemMake requests
./http3-socks-proxy/bin/client -a 10.0.1.2:8083 www.google.com
sudo ip netns exec ns2 ./http3-socks-proxy/bin/client -a 10.0.1.2:8083 www.google.com
sudo ip netns exec ns3 ./http3-socks-proxy/bin/client -a 10.0.1.2:8083 www.google.com
sudo ip netns exec ns4 ./http3-socks-proxy/bin/client -a 10.0.1.2:8083 www.google.com
All requests should succeed
-
Redirect transparent proxy - LAN (
ns2(proxy listeners),ns3,ns4), outbound sockets inns1(default route, internet access)Run proxy:
sudo ./bin/gohpts -s $WLAN_IP:1080 -4 -6 -d -sniff -body -in-netns ns2 -out-netns ns1 -nohttp -M redirect -T :8888 -autoMake requests
sudo ip netns exec ns2 curl -Nv https://example.comFor
ns3andns4request fails -
Transparent proxy with
IP_TRANSPARENT(arp/ndp spoofing enabled) LAN (ns2(proxy listeners),ns3,ns4), outbound sockets inns1(default route, internet access)Run proxy:
sudo ./bin/gohpts -s $WLAN_IP:1080 -4 -6 -d -sniff -body -in-netns ns2 -out-netns ns1 -nohttp -M tproxy -T :8888 -auto -arpspoof "fullduplex 1;debug 1;interval 1s" -ndpspoof "ra true;interval 10s;debug 1"Now previous requests on
ns3andns4should worksudo ip netns exec ns3 curl -Nv https://example.com sudo ip netns exec ns4 curl -Nv https://example.com -
HTTP3 proxy - proxy listeners in
ns1, outbound sockets on host,-nosocksflagRun proxy:
sudo ./bin/gohpts -l 0.0.0.0:8083 -4 -6 -d -sniff -body -in-netns ns1 -c ./cert.pem -k ./key.pem -nosocksMake request
./http3-socks-proxy/bin/client -a 10.0.0.2:8083 www.google.comRequest should succeed
-
HTTP3 proxy - proxy listeners on host, outbound sockets in
ns1,-nosocksflagRun proxy:
sudo ./bin/gohpts -l 0.0.0.0:8083 -4 -6 -d -sniff -body -out-netns ns1 -c ./cert.pem -k ./key.pem -nosocksMake request
./http3-socks-proxy/bin/client -a 127.0.0.1:8083 www.google.comRequest should fail
Add rules to
FORWARDchainsudo iptables -A FORWARD -i wlan0 -o veth0 -m conntrack --ctstate RELATED,ESTABLISHED -j ACCEPT sudo iptables -A FORWARD -i veth0 -o wlan0 -j ACCEPT sudo ip6tables -A FORWARD -i veth0 -j ACCEPT sudo ip6tables -A FORWARD -o veth0 -m conntrack --ctstate RELATED,ESTABLISHED -j ACCEPTMake request
./http3-socks-proxy/bin/client -a 127.0.0.1:8083 www.google.comRequest should succeed
Mixed server
GoHPTS can be configured to listen for SOCKS connections on the same address as HTTP server, just add -mixed flag to spin up additional SOCKS server. This allows GoHPTS to act not only like HTTP-to-SOCKS proxy but also SOCKS-to-SOCKS proxy. Local SOCKS5 server supports UDP ASSOCIATE command, so technically users can send UDP datagrams with this mixed server.
Run proxy:
gohpts -s :1080 -l :8080 -mixed
Test connection:
curl -Nv --proxy socks5://127.0.0.1:8080 "https://example.com"
Or disable upstream SOCKS proxy and connect directly by adding -nosocks:
gohpts -l :8080 -mixed -nosocks
Test connection:
curl -Nv --proxy socks5://127.0.0.1:8080 "https://example.com"
Add -socks4 flag to use SOCKS4 protocol instead:
# :1080 should be a socks4 server
gohpts -s :1080 -l :8080 -mixed -socks4
Test connection:
curl -Nv --proxy socks4://127.0.0.1:8080 "https://example.com"
Links
Learn more about transparent proxies by visiting the following links:
-
https://github.com/heiher/hev-socks5-tproxy
socks5proxy withUDP ASSOCIATEsupport:
IPv4/IPv6 network security:
- https://caster0x00.com/legless/
- https://caster0x00.com/intercept/
- https://www.prosec-networks.com/en/blog/ipv6-mitm/
Contributing
Are you a developer?
- Fork the repository
- Create your feature branch:
git switch -c my-new-feature - Commit your changes:
git commit -am 'Add some feature' - Push to the branch:
git push origin my-new-feature - Submit a pull request
License
GPLv3
如有侵权请联系:admin#unsafe.sh