2026-03-27
6 min read
Cloudflare Workflows is a durable execution engine that lets you chain steps, retry on failure, and persist state across long-running processes. Developers use Workflows to power background agents, manage data pipelines, build human-in-the-loop approval systems, and more.
Last month, we announced that every workflow deployed to Cloudflare now has a complete visual diagram in the dashboard.
We built this because being able to visualize your applications is more important now than ever before. Coding agents are writing code that you may or may not be reading. However, the shape of what gets built still matters: how the steps connect, where they branch, and what's actually happening.
If you've seen diagrams from visual workflow builders before, those are usually working from something declarative: JSON configs, YAML, drag-and-drop. However, Cloudflare Workflows are just code. They can include Promises, Promise.all, loops, conditionals, and/or be nested in functions or classes. This dynamic execution model makes rendering a diagram a bit more complicated.
We use Abstract Syntax Trees (ASTs) to statically derive the graph, tracking Promise and await relationships to understand what runs in parallel, what blocks, and how the pieces connect.
Keep reading to learn how we built these diagrams, or deploy your first workflow and see the diagram for yourself.
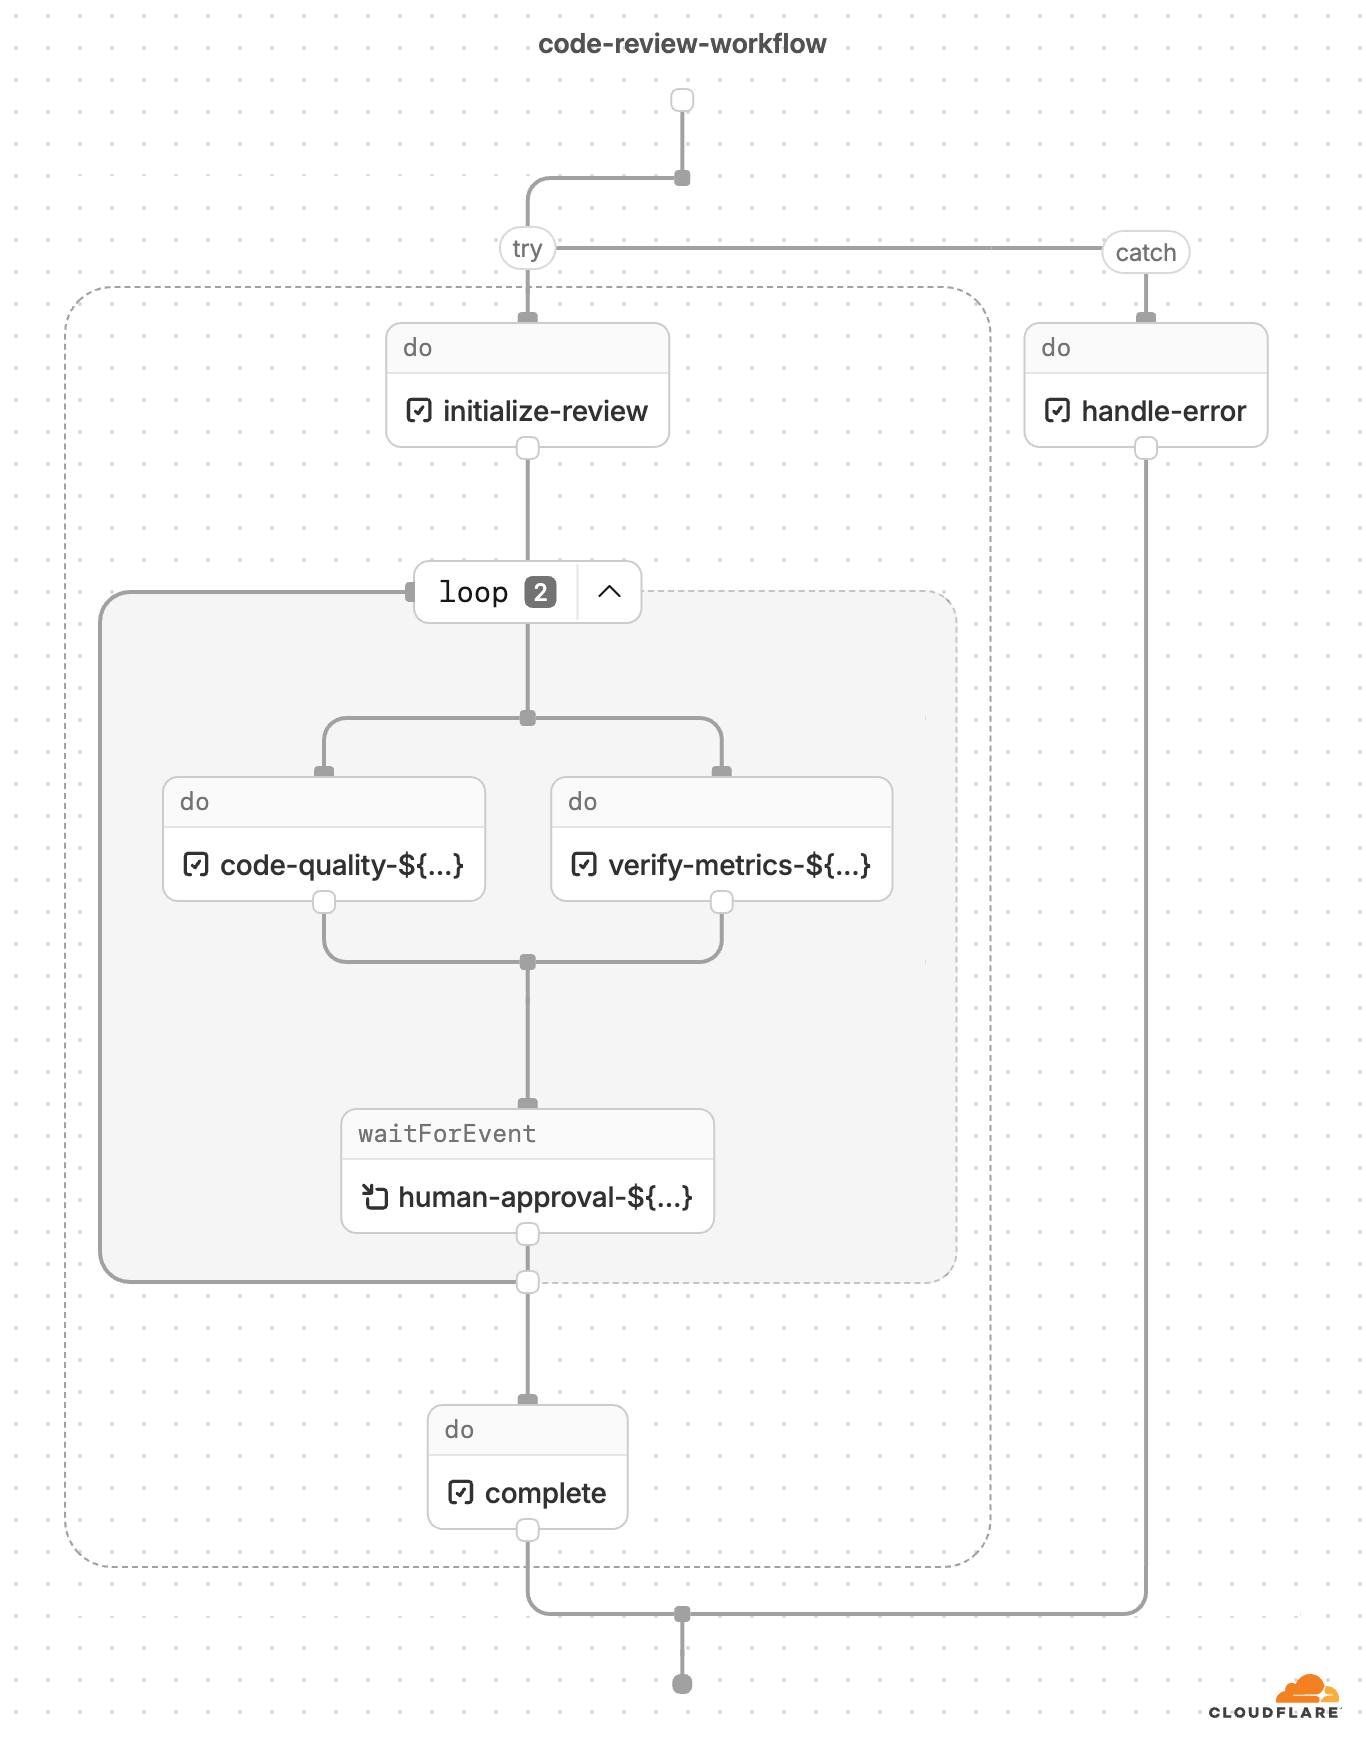
Here’s an example of a diagram generated from Cloudflare Workflows code:

Dynamic workflow execution
Generally, workflow engines can execute according to either dynamic or sequential (static) execution order. Sequential execution might seem like the more intuitive solution: trigger workflow → step A → step B → step C, where step B starts executing immediately after the engine completes Step A, and so forth.
Cloudflare Workflows follow the dynamic execution model. Since workflows are just code, the steps execute as the runtime encounters them. When the runtime discovers a step, that step gets passed over to the workflow engine, which manages its execution. The steps are not inherently sequential unless awaited — the engine executes all unawaited steps in parallel. This way, you can write your workflow code as flow control without additional wrappers or directives. Here’s how the handoff works:
An engine, which is a “supervisor” Durable Object for that instance, spins up. The engine is responsible for the logic of the actual workflow execution.
The engine triggers a user worker via dynamic dispatch, passing control over to Workers runtime.
When Runtime encounters a
step.do, it passes the execution back to the engine.The engine executes the step, persists the result (or throws an error, if applicable) and triggers the user Worker again.
With this architecture, the engine does not inherently “know” the order of the steps that it is executing — but for a diagram, the order of steps becomes crucial information. The challenge here lies in getting the vast majority of workflows translated accurately into a diagnostically helpful graph; with the diagrams in beta, we will continue to iterate and improve on these representations.
Parsing the code
Fetching the script at deploy time, instead of run time, allows us to parse the workflow in its entirety to statically generate the diagram.
Taking a step back, here is the life of a workflow deployment:

To create the diagram, we fetch the script after it has been bundled by the internal configuration service which deploys Workers (step 2 under Workflow deployment). Then, we use a parser to create an abstract syntax tree (AST) representing the workflow, and our internal service generates and traverses an intermediate graph with all WorkflowEntrypoints and calls to workflows steps. We render the diagram based on the final result on our API.
When a Worker is deployed, the configuration service bundles (using esbuild by default) and minifies the code unless specified otherwise. This presents another challenge — while Workflows in TypeScript follow an intuitive pattern, their minified Javascript (JS) can be dense and indigestible. There are also different ways that code can be minified, depending on the bundler.
Here’s an example of Workflow code that shows agents executing in parallel:
const summaryPromise = step.do(
         `summary agent (loop ${loop})`,
         async () => {
           return runAgentPrompt(
             this.env,
             SUMMARY_SYSTEM,
             buildReviewPrompt(
               'Summarize this text in 5 bullet points.',
               draft,
               input.context
             )
           );
         }
       );
        const correctnessPromise = step.do(
         `correctness agent (loop ${loop})`,
         async () => {
           return runAgentPrompt(
             this.env,
             CORRECTNESS_SYSTEM,
             buildReviewPrompt(
               'List correctness issues and suggested fixes.',
               draft,
               input.context
             )
           );
         }
       );
        const clarityPromise = step.do(
         `clarity agent (loop ${loop})`,
         async () => {
           return runAgentPrompt(
             this.env,
             CLARITY_SYSTEM,
             buildReviewPrompt(
               'List clarity issues and suggested fixes.',
               draft,
               input.context
             )
           );
         }
       );
Bundling with rspack, a snippet of the minified code looks like this:
class pe extends e{async run(e,t){de("workflow.run.start",{instanceId:e.instanceId});const r=await t.do("validate payload",async()=>{if(!e.payload.r2Key)throw new Error("r2Key is required");if(!e.payload.telegramChatId)throw new Error("telegramChatId is required");return{r2Key:e.payload.r2Key,telegramChatId:e.payload.telegramChatId,context:e.payload.context?.trim()}}),s=await t.do("load source document from r2",async()=>{const e=await this.env.REVIEW_DOCUMENTS.get(r.r2Key);if(!e)throw new Error(`R2 object not found: ${r.r2Key}`);const t=(await e.text()).trim();if(!t)throw new Error("R2 object is empty");return t}),n=Number(this.env.MAX_REVIEW_LOOPS??"5"),o=this.env.RESPONSE_TIMEOUT??"7 days",a=async(s,i,c)=>{if(s>n)return le("workflow.loop.max_reached",{instanceId:e.instanceId,maxLoops:n}),await t.do("notify max loop reached",async()=>{await se(this.env,r.telegramChatId,`Review stopped after ${n} loops for ${e.instanceId}. Start again if you still need revisions.`)}),{approved:!1,loops:n,finalText:i};const h=t.do(`summary agent (loop ${s})`,async()=>te(this.env,"You summarize documents. Keep the output short, concrete, and factual.",ue("Summarize this text in 5 bullet points.",i,r.context)))...Or, bundling with vite, here is a minified snippet:
class ht extends pe {
  async run(e, r) {
    b("workflow.run.start", { instanceId: e.instanceId });
    const s = await r.do("validate payload", async () => {
      if (!e.payload.r2Key)
        throw new Error("r2Key is required");
      if (!e.payload.telegramChatId)
        throw new Error("telegramChatId is required");
      return {
        r2Key: e.payload.r2Key,
        telegramChatId: e.payload.telegramChatId,
        context: e.payload.context?.trim()
      };
    }), n = await r.do(
      "load source document from r2",
      async () => {
        const i = await this.env.REVIEW_DOCUMENTS.get(s.r2Key);
        if (!i)
          throw new Error(`R2 object not found: ${s.r2Key}`);
        const c = (await i.text()).trim();
        if (!c)
          throw new Error("R2 object is empty");
        return c;
      }
    ), o = Number(this.env.MAX_REVIEW_LOOPS ?? "5"), l = this.env.RESPONSE_TIMEOUT ?? "7 days", a = async (i, c, u) => {
      if (i > o)
        return H("workflow.loop.max_reached", {
          instanceId: e.instanceId,
          maxLoops: o
        }), await r.do("notify max loop reached", async () => {
          await J(
            this.env,
            s.telegramChatId,
            `Review stopped after ${o} loops for ${e.instanceId}. Start again if you still need revisions.`
          );
        }), {
          approved: !1,
          loops: o,
          finalText: c
        };
      const h = r.do(
        `summary agent (loop ${i})`,
        async () => _(
          this.env,
          et,
          K(
            "Summarize this text in 5 bullet points.",
            c,
            s.context
          )
        )
      )...
Minified code can get pretty gnarly — and depending on the bundler, it can get gnarly in a bunch of different directions.
We needed a way to parse the various forms of minified code quickly and precisely. We decided oxc-parser from the JavaScript Oxidation Compiler (OXC) was perfect for the job. We first tested this idea by having a container running Rust. Every script ID was sent to a Cloudflare Queue, after which messages were popped and sent to the container to process. Once we confirmed this approach worked, we moved to a Worker written in Rust. Workers supports running Rust via WebAssembly, and the package was small enough to make this straightforward.
The Rust Worker is responsible for first converting the minified JS into AST node types, then converting the AST node types into the graphical version of the workflow that is rendered on the dashboard. To do this, we generate a graph of pre-defined node types for each workflow and translate into our graph representation through a series of node mappings.
Rendering the diagram
There were two challenges to rendering a diagram version of the workflow: how to track step and function relationships correctly, and how to define the workflow node types as simply as possible while covering all the surface area.
To guarantee that step and function relationships are tracked correctly, we needed to collect both the function and step names. As we discussed earlier, the engine only has information about the steps, but a step may be dependent on a function, or vice versa. For example, developers might wrap steps in functions or define functions as steps. They could also call steps within a function that come from different modules or rename steps.
Although the library passes the initial hurdle by giving us the AST, we still have to decide how to parse it. Some code patterns require additional creativity. For example, functions — within a WorkflowEntrypoint, there can be functions that call steps directly, indirectly, or not at all. Consider functionA, which contains console.log(await functionB(), await functionC()) where functionB calls a step.do(). In that case, both functionA and functionB should be included on the workflow diagram; however, functionC should not. To catch all functions which include direct and indirect step calls, we create a subgraph for each function and check whether it contains a step call itself or whether it calls another function which might. Those subgraphs are represented by a function node, which contains all of its relevant nodes. If a function node is a leaf of the graph, meaning it has no direct or indirect workflow steps within it, it is trimmed from the final output.
We check for other patterns as well, including a list of static steps from which we can infer the workflow diagram or variables, defined in up to ten different ways. If your script contains multiple workflows, we follow a similar pattern to the subgraphs created for functions, abstracted one level higher.
For every AST node type, we had to consider every way they could be used inside of a workflow: loops, branches, promises, parallels, awaits, arrow functions… the list goes on. Even within these paths, there are dozens of possibilities. Consider just a few of the possible ways to loop:
// for...of
for (const item of items) {
	await step.do(`process ${item}`, async () => item);
}
// while
while (shouldContinue) {
	await step.do('poll', async () => getStatus());
}
// map
await Promise.all(
	items.map((item) => step.do(`map ${item}`, async () => item)),
);
// forEach
await items.forEach(async (item) => {
	await step.do(`each ${item}`, async () => item);
});
And beyond looping, how to handle branching:
// switch / case
switch (action.type) {
	case 'create':
		await step.do('handle create', async () => {});
		break;
	default:
		await step.do('handle unknown', async () => {});
		break;
}

// if / else if / else
if (status === 'pending') {
	await step.do('pending path', async () => {});
} else if (status === 'active') {
	await step.do('active path', async () => {});
} else {
	await step.do('fallback path', async () => {});
}

// ternary operator
await (cond
	? step.do('ternary true branch', async () => {})
	: step.do('ternary false branch', async () => {}));

// nullish coalescing with step on RHS
const myStepResult =
	variableThatCanBeNullUndefined ??
	(await step.do('nullish fallback step', async () => 'default'));

// try/catch with finally
try {
	await step.do('try step', async () => {});
} catch (_e) {
	await step.do('catch step', async () => {});
} finally {
	await step.do('finally step', async () => {});
}
Our goal was to create a concise API that communicated what developers need to know without overcomplicating it. But converting a workflow into a diagram meant accounting for every pattern (whether it follows best practices, or not) and edge case possible. As we discussed earlier, each step is not explicitly sequential, by default, to any other step. If a workflow does not utilize await and Promise.all(), we assume that the steps will execute in the order in which they are encountered. But if a workflow included await, Promise or Promise.all(), we needed a way to track those relationships.
We decided on tracking execution order, where each node has a starts: and resolves: field. The starts and resolves indices tell us when a promise started executing and when it ends relative to the first promise that started without an immediate, subsequent conclusion. This correlates to vertical positioning in the diagram UI (i.e., all steps with starts:1 will be inline). If steps are awaited when they are declared, then starts and resolves will be undefined, and the workflow will execute in the order of the steps’ appearance to the runtime.
While parsing, when we encounter an unawaited Promise or Promise.all(), that node (or nodes) are marked with an entry number, surfaced in the starts field. If we encounter an await on that promise, the entry number is incremented by one and saved as the exit number (which is the value in resolves). This allows us to know which promises run at the same time and when they’ll complete in relation to each other.
export class ImplicitParallelWorkflow extends WorkflowEntrypoint<Env, Params> {
 async run(event: WorkflowEvent<Params>, step: WorkflowStep) {
   const branchA = async () => {
     const a = step.do("task a", async () => "a"); //starts 1
     const b = step.do("task b", async () => "b"); //starts 1
     const c = await step.waitForEvent("task c", { type: "my-event", timeout: "1 hour" }); //starts 1 resolves 2
     await step.do("task d", async () => JSON.stringify(c)); //starts 2 resolves 3
     return Promise.all([a, b]); //resolves 3
   };

   const branchB = async () => {
     const e = step.do("task e", async () => "e"); //starts 1
     const f = step.do("task f", async () => "f"); //starts 1
     return Promise.all([e, f]); //resolves 2
   };

   await Promise.all([branchA(), branchB()]);

   await step.sleep("final sleep", 1000);
 }
}
You can see the steps’ alignment in the diagram:

After accounting for all of those patterns, we settled on the following list of node types:
| StepSleep
| StepDo
| StepWaitForEvent
| StepSleepUntil
| LoopNode
| ParallelNode
| TryNode
| BlockNode
| IfNode
| SwitchNode
| StartNode
| FunctionCall
| FunctionDef
| BreakNode;
Here are a few samples of API output for different behaviors:
function call:
{
  "functions": {
    "runLoop": {
      "name": "runLoop",
      "nodes": []
    }
  }
}
if condition branching to step.do:
{
  "type": "if",
  "branches": [
    {
      "condition": "loop > maxLoops",
      "nodes": [
        {
          "type": "step_do",
          "name": "notify max loop reached",
          "config": {
            "retries": {
              "limit": 5,
              "delay": 1000,
              "backoff": "exponential"
            },
            "timeout": 10000
          },
          "nodes": []
        }
      ]
    }
  ]
}
parallel with step.do and waitForEvent:
{
  "type": "parallel",
  "kind": "all",
  "nodes": [
    {
      "type": "step_do",
      "name": "correctness agent (loop ${...})",
      "config": {
        "retries": {
          "limit": 5,
          "delay": 1000,
          "backoff": "exponential"
        },
        "timeout": 10000
      },
      "nodes": [],
      "starts": 1
    },
...
    {
      "type": "step_wait_for_event",
      "name": "wait for user response (loop ${...})",
      "options": {
        "event_type": "user-response",
        "timeout": "unknown"
      },
      "starts": 3,
      "resolves": 4
    }
  ]
}
What’s next
Ultimately, the goal of these Workflow diagrams is to serve as a full-service debugging tool. That means you’ll be able to:
Trace an execution through the graph in real time
Discover errors, wait for human-in-the-loop approvals, and skip steps for testing
Access visualizations in local development
Check out the diagrams on your Workflow overview pages. If you have any feature requests or notice any bugs, share your feedback directly with the Cloudflare team by joining the Cloudflare Developers community on Discord.
Cloudflare's connectivity cloud protects entire corporate networks, helps customers build Internet-scale applications efficiently, accelerates any website or Internet application, wards off DDoS attacks, keeps hackers at bay, and can help you on your journey to Zero Trust.
Visit 1.1.1.1 from any device to get started with our free app that makes your Internet faster and safer.
To learn more about our mission to help build a better Internet, start here. If you're looking for a new career direction, check out our open positions.