好的,我现在需要帮用户总结一篇文章的内容,控制在100个字以内。首先,我得仔细阅读文章,理解其主要内容。 文章主要讲的是Apple在WWDC 2023上发布的Declarative Device Management(DDM),特别是它如何通过Jamf Pro的Blueprints来管理macOS内置防火墙的设置。具体包括启用防火墙、启用隐形模式以及禁止用户更改防火墙设置。文章还详细介绍了如何手动配置Blueprints来实现这些设置,并提到MDM配置文件是通过DDM交付的,但没有签名。 接下来,我需要将这些信息浓缩到100字以内。要抓住关键点:Apple发布DDM,Jamf Pro的Blueprints功能,管理防火墙设置的具体内容,以及配置步骤和注意事项。 可能的结构是:先点明主题,然后说明功能和应用,最后提到配置方法和限制。这样既全面又简洁。 现在开始组织语言:“Apple在WWDC 2023上发布的Declarative Device Management (DDM)允许通过Jamf Pro的Blueprints管理macOS内置防火墙设置,包括启用防火墙、隐形模式及禁止用户更改。需手动配置Blueprints以部署这些设置,并通过MDM交付配置文件。” 这样大约70字左右,符合要求。 检查一下是否涵盖了所有关键点:DDM、Jamf Pro、Blueprints、防火墙设置、手动配置、MDM交付。看起来都包含了。没有遗漏重要信息。 最后确认字数在限制内,并且表达清晰。这样用户就能快速了解文章的核心内容了。 </think> Apple在WWDC 2023上发布的Declarative Device Management (DDM)允许通过Jamf Pro的Blueprints管理macOS内置防火墙设置,包括启用防火墙、隐形模式及禁止用户更改。需手动配置Blueprints以部署这些设置,并通过MDM交付配置文件。 2026-3-13 14:9:59 Author: derflounder.wordpress.com(查看原文) 阅读量:32 收藏
As part of Apple’s unveiling of Declarative Device Management (DDM) at WWDC 2023, Apple announced that DDM management included the ability to deploy MDM configuration profiles using DDM as the delivery mechanism in place of using MDM to deliver the profiles. Jamf Pro’s Blueprints leverages this capability to support managing the settings for the built-in application firewall on macOS. Let’s see how this works with the following settings for the firewall:
- Firewall enabled
- Stealth mode enabled
- User changes to the firewall disabled
For more details, please see below the jump.
As of Jamf Pro 11.25.2, there is not a Blueprints template available for creating blueprints which manage firewall settings so the blueprint will need to be configured manually. To do this, use the following procedure:
1. Log into Jamf Pro.
2. Select Blueprints.
3. Click the Create blueprint button.

4. You should see an unconfigured Blueprint. Click where it says Untitled blueprint and provide a name.
For this example, I’m using Firewall Management Settings.
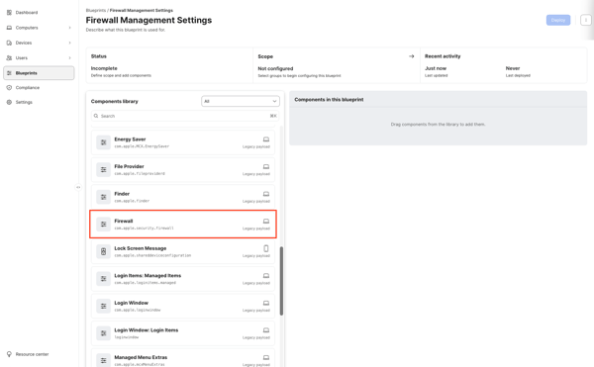
5. Scroll down in the list on the left-hand side of the browser window to locate the Firewall component.
Note: The Firewall component is listed as being the Legacy Payload type. In Blueprints, a Legacy Payload type indicates that this is an MDM configuration profile being delivered via DDM.

6. Click on the Firewall component and drag the Firewall component to the Components in this blueprint section.

7. Once added to the Components in this blueprint section, click anywhere on the Firewall component to open it for editing.
8. At this point, you will see the firewall management settings (with one exception which will be covered in following steps.) To apply the desired settings, select the following options and set them to True:
- EnableFirewall
- EnableStealthMode
9. Once all the settings choices have been made and verified, click the Save changes button.

10. The remaining setting (disabling the ability for the user to make changes to the firewall) is in the separate Security Preferences component.
Scroll down in the list on the left-hand side of the browser window to locate the Security Preferences component.

11. Click on the Security Preferences component and drag the Security Preferences component to the Components in this blueprint section.

12. Once added to the Components in this blueprint section, click anywhere on the Security Preferences component to open it for editing.
13. At this point, you will see the Security Preferences management settings. To apply the desired setting, select the following option and set it to True:
- Do not allow firewall
14. Once all the settings choices have been made and verified, click the Save changes button.

15. At this point, you should have a blueprint which has all settings configured but where no target scope has been set. To scope this blueprint, go to the Scope section and click the arrow button.

16. Select a Jamf Pro smart or static group. For this example, I’m selecting a static group named Firewall Settings Deployment Group.

17. Once everything has been configured, click the Deploy button to deploy the changes to the Macs you want to manage.

18. Once deployed, the Blueprints screen in Jamf Pro should show the newly-created Firewall Management Settings Blueprint as being deployed.

You can also check on the managed device’s end by opening System Settings: General: Device Management, locating the MDM enrollment profile in the list of profiles and double-clicking on it. When you scroll to the bottom of the enrollment profile’s window, you should see a Device Declarations section.
If you’re deploying a legacy profile via Blueprints, you should see a Profiles section in Device Declarations. In the Profiles section, there is a listing with a name that matches the name of the blueprint which was deployed. In the case of our example, the listing shows Firewall Management Settings.

If you click on the Firewall Management Settings listing, you should see the details of what is being managed.

Note: The MDM profiles delivered via Blueprints are not signed. This is mentioned in the documentation available via the link below:

You can also verify that the firewall is turned on and not editable by the user by going to System Settings: Network: Firewall. It should display a message that the setting has been configured by a profile.

如有侵权请联系:admin#unsafe.sh