嗯,用户让我总结一篇文章的内容,控制在100字以内,而且不需要特定的开头。我先看看文章讲的是什么。 文章主要介绍VMRay的UniqueSignal威胁情报 feed,它包含IOCs、TTPs和恶意软件背景。然后详细说明如何在MISP中配置这个feed,包括添加认证头、设置分布和标签,以及测试连接和安排任务。最后还提到了监控仪表盘和后续步骤。 用户可能需要一个简洁明了的摘要,用于快速了解文章内容。所以我要抓住关键点:UniqueSignal的功能、与MISP的集成步骤,以及后续的应用。 控制在100字以内的话,我需要精简语言,确保涵盖所有主要部分。比如提到威胁情报feed、集成到MISP的方法,以及如何设置和监控。 这样用户就能一目了然地知道文章的主要内容了。 </think> VMRay推出UniqueSignal威胁情报feed,提供IOCs、TTPs和恶意软件背景,并集成到MISP平台。文章详细介绍了如何在MISP中配置该feed,包括认证设置、分布和标签配置,并提供了测试连接和创建监控仪表盘的步骤。 2026-3-6 12:46:54 Author: www.vmray.com(查看原文) 阅读量:12 收藏
VMRay UniqueSignal
Last year VMRay announced UniqueSignal, a threat intelligence feed that includes:
- Indicators of Compromise (IOCs) such as IPs, URLs and hashes
- Tactics, Techniques, and Procedures (TTPs) mapped to MITRE ATT&CK®
- Malware family context that helps you track how threats evolve over time
What sets this feed apart is its context and relevancy. Rather than simply dumping raw indicators, VMRay provides background drawn from their malware analysis, phishing detection research, and notably their sandbox solutions. This enables you to move quickly from ingestion to action without needing to validate and enrich indicators yourself.
UniqueSignal is available in STIX, JSON, and CSV, and it integrates nicely with MISP.
MISP
MISP is an open source, community-driven platform for threat intelligence sharing.
It supports you through the intelligence lifecycle: collect raw indicators and events, review and enrich the data, add context, and turn it into actionable intelligence. Once you’ve curated what matters, you can operationalise it, whether that’s feeding Microsoft Defender and Sentinel or something as simple as updating firewall block lists.
Getting data into MISP is easy. You can synchronise with MISP communities, create your own events, or consume data feeds. VMRay’s UniqueSignal is available as one of those feeds, so you can add the intelligence from VMRay into your central intelligence repository and use it alongside other collection sources.
Adding VMRay UniqueSignal as a MISP feed
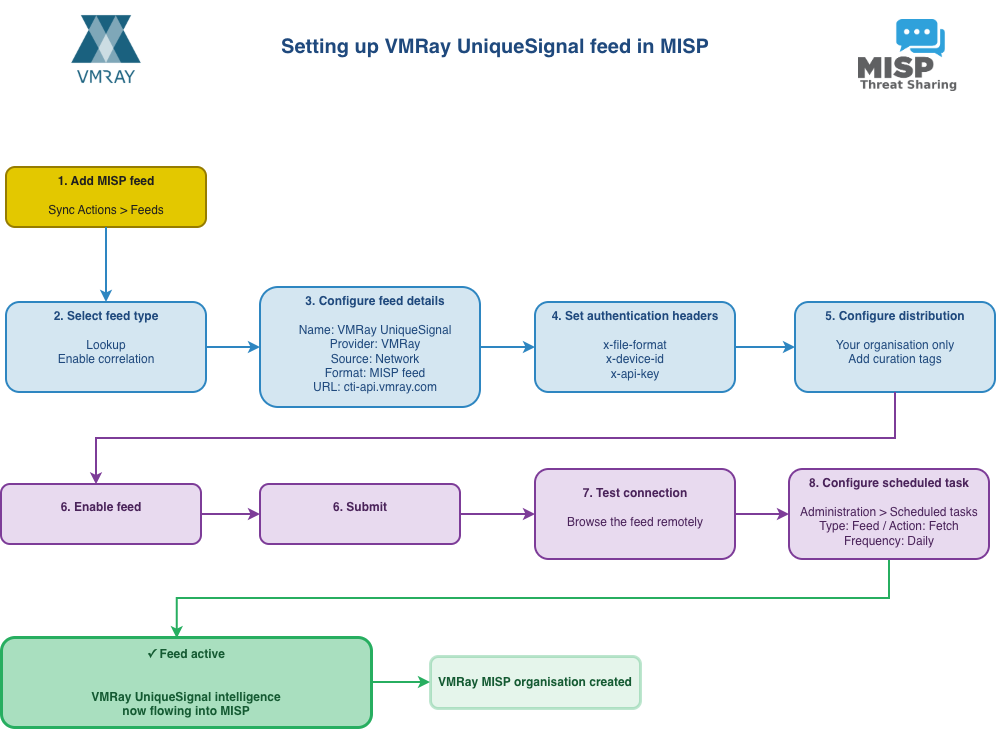
The diagram below shows the complete workflow for setting up the VMRay UniqueSignal feed in MISP, from initial configuration through to having an active feed pulling in threat intelligence.
-
Adding a new feed
You’ll find MISP feeds under Sync Actions > Feeds. Click on Add Feed.
-
Different feed types
There are two ways to use a feed:
- As a lookup feed (“Lookup visible”), where events are created on your MISP instance. This is what you want if you plan to work with the information directly.
- As a cached feed (“Caching enabled”), mainly used for correlation and validation. The data is stored in a cache but no local events are created. You’d typically use this for high-volume feeds with a relatively short life span.
You can enable both if needed, but we’ll use the lookup option for VMRay. There are a few additional settings worth mentioning, like disable correlation. You’d typically use that for a high-volume, high-noise feed where correlation on low-value indicators isn’t useful. With VMRay, we want correlation enabled so we can link UniqueSignal information to our other sources and build a fuller picture of the threat landscape.
-
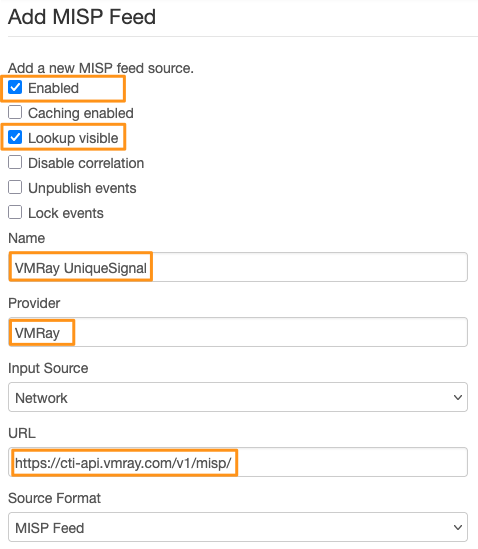
Basic configuration
Set these basic configuration options:
- Name: “VMRay UniqueSignal”
- Provider: “VMRay”
- Input source: Network (the feed is hosted externally)
- Source format: MISP feed
- URL: https://cti-api.vmray.com/v1/misp/

-
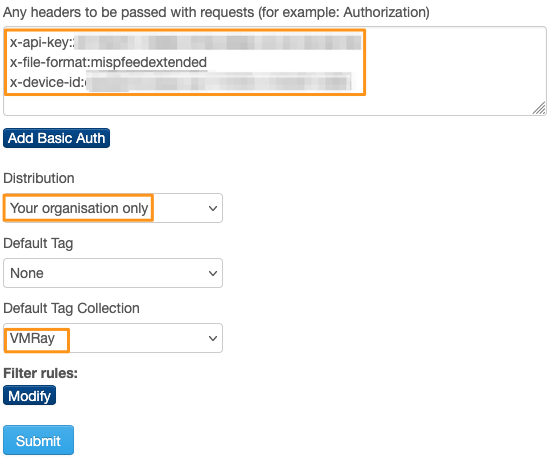
Authentication headers
You’ll also need to configure authentication headers. These identify your MISP node and organisation, and grant you access to the VMRay feed. There are three headers:
- x-file-format specifies the MISP export format. You can choose between MISPFEEDEXTENDED and MISPFEEDBASIC.
- x-device-id is a device ID you choose yourself. Ideally, pick the MISP node name or the node UUID (MISP.uuid) to make your requests easily recognisable.
- x-api-key is the authentication key VMRay gives you.
A sample format is below, make sure to replace VMRAY_API_KEY and MISP.UUID with the real values.
x-api-key:VMRAY_API_KEY
x-file-format:mispfeedextended
x-device-id:MISP.UUID
-
Distribution and tagging
A few additional settings aren’t strictly required but worth configuring.
First, set the distribution level. In most cases, you won’t want to share VMRay events with external communities, so “Your organisation only” makes sense.
You can also apply default tags to events created by the feed. This makes filtering and curation easier. For instance, you might use a single tag like curation:source=”MISP-FEEDS”, or be more specific with a tag collection containing curation:source=MISP-FEEDS, curation:community=VMRay, and admiralty-scale:source-reliability=”a”.
For reference, that last tag is from the Admiralty Scale (sometimes called the NATO System) taxonomy, which ranks source reliability and information credibility. The “a” rating means the source is completely reliable, reflecting our confidence in VMRay. Tags also give you finer control over sharing. The distribution level sets the baseline, but tags let you add specific rules. For example, in your MISP remote server options, you could block all events tagged with curation:community=VMRay from ever leaving your organisation. These custom tags will also come in handy when we set up monitoring.
-
Enable and submit
Once you’ve configured everything, make sure the Enabled checkbox (at the top of the form) is ticked so the feed is active on your system.
Then click Submit to save the feed. MISP will assign the feed an ID. Make a note of it, you’ll need it later.
-
Test connection
Before you go further, click the magnifying glass next to the feed to preview what’s available. This also checks whether any network filters or gateway devices are blocking access to VMRay, and confirms that you’ve entered the API key correctly. If you do hit proxy issues, ask your network team to allowlist HTTPS access to cti-api.vmray.com.

-
Scheduled task
Now set up a scheduled task to pull in the feed regularly. MISP gives you two options: use its built-in task scheduler, or use the Linux cron daemon with the MISP CLI. Both work well. Cron has a proven track record, but the built-in scheduler is easier and doesn’t need console access.
Using the built-in scheduler:
Go to Administration > Scheduled tasks.
Set the schedule type to Feed, the action to Fetch, and select VMRay UniqueSignal from the feed dropdown. For the polling frequency, set Runs every to 1 and Period to “Every day” (VMRay updates the feed once a day). Add a description like “Daily pull of VMRay UniqueSignal feed” and enable the schedule.

Using cron:
Add a crontab entry to the www-data user (or apache on Red Hat systems) in the format:
00 3 * * * /var/www/MISP/app/Console/cake Server fetchFeed <user_id> <feed_id>
Make sure to replace <user_id> with the user ID you want to run the fetch (typically your system services account), and <feed_id> with the ID you noted earlier.
Finishing tasks
Once you’ve added the feed, it’s just a matter of time before the VMRay events start flowing in.
VMRay MISP organisation
In MISP, each event has two types of organisations: the organisation that created the threat event (“Creator org”) and the organisation that owns the event (“Owner org”). The owner is typically the organisation running the MISP instance, which in this case is your organisation. The creator is VMRay.
Once events start flowing in, you’ll notice a new remote organisation appears in your MISP instance: VMRay, with the organisation UUID 73374ca8-55c7-4f6e-ac2f-395d49317fea. This doesn’t mean VMRay can log in to your server. The organisation entry is there to maintain database integrity. You can also use this organisation identifier when setting up monitoring and dashboards later.
Verifying the logs
If all goes well, events should start appearing in your system. If they don’t, here’s what to check:
- Can you browse the feed remotely? If not, your network route or authentication headers need fixing. Sort this out first.
- Is the scheduled task enabled? Double-check it’s active.
- Are there feed jobs in the queue? Look under Administration > Jobs to see if fetch jobs appear.
- Is task scheduling working? Verify there’s at least one MISP scheduler worker running. Check under Administration > Server Settings & Maintenance, then the Workers tab.
- Using cron? Try running the fetch command directly via the MISP CLI as the www-data user: sudo -u www-data /var/www/MISP/app/Console/cake Server fetchFeed 1 2 (replace 1 with your user ID and 2 with your feed ID) and check the output.
The logs from the task scheduler, as well as the standard MISP error logs (under Logs, Application Logs) can also help you find the root cause of ingestion problems.

Monitoring dashboard
Beyond checking logs, you can track feed activity through MISP dashboards. Widgets let you monitor trends for specific tags or organisation activity, which is perfect for keeping an eye on the VMRay feed.
Remember those tags we set up earlier? They’re useful here too. Go to Dashboards and click Add Widget in the left menu.
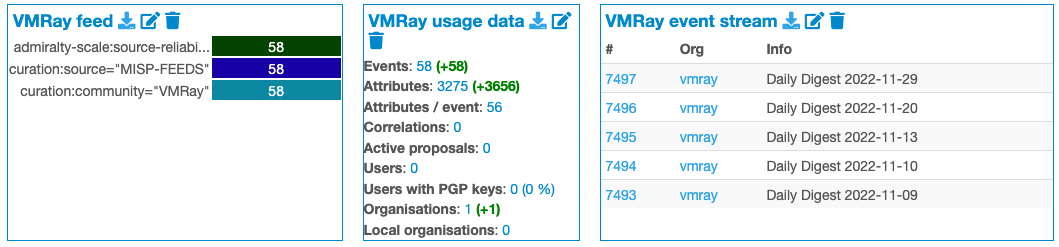
Trending Tags widget:
Select “Trending Tags” and use this configuration to filter for VMRay events:
{
“alias”: “VMRay feed”,
“filter”: {
“filter_event_tags”: “curation:community=\”vmray\””
}
}
If you’re pulling from multiple communities, you can broaden the filter to curation:community to see all your community sources.
Usage data widget:
Add the “Usage data” widget with this filter to track VMRay feed usage:
{
“alias”: “VMRay usage data”,
“filter”: {
“uuid”: “73374ca8-55c7-4f6e-ac2f-395d49317fea”
}
}
This filters by the VMRay organisation UUID.
Event stream widget:
Finally, add an “Event stream” widget to see a live view of incoming VMRay events:
{
“alias”: “VMRay event stream”,
“filter”: {
“orgs”: “vmray”
}
}
What’s next?
We’ve covered how to set up the VMRay UniqueSignal feed in MISP.
Next, we’ll look at using UniqueSignal operationally for detection and response. We’ll cover integrations with Microsoft Defender and Microsoft Sentinel, and build custom MISP workflows to push selected indicators with analyst notes into detections and hunting queries.
如有侵权请联系:admin#unsafe.sh