About The Project
As apart of my Doctorate, I am regularly building, flashing and debugging custom U-Boot bootloaders. I’ve been using OpenWrt as apart of my research on embedded systems, and developing slightly modified builds as previously documented in earlier blog posts. Recently, when flashing my OpenWrt One, I ran into errors that ultimately prevented me from writing a new image to NAND flash and rendered my device a brick! This blog post is a quick run down for future reference on how to explicitly avoid “bad blocks” and recover from a “soft-bricked” device.
OpenWrt One & Flash Layout
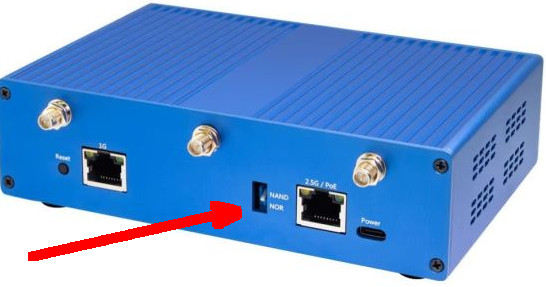
The OpenWrt One is a embedded platform for OpenWrt developers. The schematics, source code, and just about everything in between are Open Source, making it a premium platform for testing purposes. A key feature for my testing is the physical switch that allows the developer to switch between a NAND flash and NOR flash chip for booting.
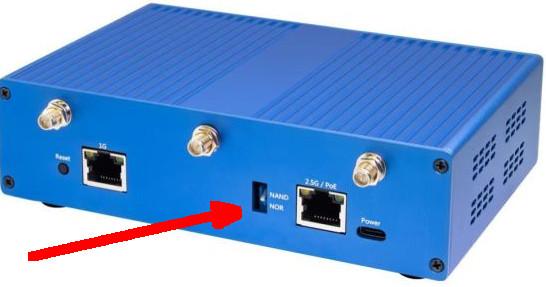
The NOR flash is write protected unless a jumper wire is placed appropriately, effectively making this device impossible to brick. Due to this feature, it’s a prime platform to build, test, break, experiment, etc… for all those weird embedded system projects one could think up. Referencing the device tree for the OpenWrt one, the NAND flash layout is as follows:
...truncated...
partitions {
			compatible = "fixed-partitions";
			#address-cells = <1>;
			#size-cells = <1>;

			partition@0 {
				label = "bl2";
				reg = <0x0 0x100000>; <---- bootloader lives here
				read-only;
			};

			partition@580000 {
				label = "ubi";
				reg = <0x100000 0xFF00000>; <---- but also here!
				compatible = "linux,ubi";

				volumes {
					ubi_fit_volume: ubi-volume-fit {
						volname = "fit";
					};
				};
			};
		}
...truncated...
The second stage bootloader (bl2) exists at NAND flash offset 0x0 in the snippet above. A “stage-2” bootloader is often triggered after ROM initialization which in turn loads a third bootloader, which is often the full feature U-Boot shell. This isn’t the case in all systems, and U-Boot can actually be used to chain bootloaders. This would ultimately result in bootloaders loading other bootloaders and is referred to as “chain booting”. A practical example from their documentation is for verified booting. The next partition is for a “Unsorted Block Images File System”(UBI), which ultimately provides a filesystem (UBIFS) for NAND flash. This is where a the flattened image tree (FIT) data lives that contains the full fleged U-Boot shell you think of when you use U-Boot, the Linux kernel, etc…
Boot ROM
  ↓
BL2 (preloader / TF-A stage) /dev/mtd4
  ↓
FIT image (U-Boot, kernel, dtb, etc..) /dev/mtd5
  ↓
OpenWrt
Because the 3rd stage bootloader lives in the FIT image on the UBI partition, when I erase the NAND flash I erase the entire UBI partition.
This ultimately requires for reflashing the entire OpenWrt UBI image or I’m left with a broken device. For those familiar with upgrading via a factory or sysupgrade image, those exist in custom builds as well. However for my usecase, the UBI images are ultimately what I’m flashing in order to replace the bootloader. The sysupgrade and factory bins do not replace the u-boot environment. The output below shows the various binary files produced when building U-Boot.
...truncated...
-rw-r--r-- 1 dllcoolj dllcoolj 22675456 Nov 17 19:25 openwrt-mediatek-filogic-openwrt_one-factory.ubi
-rw-r--r-- 1 dllcoolj dllcoolj  8978432 Nov 17 19:25 openwrt-mediatek-filogic-openwrt_one-initramfs.itb
-rw-r--r-- 1 dllcoolj dllcoolj     4129 Nov 17 19:25 openwrt-mediatek-filogic-openwrt_one.manifest
-rw-r--r-- 1 dllcoolj dllcoolj   363176 Nov 17 19:25 openwrt-mediatek-filogic-openwrt_one-nor-bl31-uboot.fip
-rw-r--r-- 1 dllcoolj dllcoolj 10551296 Nov 17 19:25 openwrt-mediatek-filogic-openwrt_one-nor-factory.bin
-rw-r--r-- 1 dllcoolj dllcoolj   222944 Nov 17 19:25 openwrt-mediatek-filogic-openwrt_one-nor-preloader.bin
-rw-r--r-- 1 dllcoolj dllcoolj  1010692 Nov 17 19:25 openwrt-mediatek-filogic-openwrt_one-snand-bl31-uboot.fip
-rw-r--r-- 1 dllcoolj dllcoolj 23724032 Nov 17 19:25 openwrt-mediatek-filogic-openwrt_one-snand-factory.bin
-rw-r--r-- 1 dllcoolj dllcoolj   238440 Nov 17 19:25 openwrt-mediatek-filogic-openwrt_one-snand-preloader.bin
-rw-r--r-- 1 dllcoolj dllcoolj 11010315 Nov 17 19:25 openwrt-mediatek-filogic-openwrt_one-squashfs-sysupgrade.itb
...truncated...
Booting into the OpenWrt One and examining the geometry of the NAND flash, the layouts and associated partitioned are now eaily observed.
As shown below the UBI image is located at /dev/mtd5 and has a total size of 267386880 (0xFF00000). The OpenWrt UBI image listed above is much smaller and fits nicely in this flash space with a little wiggle room, but more on that later.
root@OpenWrt:~# cat /proc/mtd
dev:    size   erasesize  name
mtd0: 00040000 00010000 "bl2-nor"
mtd1: 000c0000 00010000 "factory"
mtd2: 00080000 00010000 "fip-nor"
mtd3: 00c80000 00010000 "recovery"
mtd4: 00100000 00020000 "bl2"
mtd5: 0ff00000 00020000 "ubi"
Poking at this partition for U-Boot artifacts, and U-Boot shell artifacts are found!
Thus, we have proved without a doubt that /dev/mtd5 has the U-Boot we care about.
root@OpenWrt:~# strings /dev/mtd5 | grep -i u-boot
...truncated....
 *** U-Boot Boot Menu ***
U-Boot 2025.10-OpenWrt-r31857-501f4edb04 (Nov 15 2025 - 23:10:56 +0000)
....truncated....
Now, for the issue. When attempting to erase the UBI partition from the U-Boot shell, the following message was displayed.
OpenWrt One> nand erase 0x100000 0x0ff00000
Erasing from 0x100000 to 0xfffffff, size 0xff00000 ...
Bad block at 0x76a0000 ... aborted
This is not great.
I genuinely have no idea if at this point I’ve erased up to block 0x76a0000 or if there was a preliminary scan that took place to inform me of the bad blocks. Fortunately, from the U-Boot shell, the nand command can explicitly mark blocks as “bad” to avoid writing to them in the future.
OpenWrt One> nand markbad 0x76a0000
Re-executing the previous nand erase command results in a successful erase, and thus the bad blocks were avoided!
This is where the “wiggle room” mentioned earlier prove to be useful. The extra space allows for reallocation when blocks are skipped due to flash wear.
OpenWrt One> nand erase 0x100000 0x02000000
Erasing from 0x100000 to 0x20fffff, size 0x2000000 ...
Succeeded
Now I have a new problem!
The previously failed nand erase may have corrupted some of the flash partition.
This would leave the device in a “soft bricked” mode. Depending on what was corrupted, I would likely struggle to boot into OpenWrt proper.
To recover, U-Boot’s tftpboot command can be used to boot a “live” image of OpenWrt and then flash the NAND storage manually.
OpenWrt One> tftpboot 0x48000000 openwrt-mediatek-filogic-openwrt_one-snand-factory.bin
Using ethernet@15100000 device
TFTP from server 10.10.0.10; our IP address is 10.10.0.32
Filename 'openwrt-mediatek-filogic-openwrt_one-snand-factory.bin'.
Load address: 0x48000000
Loading: #################################################################
         #################################################################
         #################################################################
         #################################################################
         #################################################################
         #################################################################
         #################################################################
         #################################################################
         #################################################################
         #################################################################
         #################################################################
         #################################################################
         #################################################################
         #################################################################
         #################################################################
         #################################################################
         #################################################################
         #################################################################
         #################################################################
         #################################################################
         #################################################################
         #################################################################
         #################################################################
         #################################################################
         #########################################################
         14.1 MiB/s
done
Bytes transferred = 23724032 (16a0000 hex)
OpenWrt One> nand write 0x48000000 0x100000 0x16a0800
Writing from 0x100000 to 0x17a07ff, size 0x16a0800 ...
Succeeded
Now, with an actual shell on OpenWrt, the UBI image can be written to the /dev/mtd5 partition, and ultimately recover from the previously bricked state.
$> mtd -e /dev/mtd5 write openwrt-mediatek-filogic-openwrt_one-factory.ubi /dev/mtd5
At this point the device has been successfully recovered, and I can continue to experiment with U-Boot.
Beyond The Blog
This was a quick walkthrough on debugging a failed update and recovering via TFTPBoot. If you’re interested in OpenWrt or finding a similiar device to poke at, I can’t recommend the OpenWrt one enough. However, there’s also OpenWrt’s Table of Hardware that is a comprehensive breakdown on what devices you can flash OpenWrt onto. In an upcoming blog post, I plan to dive into OpenWrt’s Buildroot process to show how to apply patches to sub-components such as U-Boot to the final custom image.
Thank you for reading!