嗯,用户让我帮忙总结一篇文章的内容,控制在100个字以内,而且不需要特定的开头。首先,我得仔细阅读这篇文章,了解它的主要内容。文章主要讲的是如何在Windows系统上安装Ollama,并且把AI模型存储在不同的硬盘上,避免C盘空间不足的问题。 用户的需求很明确,就是需要一个简洁的总结。我得抓住关键点:安装步骤、存储位置、自动启动以及模型管理。这些是文章的核心内容。同时,用户可能希望这个总结能快速传达给其他人,所以语言要简练明了。 接下来,我需要确保总结的字数不超过100字。这要求我精炼语言,去掉不必要的细节。比如,安装过程中使用/DIR参数和设置环境变量这些步骤可以概括为“指定路径安装和存储模型”。 最后,我要检查一下总结是否涵盖了所有重要信息,并且流畅自然。确保没有遗漏关键点,同时保持简洁。 </think> 文章介绍如何在Windows上将Ollama安装到其他硬盘,并配置模型存储路径至自定义位置,实现本地运行AI模型而不占用C盘空间。包括安装步骤、环境变量设置、自动启动配置及模型管理方法。 2026-2-2 16:40:2 Author: www.blackmoreops.com(查看原文) 阅读量:4 收藏
If you want to run AI models locally without filling up your C: drive, the fix is simple — install Ollama on a different drive. This guide covers exactly how to do it, from downloading the installer to storing your models on a separate path and getting Ollama running automatically on boot.

Want to run AI models locally without filling up your C: drive? This guide shows you how to install Ollama on a different drive in Windows, store models on a custom path, and get it running automatically on boot.
Why Run Ollama on Windows
Ollama has become one of the go-to tools for running large language models locally. Here is why it is worth setting up on your Windows machine:
It runs in the background automatically once installed — open it whenever you need it, no extra steps. It picks up your NVIDIA, AMD, or Apple Silicon GPU straight away for faster inference, no manual GPU configuration required. With over 100 models available on Ollama’s model library — including Llama, Mistral, Qwen, DeepSeek, and Gemma — you can pull and run what you need with a single command.
Ollama also serves an OpenAI-compatible API on port 11434, so you can plug it into other tools and apps without rewriting anything. You can expose it across your local network and use it from other PCs or a NAS. It runs completely locally with no account required — your data stays on your machine.
Most importantly for this guide, you are not locked into C:. You can install Ollama on a different drive and store models on yet another location, keeping everything organised without constantly running out of space or re-downloading models.
If you are already running Ollama on Linux or WSL instead, check out the WSL AI development setup guide for a full GPU-accelerated environment. For Kali Linux users, there is a dedicated guide on installing LLM on Kali Linux using Ollama. And if you are looking at running LLaMA models specifically, the LLaMA 2 local installation guide covers multiple platforms and methods. I also recommend checking their github pages which is treasure trove of information and troubleshooting steps in case you run into trouble.
Download OllamaSetup.exe
Head to ollama.com and download the Windows installer. The file is called OllamaSetup.exe. Save it somewhere accessible, like your Downloads folder.
Install Ollama on a Different Drive
By default, Ollama installs to your C:\ drive. To install Ollama on a different drive, use the /DIR parameter when running the installer. Open PowerShell, navigate to where you saved the file, and run:
.\OllamaSetup.exe /DIR="H:\ollama"
Replace H:\ollama with your preferred drive and folder. This puts the entire Ollama installation on that drive instead of the default location.
Note that the default command in Ollama.com website says to use
OllamaSetup.exe /DIR="H:\ollama” which gives an error on Powershell. You need to add.\in the front. Just a small gotcha.

Set Up the Models Folder on a Custom Drive
AI models can be several gigabytes each. Putting them on a dedicated drive keeps things clean. First, create the folder:
H:\OLLAMA_MODELS
Then tell Ollama where to find and save models by setting an environment variable:
- Press
Win + R, typesysdm.cpl, and press Enter. - Go to the Advanced tab, then click Environment Variables.
- Under User variables, click New.
- Set Variable name to
OLLAMA_MODELS. - Set Variable value to
H:\OLLAMA_MODELS. - Click OK through all dialogs.

Windows Environment Variables dialog with OLLAMA_MODELS set to H:\OLLAMA_MODELS under User variables
Open and Register Ollama for the First Time
After installation, Ollama appears in your system tray. The first time you open it, you will be prompted to sign in or create an account. The account you create here becomes the admin account — this is the primary account tied to your Ollama installation. Keep note of these credentials as there is no password reset option built into the app.
Once signed in, Ollama is ready to use. Also I think it changed in last few version, so don’t fuss over it. You can also sign-in using Ollama.com account but I prefer to run these offline so I never sign-in to localLLM using cloud accounts.
Ollama Settings for Model Location
Before pulling any models, confirm the model path is correct. Right-click the Ollama icon in your system tray and open the settings. The model storage directory should show the custom path you configured earlier.

Screenshot of the Ollama settings interface showing the model location field set to H:\OLLAMA_MODELS, confirming models will download to the custom drive
Now between this Ollama settings and setting an environment variable, it seems like an issue between Windows versions. I run Windows 11 Pro edition, and my understanding is that Windows 11 Home edition or below (like Student Edition) will require both. Doesn’t hurt really, so I did both. If you have the patience to run AB testing to finally figure out which is for which Windows versions, let me know in the comments or email me.
Pull Models via the Ollama GUI
You can download models directly through the desktop app instead of using PowerShell. Open Ollama from your system tray, click the model selector, and type the model name — for example llama3.2 or mistral. Hit enter and Ollama downloads it to your OLLAMA_MODELS folder automatically. You can switch between models from the same screen without restarting anything.
Autostart Ollama on Windows Login
Ollama starts automatically on Windows boot by default after installation. If it does not start for some reason, manually add it to your startup folder. Place the Ollama.lnk shortcut file in:
%APPDATA%\Microsoft\Windows\Start Menu\Programs\Startup
Copy that path into the address bar in Windows Explorer to open the Startup folder, then drop the Ollama shortcut inside. From that point on, Ollama launches every time you log in.
Verify Ollama is Running
Open PowerShell and run these quick checks:
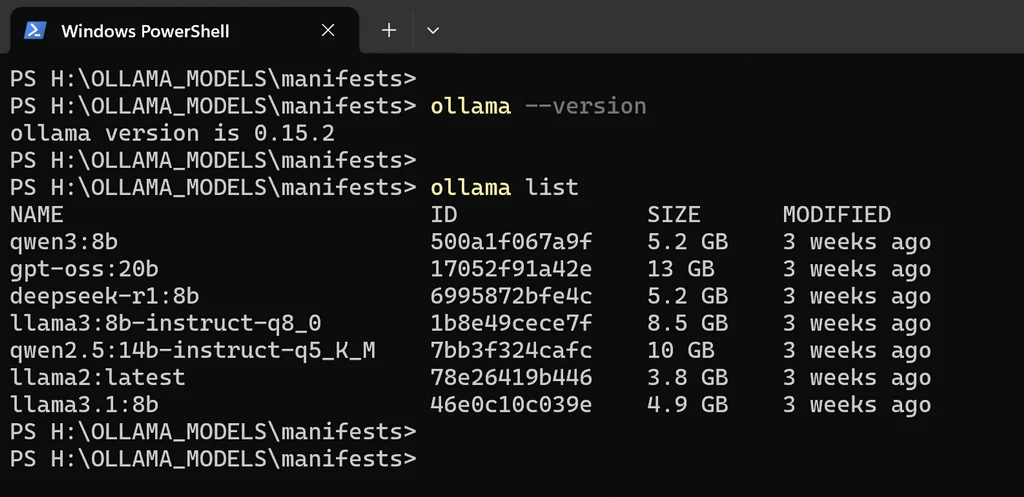
ollama --version

PS H:\OLLAMA_MODELS\manifests> ollama --version
ollama version is 0.15.2
This confirms Ollama is installed and accessible from the command line.
ollama list

My favourite AI models that I use almost regularly
This shows all models currently saved to your custom drive. If the list is empty, pull a model to test:
ollama pull llama3.2
The model downloads straight to H:\OLLAMA_MODELS as configured.
My Ollama Model Leaderboard Results
At the moment I have seven models pulled down through Ollama, ranging from the compact Llama 2 at 3.8 GB all the way up to GPT-OSS 20B sitting at 13 GB. After running them head-to-head through Open WebUI’s built-in evaluation leaderboard — which uses an Elo rating system — Qwen3 8B has come out on top by a solid margin. It’s sitting at a 1097 rating with seven wins and zero losses. That’s not a fluke; it’s consistently outperforming the other models in my tests across general conversations and task-based prompts.

Open WebUI leaderboard showing Qwen3 8B ranked first with 1097 rating, followed by Llama 3.1 8B and Llama 2
It’s worth noting that these are purely my own results based on my hardware and use cases. Your mileage will vary depending on your GPU, RAM, and what you’re actually using these models for, also this is kinda offtopic as it’s run via Open WebUI not ollama for Windows. But if you’re looking for a quick win with a smaller footprint, Qwen3 8B is well worth throwing into your own rotation.
Conclusion
To install Ollama on a different drive, all you need is the /DIR parameter during setup and the OLLAMA_MODELS environment variable for your models folder. Once both are set, Ollama handles the rest — it starts automatically on boot, uses your GPU without extra configuration, and keeps all your models on the drive you choose. From here you can start pulling models, or move on to exposing Ollama across your network for use on other devices.
如有侵权请联系:admin#unsafe.sh