This is part 2 of a multipart blog series on RedELK: Outflank’s open sourced tooling that acts as a red team’s SIEM and also helps with overall improved oversight during red team operations.
In part 1 of this blog series I have discussed the core concepts of RedELK and why you should want something like this. In this blog post I will walk you through integrating RedELK into your red teaming infrastructure. In future parts I will explain the core functionality of RedELK, and on the alarming of detection by blue teams.
In this blog I use the 1.0.1 release of RedELK . You can get it here.
Core concepts of RedELK
RedELK should be regarded as an addition to your red teaming infrastructure. Your operation will continue without RedELK. However, you will soon experience that an ops without RedELK feels like working partly blind.
There are a few core concepts that help you better understand how RedELK works and that help you with an easy deployment:
- A separate RedELK instance is intended per engagement. It is not recommended to mix operational data from multiple engagements into the same RedELK server.
- Each RedELK installation consists of the following three components:
- RedELK server;
- redir package installed on each of your redirectors;
- teamserver package installed on each of your C2 servers.
- RedELK allows you to define different attack scenario names within a single engagement. This is useful for multi-scenario engagements such as TIBER, e.g. scen1, scen2 and scenX. You could also use this to differentiate between different campaigns or otherwise differentiate between multiple goals for the same client, e.g. phisrun1, longhaul, shorthaul4, etc.
- Hopefully you already have the good practice of deploying new infrastructures per red team engagement. You should treat the RedELK server in the same way: install freshly at new engagements. Upgrading or re-installation of RedELK is not supported.
- A RedELK server is of high confidentiality as it stores all operational data as well as all traffic data. You may want to position this in a secured network segment.
- Inbound traffic to a RedELK server is limited to HTTP for the Kibana web interface and TLS-encrypted filebeat->logstash traffic from your redirectors and C2 team servers. A RedELK server initiates outbound rsync traffic to your c2 team servers and HTTP(S) to online security vendor such as Virus Total, abuse.ch, malwaredomains.com, Greynoise, etc.
- The performance impact on your redirectors and C2 team servers is very limited: it is only filebeat that is installed on both, and a little cron script to copy logs to a central directory on the C2 team servers.
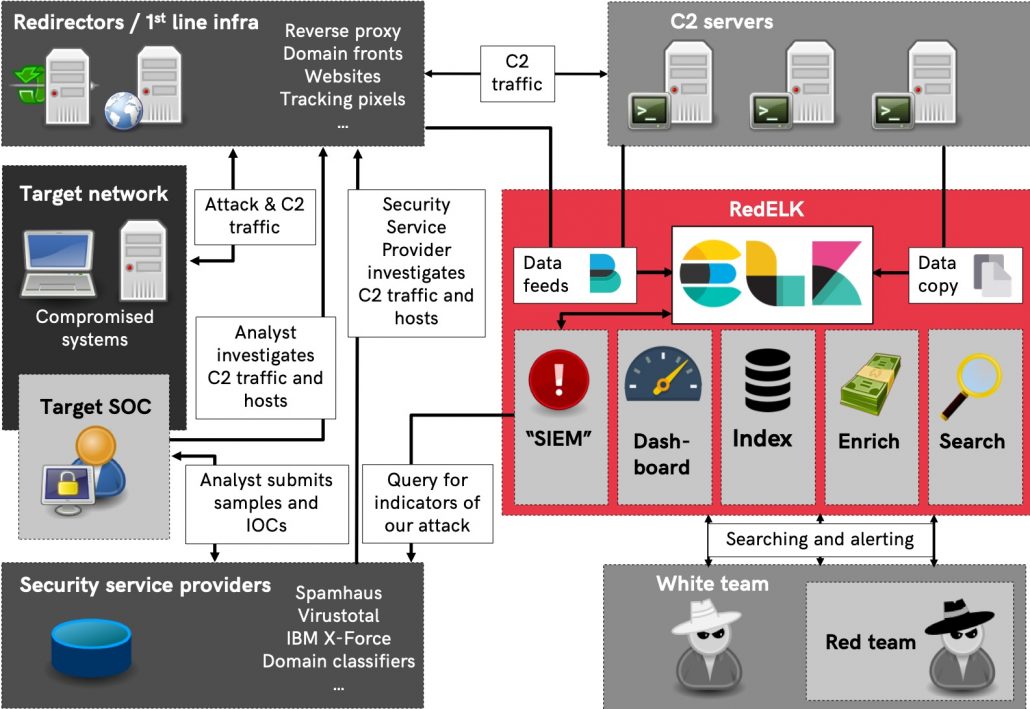
A RedELK server requires beefy hardware. It runs the full Elastic stack, and over time will contain a reasonable amount of data. A dual core CPU and 8GB RAM is recommended. - Redirectors serve as anonymization layer in red team operations. However, in the case of RedELK their purpose is extended to also serve as a logging layer. This means it is recommended to point your Domain Fronting/CDN endpoints to a redirector that you fully control and where you have the RedELK redir package installed. If you point directly to your C2 team server, you miss the traffic data.
The picture below shows a better overview of how the different components interact and how the data flows to and from the RedELK server.

Lab network setup
For this demo, I have setup a lab with the following characteristics:
- Target network with multiple machines.
- Two attack scenarios, one for shorthaul and the other for longhaul.
- Two Cobalt Strike Team servers, each for different purpose
- Two redirectors, one running Apache, the other running HAProxy.
- The Apache redirector is reachable via a Domain Fronting setup using Azure CDN. It sends its C2 traffic to a dedicated C2 server. Decoy traffic is sent to amazon.com
- The HAProxy redirector sends C2 traffic to a different C2 server. Decoy traffic is sent to a decoy website we setup ourselves.
A general overview of the test lab setup can be seen in the picture below. Note that the RedELK server is not included in this overview:

Naming
RedELK has a few requirements to the naming of objects. These are explained indetail on the wiki. In this demo lab I use the following names:
Attackscenario: shorthaul
- CDN entry DNS name:
ajax.microsoft.com - CDN endpoint name:
redelkdemo.azureedge.net - CDN origin hostname:
redira1.totallynotavirus.nl - Apache redir DNS name:
redira1.totallynotavirus.nl - Apache redir FileBeatID:
redira1 - Apache redir frontend name:
http-AzureDF - Apache redir C2 backend name:
c2-c2server1 - Apache redir decoy backend name:
decoy-amazon - C2 server DNS name:
c2server1.totallynotavirus.nl - C2 server FileBeatID:
c2server1
Attackscenario: longhaul
- HAProxy redir DNS name:
redirb1.totallynotavirus.nl - HAProxy redir FileBeatID:
redirb1 - HAProxy redir frontend name:
http-straight - HAProxy redir C2 backend name:
c2-server2 - HAProxy redir decoy backend name:
decoy-staticerror - C2 server DNS name:
c2server2.totallynotavirus.nl - C2 server FileBeatID:
c2server2
RedELK server info
- RedELK server DNS name:
redelk.totallynotavirus.nl
The CDN configuration is shown below. Don’t forget to set the caching behavior to ‘Bypass Cache’ within the Caching Rules rules of the endpoint. There are several blog posts explaining how to do this, including this great post by @rvrsh3ll.

Each Cobalt Strike server requires two things: the Mallable profile, and the listener setup. The Mallable profile I’ve used in this example is based on the same that ships with RedELK, and can be found here. Note that this profile requires you to insert the host header of your Domain Fronting CDN endpoint name. If you don’t want domain fronting you can remove the Host Header Host directive.

The important things with listener setup is to use a HTTP Host that is frontable, and to use the hostname of the CDN endpoint in the Host Header field.

The example above is for the CDN redir-teamserver setup. I have configured the other Cobalt Strike teamserver with a rather basic HTTP listener setup.
With the test lab setup explained, let’s focus on the RedELK specific installation.
Initial installation
First, download RedELK and extract the package. Check with version you get, there may be newer versions available:
curl -L https://codeload.github.com/outflanknl/RedELK/tar.gz/1.0.1 -o redelk_v1.0.1.tgz
tar zxvf redelk_v1.0.1.tgz
Before we can run the installers on the different systems we need to:
- Generate TLS certificates used for the secured traffic between filebeat on redirectors/c2 team servers and the RedELK server
- Generate three installation packages for redirectors, c2 team servers and for the RedELK server.
Both steps are done with the initial-setup.sh script. You can run this initial setup on the RedELK server, but it is also tested macOS clients.
Important note: Make sure to edit the details of the TLS Certificate Authority in the certs/config.cfg file prior to running the script. Make sure to not make typos here: TLS is non-forgiving, resulting in blocked data flows to your RedELK server. Troubleshooting is difficult, so pay attention while performing this step.
In this case I’ve configured the TLS config file to use redelk.totallynotavirus.nl as DNS.1, and I’ve removed the DNS.2 and IP.1 lines.
After editing the TLS config file, run the installer:
./initial-setup.sh certs/config.cnf
Output should look like:

Installation on redirector
In this demo setup I have created two redirectors, one running Apache (used via the CDN), the other running HAProxy for the direct HTTP communication. Both redirectors need the redirs.tgz package generated in the previous step. So copy them over to the remote systems.
Before we can run the installers on the redirectors we need to configure Apache and HAProxy to be more verbose in their logging. This requires a modified config. Luckily RedELK ships with example configs for these extra logging directives, and can be found here. Let’s walk through the required steps.
Redirector setup
I will start with the Apache one. We need to enable required Apache modules, make a new site, configure the new site according to the Cobalt Strike profile and according to the RedELK logging requirements. This can be done as following:
apt-get install apache2
a2enmod rewrite proxy proxy_http proxy_connect ssl proxy_html deflate headers
a2dissite 000-default.conf
curl https://raw.githubusercontent.com/outflanknl/RedELK/master/example-data-and-configs/Apache/redelk-redir-apache.conf -o /etc/apache2/sites-available/redelkdemo.conf
Now open Apache config file, change the two occurrences of $$IP_OF_YOUR_C2SERVER to your C2 team server’s address (in my case c2server1.totallynotavirus.nl), define a friendly hostname (in my case redira1) and make sure to configure an informative name for the frontend (in my case www-http) and for the backends (in my case decoy and c2). See example in screenshot below.

Enable the site and start apache:
a2ensite redelkdemo.conf
service apache2 restart
As traffic hits your redirector the log file /var/log/access-redelk.log should be filled.
Now it is time to run the RedELK redir installer. Copy the redirs.tgz package from the initial setup step over to your redirector. Extract the tgz file and run the following command:
install-redir.sh $FilebeatID $ScenarioName $IP/DNS:PORT
In my case I ran:
./install-redir.sh redira1 shorthaul redelk.totallynotavirus.nl:5044
The installer should exit without errors, and filebeat should be started. Note that the filebeat log file will report errors as the RedELK server isn’t configured yet so the incoming Filebeat traffic is not acknowledged.
The setup of the HAproxy redirector is largely similar. You can find an example config here. The RedELK installer command I ran is:
./install-redir.sh redirdb1 longhaul redelk.totallynotavirus.nl:5044
Installation on C2 team server
The installation on the Cobalt Strike C2 teamservers is rather straight forward. Copy the teamservers.tgz package to the teamserver and run the installer using:
install-teamserver.sh $FilebeatID $ScenarioName $IP/DNS:PORT
These parameters should sound familiar. 🙂
I’ve ran the following command:
./install-teamserver.sh c2server1 shorthaul redelk.totallynotavirus.nl:5044
Important note: you want to keep the $ScenarioName the same as used during installation on the redirector. If you’ve failed to do so, or want to rename the scenarioname or the host at a later moment, just edit the fields in the /etc/filebeat/filebeat.yml file.
The installation on the other c2 team server is roughly the same, of course using FilebeatID c2server2 and scenario name longhaul.
Installation on RedELK server
The installation on the RedELK server requires no parameters. Just copy and extract the elkserver.tgz file, and run:
./install-elkserver.sh
You should see something like this.

As the installer tells you, there are a few mandatory things left to do:
- edit the configuration
/etc/cron.d/redelk. This is required to rsync the Cobalt Strike logs, screenshots, downloaded files, etc to the local RedELK server. This *greatly* enhances ease of use during the ops. - edit the configuration files in
/etc/redelk/. I recommend at least thealarm.json.confif you want alarms, andiplist_redteam.confto define what external IP addresses are used for testing purposes and you naturally don’t want alarms on. But please check out all the details as also described at the RedELK wiki
See below screenshots for the edits in my example.


Test the access
Browse to the HTTP port of the RedELK server. Login with your own creds, or use the default redelk:redelk. As soon as data is flowing you should find data in the indices.

Do you see data? Great! In the next blog post I will walk you through the specifics.
Troubleshooting
Still no data there? Here are some troubleshooting tips.
- Did any of the installer packages report any error? If so, check the local installer log file.
- Did you use the correct name for the TLS setup in the
initial-setup.shscript? - Did you point filebeat to the correct DNS name or IP address? Check
/etc/filebeat/filebeat.ymlfor the value ofhosts. The value should match to something listed asDNSorIPin the TLS config file for theinitial-setup.sh. - Is Filebeat correctly sending data? Check
/var/log/filebeat/filebeaton redirs and teamservers. Sadly, the exact error messages are cryptic at best. In our experience, most often it comes down to a TLS-DNS-certificate mismatch. - Is Logstash on the redelk server reporting errors in
/var/log/logstash/logstash-plain.log? - Are there any beacons running, and/or is there traffic flowing to your infra? If not, well, RedELK doesn’t have any data if there is no data 🙂
- “It is not DNS. It can’t be DNS. Ah crap, it was DNS.” Make sure the DNS records are correctly configured.
- Check the wiki of the project.
- Still having issues? Create an issue at GitHub.