文章讨论了网站安全的重要性,并提供了一个全面的安全测试和持续监控策略。包括外部扫描、配置检查、DNS验证、服务器扫描等步骤,并强调定期备份和使用防火墙的重要性。 2025-12-15 23:7:45 Author: blog.sucuri.net(查看原文) 阅读量:10 收藏
Many website owners follow a similar “security plan,” even if they don’t call it that. They launch the site, add a couple of plugins, and just hope nothing goes wrong.
The issue is that modern website hacks don’t make themselves obvious. Instead, they show up as small signs, like a redirect that only affects mobile users, a hidden credit card skimmer in a template file, silent SEO spam that hurts your rankings, or a DNS change that quietly reroutes your email.
A real security strategy has two parts:
- A security test (a focused checkup that tells you where you stand today).
- Continuous monitoring (an early warning system that tells you when anything changes tomorrow).
This post explains a practical, repeatable way to do both, without making it a week-long project.
What running a security test actually means
A website security test isn’t one tool, one scan, or one report. It’s a short sequence of checks that answers four questions:
- Is my site currently compromised or showing indicators of compromise?
- If something is wrong, where is it likely hiding—front-end content, server files, database, DNS, or configuration?
- Is my site’s security posture making an attack more likely (weak headers, outdated software, exposed admin paths, etc.)?
- If an incident happens, will I detect it quickly and recover cleanly?
The main point is that a “test” is just a snapshot. It’s useful, but it becomes outdated as soon as you deploy new code, add a plugin, change DNS, or update a certificate.
That’s why you should finish the test by setting up continuous monitoring.
Step 1: Define your scope so you don’t miss the real target
Before you scan anything, list what “your website” actually includes:
- example.com and www.example.com (configuration varies)
- Any important subdomains (like shop., app., cdn., staging.)
- Your login/admin area (WordPress
/wp-admin/, etc.) - Your public forms and checkout flows
Step 2: Run an external malware and reputation scan
Start with what the public (and search engines) can see.
A remote scanner will typically look for things like injected JavaScript, malicious iframes, defacements, suspicious redirects, and signs of spam. It can also surface whether your domain is showing up on major blocklists.
If you want a fast first pass, run a scan with a tool like SiteCheck.

External scanning is still important, even for technical users, because attackers often use conditional payloads that only show bad content to certain devices, IP addresses, referrers, or user agents. A good remote scanner will act like a normal visitor in different ways, making it more likely to catch these tricks.
What you’re looking for here isn’t just a big red “infected” warning. Pay attention to details:
- New external script sources you don’t recognize
- Strange HTML injected into headers/footers
- Redirect chains you didn’t configure
- Unexpected references to pharma/gambling keywords
- Pages that look normal in your browser but different in the scanner output
If the external scan comes back clean, don’t celebrate just yet. Remote scanners can’t catch everything.
Step 3: Check your blocklist status where it actually matters
Many site owners are surprised when they fix their site, but traffic doesn’t recover because their domain is still flagged.
In addition to whatever your security scanner reports, it’s worth checking your status with major browser/search ecosystem signals. Google’s Safe Browsing site status tool is a common one to verify.
And if you use Google Search Console, review the Security issues report, because it’s one of the first places Google will tell you about hacked content or harmful behavior.

The goal is not to rely on just one provider, but to reduce blind spots. If your site is compromised, you want several smoke detectors to alert you.
Step 4: Run a configuration test (TLS + headers)
Many website hacks start from configuration problems, like weak TLS settings, missing security headers, or browser policies that make it easier for attackers.
Two quick, public checks can surface common issues:
- Test TLS configuration with SSL Labs.
- Test HTTP security headers with Mozilla Observatory (MDN).
You can also do a fast header review with securityheaders.com.
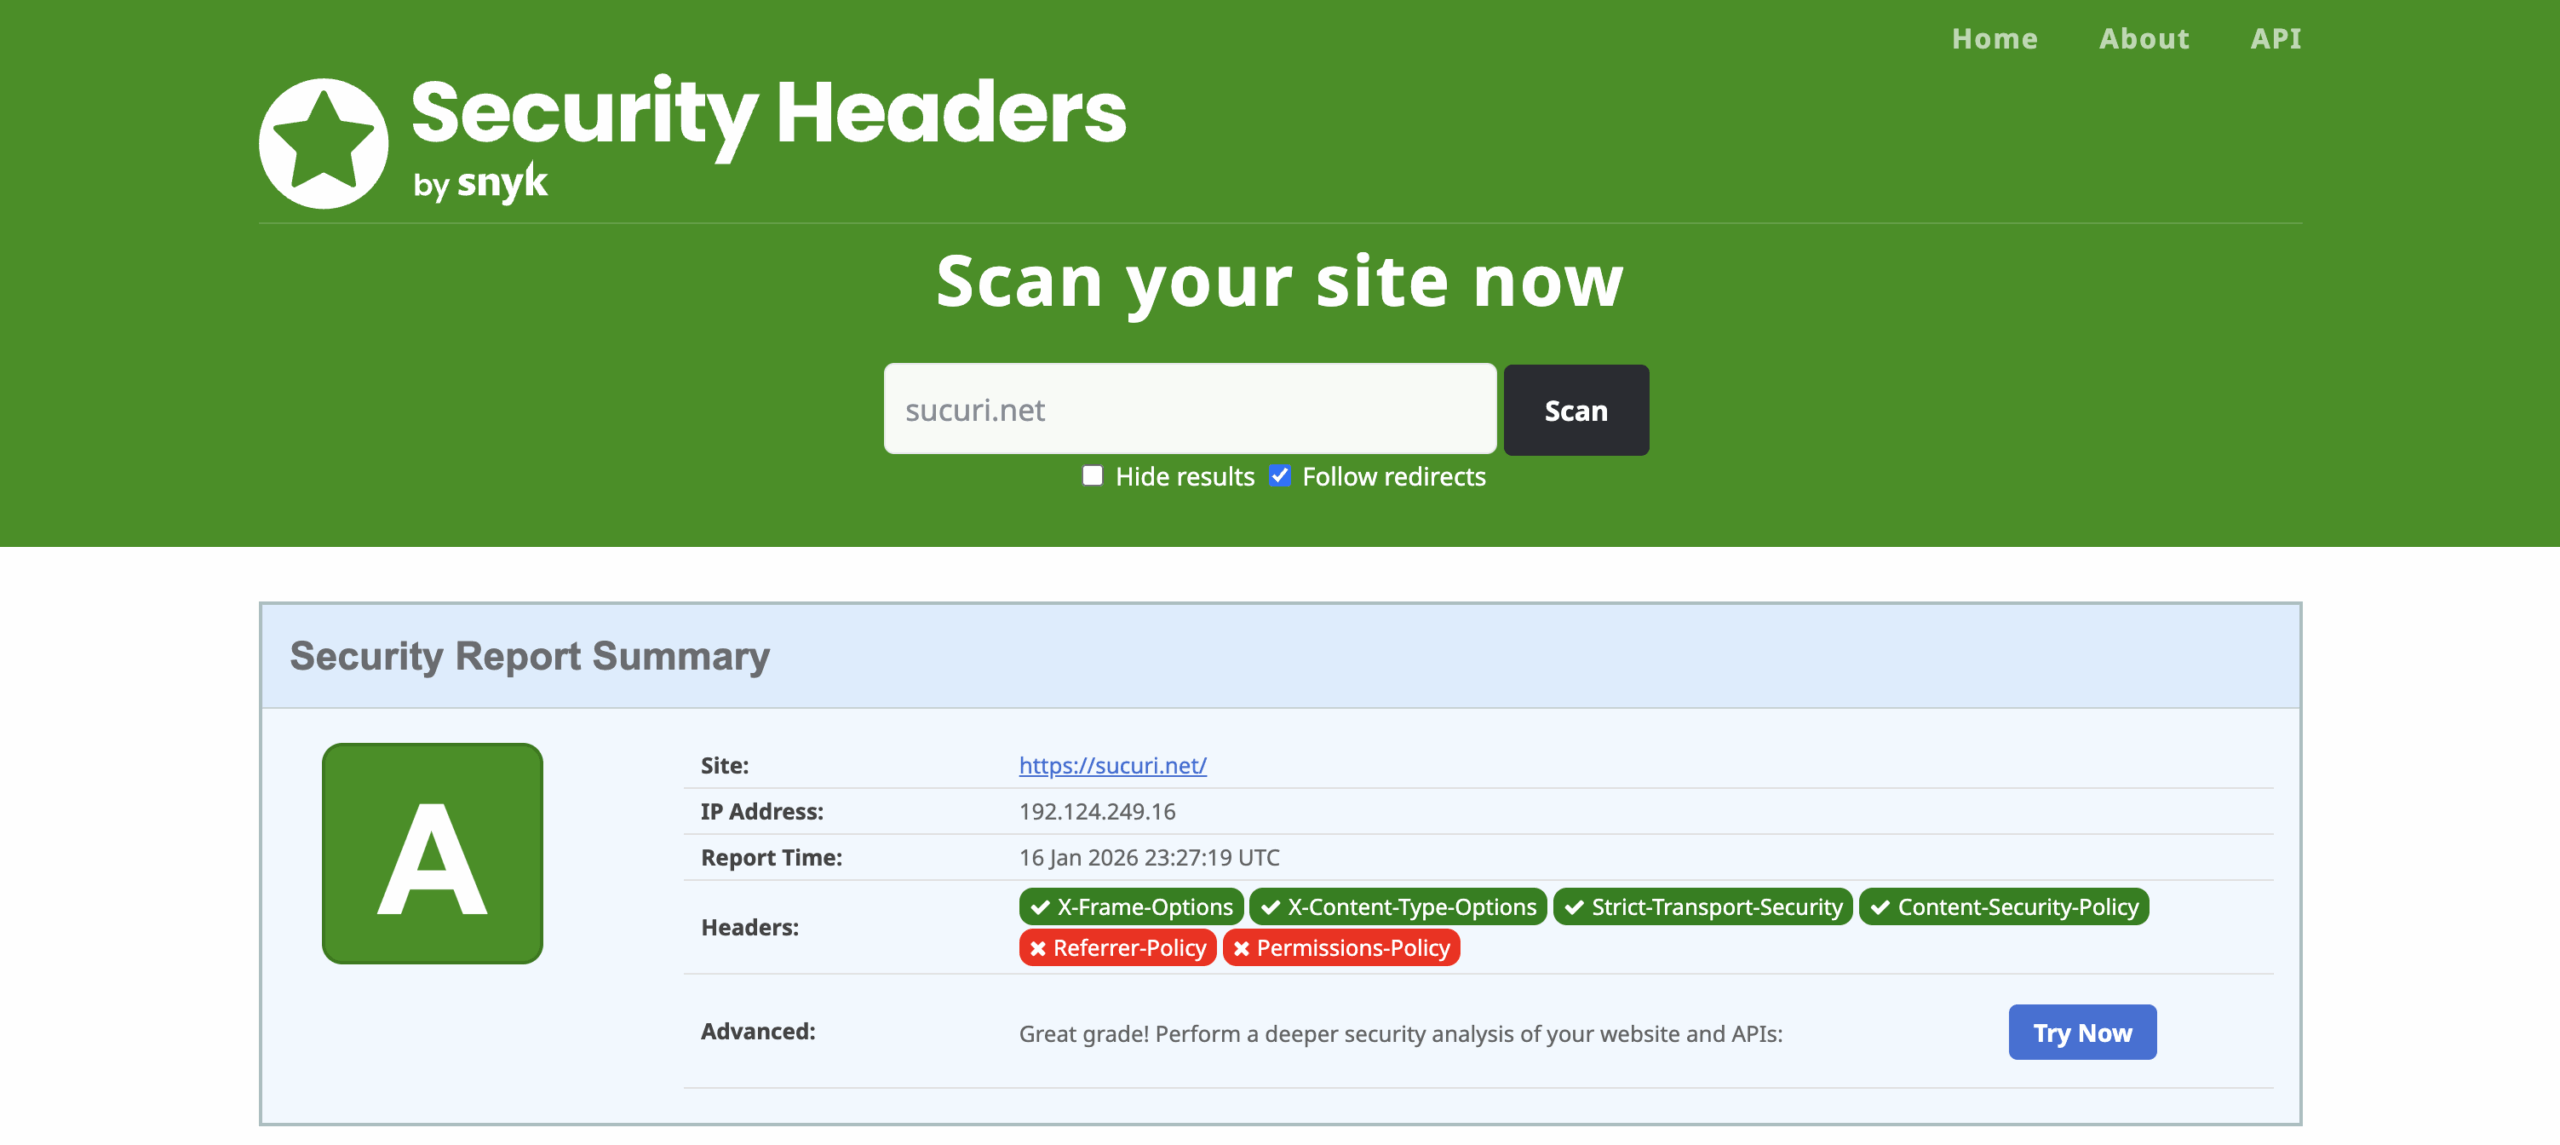
If you’re unsure what to do with the results, don’t worry about getting a perfect score. Focus on the headers and settings that actually reduce risk for your site, like a good Content Security Policy for payment sites or HSTS for sites that should always use HTTPS.
Think of this step as basic security hygiene. It won’t replace malware detection, but it can definitely stop some attacks from being easy.
Step 5: Verify DNS hasn’t drifted or quietly changed
DNS changes are common and easy to miss, especially if several people or vendors have access to your registrar and hosting accounts.
A simple security test question:
“Are my DNS records exactly what I expect them to be today?”
Look for unexpected:
- A record changes (traffic rerouted)
- CNAMEs changes (subdomain hijinks)
- Nameserver changes (full domain takeover risk)
- MX record changes (email interception/spoofing headaches)
If you use a WAF or CDN, this step becomes even more important because DNS is how you ensure traffic is really passing through your protective layer.
Step 6: Server-side scanning + FIM
Even if your external scan is clean, your website might not be.
A lot of real-world infections live entirely on the server:
- PHP backdoors that never render in HTML
- Mailer scripts used for spam campaigns
- Payloads stored in “ignored” directories
- Malware designed to execute only under certain conditions
- Rogue cron jobs or dropped files that aren’t publicly accessible
This is why server-side scanning and File Integrity Monitoring (FIM) are important.
FIM works by establishing a baseline (a known-good snapshot) and then detecting changes in file content, permissions, or ownership. That’s useful not only for catching intrusions, but also for diagnosing “what changed?” when your site suddenly breaks after an update.
It’s also more important for compliance now. Many security standards, including payment security frameworks, expect you to detect unauthorized file changes.
If you’re using Sucuri, this is exactly what the Server Side Scanner is designed for, scanning the file system and tracking file changes so you have an audit trail.
Step 7: Turn your one-time test into continuous monitoring
This is what separates “I ran a scan” from “I run a secure site.”
Continuous monitoring means you’re watching the things that tend to change when an attacker is active:
- Website malware/IOC signals (front-end and server-side)
- File changes (FIM/audit logs)
- Blacklist status
- Uptime (availability and unexpected outages)
- DNS and SSL certificate changes
The best setup depends on how often your site changes. A static marketing site and a busy online store have very different risks.
A simple rule of thumb:
- If you deploy often, monitor more frequently and expect “normal change noise.”
- If you rarely deploy, treat file and DNS changes as higher-suspicion events.
Monitoring doesn’t help if alerts go to an inbox no one checks. Send alerts to where your team will actually see them, like email, SMS, Slack, or a webhook. Then test to make sure the alerts work.
Step 8: Put a protective layer in front and prove it’s active
Even with monitoring in place, prevention is important. A Web Application Firewall (WAF) stands between your visitors and your server, blocking malicious traffic before it reaches your site.
A WAF is especially useful for stopping threats that never go away, such as:
- Brute force attempts
- Vulnerability probing
- Injection attacks (SQLi, XSS, LFI/RFI patterns)
- Credential stuffing
- DDoS activity (depending on the network and plan)
When testing internal domains, HTTPS or HSTS settings can make things tricky. If your site forces HTTPS everywhere, you might need to temporarily relax that rule to test the internal domain, then turn your preferred HTTPS settings back on once you’re done.
Also, keep in mind that DNS changes don’t take effect right away. There will be a period when some visitors see the old site and others see the new one.
The step that separates “protected” from “looks protected”
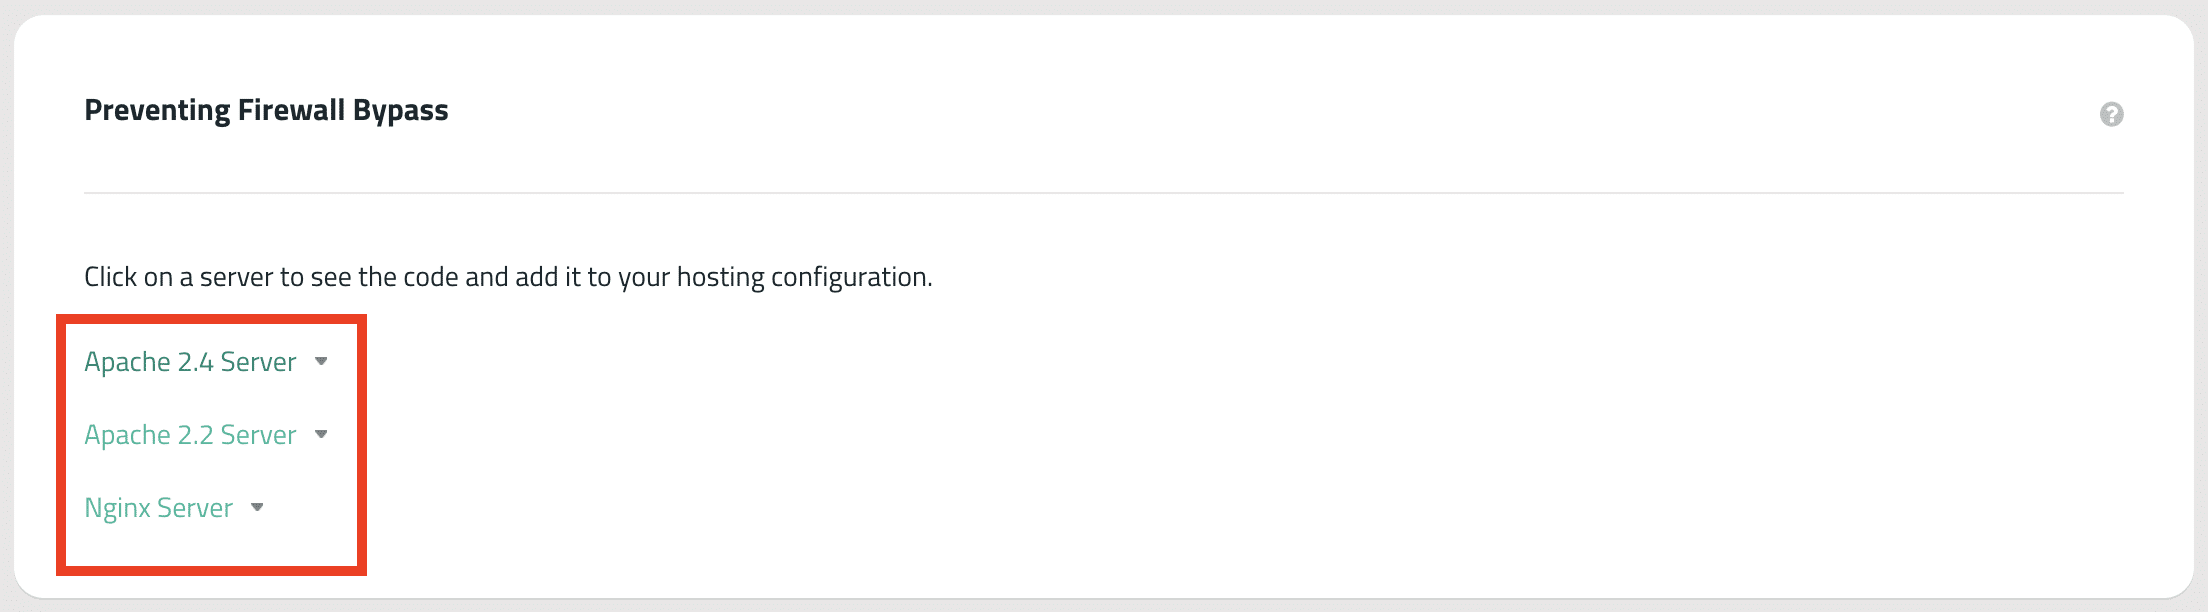
If an attacker can hit your origin server directly (because they know the hosting IP), they can potentially bypass your WAF entirely.
After you activate a firewall, take the extra step to restrict access to your origin server so only the WAF network can reach it. This is one of the most overlooked but effective actions you can take, especially for sites that have been targeted before.
Step 8: Backups are part of security, not a separate project
Even with the best monitoring and prevention, you can’t eliminate all risk. If you can’t restore your site, you could face a long outage after just one bad day.
What to validate during your “security test” phase:
- You have offsite backups (not only on the same server)
- You’re backing up both files and databases
- Your backup schedule matches your business needs (daily for ecommerce, maybe weekly for smaller brochure sites)
- You’ve tested at least one restore path (even to a staging environment)
Backups might seem boring, but they’re the only thing that can quickly get you out of trouble when something goes wrong.
A practical cadence that works in the real world
If you want a routine your team will actually stick to:
- After every deployment: quick external scan + spot-check key pages
- Weekly: review monitoring alerts, file change logs, and uptime trends
- Monthly: TLS/header re-test, plugin/theme inventory review, access review
- Quarterly: restore drill (prove you can recover), DNS review, admin hardening review
The key is to be consistent. A perfect security plan that no one follows is worse than a simple plan you stick to every week.
Bringing it all together with Sucuri
If you’re using Sucuri, you can translate everything above into a concrete setup pretty quickly:
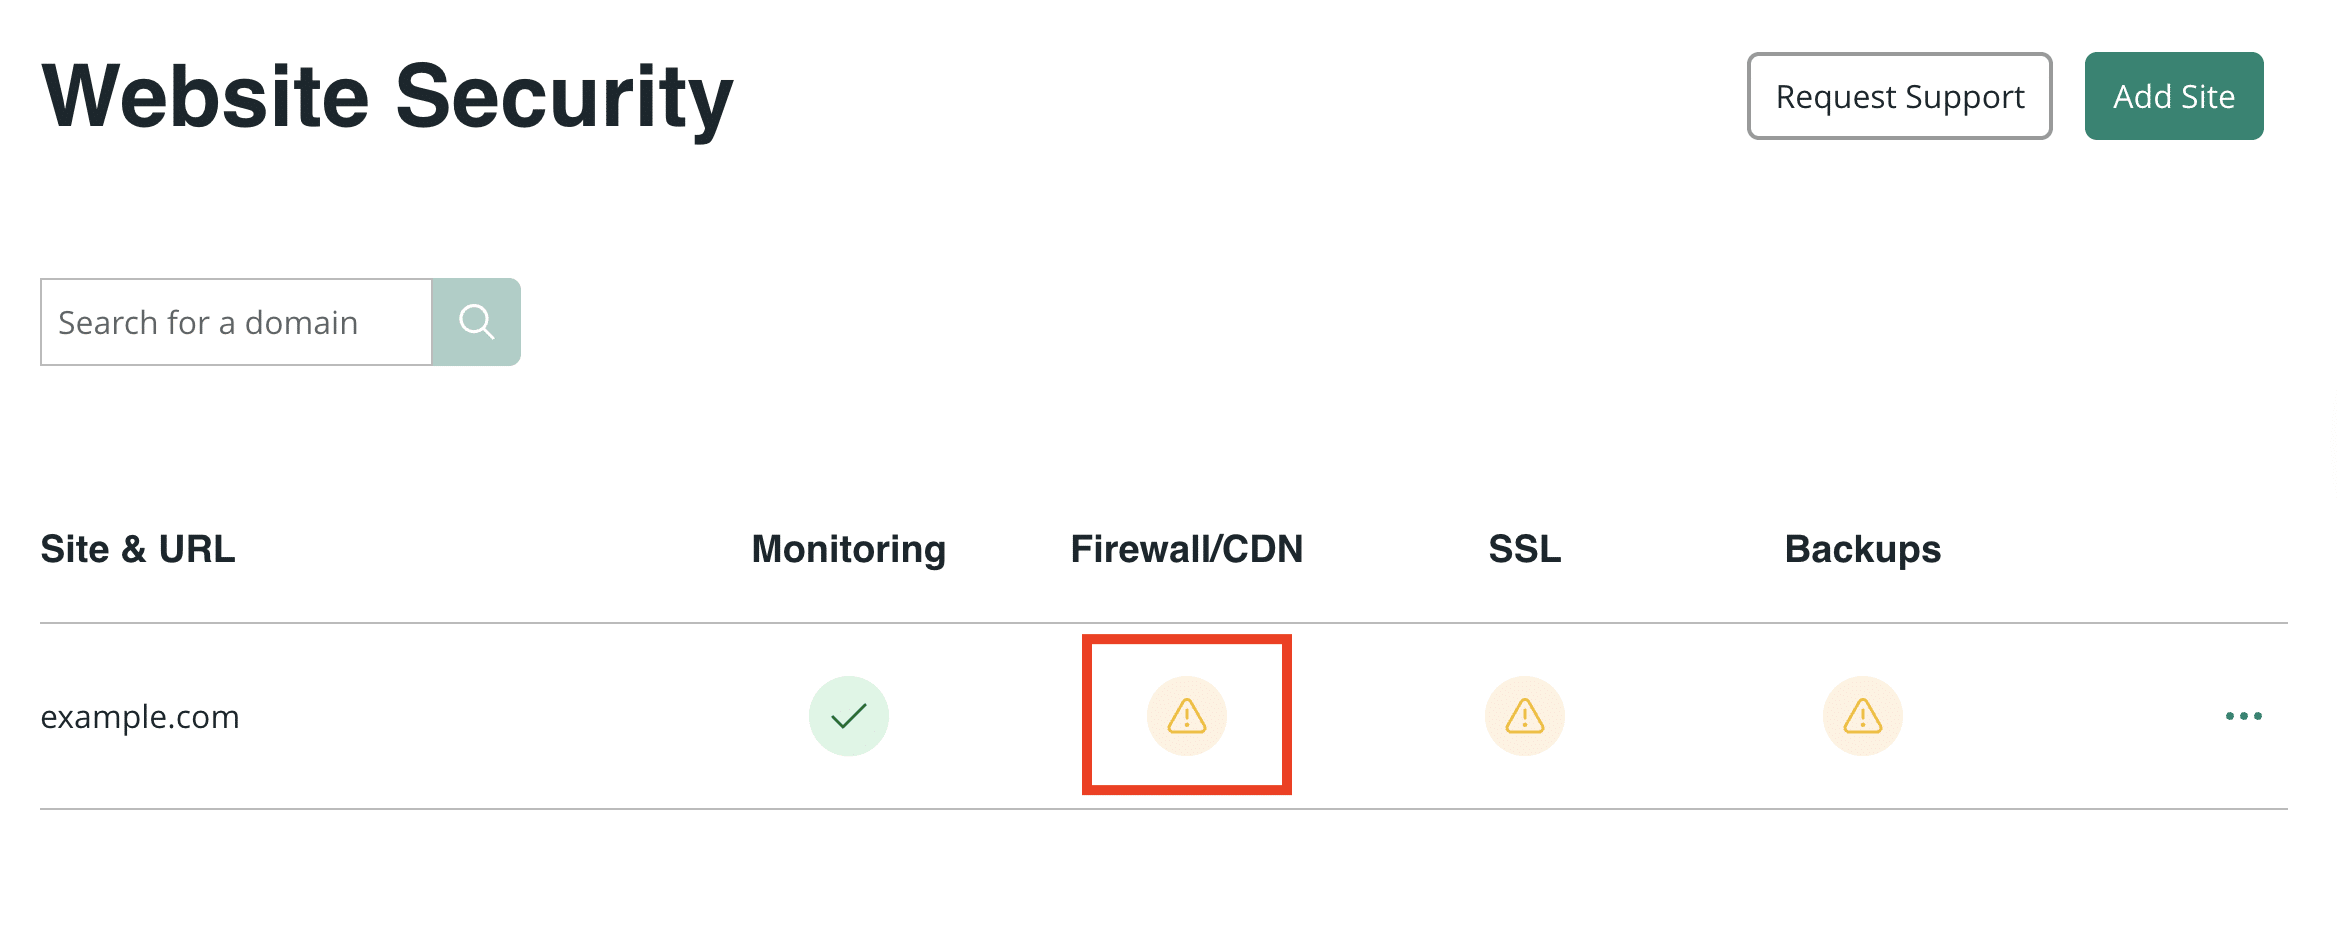
Add your site to Website Monitoring in the dashboard.

Enable the Server Side Scanner (preferably via SFTP) so you get deeper detection plus file-change visibility.

Choose your monitoring types & frequency so the monitoring matches how your site changes.

Activate the Sucuri Website Firewall and complete DNS changes so protection is in place:
- Select the Firewall icon in your Sucuri dashboard.
- Add your site and generate a firewall endpoint (IP).

- Test the “internal domain” version to confirm the cached copy loads correctly.
- Change DNS so your domain points to the firewall.
- Allowlist the firewall IPs at the host level if your server firewall might block caching.
- After activation, take the extra step to prevent firewall bypass by restricting origin access.


If you need help at any point, Sucuri support can be reached via the support portal.
If you want the full “getting started” walkthrough in one place, our detailed guide lays out the setup flow end to end.
One last piece of tough advice: don’t stop at “installed” or “activated.” The goal is to make sure everything works. Test the setup, verify alerts are arriving in the intended channels, confirm your firewall is active, and simulate a data restore to ensure you can recover smoothly in the event of an issue.
By covering these points, you effectively turn your security from wishful thinking into a real system.

如有侵权请联系:admin#unsafe.sh