好的,我现在需要帮用户总结这篇文章的内容,控制在100字以内,并且不需要特定的开头。首先,我得通读整篇文章,抓住主要信息。 文章主要讲的是身份和访问管理(IAM)在现代工作中的重要性,以及企业在扩展过程中遇到的挑战。特别是临时访问权限(JIT)的问题,比如手动处理导致响应慢、权限积累和审计困难。 接着,文章介绍了一个预建的工作流解决方案,使用Tines平台来自动化临时访问权限的申请、审批、授予和撤销。这个工作流整合了Jira、Okta和Slack等工具,确保了快速响应和自动撤销权限,从而提高了安全性和效率。 最后,文章还提到如何配置这个工作流,包括导入模板、连接工具、设置表单和策略等步骤。 总结起来,文章的核心是通过自动化解决IAM中的临时访问问题,提升效率和安全性。我需要用简洁的语言表达这些要点,并控制在100字以内。 </think> 文章探讨了身份与访问管理(IAM)在现代工作中的重要性,并指出企业在扩展过程中面临的挑战。临时访问权限(JIT)的管理尤其困难,涉及响应速度慢、权限积累及审计问题。文中介绍了一个预建的工作流解决方案——Grant Temporary Application Access,通过自动化流程实现快速审批、即时授权及自动撤销权限,提升效率与安全性。 2026-1-15 15:15:16 Author: www.bleepingcomputer.com(查看原文) 阅读量:0 收藏

Whether it’s logging into email, provisioning a virtual machine, or accessing a CRM platform, Identity and Access Management (IAM) is the digital backbone of work.
Yet, as organizations grow, the controls meant to safeguard these identities often fail to keep pace with the scale, speed, and complexity of today’s environments.
A common friction point in this landscape is granting temporary access, or Just-In-Time (JIT) access, to sensitive applications. IT teams are often caught in the middle: business units expect immediate access to maintain productivity, while security teams and auditors demand zero gaps and clear trails.
This article explores a pre-built Tines workflow designed to solve this specific challenge: Grant Temporary Application Access. The workflow helps teams balance speed with security through orchestration.
The problem: scaling access equals scaling risk
"Scaling access equals scaling risk," notes Stephen McKenna, IT Operations Technician at Tines in a recent blog post on IAM orchestration. Every "joiner, mover, or leaver" event spawns a chain of changes.
In many organizations, these changes are handled manually across patchwork systems. Some applications plug into Single Sign-On (SSO) quickly, while others require manual provisioning.
When a user needs JIT access, perhaps a developer needs production access for debugging, or a contractor needs entry for a specific project, the manual process often looks like this:
- Slow Response Times: The user submits a ticket, which sits in a queue until an analyst sees it.
- Permanent Privilege Creep: Once access is granted, analysts often forget to revoke it. "Temporary" access becomes permanent, leading to privilege accumulation that attackers can exploit.
- Audit Nightmares: Evidence of who approved the access, when it was granted, and when it was revoked is scattered across emails, Slack messages, and ticket comments.
Without orchestration, accounts linger and privileges pile up.
How Orchestration is Reshaping IT Infrastructure
Learn how modern IT Ops teams use orchestration to manage capacity, improve reliability, and scale infrastructure without burnout.
This practical guide shows how to replace manual workflows with predictable, automated operations using the tools you already have.
The solution: automated, time-bound provisioning
The Grant Temporary Application Access workflow automates the entire lifecycle of a JIT access request.
By orchestrating tools like Jira Software, Okta, and Slack, the workflow ensures that access is granted quickly, approved properly, and, most importantly, revoked automatically when the time is up.
Here is an overview of how the workflow operates:
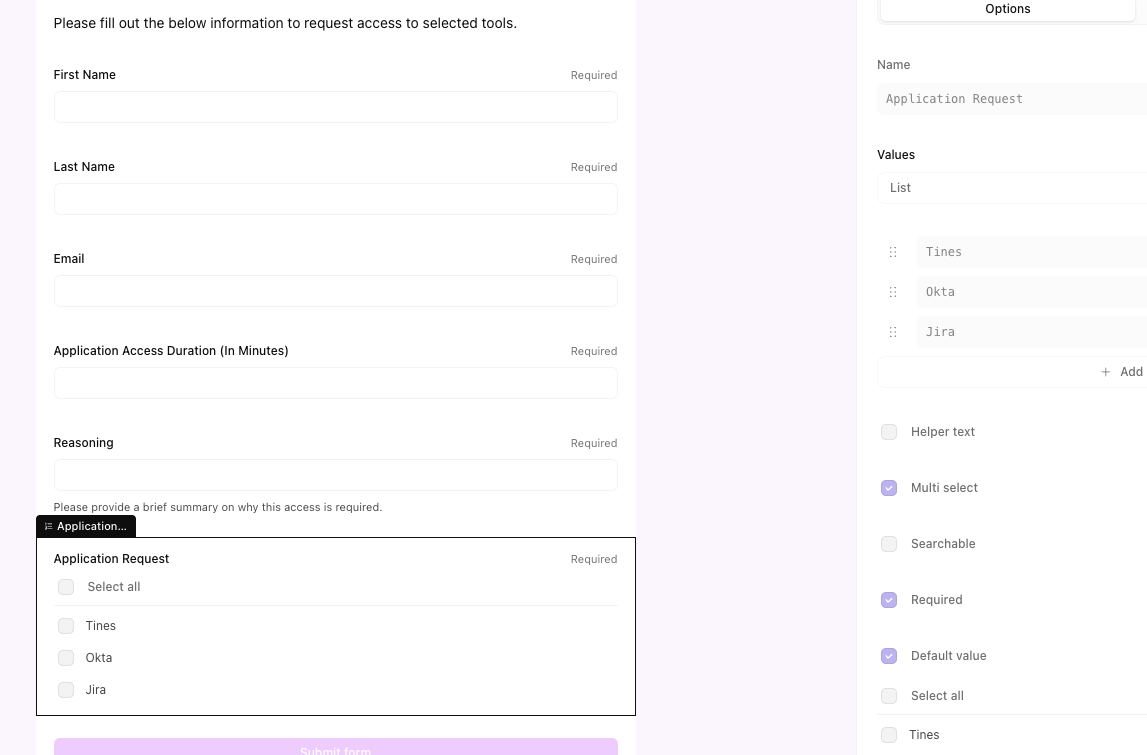
1. Self-Service Request Instead of sending an email or DM, the user visits a Tines Page—a simple, drag-and-drop web form. They select the application they need (e.g., "AWS Production Console"), the duration of access required (e.g., "2 hours"), and the business justification.
2. Automated Approval Routing Upon submission, Tines automatically identifies the user’s manager or the application owner. It sends a rich notification via Slack (or Microsoft Teams) to that approver. This message contains the request details and interactive "Approve" or "Deny" buttons.
3. Instant Provisioning If approved, the workflow triggers an API call to Okta. It adds the user to the specific Okta group associated with that application. This happens instantly—no manual clicking by an IT admin required. Simultaneously, a ticket is created or updated in Jira Software to log the approval for compliance purposes.
4. The "Time-Out" This is the crucial security step. The workflow enters a "wait" state for the duration specified by the user (e.g., 2 hours).
5. Automatic Revocation Once the timer expires, Tines wakes up and performs the cleanup. It calls the Okta API again to remove the user from the group, effectively revoking access. Finally, it updates the Jira ticket to "Closed" and notifies the user via Slack that their session has ended.
The benefits
Implementing this intelligent workflow delivers immediate value across three key pillars:
- Enforced Least Privilege: By automating the revocation of access, you eliminate the risk of "lingering accounts." Access is granted only for the exact time needed, reducing the attack surface.
- Audit-Ready Compliance: Every step—request, approval, provisioning, and revocation—is logged automatically in Jira. When auditors ask for evidence of access controls, you have a single source of truth without chasing down screenshots.
- Improved User Experience: Users get access in minutes, not days. They don't have to wait for an admin to return from lunch to click a button in Okta.
- Efficiency: IT analysts are freed from the repetitive "click-ops" work of adding and removing users from groups, allowing them to focus on higher-value security tasks.
Configuring the workflow
You don't need to start from scratch. This workflow is available as a pre-built story in the Tines Library.
Step 1: Import the Story: Visit the Tines Library and search for Grant temporary application access. Click "Import" to bring the template into your tenant.
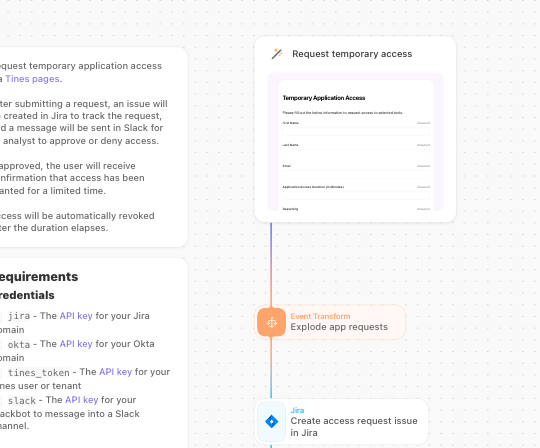
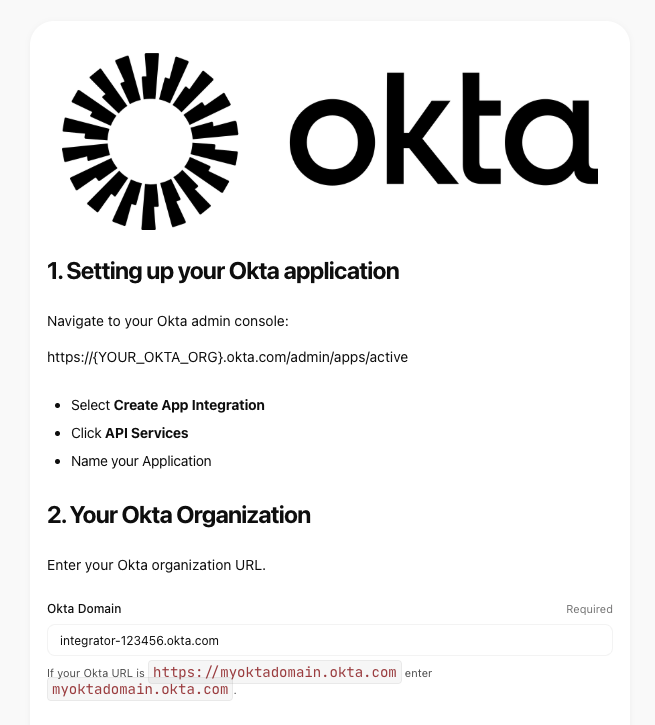
Step 2: Connect Your Tools: The workflow relies on Credentials to talk to your external tools. You will need to connect:
- Okta: To manage group memberships.
- Jira Software: To track requests and approvals.
- Slack: For notifications and interactive approval messages.
Step 3: Configure the Tines Page: Open the "Page" element in the workflow. You can customize the form fields to match your organization's specific applications. For example, you might create a dropdown menu listing "Salesforce Admin," "AWS Write Access," and "GitHub Admin."
Step 4: Set Your Policies: Adjust the logic to fit your security policies. You might want to cap the maximum duration at 4 hours or require a second level of approval for highly sensitive apps. Because Tines is flexible, you can drag and drop these additional logic blocks right onto the canvas.
Step 5: Test and Publish: Run a test request to ensure the Slack notifications fire and the Okta group changes occur as expected. Once verified, publish the Page and share the link with your team.
To try this workflow for yourself, you can sign up for a free Tines account.
Sponsored and written by Tines.
如有侵权请联系:admin#unsafe.sh