One of the management options Jamf Pro provides with Blueprints is the ability to create and dep 2025-11-26 20:28:0 Author: derflounder.wordpress.com(查看原文) 阅读量:21 收藏
One of the management options Jamf Pro provides with Blueprints is the ability to create and deploy custom declarative declarations to managed Macs. What this means that if you can manually build the JSON payload for a DDM declaration, you should now be able to deploy it using Blueprints even if Jamf does not yet have a Blueprint template available yet for that declaration. This is conceptually similar to Jamf Pro’s ability to deploy custom configurations in management profiles to macOS using the Application & Custom Settings management profile payload
For more details, please see below the jump.
For this example, I am using the following custom declaration to set disk management settings. Blueprints also has a declaration template for disk management, but using a custom declaration to deploy disk management settings allows the use of an example where that declaration is all in one JSON payload and doesn’t need to refer to other components (an example of a declaration which needs to refer to other components is a service configuration declaration deploying a sudo configuration, where files need to be downloaded from an external source.)
In this case, the declaration is setting the following disk management settings:
- External storage devices are disallowed: the system can’t mount any external storage.
- Network storage is disallowed: the system can’t mount any storage from a network server.
As of Jamf Pro 11.22.1, there is not a Blueprints template available for creating blueprints which deploy custom declarations so the blueprint will need to be configured manually. To do this, use the following procedure:
1. Log into Jamf Pro.
2. Select Blueprints
3. Click the Create blueprint button.

4. You should see an unconfigured Blueprint. Click where it says Untitled blueprint and provide a name.

For this example, I’m using Disk Management Settings.

5. Scroll down in the list on the left-hand side of the browser window to locate the Custom Declarations component.

6. Click on the Custom Declarations component and drag the Custom Declarations component to the Declaration group section.

7. Once added to the Declaration group section, click anywhere on the Custom Declarations component to open it for editing.
When the Custom Declarations component opens for editing, there is an explanation about custom configurations and a warning that using custom configurations can come with risks and to carefully test all configurations built using the Custom Declarations component before deploying them in a production environment.
8. Once you’ve read through the warnings and understand the potential risks, click the Get Started button.

9. Click the Add item button. The custom declarations settings will open and show a set of placeholder settings.


Before continuing further, if you have not already, I strongly recommend reading the Creating a Custom Declaration Blueprint documentation to understand all the parts involved in creating a custom declaration using the Custom Declarations Blueprints component.
In the Kind field of the Custom Declarations component, there are two choices:
- Configuration
- Asset
Configuration: Settings and policies that define how devices should be configured, functioning similarly to profile payloads.
Asset: Data used by configurations such as certificates, configuration files, scripts or other data supported for use in a DDM declaration.
For our example, we’re choosing Configuration.
In the Channel field of the Custom Declarations component, there are two choices:
- System
- User
System: applies management settings to the device.
User: applies management settings to the MDM-managed user or users.
For our example, we’re choosing System.
In the Type field, enter the declaration type.
For our example, we’re using the declaration type for disk management: com.apple.configuration.diskmanagement.settings
In the Payload field, enter the configuration of the declaration in JSON format. For our example, here’s the configuration we’re using:
10. Once the Kind, Channel, Type and Payload settings have been configured and verified, click the Update button.

11. Verify that all settings look as expected, then click the Save button.

12. At this point, you should have a blueprint which has all settings configured but where no target scope has been set. To scope this blueprint, go to the Scope section and click the arrow button.

13. Select a Jamf Pro smart or static group. For this example, I’m selecting a static group named Disk Management Deployment Group.

14. Once everything has been configured, click the Deploy button to deploy the changes to the Macs you want to manage.

15. Once deployed, the Blueprints screen in Jamf Pro should show the newly-created Disk Management Settings Blueprint as being deployed.

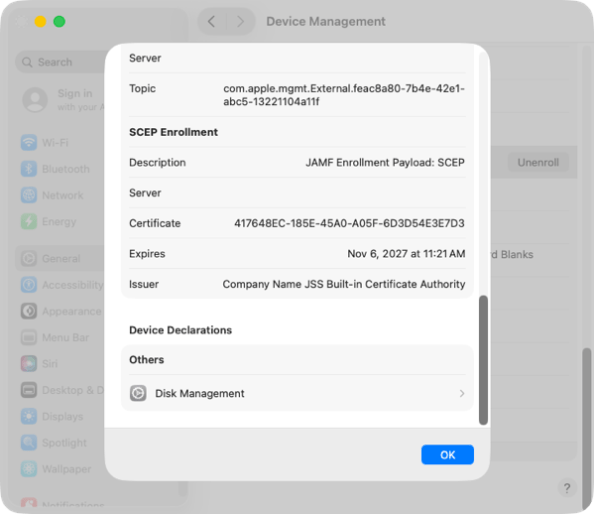
On your managed devices, you can verify that the new custom declaration has been deployed by clicking on the enrollment profile, then scrolling to the bottom. In the case of this example, because you’re deploying a disk management configuration you should see a Device Declarations section with a listing for Disk Management.

If you click on the Disk Management listing, it should report the following:
- External Storage Restriction: Not Allowed
- Network Storage Restriction: Not Allowed

如有侵权请联系:admin#unsafe.sh