2018-01-18 23:00:19 Author: blog.christophetd.fr(查看原文) 阅读量:94 收藏
Cloudflare is a service that acts as a middleman between a website and its end users, protecting it from various attacks. Unfortunately, those websites are often poorly configured, allowing an attacker to entirely bypass Cloudflare and run DDoS attacks or exploit web-based vulnerabilities that would otherwise be blocked. This post demonstrates the weakness and introduces CloudFlair, an automated detection tool.

Cloudflare allows websites to protect against all sorts of attacks. It can also act as a Web Application Firewall (WAF) to block the exploitation of web-based vulnerabilities such as XSS and SQL injections. It gained even more traction recently by announcing unmetered mitigation of DDoS attacks: Cloudflare is essentially stating they will protect their customers against DDoS attacks of any scale without charging any extra, no matter what pricing plan they are on (including the free one).
In the past few weeks, I found that multiple websites using Cloudflare were misconfigured, and allowed an attacker to bypass any Cloudflare protection in place easily. Several of the companies behind these websites had more than 1 million users and were among the top companies of their market segment.
Some of the vulnerable companies had a public bug bounty program
To be clear, this article is not talking about a vulnerability in the Cloudflare service itself, but rather about a configuration mistake commonly made by website owners protecting their website with Cloudflare.
Note: A few minutes before publishing this article, someone brought to my attention that a similar piece had been written a few months ago. I am publishing it nonetheless because I believe it can help raise awareness on the topic (and I spent too much time writing it anyway).
Table of Contents
Background: protecting a website with Cloudflare
Here’s what a typical request flow looks like for a website which is not protected by Cloudflare.
- The user contacts the DNS server of the website’s hosting provider, and asks for the IP of example.com
- The DNS server responds with the IP of the web server hosting example.com (e.g., 93.184.216.34)
- The user makes an HTTP request to that web server
- The web server responds with the web page
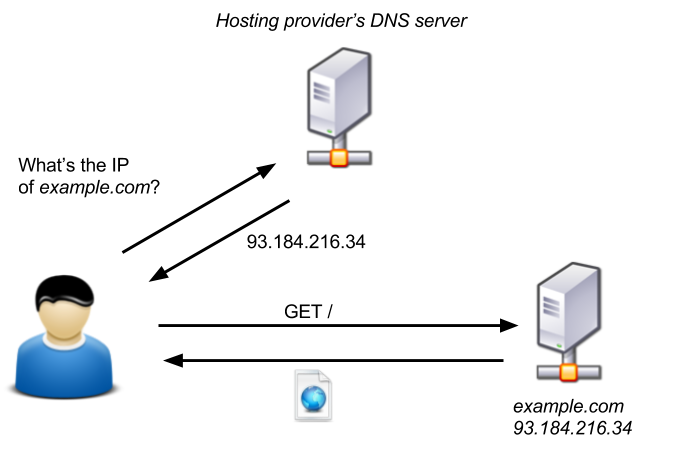
Since anyone can directly access the web server hosting example.com, an attacker can potentially harm the website by running a DDoS attack against it. If the infrastructure behind example.com is not large enough to absorb or block the traffic, the site can be completely knocked out.
When a company (or individual) decides to use Cloudflare to protect its website, it
- goes to its domain registrar, and sets the DNS servers to Cloudflare’s (e.g., kim.ns.cloudflare.com) ;
- sets up its Cloudflare account to work with the domain name (e.g., mycompany.com).
Now, when a user accesses mycompany.com, the following happens.
- The user contacts the DNS server kim.ns.cloudflare.com, and asks for the IP of mycompany.com
- The DNS server responds with the IP of an intermediary Cloudflare server (e.g., 104.16.109.208)
- The user makes an HTTP request to this server
- Cloudflare checks the legitimacy of the request (presence of malicious-looking content, source IP address, in addition to other factors), and decides whether to let the request pass through or block it
- If Cloudflare chooses to allow the request to pass through, it forwards it to the real web server responsible for mycompany.com (e.g., 188.226.197.73). This server is commonly called the origin server.
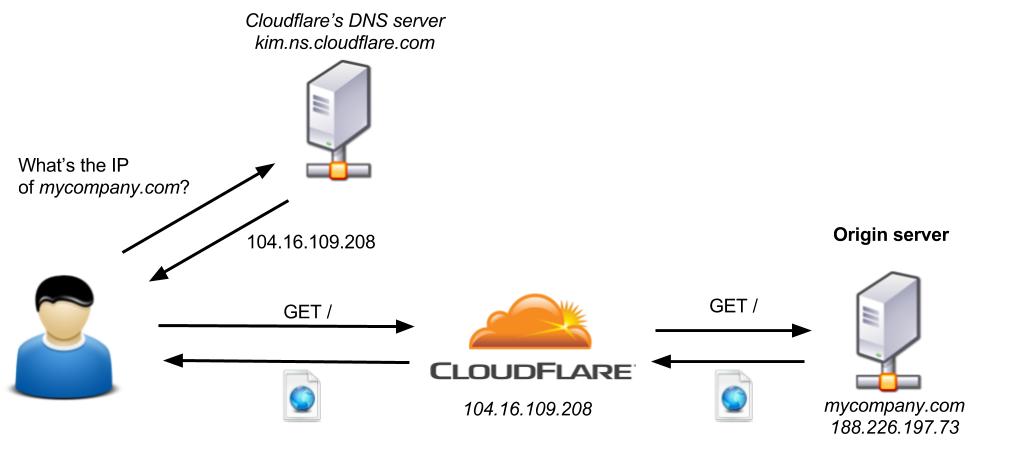
In theory, an attacker can not access the origin server directly, and in particular, does not know its IP address. However, this protection relies on the origin server being only accessible through Cloudflare.
For this protection to work, an attacker must not be able to access the origin server directly. Otherwise, it can just contact the origin server without passing through Cloudflare, and bypass any protection.
Exposed origin servers
The proper way an origin server behind Cloudflare should behave is only to accept traffic coming from Cloudflare’s IP ranges. However, many origin servers are gladly taking incoming traffic from any source. I believe this is partly due to the lack of emphasis on this issue in Cloudflare’s documentation. The closest thing I found in the docs lies in a page entitled Recommended First Steps for all Cloudflare users:
Step 1: Whitelist Cloudflare’s IP addresses
Once you’ve changed your name servers to Cloudflare, web traffic will be routed through Cloudflare’s network. Hooray! This means that your webserver will see a lot of traffic proxied through Cloudflare, and in order to allow all this traffic to access it, you will need to make sure that Cloudflare IPs are whitelisted and not rate-limited in any way on your server (you can ask about this at your host). We have a page with all the Cloudflare IPs.
(emphasis mine)
As you can read, this only tells system administrators to whitelist Cloudflare’s IP addresses, without explicitly instructing to block the incoming traffic coming from other sources. The post from Cloudflare’s blog DDoS Prevention: Protecting The Origin makes it even worse in my opinion, by implying that keeping the IP address of the origin server “secret” is enough.
Cloudflare doesn’t stop clever attackers who know your IP address from sending traffic to it directly. Just because your origin server’s IP address is no longer advertised over DNS, it’s still connected to the internet. If your IP address is not kept secret, attackers can bypass the Cloudflare network and attack your servers directly.
(emphasis mine)
To sum up – a publicly accessible origin server is safe… as long as nobody finds its IP addresses.
Internet-wide scan data with Censys
Unfortunately, in 2018, relying on someone not finding your IP address is a bit optimistic to say the least. Projects like Shodan or Censys continuously scan the Internet and make their data accessible to anyone for free.
As a random example, it takes about one second to retrieve a list of all the HTTP servers on the Internet who return a page with a title containing Nicolas Cage or Rick Astley.
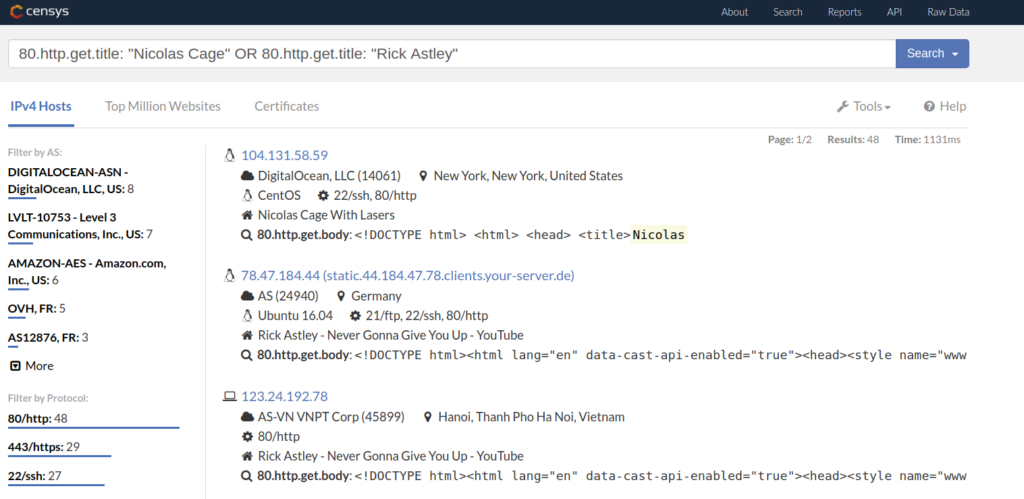
Censys is very well-suited to find exposed origin servers efficiently. The following sections describe a method to detect exposed origin servers of a specific domain, using Censys.
Finding exposed origin servers of a domain with Censys
An efficient way to find publicly accessible origin servers is to use their SSL certificate. Using Censys Certificate search feature, we can search for valid SSL certificates for a specific domain name. Censys collects those certificates from multiple sources (direct probe on port 443, and logs of the Certificate Transparency project).
For instance, the query parsed.names: reddit.com and tags.raw: trusted can be used to find valid certificates issued to reddit.com or one of its subdomains. Here’s a direct link to the associated Censys search.
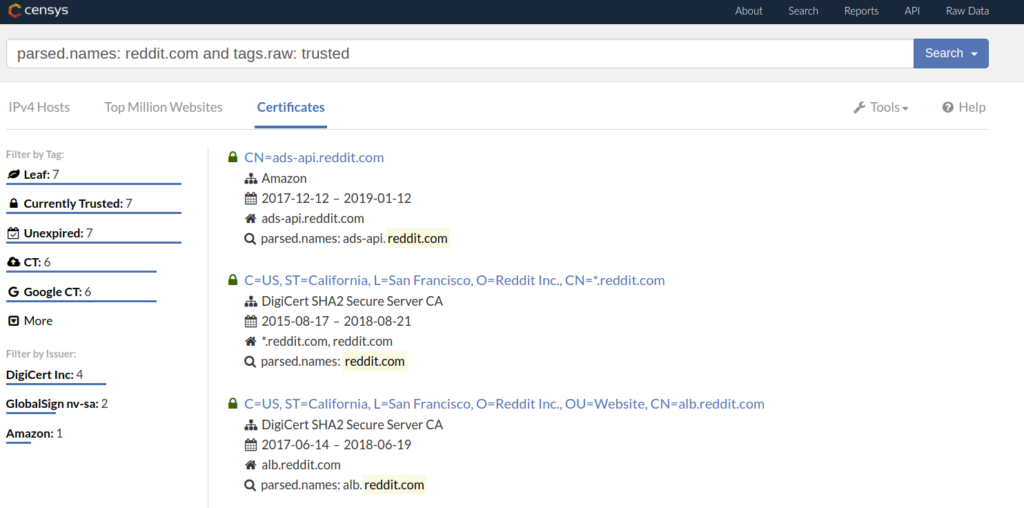
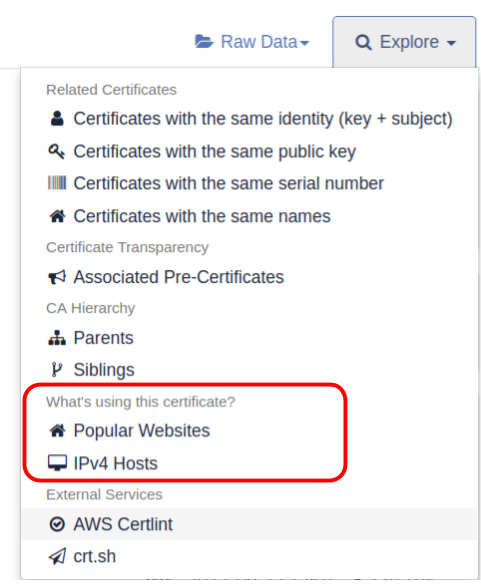
As you can see, Censys found 7 individual certificates. If you click on one, you will have the option to find all IPv4 hosts that were found to present this certificate when probed on port 443.
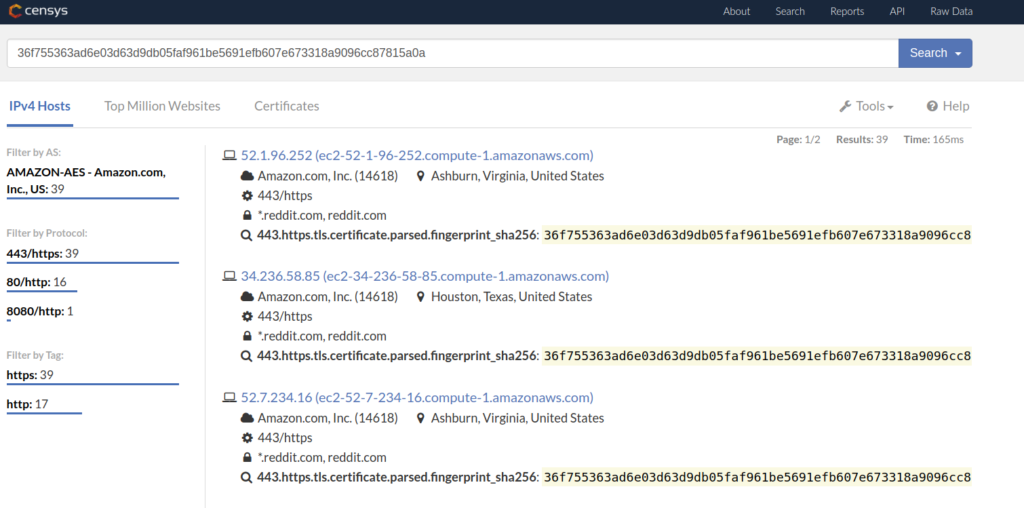
In this view, we can see all IPv4 hosts using the SSL certificate whose SHA256 fingerprint is 36f7[…]815a0a.
This simple method to search for IPv4 hosts using SSL certificates issued to a specific domain can be used to find exposed origin servers.
- Search for SSL certificates issued to mytarget.tld
- Find all IPv4 hosts using one of these certificates
- Check if these hosts seem to be origin servers of mytarget.tld
Checking if a host is a (likely) origin
Once we have a list of potential origin servers, the next question is: how do we assess if a host is an origin server of a specific Cloudflare protected domain? There is no silver bullet here since only a company’s sysadmins will be able to tell for sure, but some basic heuristics can help.
First, the IP of the candidate host should not fall into Cloudflare IP ranges, otherwise, we have just found the Cloudflare server which acts as a middleman between the end-users and the origin server. Then, the HTML response of the candidate host should be similar to the response we get when accessing the website using its standard domain name (e.g., mytarget.tld). I say similar because exact equality is too strict here, since it is common that parts of the same webpage change every time – CSRF tokens, session identifiers, and so on.
Once we find a set of hosts matching these criteria, we can be quite confident we have found a set of exposed origin servers. Of course, these hosts could be very similar to mytarget.tld but actually be development or staging instances. We cannot know with 100 % confidence, but what can help is to browse to the candidate host’s IP directly, and see if it behaves like the production website accessible via mytarget.tld: can you register an account on it? Can you login to an account you created from mytarget.tld, and vice versa? If the answer is yes, you should be pretty confident you found an origin server which shouldn’t be publicly exposed.
Keep in mind that accessing an origin server by entering directly its IP in your browser’s address bar will sometimes not work, as the web server running on it might be expecting an HTTP Host header. When this is the case, you can add a static mapping to your hosts file or query the origin server with a tool like curl or Postman which allows you to set specific Host headers.
Automating the process with CloudFlair
This process can be cumbersome when done manually; to help automate it, I wrote a tool called CloudFlair. It uses the Censys API to search for SSL certificates and associated IPv4 hosts. Once it has retrieved a list of potential origin servers using the method previously described, it will call each one of them and compute the similarity of the response with the response sent by the original domain. It uses a structural similarity function designed on purpose for comparing web pages (described here), since standard string similarity functions such as the Levenshtein distance are too slow to work with strings of the size of a typical web page.
Here’s a sample output.
Once you get a list of likely origin servers, you might still have to make a few manual checks to confirm the result.
Remediation
Update: After Cloudflare’s CTO pointed it out on Twitter, the best mitigation in the future will probably be to use Cloudflare Warp. This feature is currently still in beta, but it’s probably going to be a real game-changer regarding this issue. I did not look into in detail, but essentially it’s allowing you to open a tunnel to a Cloudflare from within a private network (not publicly routable), making sure that only Cloudflare can access your origin server (since it’s not exposed on the Internet).
If your website is vulnerable to the weakness discussed in this post, there is most likely no easy way to fix it. Once the IP of an origin server has leaked, it’s game over. The data used by Censys is versioned, and anyone can download a snapshot of this data at any point in time. What’s more, restricting the incoming traffic on a server is not enough to protect it against DDoS attacks. Dropping traffic at the software level with iptables does not prevent an attacker from sending a large number of packets to the server to consume all the available bandwidth and make it inaccessible to legitimate users.
Below are two steps I would recommend taking.
- The first step should prevent the IP address of your origin server from appearing in future Censys scans, and ensure that application-level security features of Cloudflare cannot be bypassed (such as WAF or HTTP endpoint rate limiting).
- The second step should (and I believe is the only way to) prevent an attacker from running a DDoS attack against you.
Step 1: Firewall incoming traffic or enable Authenticated Origin Pulls
Configure your origin server only to accept incoming traffic from Cloudflare’s IP ranges. Refer to:
- https://danielmiessler.com/blog/whitelisting-cloudflare-iptables/
- https://support.cloudflare.com/hc/en-us/articles/200169166-How-do-I-whitelist-Cloudflare-s-IP-addresses-in-iptables-
Note: Before applying those steps, make sure you understand that it will prevent you from accessing your origin servers via SSH, RDP, FTP, or any non-HTTP based protocol. Depending on your needs, this might be fine. However, if you still need to access your origin server using one of these protocols, you will need to leave the corresponding ports open.
Another way you can restrict incoming traffic to Cloudflare’s servers is by enabling Authenticated Origin Pulls on your account, and configure your web server accordingly. This feature will make Cloudflare authenticate with a TLS client certificate when talking to your origin server.
Step 2: Change the IP address of your origin server
As stated above, once the IP address of your origin server has leaked, it’s game over. The best solution would be to change it if it is possible, and if DDoS attacks are a credible threat to you. Depending on your hosting provider, this might be easy or painfully hard to achieve.
Acknowledgments
I want to address a big thank you to the people below, for their multiple suggestions and for proofreading this post!
- Julien Bachmann (Hacknowledge)
- Ludovic Barman
- Hadrien Milano
- Nicolas Reich
Thank you for reading! Feel free to leave a comment below or to tweet @christophetd for discussions and remarks.
Liked this post? Show it by pushing the heart button below! You can also follow me on Twitter.
如有侵权请联系:admin#unsafe.sh
