
亚马逊 SageMaker Unified Studio 与 Tonic Textual 结合使用,提供了一种安全高效的数据脱敏和 AI 模型训练解决方案。通过 Tonic Textual SDK 脱敏敏感数据后,在 SageMaker 中完成模型微调和部署,确保数据隐私与合规性。 2025-9-30 17:21:34 Author: securityboulevard.com(查看原文) 阅读量:2 收藏
This blog post was collaboratively authored by: Adam Kamor (Tonic.ai), Ander Steele (Tonic.ai), Gitika Vijh (AWS), Vitor Freitas (AWS), and Dylan Sarachek (AWS)
For nearly two decades, companies have trusted Amazon S3 as the cornerstone of their data strategy, creating vast repositories of everything from application logs to rich customer interactions. The primary challenge has been the lack of a scalable way to analyze this vast trove of unstructured data. With LLMs, however, a new frontier of analysis is possible. Amazon is now equipping its global and diverse customer base with the integrated tools and data platform required to create considerable business value from the data they’ve trusted to S3. Now, AWS has delivered the solution with Amazon SageMaker Unified Studio: a single, integrated environment designed to accelerate the entire data and AI development lifecycle.
As AWS puts it, SageMaker Unified Studio is designed to be “the center for all your data, analytics, and AI,” bringing together data preparation, analytics, machine learning, and agentic AI into one seamless platform. The goal is to empower teams to collaborate more effectively and drastically reduce the time it takes to move from raw data to a deployed model. This unified approach is a game-changer for innovation, but it also brings a critical challenge into sharp focus: how do you maintain security and compliance when you make it easier than ever to access and use your most sensitive data?

That’s where Tonic Textual comes in. To truly unlock the power of this unified platform, you need a way to make your data safe for this accelerated workflow. We’re excited to introduce a powerful, automatable workflow that bakes data privacy directly into your SageMaker environment. This post provides a hands-on guide to de-identifying sensitive data with Tonic Textual and then using that safe, high-quality data to fine-tune an LLM, all within SageMaker Unified Studio.
In this post, we will:
- Use the Tonic Textual SDK to transform raw, sensitive call transcripts into a safe, de-identified dataset.
- Store this new AI-ready asset in an S3 bucket.
- Leverage Amazon SageMaker JumpStart within SageMaker Unified Studio to fine-tune a Llama model using our safe data.
- Deploy the fine-tuned model to a SageMaker endpoint and test its performance.
Solution architecture
The end-to-end workflow is designed for simplicity and security. Raw, unstructured data containing PII is ingested from a source like an S3 bucket. A SageMaker notebook is used to call the Tonic Textual API, which de-identifies the data by redacting or synthesizing sensitive entities. This newly created safe dataset is then written back to S3, where it becomes a secure asset ready for a SageMaker fine-tuning job.
.png)
Prerequisites
To follow this walkthrough, you will need:
- An AWS account with access to Amazon SageMaker Unified Studio and S3.
- A Tonic Textual account and API key. You can get started with a free account here.
The two demo notebooks (textual_demo_redaction-edited.ipynb and textual_fine_tune_demo_sagemaker.ipynb) and the call_transcripts.csv dataset.
Step-by-step walkthrough
This guide provides the full workflow for turning your raw data into a fine-tuned model.
Part 1: Transforming sensitive data into a safe asset with Tonic Textual
For this demo, we’ll use call_transcripts.csv, a dataset representing realistic customer service calls that provides a perfect foundation for building a fine-tuning dataset. However, this valuable data is riddled with sensitive PII, such as customer names, addresses, and credit card numbers, which could easily leak into a trained model if not properly handled.
First, however, we’ll familiarize ourselves with the Textual SDK to understand the core capabilities of Tonic Textual and then apply them at scale to data using the Lakehouse architecture of Amazon SageMaker, which we’ll refer to as the “Lakehouse” going forward.
Step 1: Understanding the Tonic Textual SDK
Before processing a large dataset, let’s start with the basics. The Tonic Textual SDK allows for powerful, granular control over how you de-identify text. You can either redact sensitive data by replacing it with a token (e.g., [NAME_GIVEN]) or synthesize it by replacing it with realistic-looking but fake data (e.g., “John Smith” becomes “Alfonzo Uva”).
First, launch a notebook in your SageMaker Unified Studio environment, install the tonic_textual library, and initialize the client with your API key. For production workflows, we recommend storing your API key in AWS Secrets Manager and granting your SageMaker IAM role permission to access it.
# Install the Tonic Textual SDK
!pip install -q tonic_textual

# Import the Textual NER client
from tonic_textual.redact_api import TextualNer
import json

# Initialize the Textual client with your API key
textual_api_key='<YOUR_TONIC_TEXTUAL_API_KEY>'
textual_ner = TextualNer(api_key=textual_api_key)
Now, let’s see redaction in action. By default, Textual will find all sensitive entities and replace them with tokens.
# The redact() call returns the sanitized text and a list of all found entities
response = textual_ner.redact("The patient, John Smith is a 42-year male and suffers from Crohn's Disease.")

print(json.dumps(response, indent=4))
This returns a detailed JSON object, and the redacted_text will look like this, with tokens replacing the PII:
"The patient, [NAME_GIVEN_dySb5] [NAME_FAMILY_7w4Db3] is a [PERSON_AGE_BF3]-year [GENDER_IDENTIFIER_AzwE0]..."
Next, let’s use synthesis. We can also specify which entity types we want to ignore. In this call, we’ll synthesize new, fake values for most entities but turn off detection for GENDER_IDENTIFIER.
# This call synthesizes values instead of using tokenized redactions,and defines the list of entities we do not want to synthesize.

response = textual_ner.redact(
    "The patient, John Smith is a 42-year male and suffers from Crohn's Disease.",
    generator_default='Synthesis',
    generator_config={'GENDER_IDENTIFIER':'Off'}
)

print(response['redacted_text'])
The output is a realistic but fully synthetic sentence, with the gender left intact as requested:
"The patient, Alfonzo Uva is a 47-year male and suffers from Vasconez's Disease."
Step 2: Loading data into the Lakehouse
With a feel for the SDK, let’s apply Textual’s data protection capabilities at scale to data in your Lakehouse. We’ll start by taking a Parquet file of customer support transcripts from S3 and loading it into a queryable Iceberg table in the AWS Glue Data Catalog.
Before running the following cells, ensure your SageMaker execution role has the necessary IAM permissions (e.g., Glue:GetTable, S3:GetObject, S3:PutObject).
First, we configure our Spark session and then run a PySpark command to create the database and table.
%%configure --name project.spark.compatibility -f
{
  "number_of_workers": 2,
  "worker_type": "G.1X",
  "conf": {
    "spark.pyspark.virtualenv.enabled": "true",
    "spark.pyspark.virtualenv.type":   "native",
    "spark.pyspark.virtualenv.bin.path": "/usr/bin/virtualenv"
  }
}

%%pyspark project.spark.compatibility
from sagemaker_studio import Project

project = Project()
db_name = project.connection().catalog().databases[0].name
tbl_name  = "call_transcripts"
data_path = f"s3://{project.s3.root.split('/',3)[2]}/lakehouse/{db_name}/{tbl_name}"

# Create the Iceberg table schema in the Glue Data Catalog
spark.sql(f"""
CREATE TABLE IF NOT EXISTS {db_name}.{tbl_name} (
    id STRING,
    customer_id STRING,
    transcript STRING
)
USING iceberg
LOCATION '{data_path}'
""")

# Load the raw data from S3 and append it to our new table
raw_data_path = f"{project.s3.root}/customer_support_transcripts.parquet"
raw_df = spark.read.parquet(raw_data_path)
raw_df.write.format("iceberg").mode("append").saveAsTable(f"{db_name}.{tbl_name}")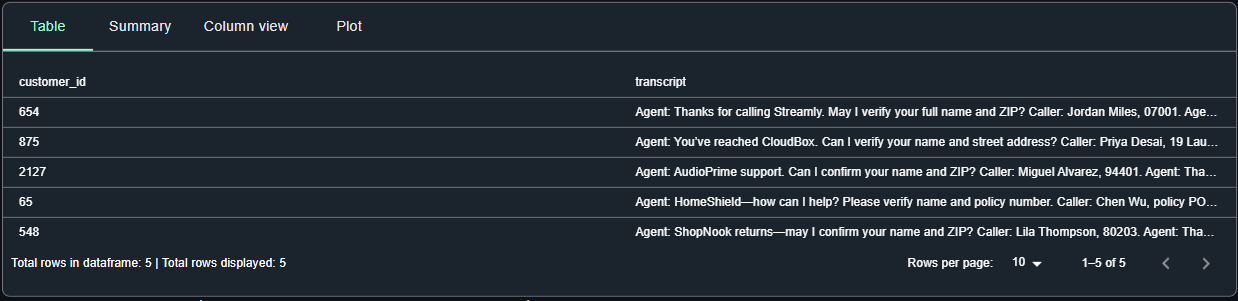
Step 3: Creating a PySpark UDF for de-identification at scale
To process data across our Spark cluster, we’ll create a User-Defined Function (UDF). This UDF will wrap the Tonic Textual redact() method, allowing Spark to apply it to every row of our transcript data in a distributed fashion.
First, we ensure the tonic_textual library and our API key are available on all Spark worker nodes.
%%pyspark project.spark.compatibility
# Install the library on all workers
sc.install_pypi_package("tonic_textual")
# Send the API key from the notebook to the workers
%send_to_remote --name project.spark.compatibility --language python --local textual_api_key --remote textual_api_keyNow, we define the UDF. Inside this function, we specify exactly which sensitive entities we want to find and synthesize. All other entities will be ignored, giving us precise control over the output. For a full list of entity values Textual detects out-of-the-box, see here.
%%pyspark project.spark.compatibility
from tonic_textual.redact_api import TextualNer
from pyspark.sql.functions import udf
from pyspark.sql.types import StringType

@udf(StringType())
def redact(txt):
    if txt is None:
        return None

    # Lazily initialize the Textual client on each worker node
    if not hasattr(redact, "_ner"):
        redact._ner = TextualNer("[https://textual.tonic.ai](https://textual.tonic.ai)", textual_api_key)

    # Define exactly which entities to synthesize. All others will be ignored.
    sensitive_entities = [
        'NAME_GIVEN', 'NAME_FAMILY', 'LOCATION_ADDRESS', 'LOCATION_CITY', 'LOCATION_STATE', 'LOCATION_ZIP', 'EMAIL_ADDRESS', 'US_SSN', 'CVV', 'CC_EXP', 'NUMERIC_PII', 'ORGANIZATION'
    ]
    config = {k: 'Synthesis' for k in sensitive_entities}

    return redact._ner.redact(txt, generator_default='Off', generator_config=config).redacted_text
Step 4: Transforming the data and storing the new AI asset
With our UDF created, we can now run the transformation. We’ll read our raw data table, apply the redact UDF to the transcript column, and store the results—both the original and synthesized transcripts—in a new, final Iceberg table. This new table is our safe, ready-to-use AI asset.
%%pyspark project.spark.compatibility
# Read the raw data table
df = spark.read.table('call_transcripts')

# Apply the UDF to create a new column with the synthesized text
df_with_redacted = df.withColumn("transcript_redacted", redact(df["transcript"]))

# Define and create the new Iceberg table for our safe AI asset
%%pyspark project.spark.compatibility
tbl_name  = "call_transcripts_synthetic"
data_path = f"s3://{project.s3.root.split('/',3)[2]}/lakehouse/{db_name}/{tbl_name}"

spark.sql(f"""DROP TABLE IF EXISTS {db_name}.{tbl_name}""")

spark.sql(f"""
CREATE TABLE IF NOT EXISTS {db_name}.{tbl_name} (
    id STRING,
    customer_id STRING,
    transcript STRING,
    transcript_redacted STRING
)
USING iceberg
LOCATION '{data_path}'
""")

# data_path = f"{project.s3.root}/call_transcripts.csv"
df_with_redacted.write.format("iceberg").mode("append").saveAsTable(f"{db_name}.{tbl_name}")
In SageMaker, you can view the synthesized data.
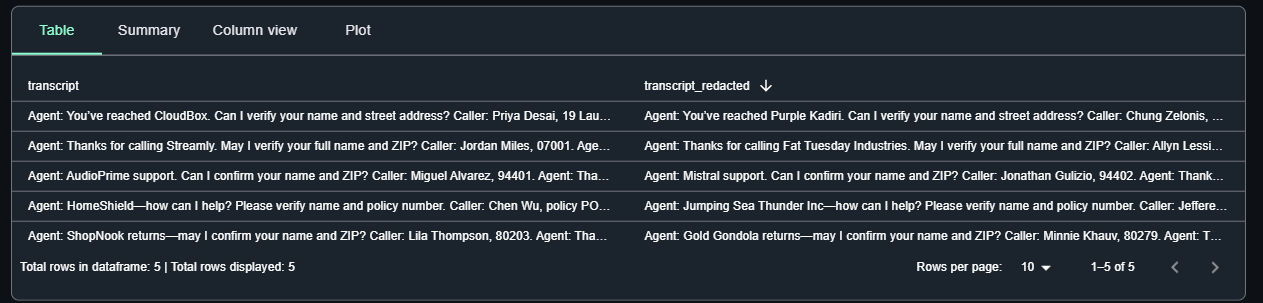
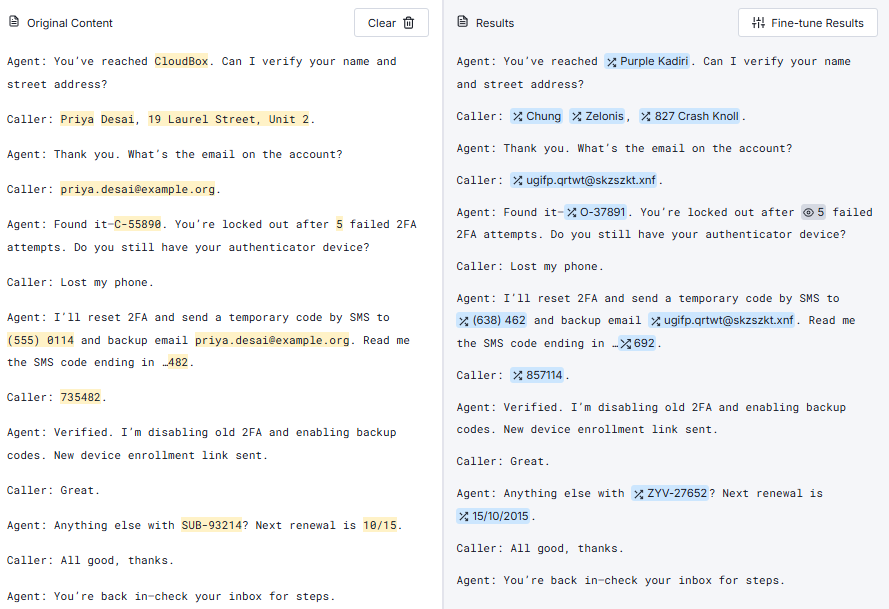
To better visualize the transformation, the Tonic Textual UI provides a clear, color-coded view of the sensitive data it detects and redacts. Here’s what one of the transcripts looks like within the UI, showing how Textual identifies each piece of PII before it’s transformed:
Step 5: Publishing the safe asset to the SageMaker Catalog
Your call_transcripts_synthetic table is now a secure and valuable asset for downstream consumption by data and AI workflows. To make it easily discoverable for other teams and projects, you can publish it to the Amazon SageMaker Catalog directly from the Studio UI (see the full notebook for instructions on how to do this). This allows other users to find, subscribe to, and use this safe data for their own analytics and model training needs, completing the data-as-an-asset lifecycle.
Now, let’s move on to Part 2 of this blog post, where we will demonstrate how to train a secure model on de-identified data, and make that model available in SageMaker for downstream usage.
Part 2: Activating your safe data for fine-tuning in SageMaker
Beyond securing data in SageMaker, Tonic Textual enables another high-value use case: fine-tuning a Llama 3 model to pull structured data from unstructured clinical notes. This process is essential for converting free-form text into standardized formats like HL7 FHIR for compliance and seamless data exchange. Crucially, Tonic Textual allows you to train models using data rich with Protected Health Information (PHI) without the risk of the model memorizing confidential patient details.
Step 6: Load and de-identify the training data
Our first step is to load our synthetic clinical note dataset from Hugging Face and configure Tonic Textual to de-identify it according to HIPAA Safe Harbor guidelines. This ensures that any sensitive PHI is replaced with safe, synthetic values while preserving the data’s utility for training.
from datasets import load_dataset
from tonic_textual.classes.generator_metadata.name_generator_metadata import NameGeneratorMetadata

# Load the synthetic clinical dataset
ds = load_dataset("TonicAI/synthetic_clinical_notes", download_mode='force_redownload')

# Define the PHI entity types for de-identification
phi_labels = [
    "NAME_GIVEN", "NAME_FAMILY", "LOCATION_ADDRESS", "LOCATION_STATE", "LOCATION_CITY", "LOCATION_ZIP", "LOCATION_COUNTRY", "PHONE_NUMBER", "EMAIL_ADDRESS", "CREDIT_CARD", "CC_EXP", "CVV", "MONEY", "ORGANIZATION", "DOB", "DATE_TIME", "URL", "NUMERIC_PII", "HEALTHCARE_ID",
]
# Configure Textual to synthesize these entities, and turn others off
generator_config = {label:'Synthesis' for label in phi_labels}
# Ensure that synthesized names preserve the gender of the original name
generator_metadata = {'NAME_GIVEN': NameGeneratorMetadata(preserve_gender=True)}
With the configuration set, we can de-identify the entire training dataset. We use a parallel processing approach to efficiently handle all the records. Concurrent.futures allows us to parallelize de-identification of the dataset.
from tqdm.notebook import tqdm
import concurrent.futures

def process_row(i, row):
  synth_encounter_data = json.loads(textual.redact_json(
      row,
      generator_config=generator_config,
      generator_metadata=generator_metadata,
      generator_default='Off',
      random_seed=i).redacted_text)
  return synth_encounter_data

# Process all rows in the training set in parallel
synthetic_rows = []
with concurrent.futures.ThreadPoolExecutor(max_workers=6) as executor:
  futures = [executor.submit(process_row, i, row) for i, row in enumerate(ds['train'])]
  for future in tqdm(concurrent.futures.as_completed(futures), total=len(ds['train'])):
    synthetic_rows.append(future.result())
Step 7: Prepare the data for fine-tuning
Next, we need to format this de-identified data into a prompt-completion structure that the LLM can learn from. The goal is to teach the model to take an unstructured note (the prompt) and output a structured JSON object (the completion). We define a detailed prompt that includes the desired output schema and extraction rules.
from typing import List, Optional
from enum import Enum
from pydantic import BaseModel

# Define the Pydantic schema for the structured output
class EncounterData(BaseModel):
    name: str
    age: int
    # ... other fields

# Create the prompt template
prompt_fmt = """You are FHIR‑Note‑Extractor v1.
Your sole task is to read a free‑text clinical note and emit only a compact JSON object that validates against the following Pydantic schema:
...
## Note:
{note}
"""

def formatting_prompts_func(example):
    """Expected format for instruction fine-tuning"""
    return {
        'dialog': [
            {'content': prompt_fmt.format(note=example['note']), 'role': 'user'},
            {'content': json.dumps(example['encounter_data'], indent=2), 'role': 'assistant'}
        ]
    }

# Create the final training and validation datasets
from datasets import Dataset
synth_dataset = Dataset.from_list(synthetic_rows)
synth_dataset = synth_dataset.map(formatting_prompts_func).remove_columns(['note', 'encounter_data'])
val_dataset = ds['validation'].map(formatting_prompts_func).remove_columns(['note', 'encounter_data'])
Finally, we upload our prepared datasets to an S3 bucket for SageMaker to access.
import os
import boto3

# Helper function to write data to S3
def write_jsonl_to_subdir(s3_dir: str, subpath: str, records:List[Dict]) -> str:
    # ... function implementation ...

# Get the default S3 project root and write the data
from sagemaker_studio import Project
project = Project()
train_data_uri = write_jsonl_to_subdir(project.s3.root, 'train/train.jsonl', synth_dataset)
Step 8: Configure and launch the fine-tuning job via the UI
With our data prepared and stored in S3, we use the intuitive interface of SageMaker JumpStart to launch our fine-tuning job.
First, navigate to SageMaker JumpStart in the Studio UI and select the Llama 3 8B Instruct model. From the model page, click Train. In the configuration panel, set the training dataset S3 location to the train_data_uri from the previous step. We can use the default training parameters, which will train a LoRA on a g5.2xlarge instance in about 30 minutes. Once configured, click Train to launch the job.


Step 9: Deploy and evaluate the custom model
Once the training job is complete, a Deploy button becomes available on the job’s detail page. Clicking this creates a real-time SageMaker endpoint for your newly fine-tuned model.

To evaluate its performance, we retrieve the endpoint and query it with an unseen note from our validation set, which contains real (not synthetic) data.
from sagemaker.predictor import retrieve_default
from typing import Dict

# Find your endpoint name in the SageMaker UI under Endpoints
endpoint_name = "jumpstart-dft-llama-3-2-3b-instruct-20250715-225729" # Replace with your endpoint
predictor = retrieve_default(endpoint_name)

# Select a validation example and format the prompt
example = val_dataset[0]
def make_prompt(input_message: Dict) -> str:
    user_str = input_message['content']
    return f"""<|begin_of_text|><|start_header_id|>user<|end_header_id|>\n\n{user_str}<|eot_id|><|start_header_id|>assistant<|end_header_id|>\n\n"""

# Create the payload and query the endpoint
payload = {
    "inputs": make_prompt(example['dialog'][0]),
    "parameters": {"max_new_tokens": 1025, "top_p": 0.9, "temperature": 0.0},
}
response = predictor.predict(payload)
print(response['generated_text'])
The model, trained exclusively on safe, synthetic data, successfully extracts and structures the information from a real clinical note (response), closely matching the ground truth (example).

This proves you can build highly effective, specialized models without exposing sensitive production data during training.
Cleaning up
To avoid ongoing AWS charges, be sure to delete the SageMaker endpoint.
# Delete the SageMaker endpoint
predictor.delete_endpoint()
Conclusion
In just a few steps, you have successfully turned sensitive, high-risk data into a safe, valuable AI asset. This repeatable workflow allows your organization to innovate responsibly, building cutting-edge AI on your most relevant data while upholding a strong security and compliance posture.
- Ready to turn your data into assets? Sign up for a free Tonic Textual account today.
- Want to run this demo yourself? Check out the full notebooks on GitHub.
- Contact us to learn how Tonic Textual can secure your entire data estate.
如有侵权请联系:admin#unsafe.sh