
文章介绍了 Android 应用的反调试技术,包括 TracerPid、stat 和 wchan 检测方法,并通过代码实现展示了如何检测调试器的存在。同时指出通过修改内核代码(如 /proc 文件输出)可以绕过这些反调试机制,从而实现对应用的调试。 2025-9-11 04:0:0 Author: www.freebuf.com(查看原文) 阅读量:6 收藏
在 Android 安全对抗中,反调试 几乎是 App 的标配。开发者往往会在关键逻辑中加入各种检测手段,只要发现进程被调试,就立即崩溃或退出,从而大幅增加逆向人员分析的难度。 常见的反调试手段包括:
- • TracerPid 检测通过读取 /proc/self/status,如果 TracerPid 不为 0,就说明当前进程正被调试器(如 gdb、lldb、IDA Pro)附加。这是最常见的调试检测方式之一。
- • stat 检测通过 /proc/self/stat 可以获取进程的运行状态,如果发现状态异常(如被调试中),就会触发保护逻辑。
- • wchan 检测读取 /proc/self/wchan,检查线程当前在内核中的等待状态。如果检测到线程因调试而阻塞,就会触发异常处理。

1. TrackerId
首先,通过 IDA Pro 的调试器附加到当前 app 进程
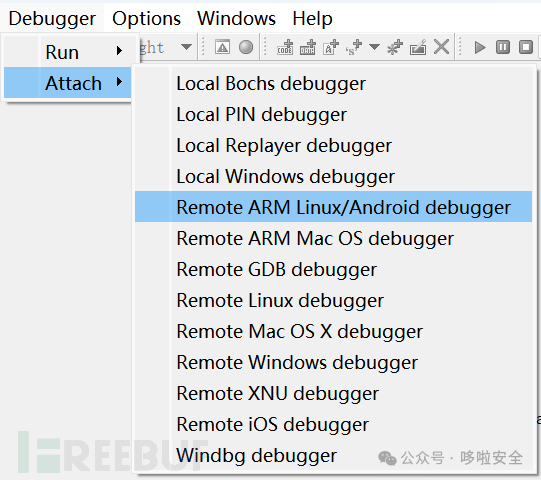 相关文章:静态分析根本不够!IDA Pro 动态调试 Android 应用的完整实战[1]
使用 top 命令查看进程状态
相关文章:静态分析根本不够!IDA Pro 动态调试 Android 应用的完整实战[1]
使用 top 命令查看进程状态
top | grep com.cyrus.example17305 u0_a137 10 -10 4.8G 104M 42M t 0.0 1.8 0:02.02 com.cyrus.example
在输出中,S 表示进程状态,17305 是 PID。 通过head /proc/[pid]/status 可以查看详细的进程状态。
head -n 6 /proc/17305/statusName: m.cyrus.exampleState: S (sleeping)Tgid: 17305Pid: 17305PPid: 728TracerPid: 16208
TracerPid: 16208 说明当前的进程正在被进程 16208 调试或跟踪,否则没有被调试值应该为0。
2. stat
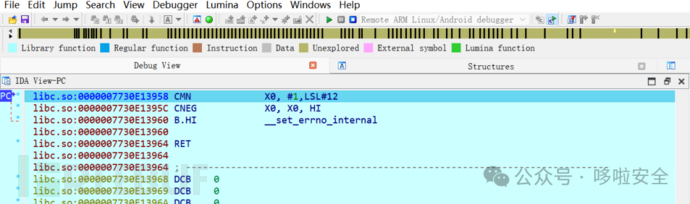
这时我们断点调试 app
 再通过 head /proc/[pid]/status 可以查看详细的进程状态,包括是否被调试等信息。
head -n 6 /proc/17305/statusName: m.cyrus.exampleState: t (tracing stop)Tgid: 17305Pid: 17305PPid: 728TracerPid: 16208
在输出中,t (tracing stop) 表示 app 停止(被调试或其他暂停)
3. wchan
使用 cat 命令查看 /proc/[pid]/wchan 文件,该文件显示进程当前正在等待的内核函数。
cat /proc/17305/wchanptrace_stop
在输出中,ptrace_stop 表示进程 17305 当前正在被调试器暂停,等待调试器发出的命令。
Android App 中如何实现这些反调试检测的? 实际上,绝大多数方法都离不开 /proc 文件系统 。
- • /proc/self/status 提供了 TracerPid 字段,用于判断进程是否被调试;
- • /proc/self/stat 记录了进程的详细运行状态;
- • /proc/self/wchan 则能反映线程当前在内核中的等待点。
App 只需要在代码里定期读取这些文件,分析其中的关键字段,就能在第一时间发现调试器的存在。一旦检测成功,常见的做法是:
- • 直接调用 exit() 或 kill() 结束进程;
- • 抛出异常导致崩溃;
- • 或阻止正常运行。
这类检测逻辑可以埋在关键功能附近,形成了一种 用户态的“防火墙” 。。 代码实现如下:
package com.cyrus.example.antidebugimport android.os.Bundleimport android.os.Debugimport android.util.Logimport android.widget.TextViewimport androidx.appcompat.app.AppCompatActivityimport com.cyrus.example.Rimport kotlinx.coroutines.CoroutineScopeimport kotlinx.coroutines.Dispatchersimport kotlinx.coroutines.launchimport kotlinx.coroutines.withContextimport java.io.BufferedReaderimport java.io.Fileimport java.io.FileReaderimport java.io.IOExceptionimport java.net.InetSocketAddressimport java.net.Socketclass AntiDebugActivity : AppCompatActivity() { private val TAG = "AntiDebug" private lateinit var debugInfoTextView: TextView override fun onCreate(savedInstanceState: Bundle?) { super.onCreate(savedInstanceState) setContentView(R.layout.activity_anti_debug) // 绑定 TextView debugInfoTextView = findViewById(R.id.debugInfoTextView) // 使用协程来执行调试检测 CoroutineScope(Dispatchers.Main).launch { val debugInfo = checkDebugInfo() // 将调试信息显示到 TextView debugInfoTextView.text = debugInfo // 打印调试信息到日志 Log.d(TAG, debugInfo) } } // 检查所有的调试信息 private suspend fun checkDebugInfo(): String { val debugInfoBuilder = StringBuilder() val debuggerConnected = isDebuggerConnected() val waitingForDebugger = isWaitingForDebugger() // 获取TrackerId(TracerPid) val tracerPid = hasTracerPid() // 从 /proc/self/stat 获取调试状态 val debugStatus = getProcStatStatus() // 获取wchan trace标识 val wchanStatus =getWchanStatus() // 检测 JDWP 端口时使用协程的 IO 线程 val jdwpDetected = withContext(Dispatchers.IO) { detectJDWP() } debugInfoBuilder.append("Debugging Information:\n") debugInfoBuilder.append("Debugger Connected: ").append(debuggerConnected).append("\n") debugInfoBuilder.append("Waiting for Debugger: ").append(waitingForDebugger).append("\n") debugInfoBuilder.append("JDWP Port (Debugger Attached): ").append(jdwpDetected).append("\n") debugInfoBuilder.append("TracerPid: ").append(tracerPid).append("\n") debugInfoBuilder.append("状态: ").append(debugStatus).append("\n") debugInfoBuilder.append("Wchan 状态: ").append(wchanStatus).append("\n") if (debuggerConnected || waitingForDebugger || tracerPid != 0 || jdwpDetected || debugStatus == "停止(可能是被调试状态)" || wchanStatus.contains("trace")) { debugInfoBuilder.append("\nApp is being debugged!\n") } else { debugInfoBuilder.append("\nApp is not being debugged.\n") } return debugInfoBuilder.toString() } // 方法 1: 使用 Debug.isDebuggerConnected() private fun isDebuggerConnected(): Boolean { return Debug.isDebuggerConnected() } // 方法 2: 检查 Debug.waitingForDebugger() private fun isWaitingForDebugger(): Boolean { return Debug.waitingForDebugger() } // 方法 3: 返回 TracerPid 的值 private fun hasTracerPid(): Int { try { BufferedReader(FileReader("/proc/self/status")).use { reader -> var line: String? while (reader.readLine().also { line = it } != null) { if (line!!.startsWith("TracerPid:")) { return line!!.split(":")[1].trim().toInt() } } } } catch (e: IOException) { e.printStackTrace() } return 0 // 如果没有找到 TracerPid,返回 0 表示没有被调试 } // 方法 4: 检测调试端口(JDWP),在后台线程中运行 private fun detectJDWP(): Boolean { return try { Socket().use { socket -> socket.connect(InetSocketAddress("127.0.0.1", 8700), 1000) } true } catch (e: IOException) { // 没有调试器连接 false } } // 从 /proc/self/wchan 获取进程的等待状态 private fun getWchanStatus(): String { try { // 读取 /proc/self/wchan 文件 val wchanFile = File("/proc/self/wchan") if (wchanFile.exists()) { return wchanFile.readText().trim() } } catch (e: Exception) { e.printStackTrace() } return "无法获取 Wchan 状态" } // 解析 /proc/self/stat 获取进程状态 private fun getProcStatStatus(): String { try { // 读取 /proc/self/stat 文件 val statFile = File("/proc/self/stat") val statContent = statFile.readText() // /proc/self/stat 的内容格式是以空格分隔的字段 // 第3个字段是进程状态 val statFields = statContent.split(" ") if (statFields.size > 2) { val processState = statFields[2] // 进程状态字段 return when (processState) { "R" -> "运行中" "S" -> "睡眠中" "D" -> "不可中断睡眠中" "T" -> "停止(可能是被调试状态)" "Z" -> "僵尸进程" else -> "未知状态: $processState" } } } catch (e: Exception) { e.printStackTrace() } return "无法获取调试状态" }}
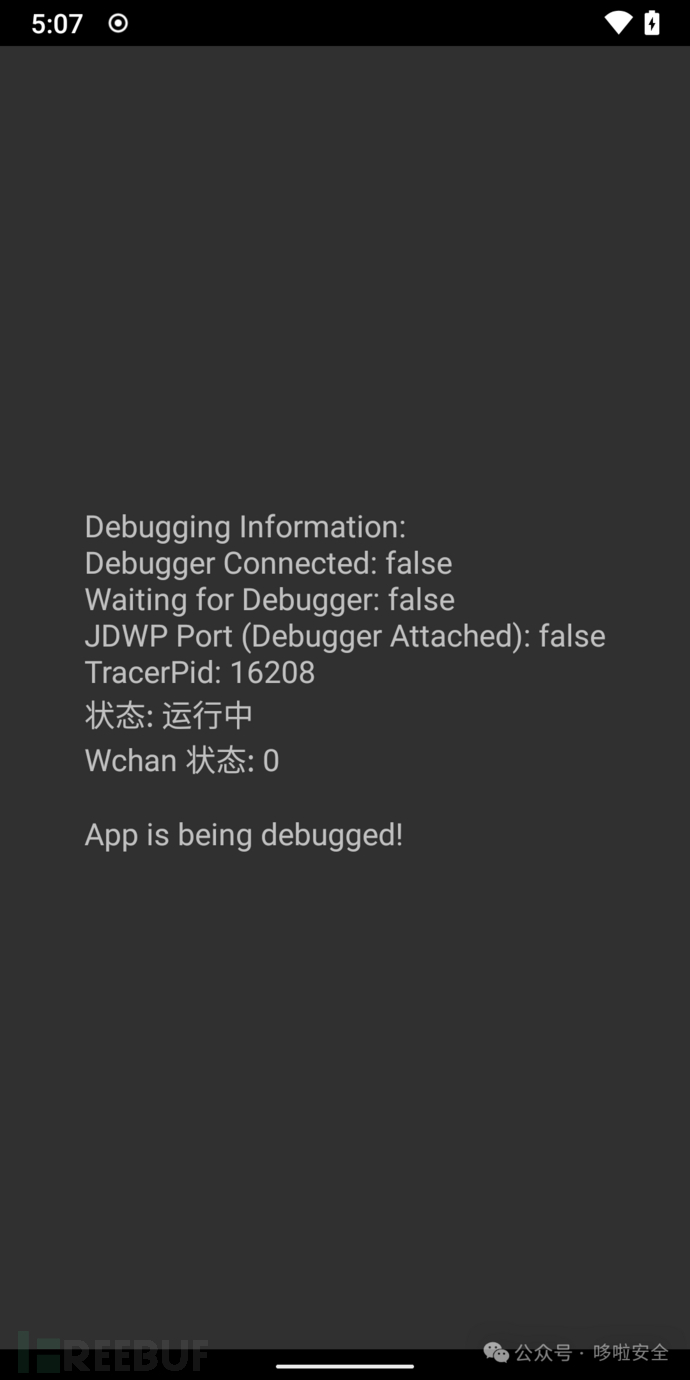
当调试器附加到 app
 源码地址:https://github.com/CYRUS-STUDIO/AndroidExample
既然 App 的反调试检测主要依赖 /proc 文件系统 ,本质上就是通过读取 内核暴露的进程信息 来判断是否被调试。 如果我们在 内核层 修改这些信息的返回结果,让 App 无法正确感知调试状态,就能轻松绕过用户态的所有反调试逻辑。 换句话说,App 在用户态“设防”,我们则可以在内核态“拆墙”。
- • 对 TracerPid 的检测,可以通过修改内核对 /proc/self/status 的输出,让它永远返回 0;
- • 对 /proc/self/stat、/proc/self/wchan 的检测,同样可以在内核源码中找到对应实现,定制输出结果;
- • 甚至可以进一步调整系统属性,比如修改 ro.debuggable,直接让系统层面全局允许调试。
这样一来,无论 App 加了多少层用户态检测,都无法再发现调试器的存在。
1. TrackerId
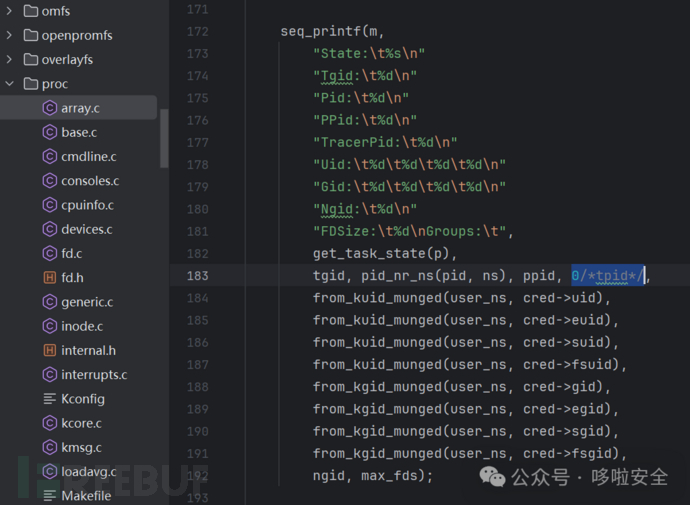
编辑 fs/proc/array.c
修改tpid(TrackerId)固定返回0
2. stat
编辑 fs/proc/array.c 直接把状态标识T(stopped)和t(tracing stop),修改为S(sleeping)
static const char * const task_state_array[] = { "R (running)", /* 0 */ "S (sleeping)", /* 1 */ "D (disk sleep)", /* 2 */ "T (stopped)", /* 4 */ "t (tracing stop)", /* 8 */ "X (dead)", /* 16 */ "Z (zombie)", /* 32 */};
修改后
static const char * const task_state_array[] = { "R (running)", /* 0 */ "S (sleeping)", /* 1 */ "D (disk sleep)", /* 2 */ "S (sleeping)", /* 4 */ "S (sleeping)", /* 8 */ "X (dead)", /* 16 */ "Z (zombie)", /* 32 */};
3. wchan
编辑 fs/proc/base.c 修改 proc_pid_wchan 函数,去掉 trace 检测标识
static int proc_pid_wchan(struct seq_file *m, struct pid_namespace *ns, struct pid *pid, struct task_struct *task){ unsigned long wchan; char symname[KSYM_NAME_LEN]; wchan = get_wchan(task); if (wchan && ptrace_may_access(task, PTRACE_MODE_READ_FSCREDS) && !lookup_symbol_name(wchan, symname)) seq_printf(m, "%s", symname); else seq_putc(m, '0'); return 0;}
修改后
static int proc_pid_wchan(struct seq_file *m, struct pid_namespace *ns, struct pid *pid, struct task_struct *task){ unsigned long wchan; char symname[KSYM_NAME_LEN]; wchan = get_wchan(task); if (wchan && ptrace_may_access(task, PTRACE_MODE_READ_FSCREDS) && !lookup_symbol_name(wchan, symname)) // 判断 symname 中是否包含 "trace" if (strstr(symname, "trace")) { // sys_epoll_wait 是内核中实现 epoll_wait 系统调用的具体函数。 // 这个表示进程正在等待 ep_poll 函数(通常与 I/O 事件相关)。 seq_printf(m, "%s", "sys_epoll_wait"); } else { seq_printf(m, "%s", symname); } else seq_putc(m, '0'); return 0;}
编辑 device/{vendor}/{device}/common_prop.mk 找到 ro.debuggable 这一行。如果没有这一行,你可以手动添加
# DebugPRODUCT_PROPERTY_OVERRIDES += \ ro.debuggable=1 \
修改完成后,你就可以调试设备上所有 app 了。
如何编译和刷机 Android 系统可以参考:
- • 解决90%踩坑问题!LineageOS 源码下载与编译保姆级教程[2]
- • 教你签自己的系统!LineageOS Release Key 签名刷机教程[3]
打开 IDA Pro 的调试器附加到当前 app 进程并 Pause process 。 通过命令行读取进程 TracerPid、State 和 wchan 信息检测是否修改成功。
adb shell# 查看进程信息top | grep com.cyrus.example 6780 root 20 0 32M 1.4M 1.0M S 0.0 0.0 0:00.00 grep com.cyrus.example 5256 u0_a137 10 -10 4.9G 105M 43M S 0.0 1.8 0:02.69 com.cyrus.example# 查看进程状态head -n 6 /proc/5256/statusName: m.cyrus.exampleState: S (sleeping)Tgid: 5256Pid: 5256PPid: 738TracerPid: 0# 查看wchan状态 wayne:/ # cat /proc/5256/wchansys_epoll_waitwayne:/ # cat /proc/5256/wchanSyS_epoll_wait
通过 APP 读取 TracerPid、State 和 wchan 信息,检测是否修改成功。 ![图片](https://mmbiz.qpic.cn/mmbiz_png/LtmuVIq6tF2khAcBwZib83Bgq9PGSroV1RedRiabNobePvXAM1myWkGrGWdZDYWmophNkBOc0sdPWlN2TfP910Ug/640?wx_fmt=png&from=appmsg&water
如有侵权请联系:admin#unsafe.sh