
文章描述了在安装Kali Linux 1.0.6时遇到的“Installing step failed”错误,并提供了多种解决方法,包括下载官方镜像、验证校验和、烧录DVD低速、增加磁盘空间、删除并重新分区、减少分区数量、选择文本安装模式、使用LiveCD安装和拔掉外设等。 2025-5-12 23:29:5 Author: www.blackmoreops.com(查看原文) 阅读量:1 收藏
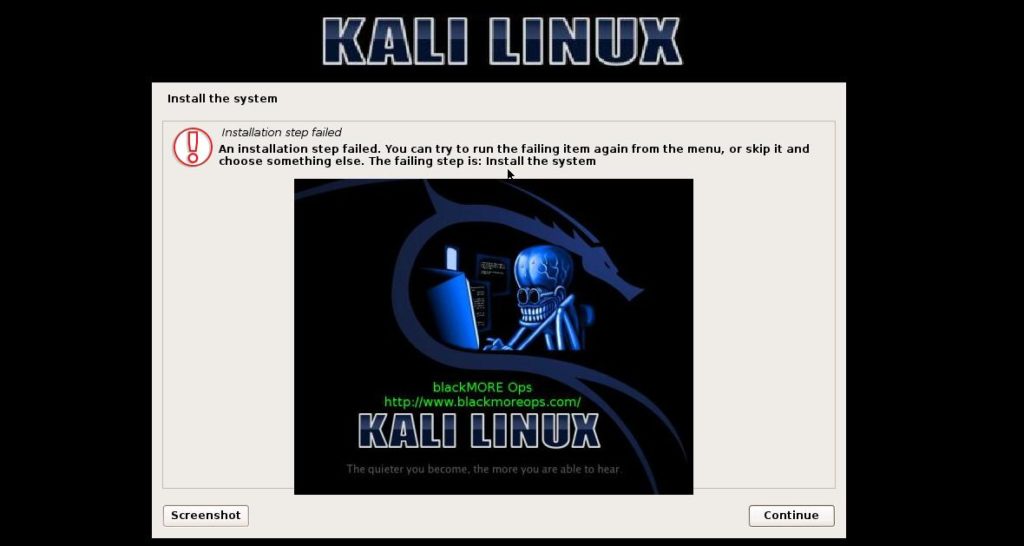
When I tried to install Kali Linux 1.0.6 today, I got an error. I didn’t really knew exactly at what percentile it failed, but the error message was “Installing step failed” and I could either take a screenshot or Continue from there. Very annoying. I saw many people who had the same issue in Kali forums and I tried one step at a time. This error message varies for different people to different version of Kali Linux. You might be getting any of these errors
- Step failed: Installing the system in Kali Linux or
- Installing step failed : Install the system at failed at 80% or any any random percent in Kali Linux or
- The failing step is install the system error in Kali Linux
Following are my troubleshooting steps and the summary of all the solution proposed by different people in different forums, blogs etc. I take no credit for the information’s provided except being the keyboard jockey who likes to write stuffs and LOVE Kali Linux. Kudos to all the people who tried to provide solution and managed to work past it. So here goes:
Step 1. Download Official Kali Linux Images:
Pretty much explains itself. You should download Kali Linux from it’s official website. Everyone knows where you can get these images, but I’ll list them here for conveniences:
ISO Files
Kali Linux is available as a bootable ISO in both 32 and 64-bit formats.
VMware Images
Kali is available as a pre-made VMware virtual machine with VMware Tools installed. The VMware image is available in a 32-bit PAE format.
ARM Images
Due to the nature of the ARM architecture, it is not possible to have a single image that will work across all ARM devices. Kali Linux website has Kali Linux ARM images available for the following devices:
- rk3306 mk/ss808
- Raspberry Pi
- ODROID-U2/X2
- MK802/MK802 II
- Samsung Chromebook
Personally, I found by downloading from TORRENT is much better, faster, you get SHA1 checksum file with your download and TORRENT does check file integrity better than most download clients. Then again, it is up to you on what method you want to choose.
Step 2. Verifying SHA1 Checksums of Downloaded Images:
When you download an image, be sure to download the SHA1SUMS and SHA1SUMS.gpg files that are next to the downloaded image (i.e. in the same directory on the server).
Step 2.a Ensure the Origin of the SHA1SUMS File
Before verifying the checksums of the image, you must ensure that the SHA1SUMS file is the one generated by Kali. That’s why the file is signed by Kali’s official key with a detached signature in SHA1SUMS.gpg. Kali’s official key can be downloaded in one of two ways:
$ wget -q -O - http://archive.kali.org/archive-key.asc | gpg --import
or
$ gpg --keyserver subkeys.pgp.net --recv-key 44C6513A8E4FB3D30875F758ED444FF07D8D0BF6
Once you have downloaded both SHA1SUMS and SHA1SUMS.gpg, you can verify the signature as follows:
$ gpg --verify SHA1SUMS.gpg SHA1SUMS
gpg: Signature made Thu Mar 7 21:26:40 2013 CET using RSA key ID 7D8D0BF6
gpg: Good signature from "Kali Linux Repository <[email protected]>"
If you don’t get that “Good signature” message or if the key ID doesn’t match, then you should stop the process and review whether you downloaded the images from a legitimate Kali mirror. If the SHA1SUMS file is the one provided by Kali, then you can verify that the image downloaded has the required checksum. You can either generate the checksum and do a manual comparison with what’s listed in SHA1SUMS or use a tool that knows how to verify those checksums.
TODO: explain how to use GPG on OS X and Windows. See How to verify signatures for packages for detailed explanation.
Step 2.b Verifying SHA1 Checksums on Linux
With a manual comparison:
$ sha1sum kali-linux-1.0-i386.iso
796e32f51d1bf51e838499c326c71a1c952cc052 kali-linux-1.0-i386.iso
$ grep kali-linux-1.0-i386.iso SHA1SUMS
796e32f51d1bf51e838499c326c71a1c952cc052 kali-linux-1.0-i386.iso
By using sha1sum -c:
grep kali-linux-1.0-i386.iso SHA1SUMS | sha1sum -c
kali-linux-1.0-i386.iso: OK
Step 2.c Verifying SHA1 Checksums on OSX
With a manual comparison:
$ shasum kali-linux-1.0-i386.iso
796e32f51d1bf51e838499c326c71a1c952cc052 kali-linux-1.0-i386.iso
$ grep kali-linux-1.0-i386.iso SHA1SUMS
796e32f51d1bf51e838499c326c71a1c952cc052 kali-linux-1.0-i386.iso
Step 2.d Verifying SHA1 Checksums on Windows
Windows does not have the native ability to calculate SHA1 checksums so you will need a utility such as
to verify your download. [SOURCE: Download Official Kali Images]
Step 3: Troubleshooting installation errors: Installation step failed
Up to this point, we only ensured the followings:
- We downloaded the correct image
- We downloaded from Official website
- We verified SHA1 checksum of the downloaded image.
- There’s no disk fault or bad sector in your hard-disk.
I’ll leave it to you on how to check for bad sector (hint: Windows Defragment/DiskCheck is quite good)
If if the above 4 points didn’t match, go back, rectify and come back to Step 3 here. Moving on..
Assuming you managed to meet all those 4 requirements and failed in installing Kali Linux with any of the following errors:
- Step failed: Installing the system in Kali Linux or
- Installing step failed : Install the system at failed at 80% or any any random percent in Kali Linux or
- The failing step is install the system error in Kali Linux
we can proceed to troubleshooting and try different workarounds.
Troubleshooting step 3.a: Burn a DVD with the ISO at slowest speed
If you’re using a DVD such as me, (I burn DVD cause in that way I can label them and keep them in stack for comparison), then burn it at the slowest possible speed. Personally, this didn’t matter to me cause I burned them at highest possible speed and even left out the verify option.
However, when I burn the DVD in Windows 7; I turned off my Antivirus/Firewall (put them in Allow/Game mode) to avoid write error. Some Anti Virus software’s are notorious for causing write errors.
Troubleshooting step 3.b: Kali Linux Live USB Install
If you’re using a Live USB, just read this manual. I cannot stress enough why you should read and follow official documentation at the first place, rather than coming to my website and reading it off here…
Official Instructions on Kali Linux Live USB Install
In short, stick with official instructions and if you go and cry on Kali Forum, RTFM is the only answer you’ll get. (even though I know for sure other methods works from time to time).
Troubleshooting step 3.c: Increase allocated disk space
First of all, check how much disk space you allocated for Kali installation. I usually allocate 40GB including SWAP space. At the end of my partitioning, I get 36.3GB for my root / partition and 2.1 GB for my SWAP partition. Looking around, it seems the lowest you should allocate is 10GB. As a safer option, allocate at least 20GB including swap space and allow automatic partitioning to divide them up.
You could also try to allocate disk space manually as shown in this excellent post by kpoeticg in this post How To Create Seperate Root,Home,Usr,Var,Tmp Partitions in “Graphical Installation”.
Again, your call and I cannot say which one will work best for you.
Troubleshooting step 3.d: Graphical Install – Delete and repartition free space
This one worked for me. I pre-partitioned my disk giving 36GB to Kali root / and 2 GB for SWAP Space. I received an error during Kali Linux install “Installation Step failed”. I went back, deleted both Kali root / partition and SWAP partition, thus creating a 40GB free space.
I then allowed Kali Linux to automatically partition that free space and next time installation worked just fine. Not too sure why this would happen, but this little workaround worked just fine for me.
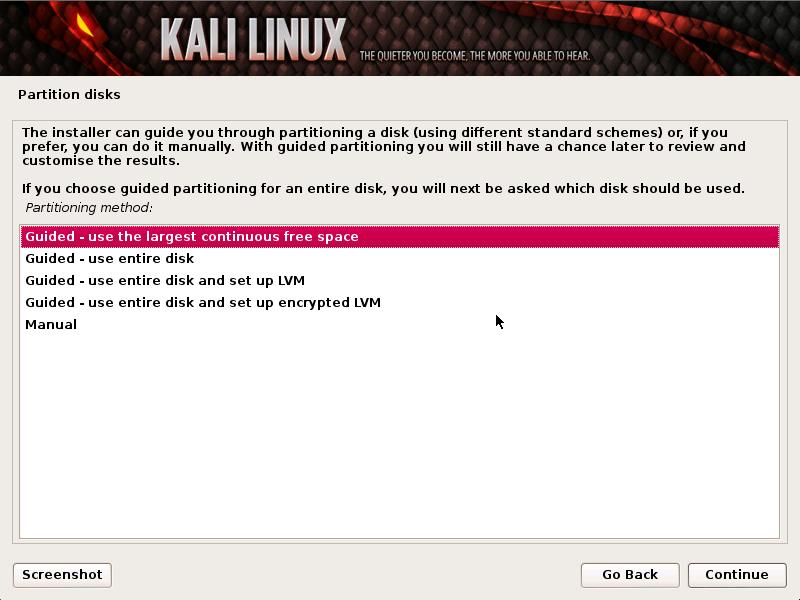
Troubleshooting step 3.e: Do you have too many partitions?
Apparently, this is another reason you get installation failed errors in Kali Linux. If you have too many partitions (counting primary and extended together .. more than 4 partitions in a single Disk), for some reason you get this error message. maverik35 provided an excellent explanation on what worked for him here:
I do not understand well, what did you use to partition HDD?..
I installed kali using: /, /home, swap (2 partitions and swap) and all in extended partition..I partitioned the HDD using as always, gparted, then reboot with kali dvd live and used, as always, install option (NOT Graphical install) and installed manually, then (not guided), configuring mounting points: /home and /, write changes and then installation ends up fine…Make sure you have identified the partitions.
Try with / and /home..The /var is one of the most increasing folders in Debian, but it will do no harm keeping it in the same partiton and making some maintenance such as erasing some files like in /var/log/. As to the /tmp, it gets erased every time you boot..
But again, is your decision, but try with 2 partitions and swap. Let’s see what happens.
That worked and you can see the confirmation reply in the forum post. Something you could also try? Maybe!!
Troubleshooting step 3.f: is your USB selected as primary during partitioning?
This is again I found useful from the forum post. See fogfreak‘s response and workaround:
I was trying to install Kali 1.0.5 i386 32bit. After several failed attamp i have managed to install. When I reach Disk Pertitioning step in intalletion procedure I saw my usd stick (/dev/sdb) as primery pertition. I just select that choose “Do not use this device”.
Then kali installed smoothly.Some older system doesnt supports more then 4 primery pertitions at a time including swap. I found 1 primery and 1 swap on my usb live Kali installetion disk. I select “Do not use this device” for both. Its work for me.
Troubleshooting step 3.g: Install using Non-Graphical or Text-mode option from boot menu
This is another option. Every single installation failed error relates to Graphical installation method, from either Live USB or DVD. Kali does provide an option for non-graphical installation. You could try that to install Kali Linux.

Troubleshooting step 3.h: Run Kali in LiveCD mode and install from there
You can run Kali Linux as LiveCD mode. Once you’re in Live mode, install from there.
Troubleshooting step 3.i: Install from MiniISO instead of full ISO
This always works as MiniISO is just megabytes in size. You can download MiniISO and boot using that. Once booted, just install what you prefer. I am yet to see anyone who failed with this step.
Official Kali Linux Mini ISO Install guide
Troubleshooting step 3.j: Un-plug peripherals and network
This is the last one I can think of. You might have something plugged in, USB Keyboard, Mouse, WebCAM, External HDD, PnP devices, an elephant, Master Yoda, Chuck Norris and god knows what!! Well if it was Chuck Norris, go get yourself a new computer.
Anyhow, jokes aside, … try unplugging something that you think might not be supported. Unplug your network.
Conclusion:
Kali Linux is still crawling out of infancy, so you need to give the developers some time and space to work through the problems. If you think step failed: Installing the system or Installing step failed : Install the system at 80% or The failing step is install the system error in Kali Linux is dreadful, you should try to use Minix or one of the old Linux distributions. People had smoke coming out of their motherboard, so consider yourself lucky. Be patient and good luck installing Kali Linux.
I hope at least one troubleshooting step might work out for you. At least they worked for me. I am putting all those random information in different posts in one place. Let me know if you know another workaround and I’ll be happy to include that in here.
Thanks for reading.Please share.
如有侵权请联系:admin#unsafe.sh