
文章描述了使用Sidekick工具分析LockBit 3.0恶意软件的过程,包括识别关键函数、解密字符串、构建解密工具以及提取和分析所有加密字符串。通过自动化工作台和LLM功能,快速定位并理解恶意软件行为,揭示其加密机制及潜在功能。 2025-2-26 05:0:0 Author: binary.ninja(查看原文) 阅读量:5 收藏
In this post, we’ll explore how we used Sidekick to analyze complex malware samples. We used LockBit 3.0 as our target, walking through the process of identifying and understanding key functions, deobfuscating strings, and mapping the sample’s behavior.
The Challenge
LockBit 3.0 exemplifies the complexity of modern malware analysis. Like many sophisticated samples, it employs various obfuscation techniques to hinder analysis. Using traditional reverse engineering tools, tasks like locating string decryption routines or mapping key functionality can take a considerable time. However, with AI assistance, we were able to reduce these tasks to minutes while maintaining accuracy.
Stage 1: Quickly Identifying Important Functions
Our first step was to get a high-level understanding of the binary’s structure. Using the Automation Workbench interface (shown in Figure 1), we started by running the utility functions analysis tool, which scanned the binary for functions with high in-degree. In malware, string decryption routines and hashing routines typically have high in-degree.
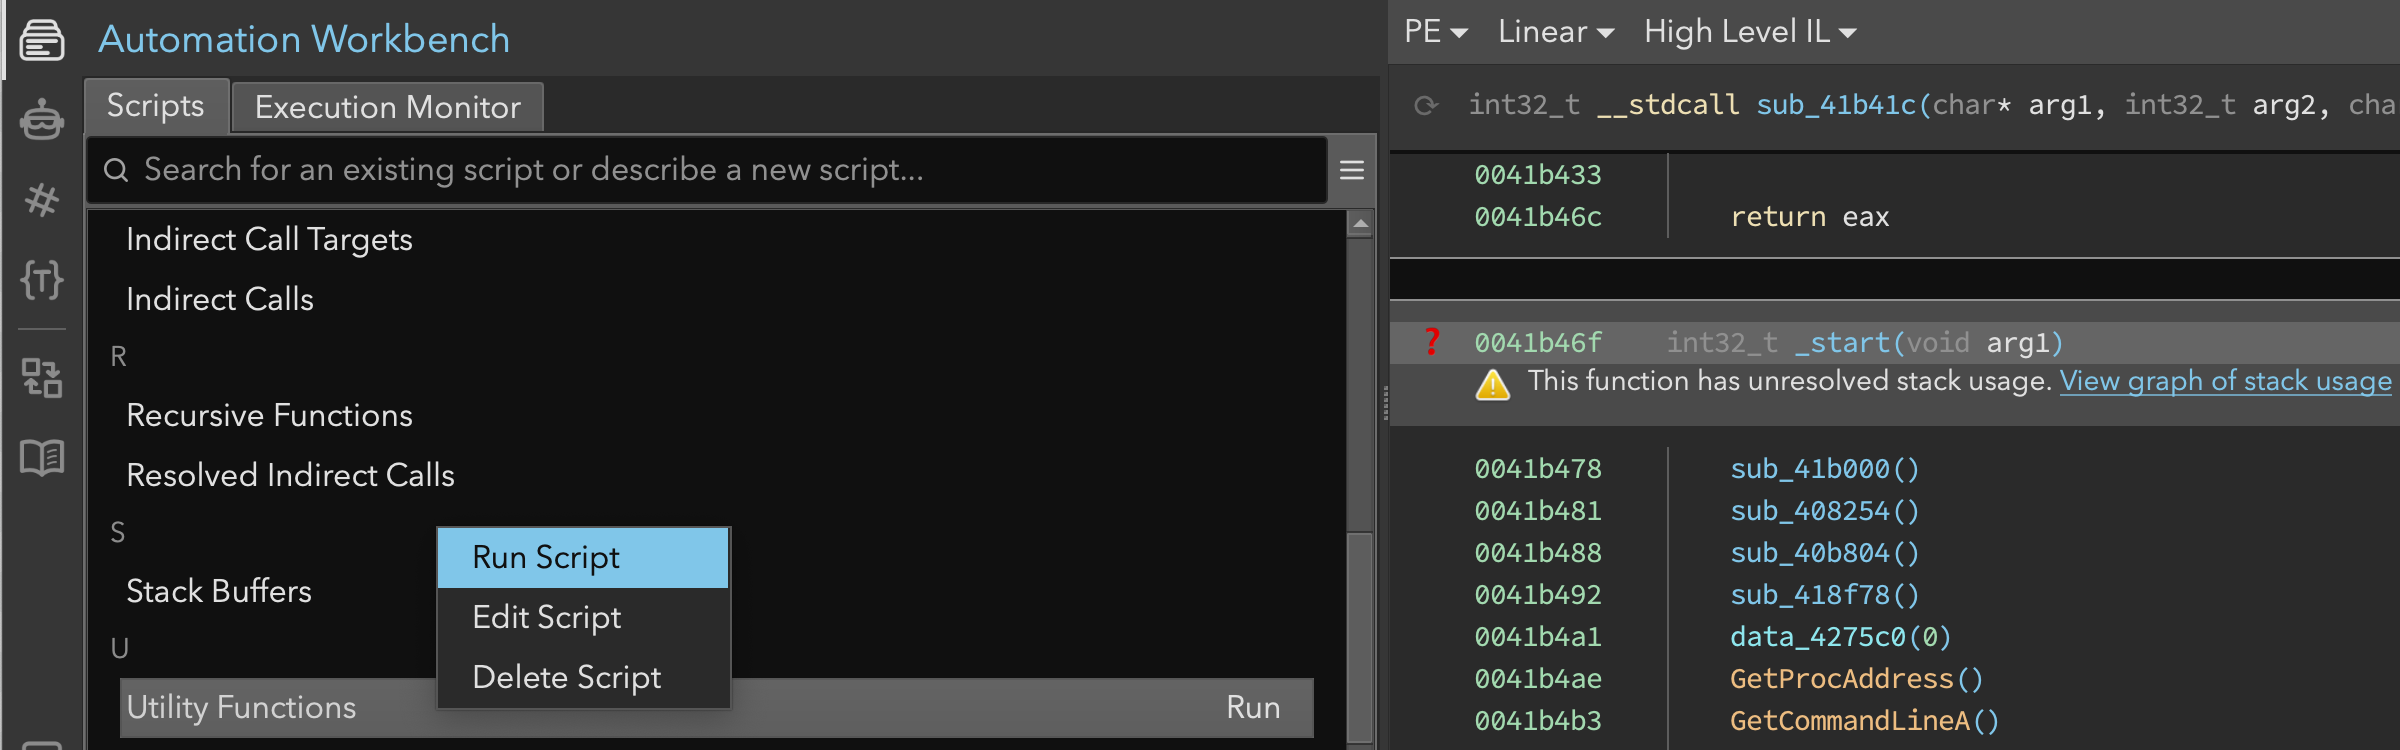 Figure 1: Binary Ninja’s Automation Workbench interface showing the utility functions tool
Because this post was intended to highlight the new Analysis Console, we didn’t run the script directly. Instead, we asked Sidekick to run it on our behalf (Figure 2). In response, Sidekick:
- Searched the scripts in the Automation Workbench
- Choose the most appropriate script
- Registered the script as a tool that it can call
- Ran the tool and reported the results
This demonstrated that Sidekick can readily use scripts (created by users or by itself) to answer analysis questions. We will see more of that later.
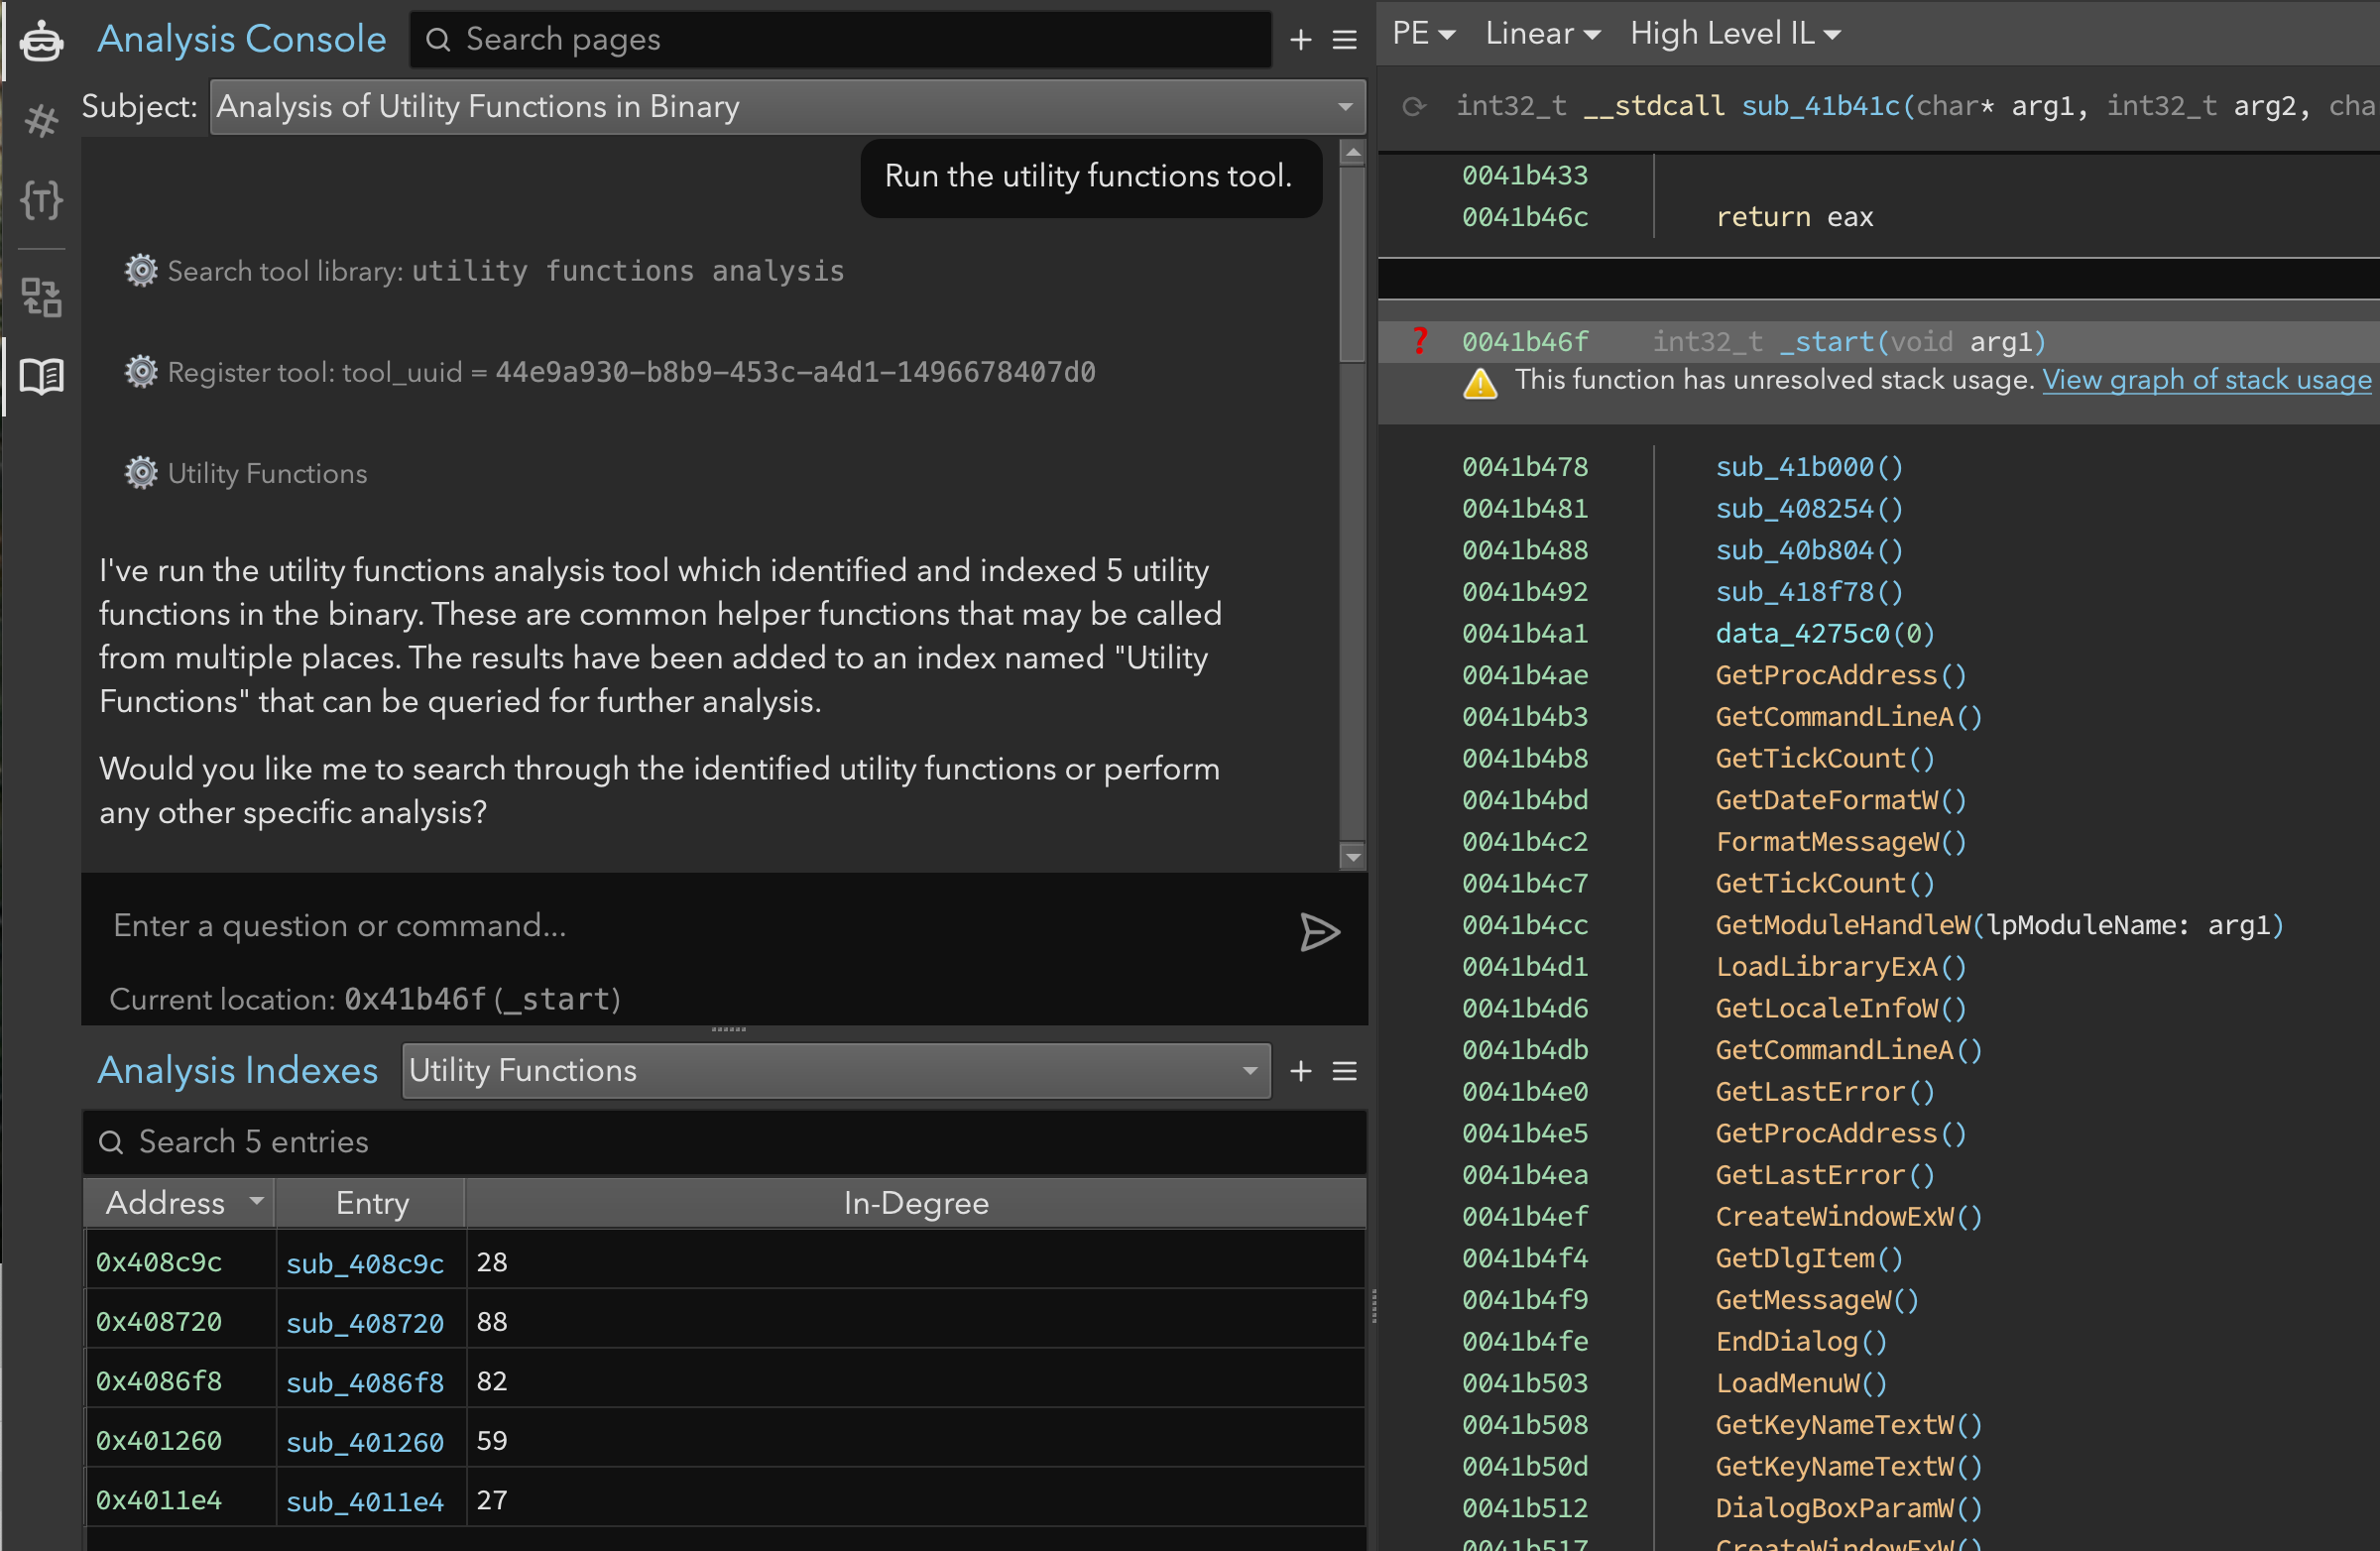 Figure 2: Analysis Console and Indexes showing the identified utility functions
At this point, Sidekick asked if we’d like it to search through the functions in the newly created “Utility Functions” index, and we consented. Sidekick proceeded and examined the contents of the index:
index:Utility Functions
Metadata:
 Name: Utility Functions
 Total entries: 5
Type Distribution:
 function: 5
Entries by Type:
 function (5 entries):
   4011e4: sub_4011e4   | {In-Degree=27}
   401260: sub_401260   | {In-Degree=59}
   4086f8: sub_4086f8   | {In-Degree=82}
   408720: sub_408720   | {In-Degree=88}
   408c9c: sub_408c9c   | {In-Degree=28}
Next, we observed (in Figure 3) Sidekick retrieving the several functions in the index before responding. Having accessed the function contents, it identified sub_401260 as a likely string decryption function and gave a quick rundown of its operation. It was also helpful enough to suggest the purposes of the other functions.
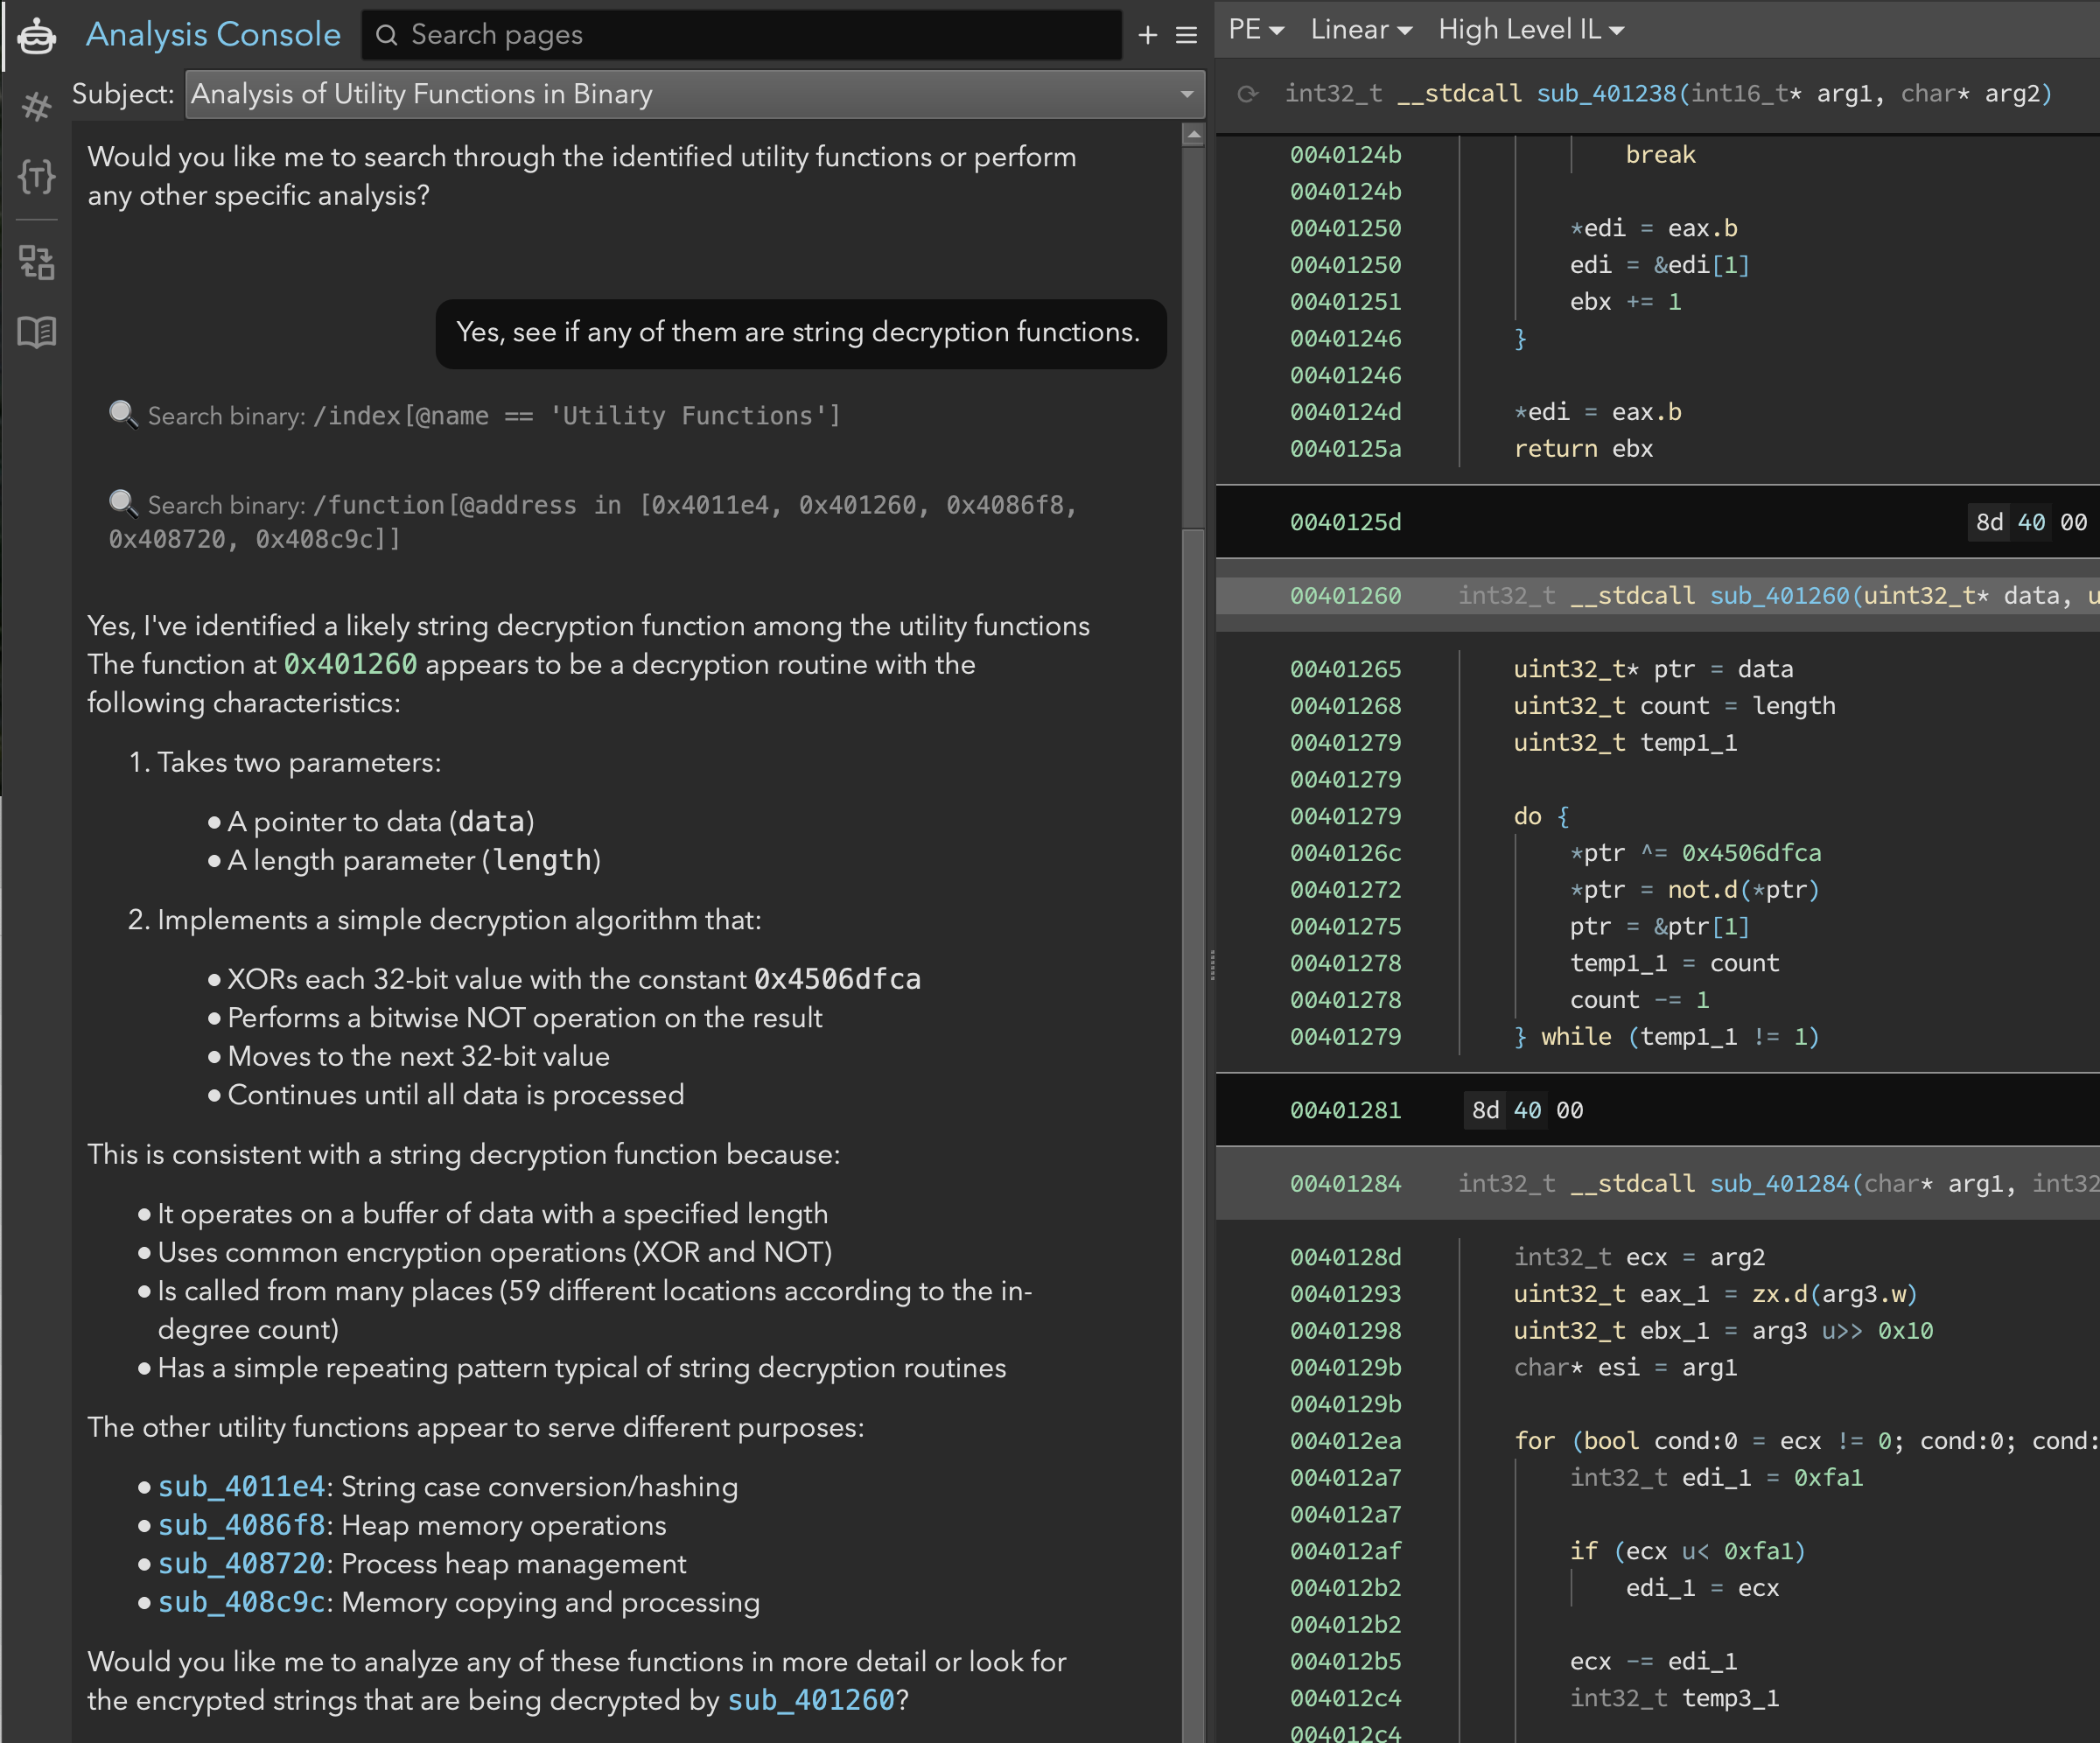 Figure 3: Examining the functions in the Utility Functions index
Eventually, we needed to decrypt the strings by mimicking sub_401260. But, before doing that, we wanted to edit the binary to reflect our new understanding. So, we asked Sidekick to improve the decompilation accordingly. Sidekick made several updates based on its analysis and told us what edits it made (Figure 4). Among those edits, two were particularly interesting at this point:
compute_string_hash(formerlysub_4011e4): String case conversion/hashingdecrypt_data_block(formerlysub_401260): Decrypts data using XOR with 0x450bdfca and NOT operations
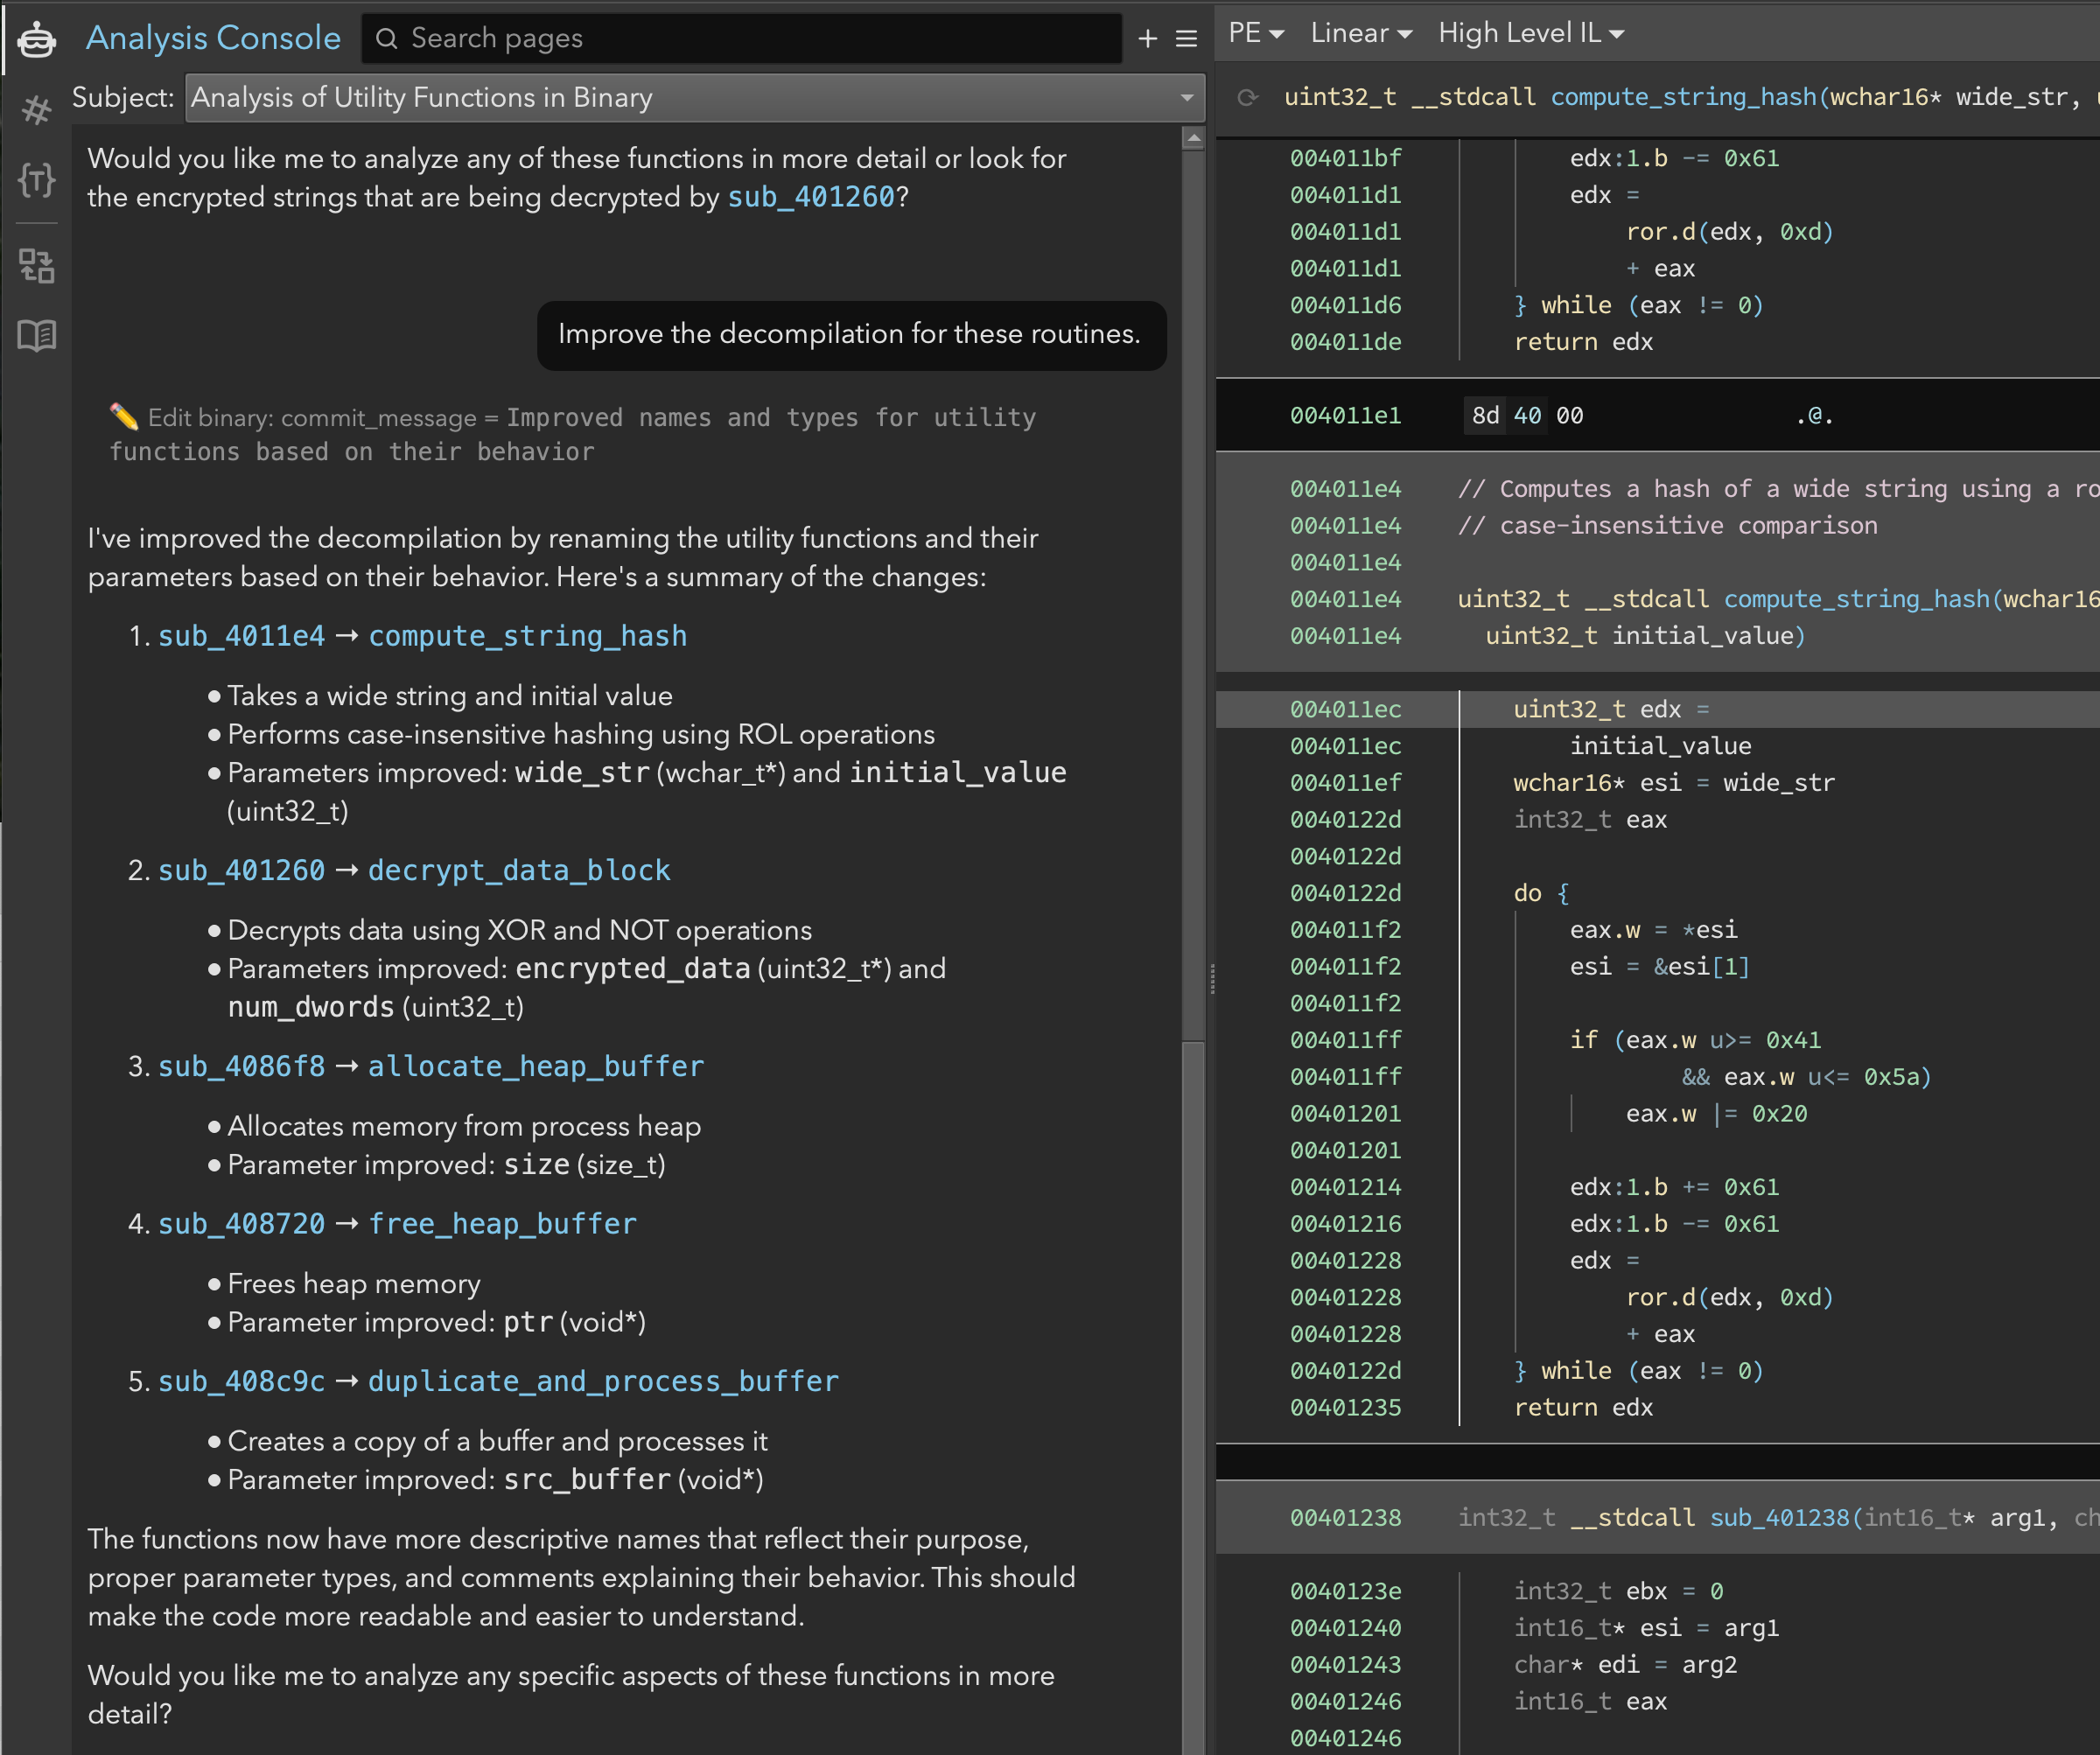 Figure 4: Sidekick fixes up the names and parameter types
As an aside, all changes made by the assistant were recorded and viewable in the Sidekick Change Log sidebar. In Figure 5, we could see that Sidekick named the functions, added comments, and fixed up the parameters. The Change Log provided transparency and allowed us to see each edit that was made. As always, if we felt Sidekick got something wrong, any such changes could be quickly reverted using Binary Ninja’s undo system.
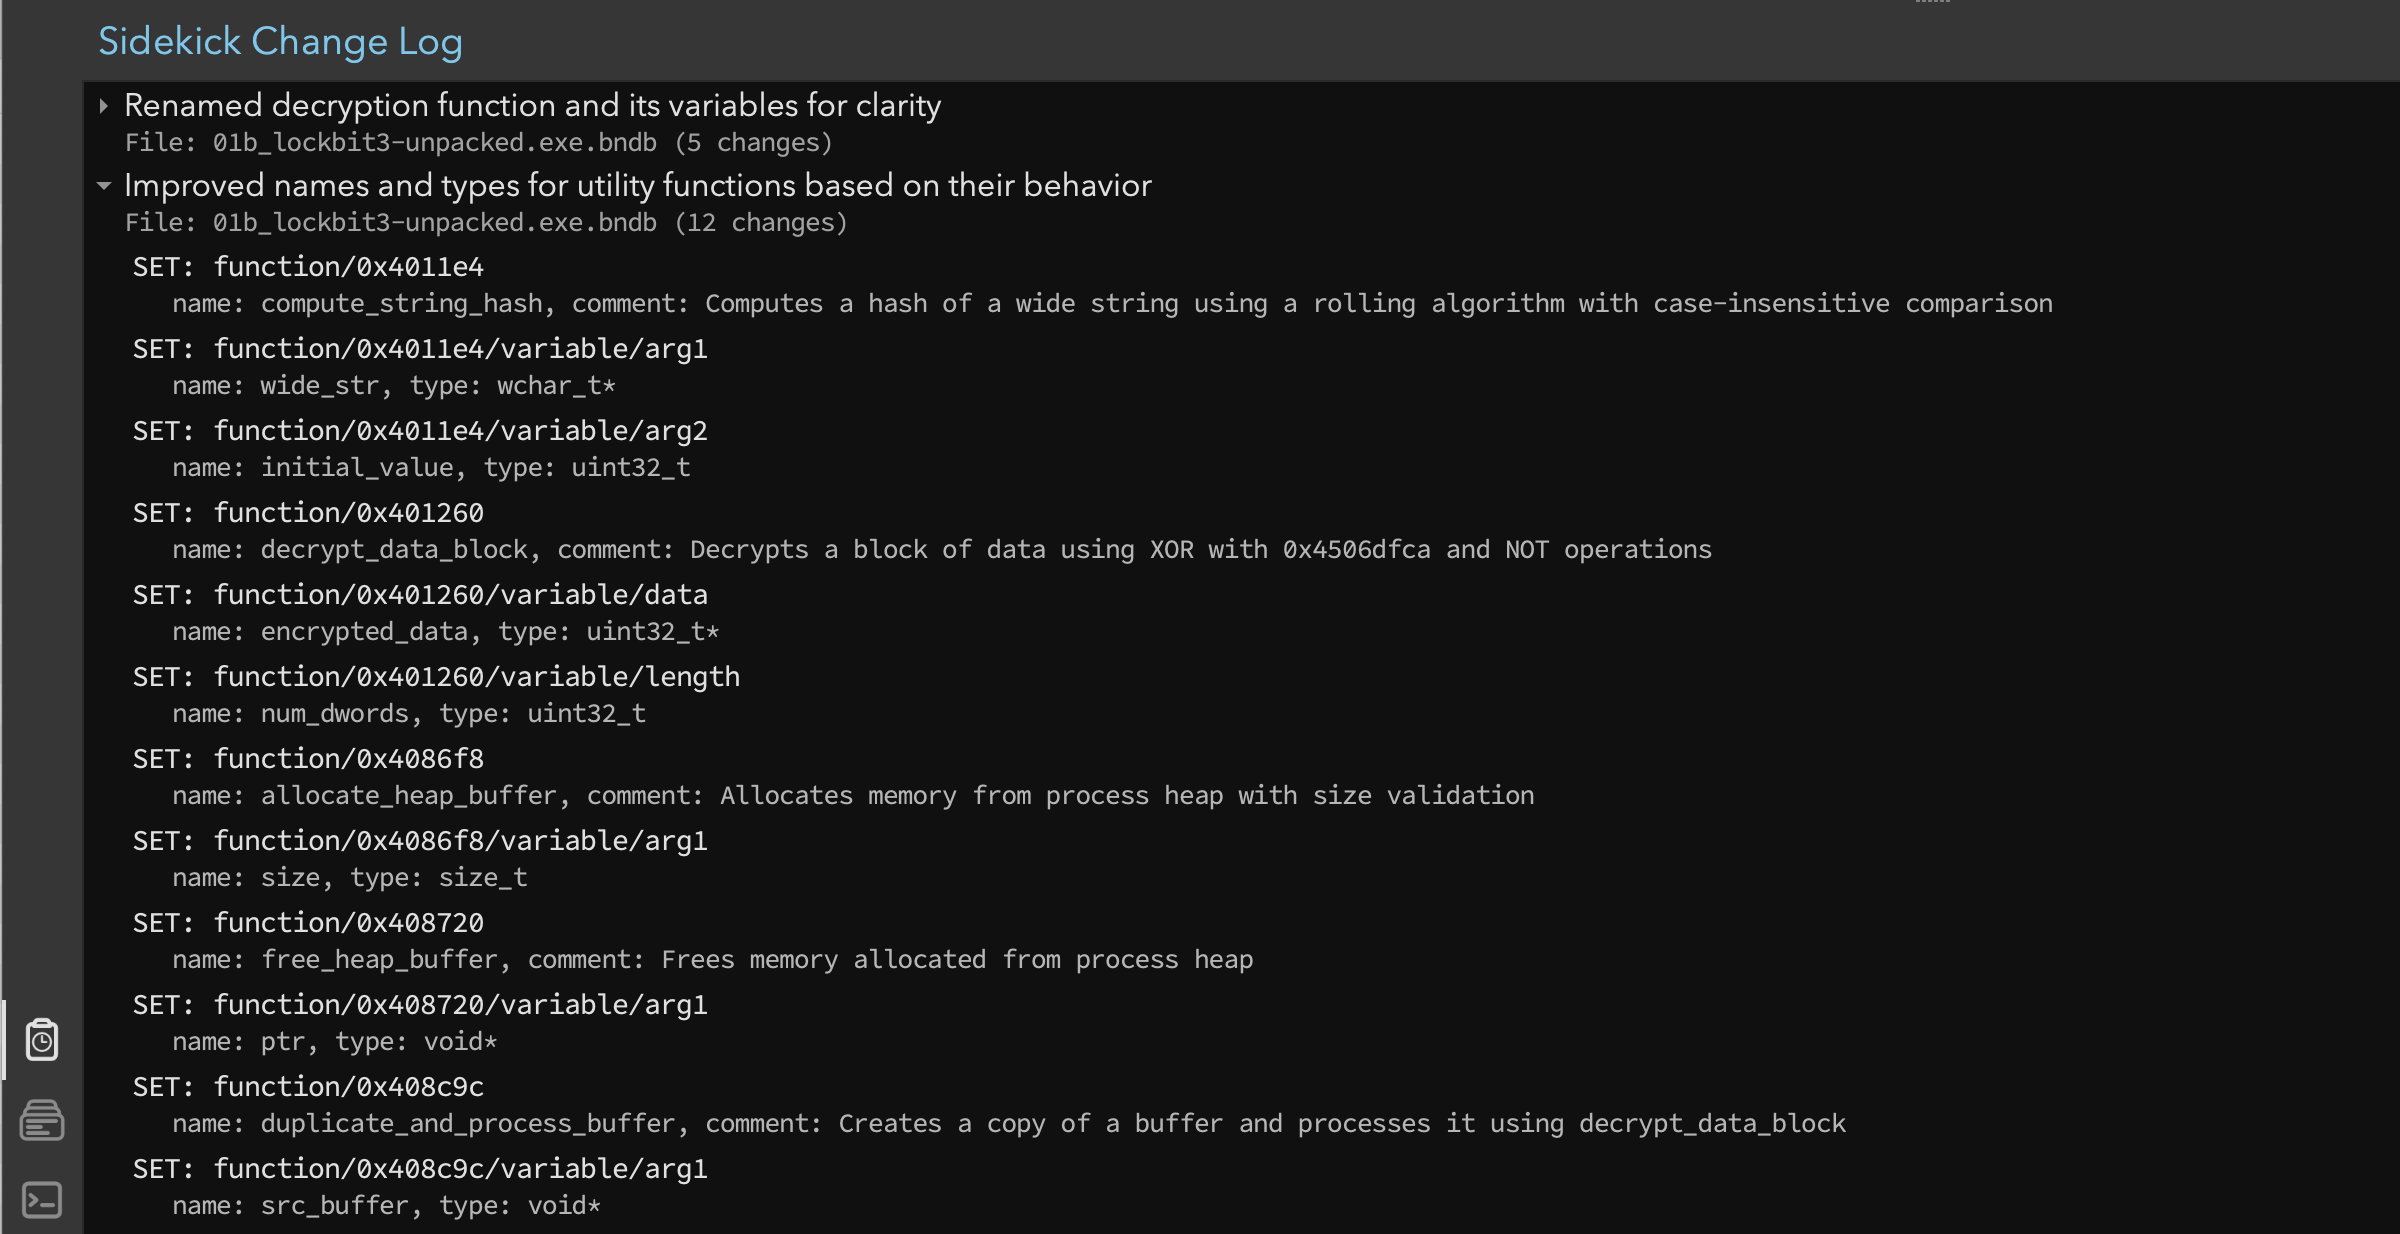 Figure 5: Sidekick Change Log showing the edits made
Stage 2: Decrypting Strings
With key functions identified, we focused on the decrypt_data_block function, which:
- Takes two parameters:
- A pointer to data (data)
- A length parameter (length)
- Implements a decryption routine that:
- XORs each 32-bit value with the constant 0x450bdfca
- Performs a bitwise NOT operation on the result
- Moves to the next 32-bit value
- Continues until all data is processed
This is a rather straightforward string decryption routine, so we proceeded with the next steps.
Build the Decryption Tool
We created a matching decryption tool simply by asking Sidekick to create a decryption tool for decrypt_data_block. As shown in Figure 6, Sidekick described what we needed more precisely: the inputs, outputs, and processing required.
 Figure 6: Asking the assistant to create a decryption tool
We wanted to copy and paste the bytes from the __builtin_memcpy call in the linear view to verify that the tool worked correctly. However, the bytes were escaped hex strings, not plain hex strings. So we used the Automation Workbench directly to make that change (Figure 7). The script was also stripping the final zero byte, which messed up the final character, so we manually removed that line. After running the script, it was obvious that the decrypted strings were actually 16-bit little endian. We quickly fixed this issue.
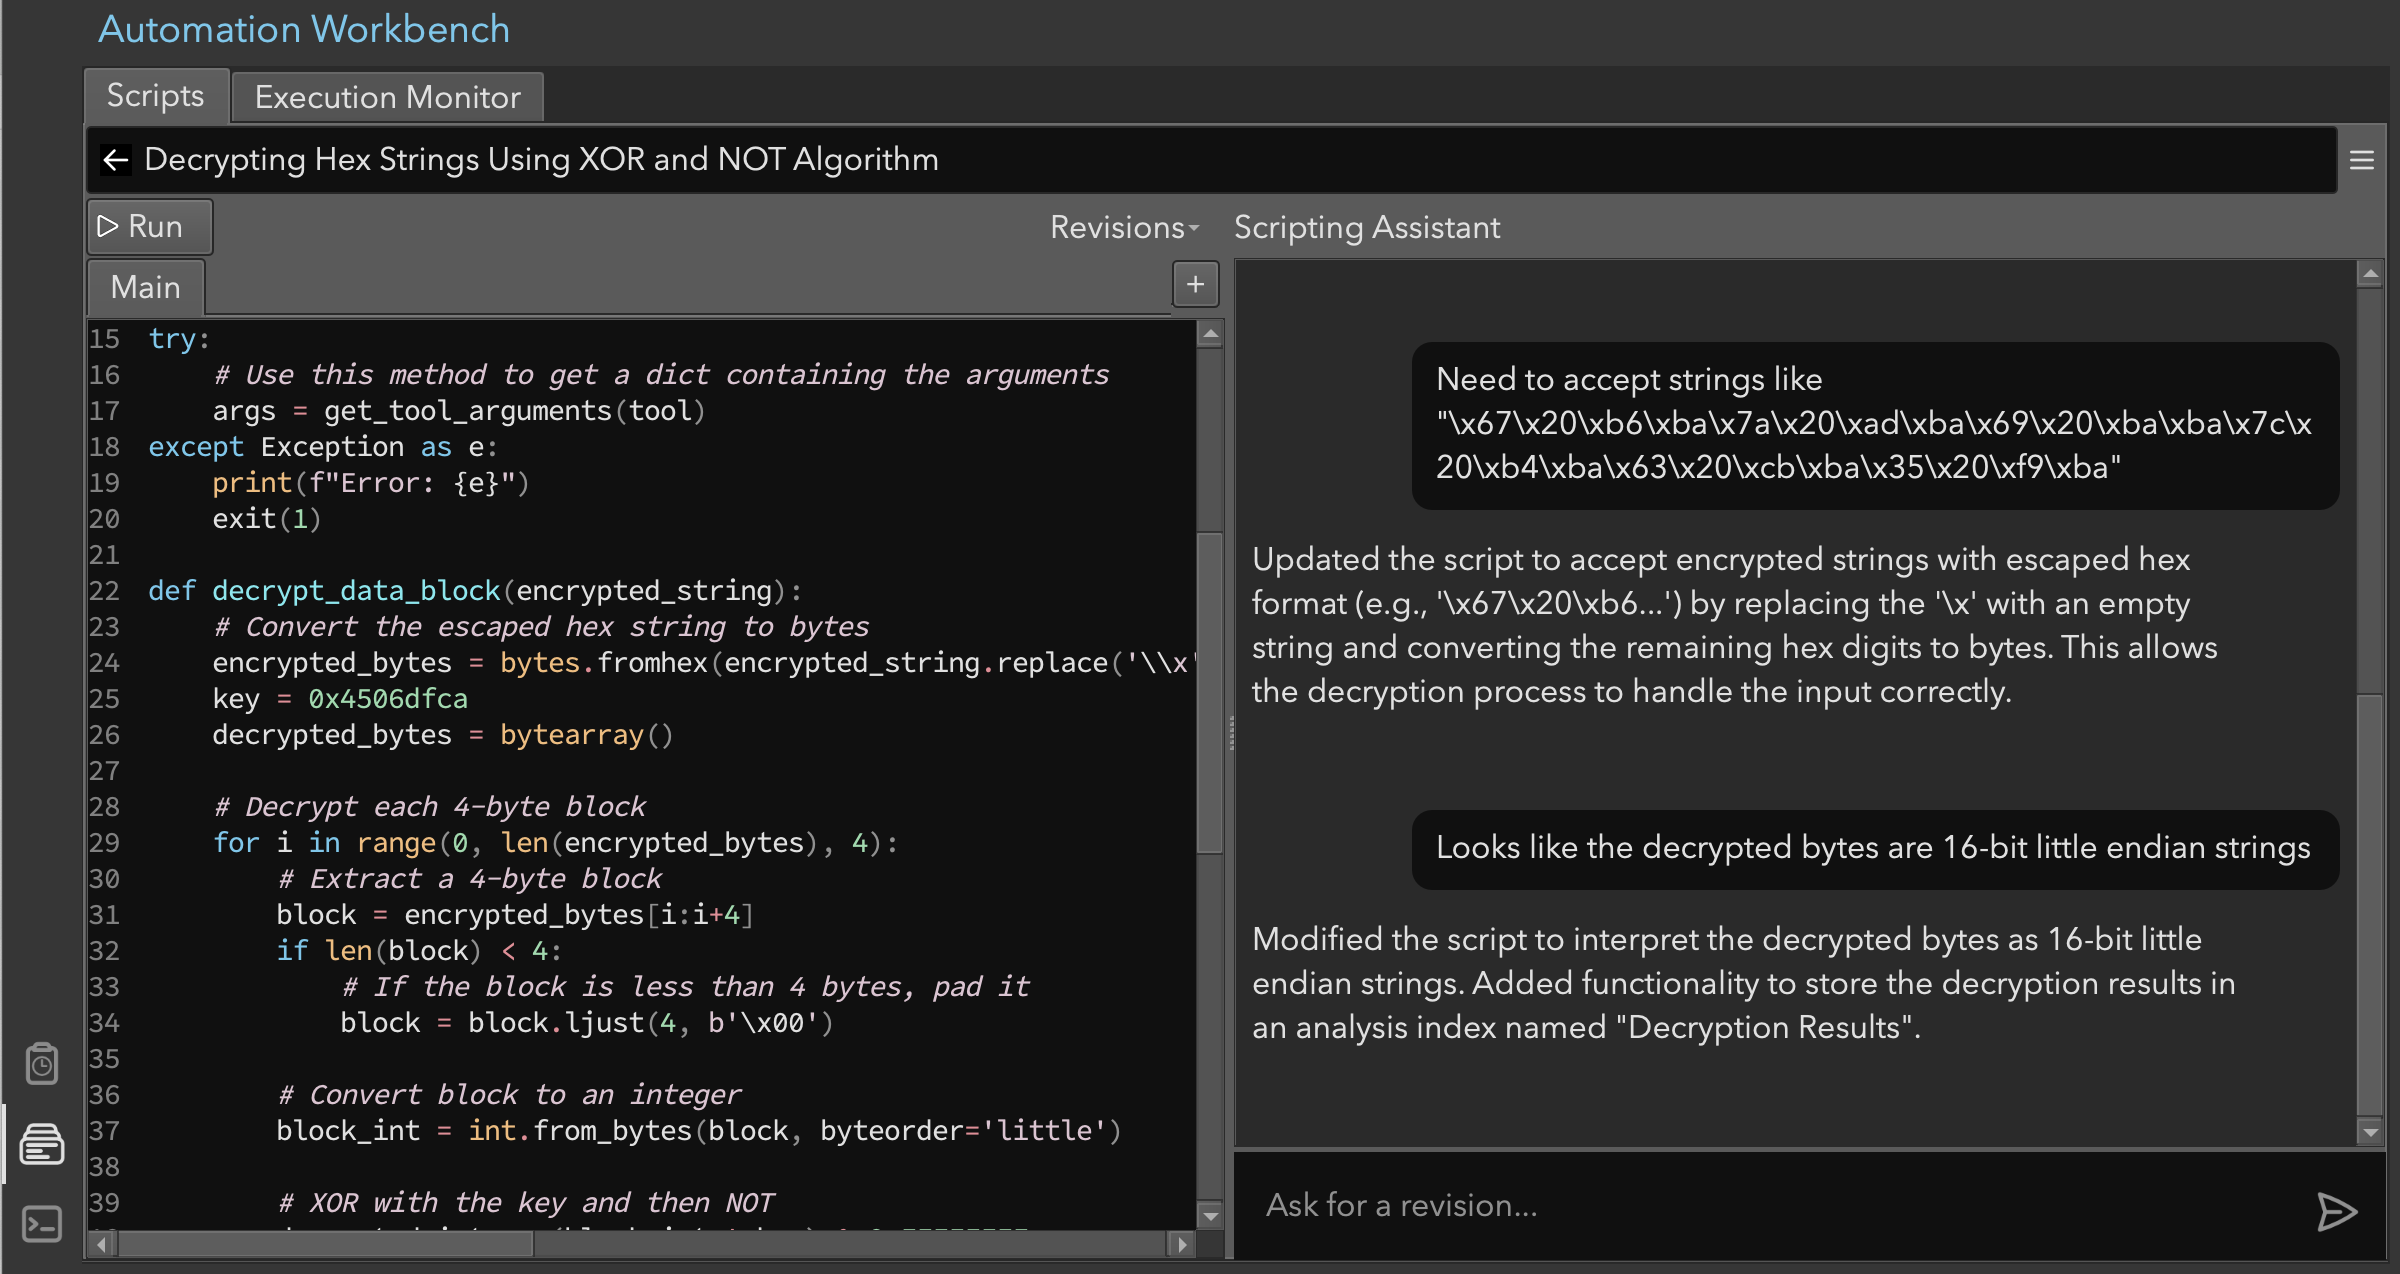 Figure 7: Editing the decryption tool
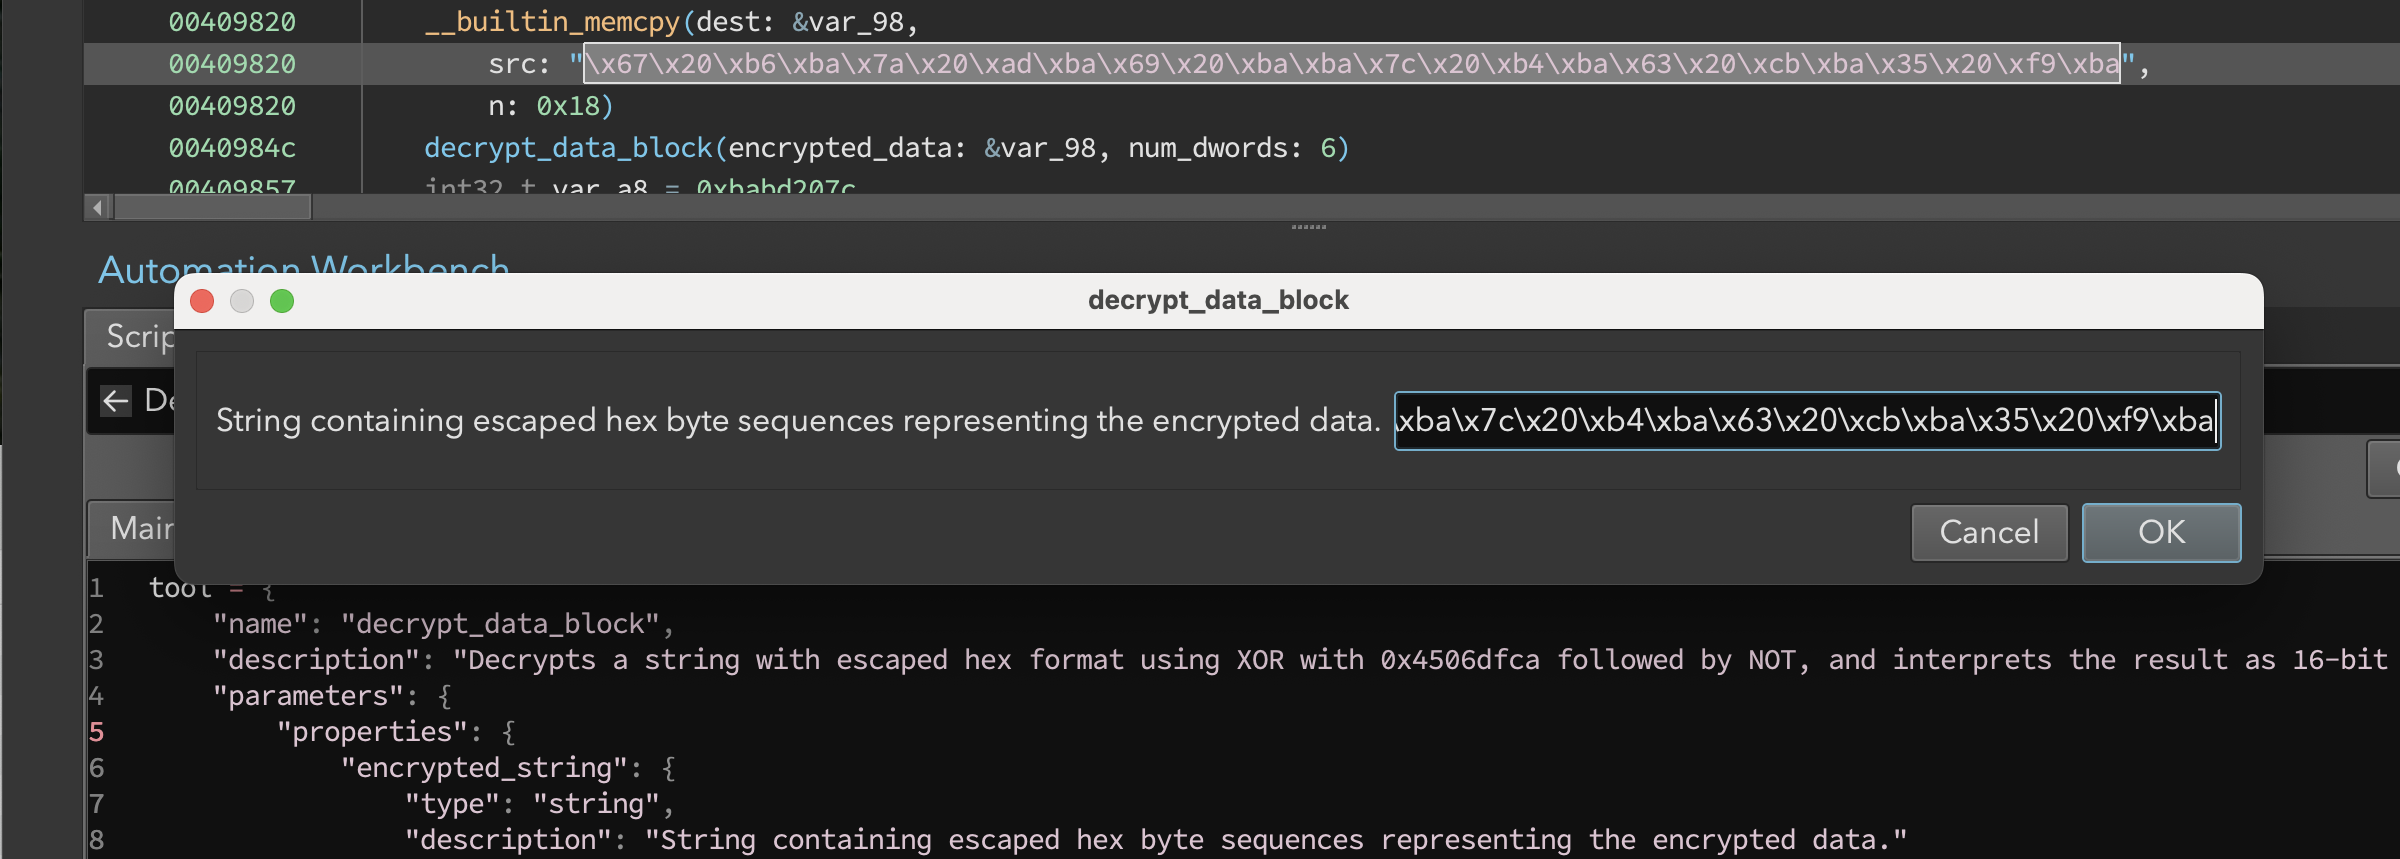 Figure 8: Running the script prompts for input
When we ran the script, we were prompted for the input sequence (Figure 8). Running the script after these minor edits produced the output:
Decoded String: ROOT\CIMV2
This confirmed that our approach was working. We were ready to decrypt all the strings.
Note: We could have asked the assistant to use the tool directly to verify for us. For example, “Go pick a few of the call sites for decrypt_data_block and see what kinds of strings there are.” We skipped that step and proceeded to decrypt all of the strings.
Decrypt All the Strings
For extracting all encrypted strings, we considered three approaches:
- Look for
__builtin_memcpycalls before eachdecrypt_data_blockcall- Pros: Straightforward approach
- Cons: Misses short strings and may require additional code for edge cases
- Write a script to reconstruct the arrays
- Pros: Comprehensive
- Cons: Time-consuming and duplicates Binary Ninja’s functionality
- Use an LLM to extract memory contents at each call site
- Pros: Low effort and flexible analysis
- Cons: Potential for mistakes or missed instances
We provided a fairly detailed description of what we wanted. Our goal was to use the existing decrypt function to scan all the callers. And, we wanted to use an LLM to extract the bytes being passed to decrypt_data_block. We also wanted all the decrypted strings to be put into an index and associated with the call site (Figure 9).
The script functionality was designed to:
- Automatically identify call sites
- Extract encrypted strings
- Process multiple strings per function
- Use the decryption function
- Store results in an analysis index
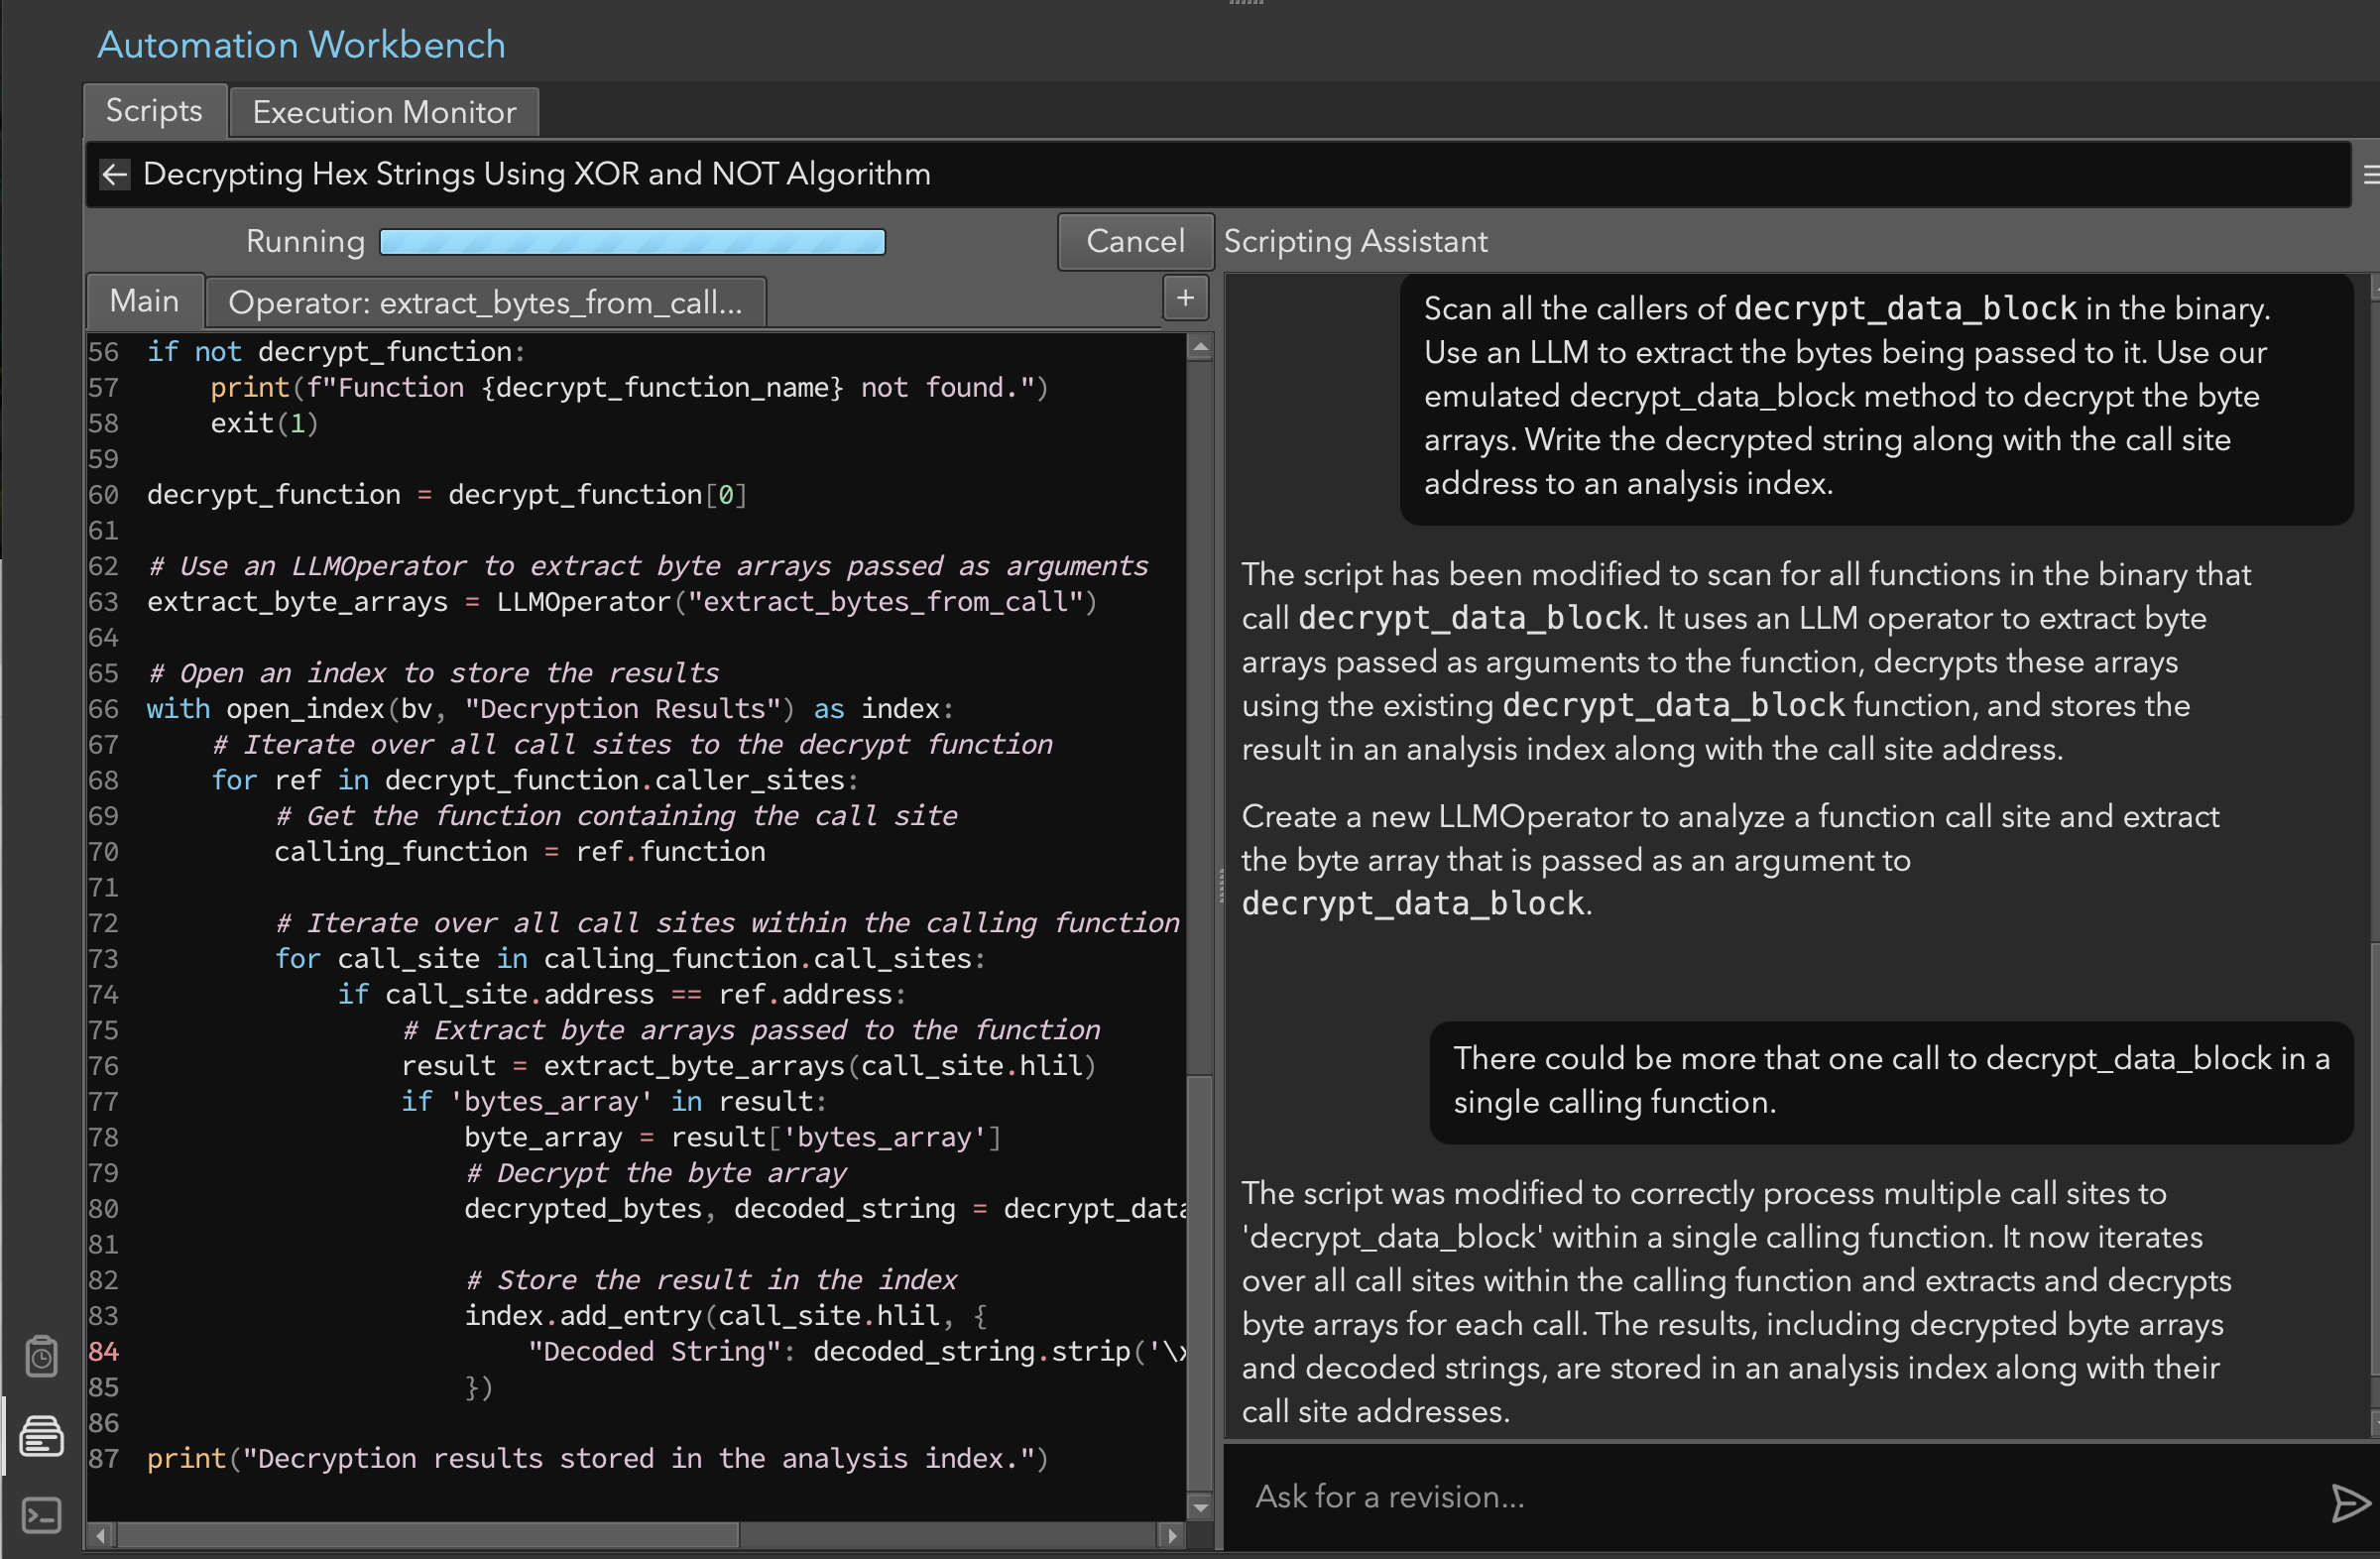 Figure 9: Script for processing all strings
We had to fix the script because we only wanted the decoded string added to the index (not an extra column for the decoded bytes), and we wanted the index to refer to the associated HLIL instruction. Quick adjustments were made manually.
We ran the script and the strings, shown in the Analysis Index (Figure 10), started appearing.
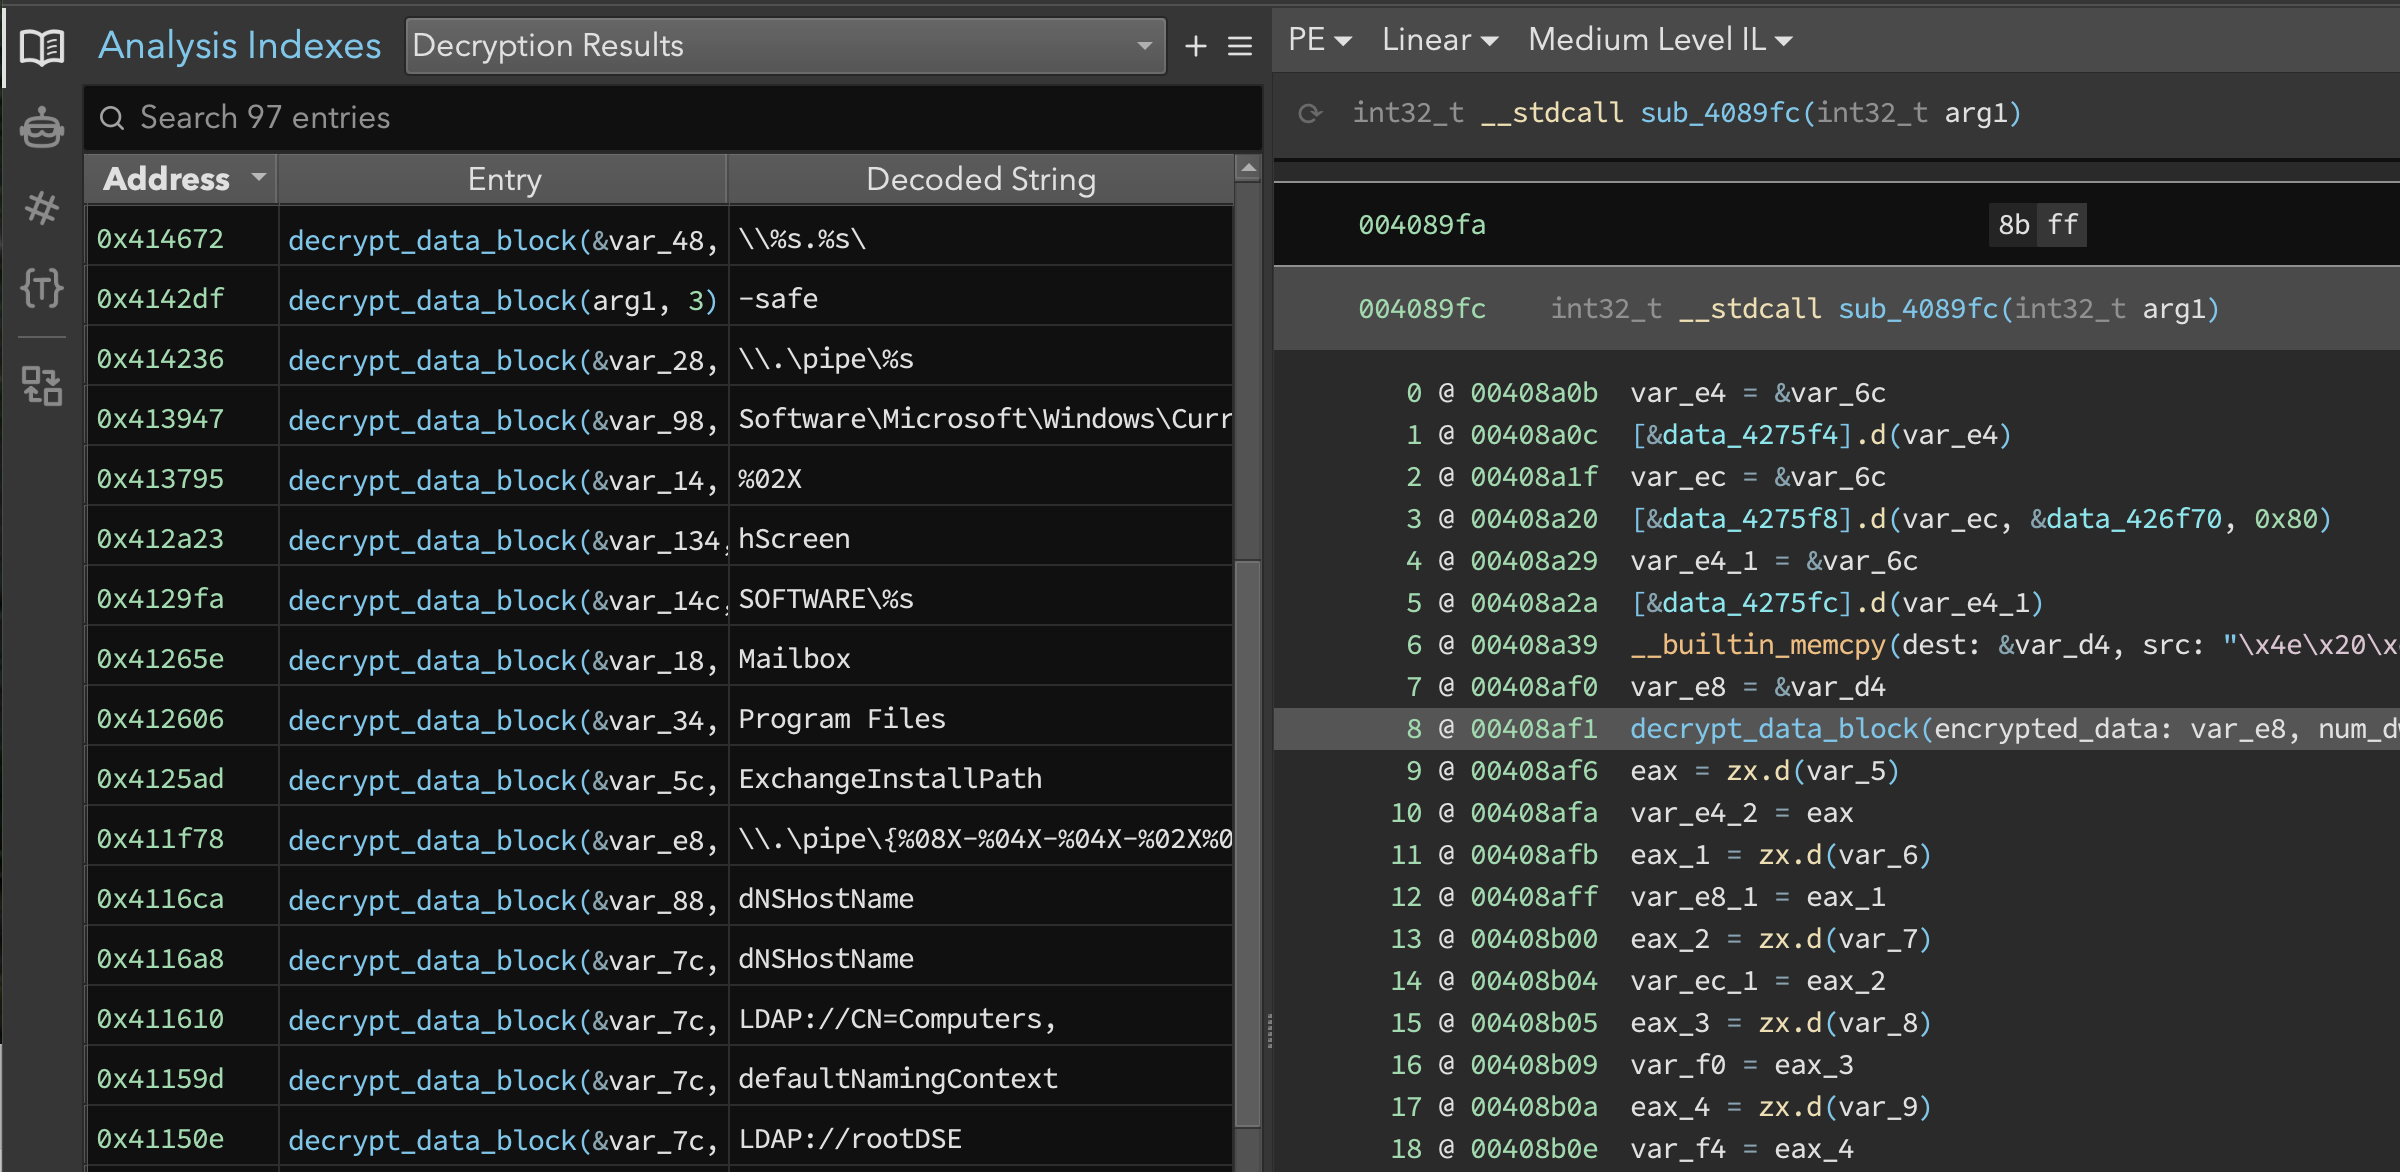 Figure 10: Decrypted strings in the Analysis Index
After the script finished running, we used the Code Insight Map feature (Figures 11 & 12) to visualize the relationship between decrypted strings and their usage throughout the binary. This visualization helped identify clusters of related functionality throughout the program.
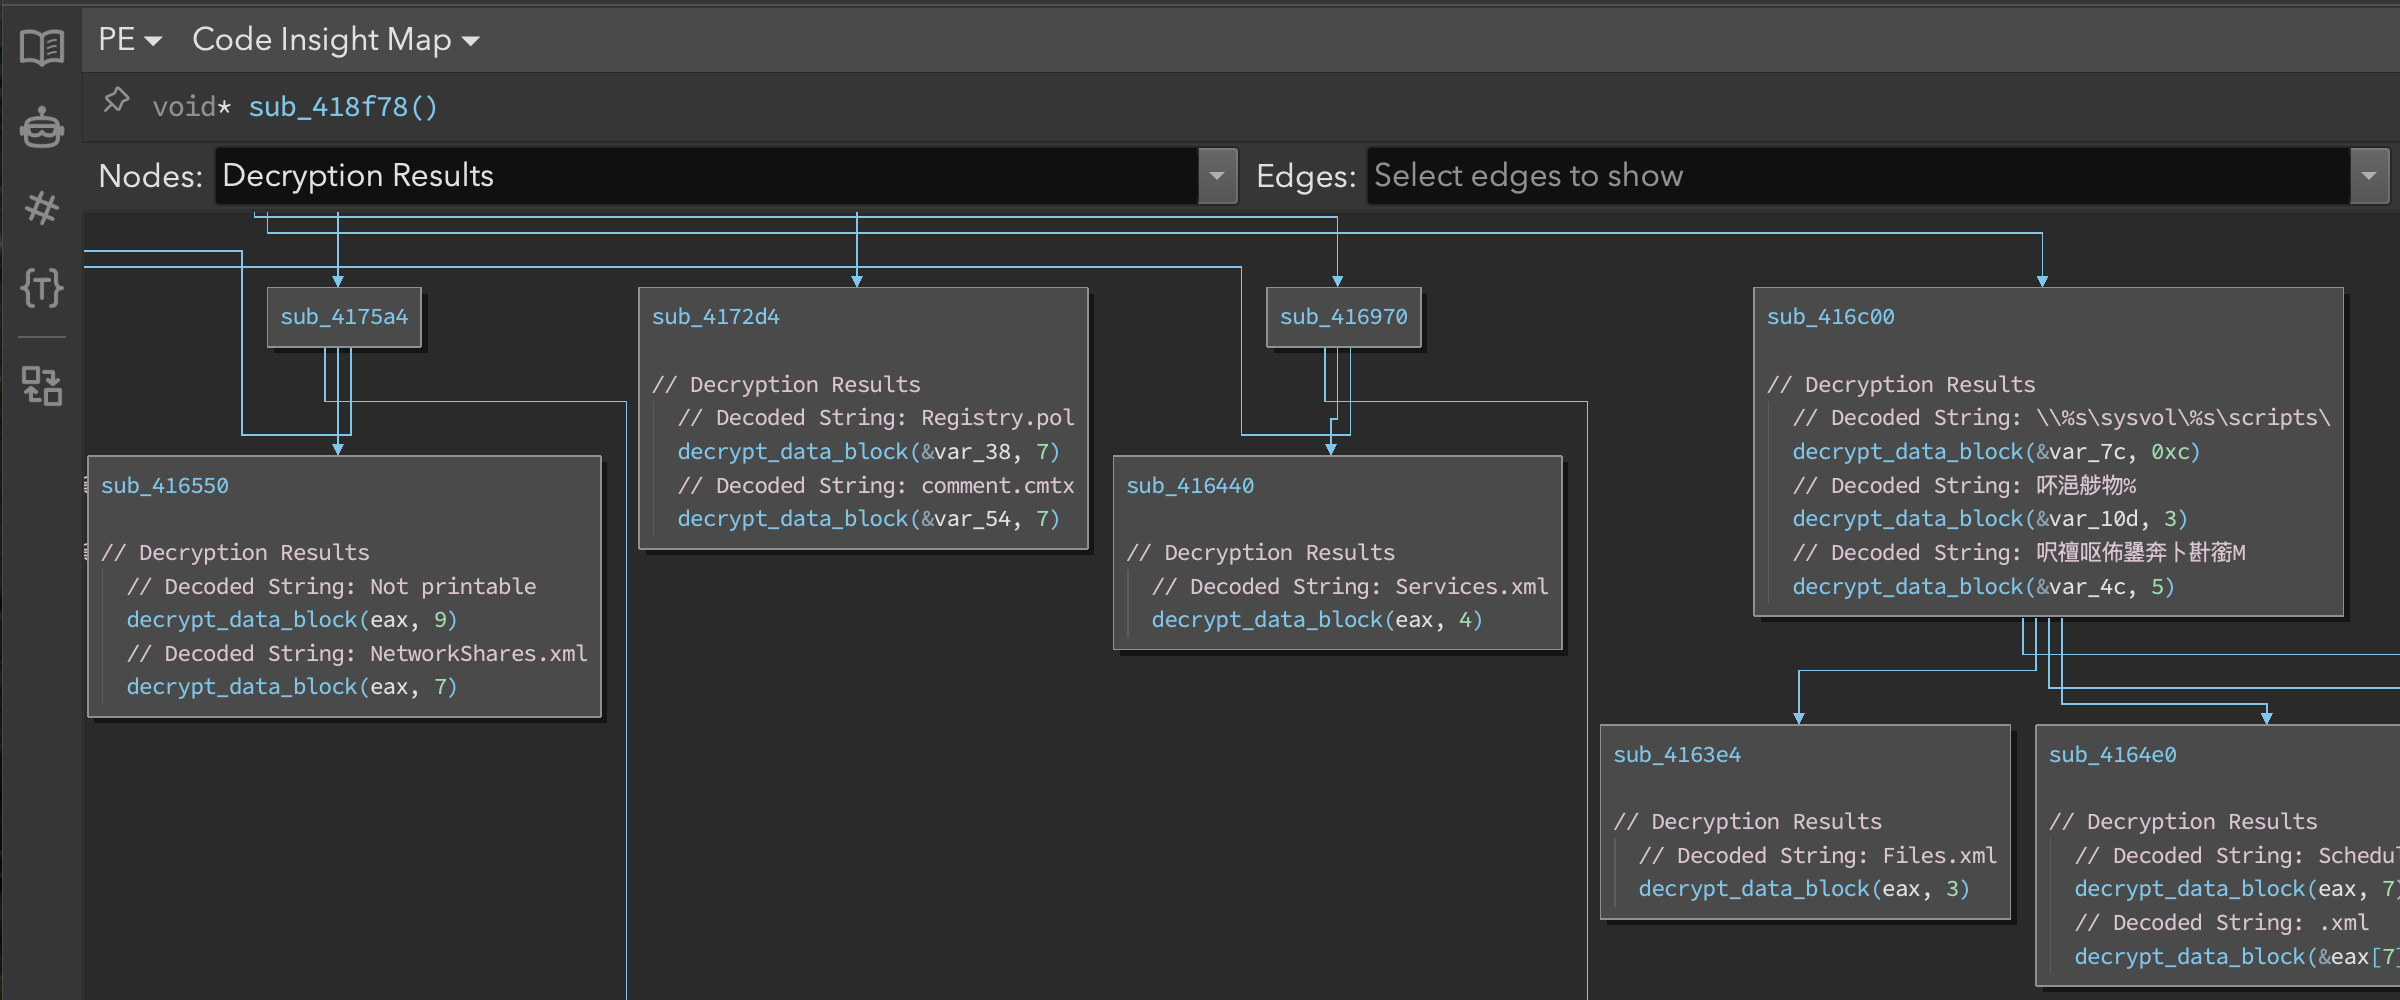 Figure 11: Code Insight Map showing string relationships
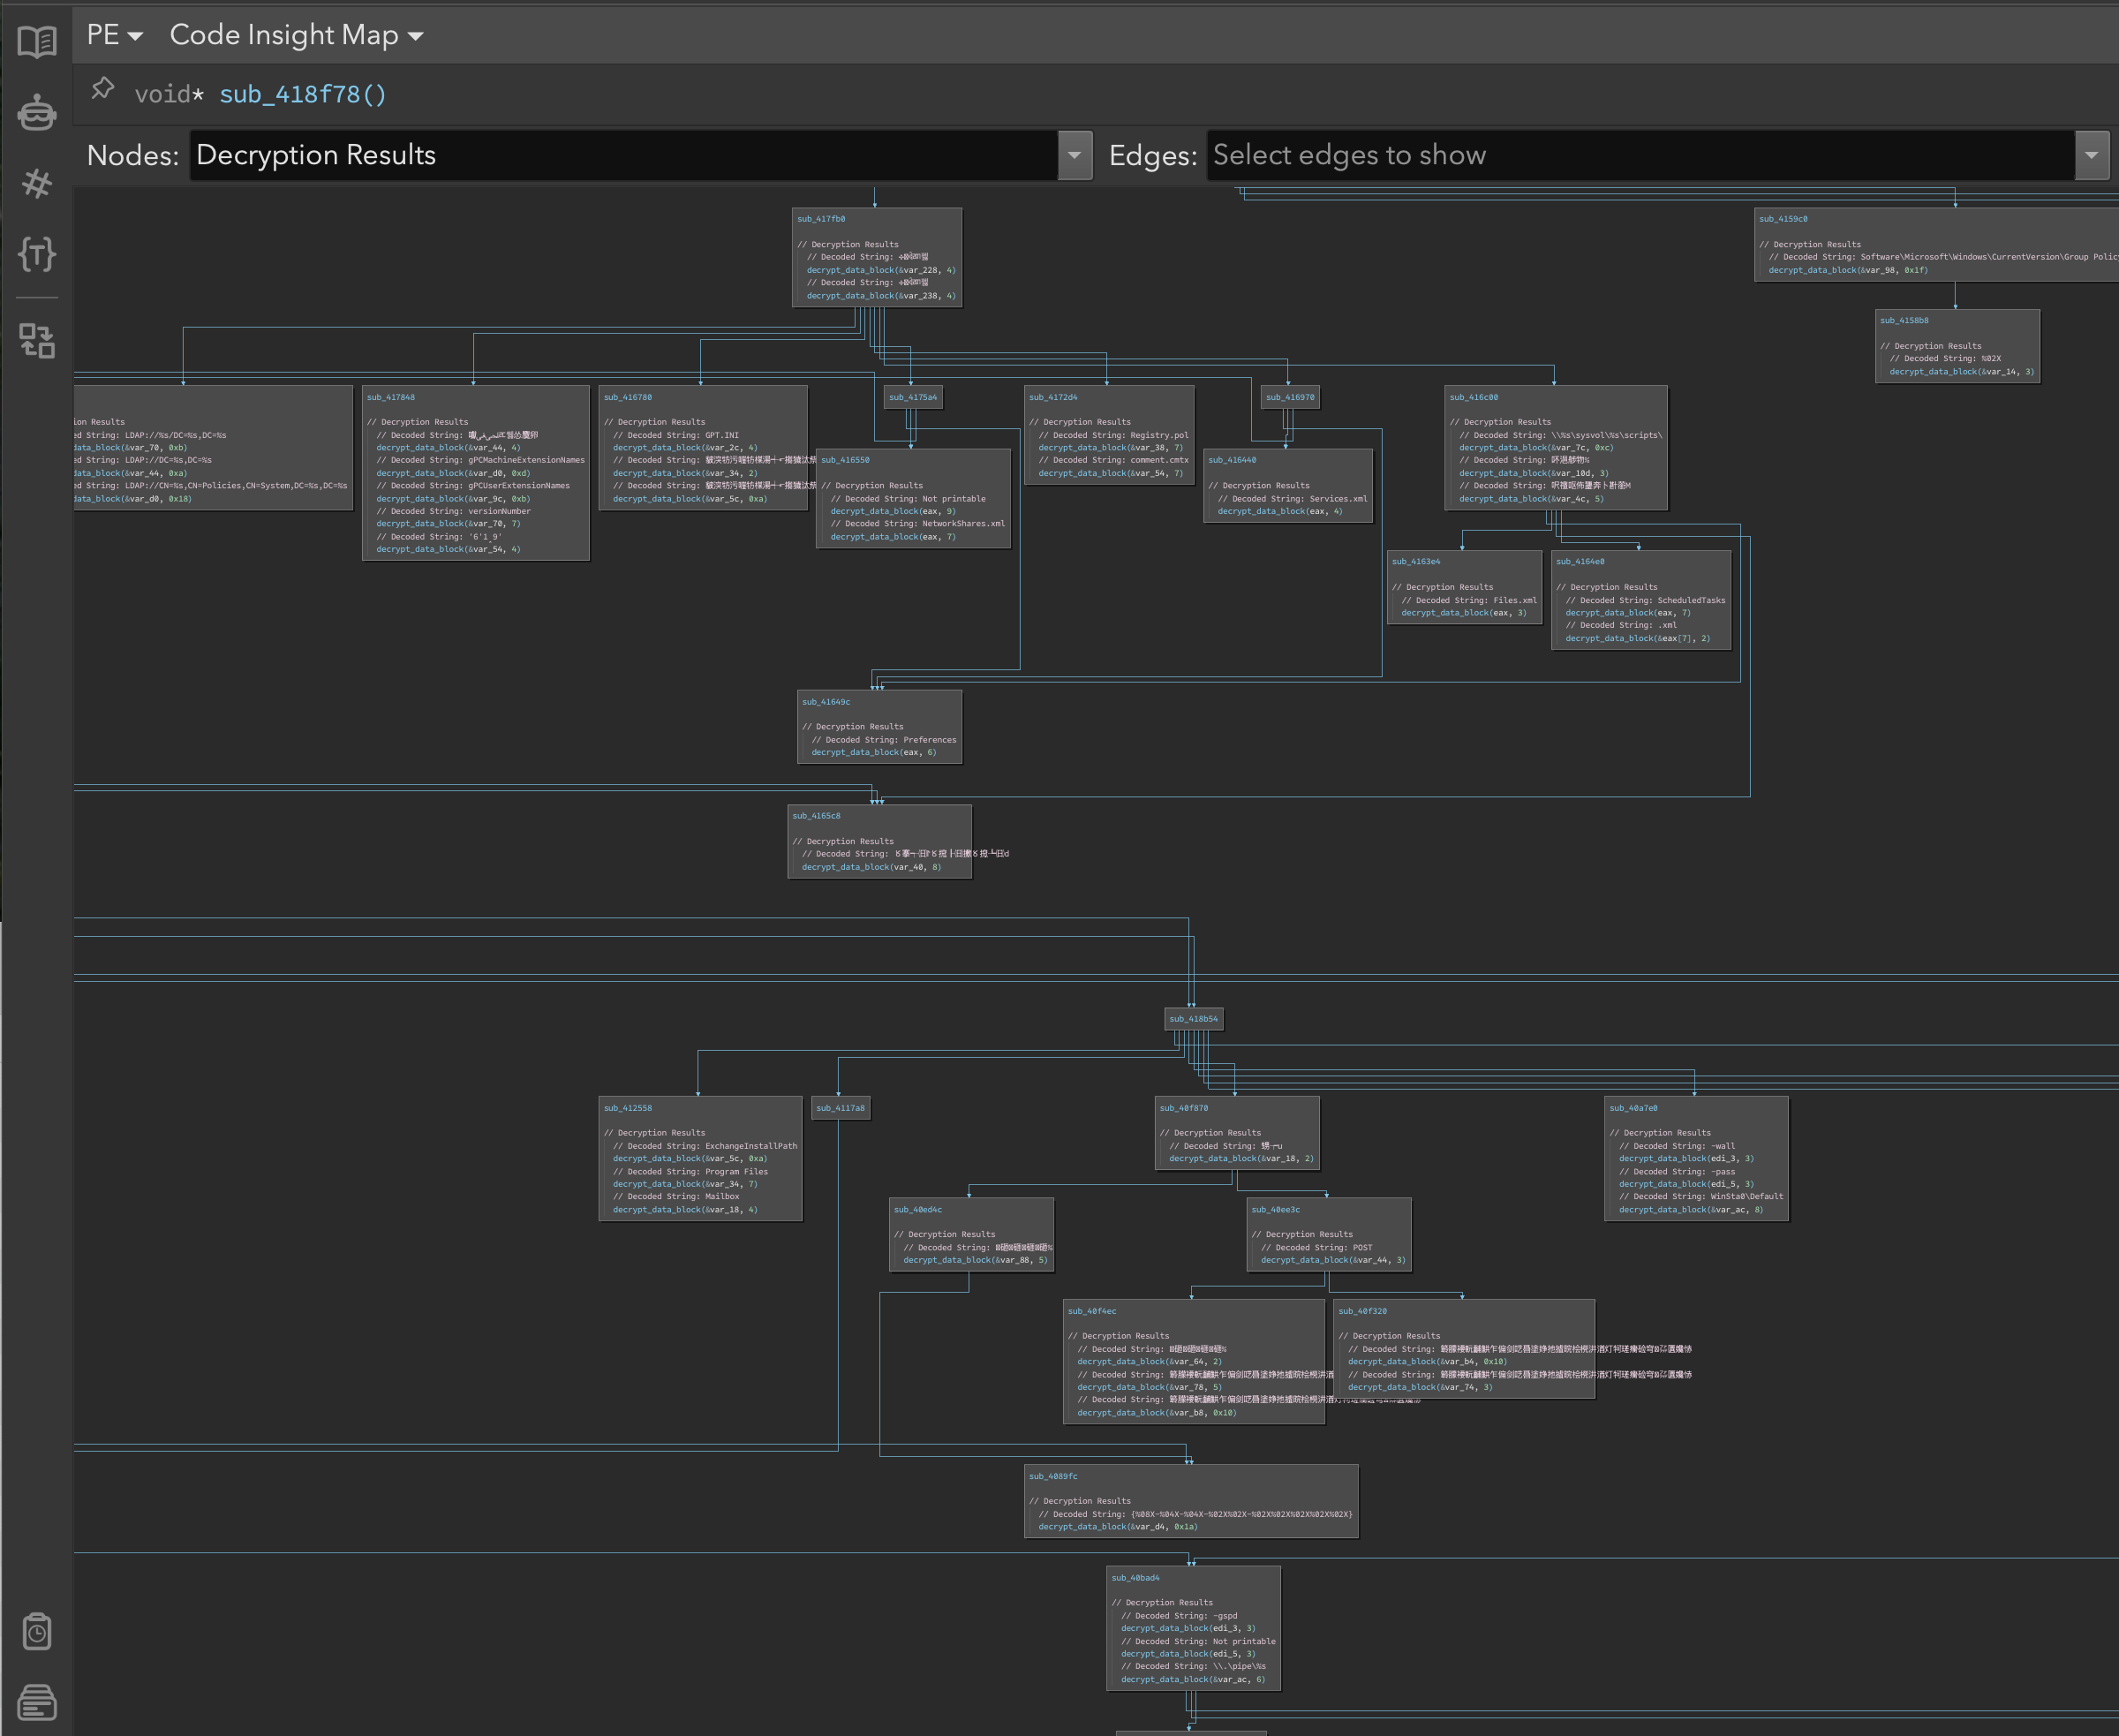 Figure 12: Zoomed out view of the Code Insight Map
In addition to these graphical representations, we asked Sidekick to assess the string contents. Sidekick retrieved the strings from the analysis index and gave a comprehensive analysis of the strings (Figure 13).
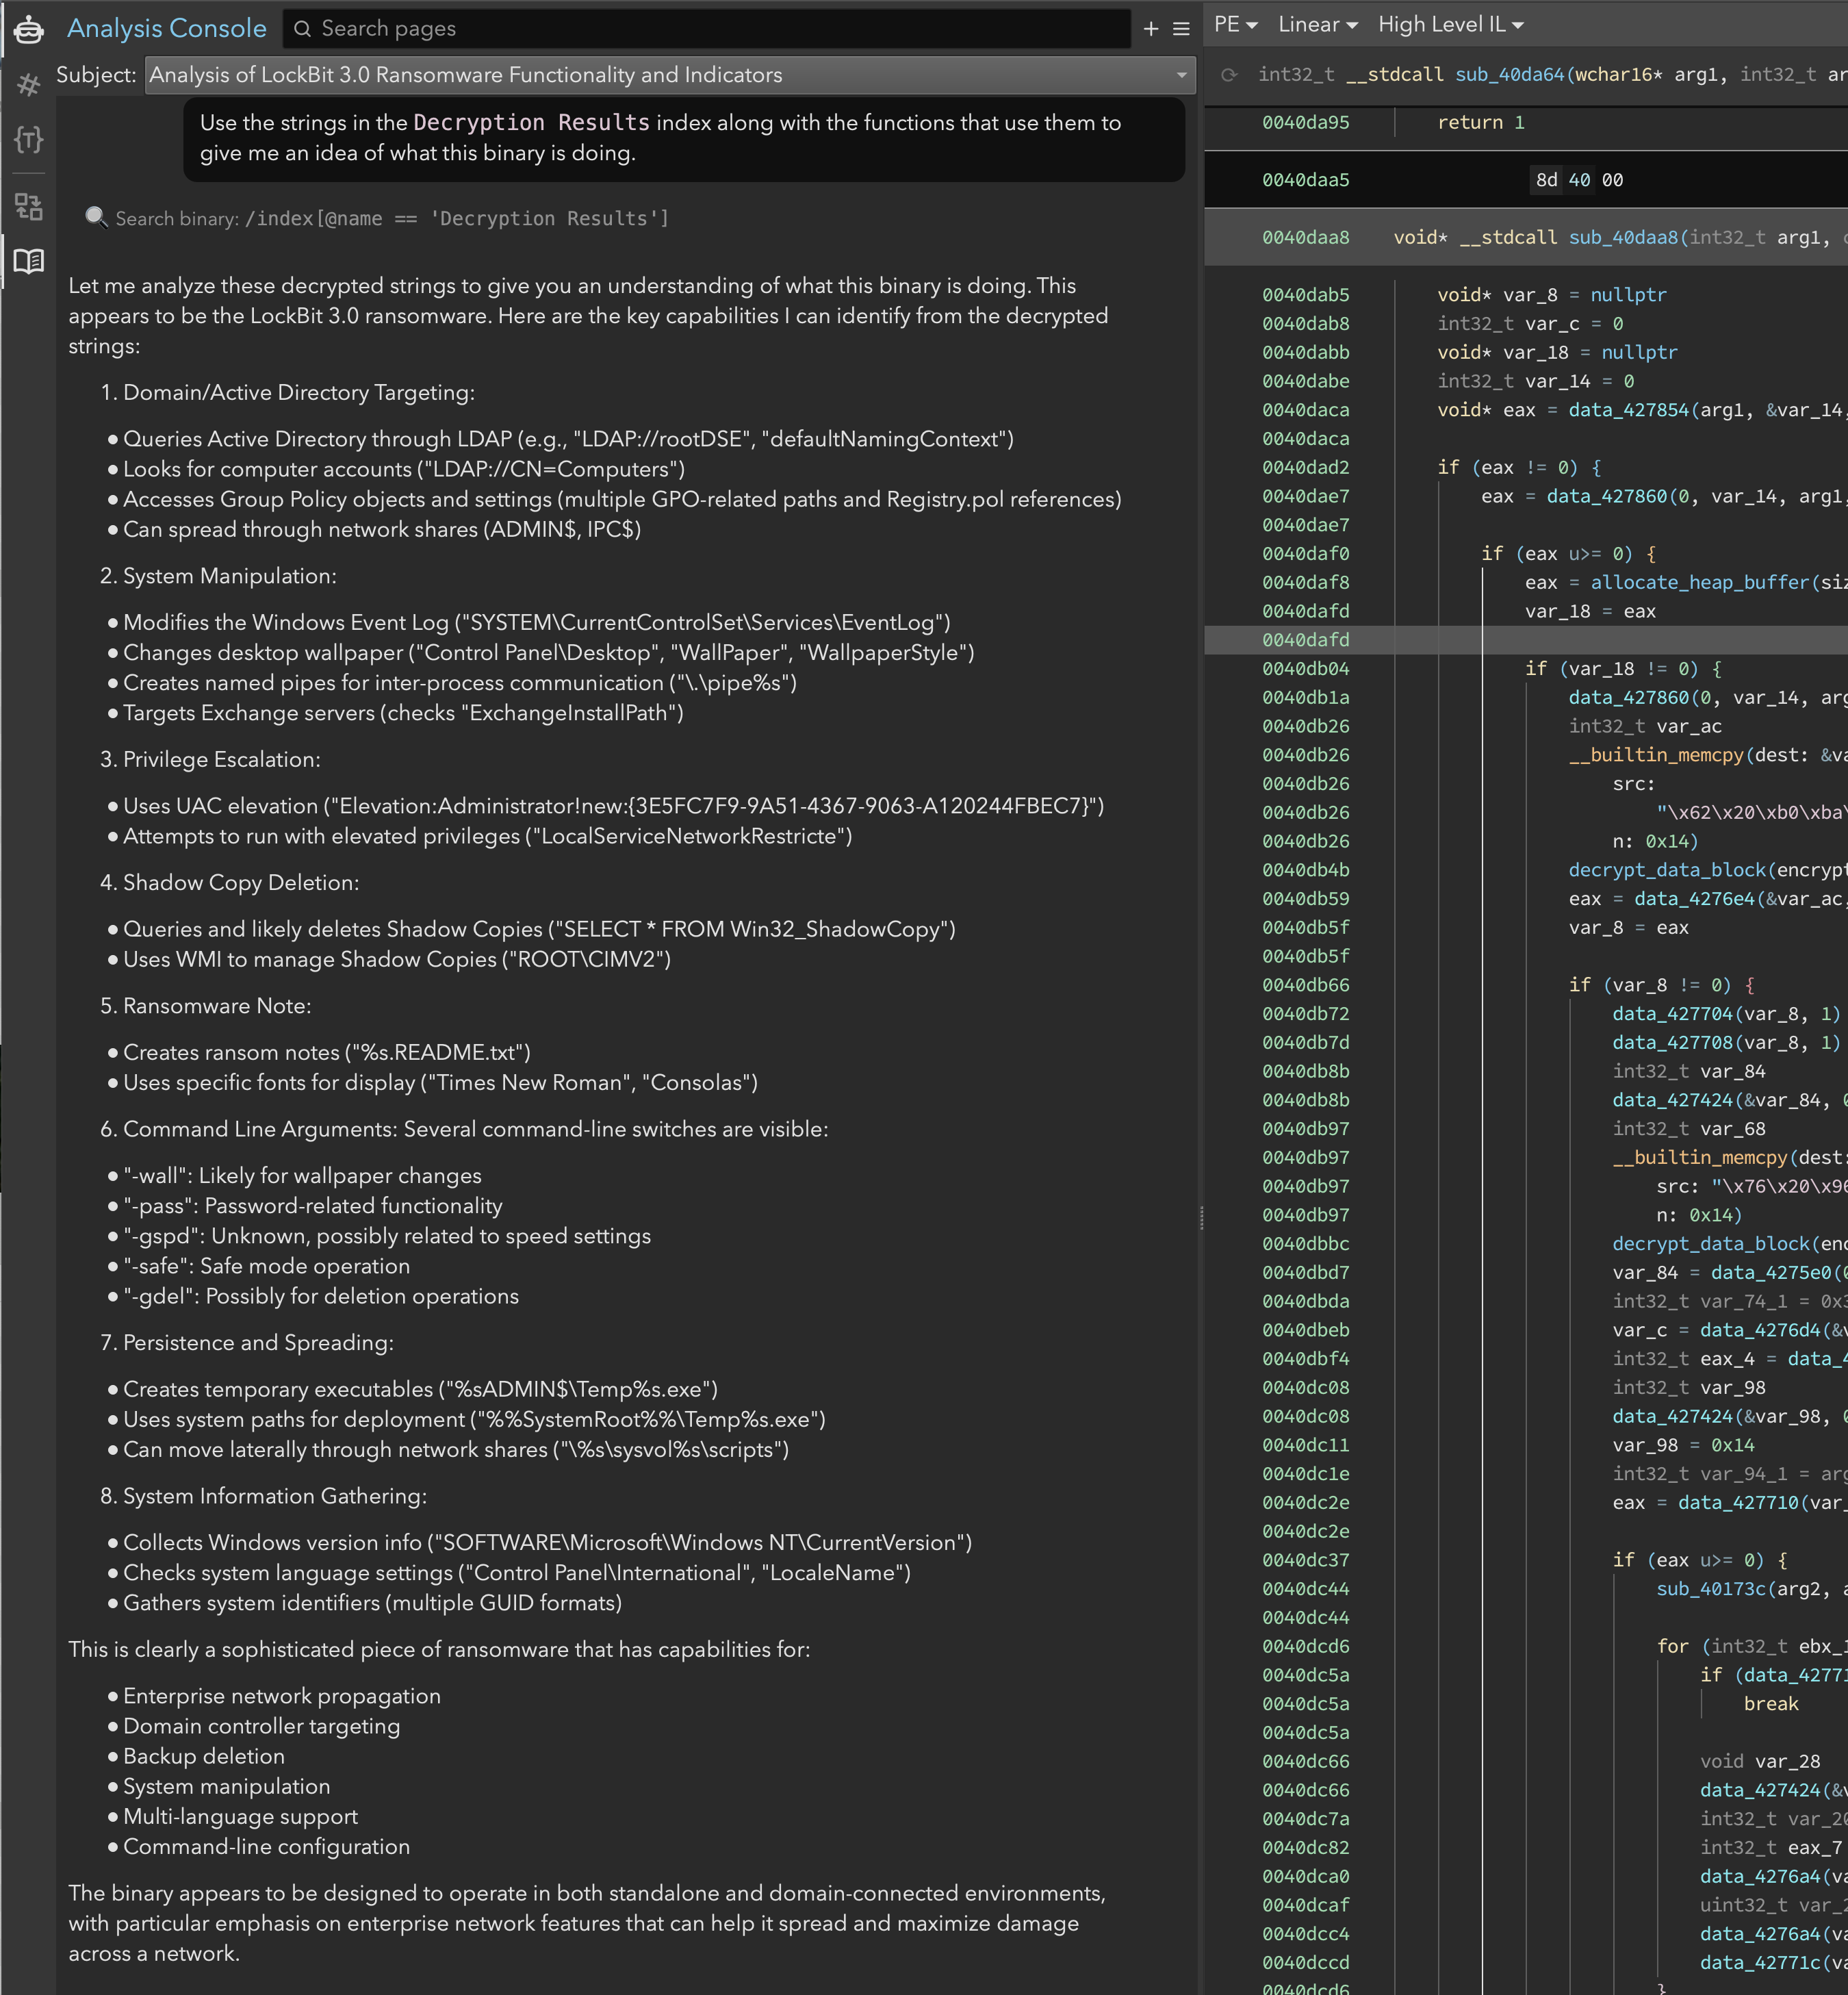 Figure 13: Sidekick’s analysis of the decrypted strings
Initial Findings
Through this initial analysis, we uncovered several key aspects of LockBit 3.0’s functionality:
- Its string encryption scheme using XOR and NOT operations
- Evidence of registry manipulation (through registry path strings)
- File system interactions (temporary file creation and access)
- Process manipulation capabilities (
LocalServiceexecution) - An interesting hashing function that we suspect is used for import resolution
Conclusion
The objective of this exercise was showing the new capabilities in Sidekick 3.0.
We used the Analysis Console to very quickly find interesting utility functions, understand their purpose, and annotate the binary accordingly.
We then asked the assistant to make a decryption tool for us. We used the Automation Workbench to write an LLM-powered script that extracted the contents of memory being passed to the decrypt_data_block function at every call site.
Finally, we decrypted all of the strings, visualized clusters of functionality based on these strings, and got lots of clues about the malware’s behavior.
This foundation will be crucial as we continue our analysis in part II.
如有侵权请联系:admin#unsafe.sh