read file error: read notes: is a directory 2024-12-20 09:40:3 Author: payatu.com(查看原文) 阅读量:25 收藏
Introduction
Automation significantly enhances the efficiency and productivity of our work. It spares the human effort involved in doing a repetitive task manually. By writing a script, we can delegate our work to the computer’s processor, which is better suited to handle such repetitive tasks.
There are already many extensions available online to automate different things on Burp. Still, sometimes, we may encounter a situation where the available Burp extensions cannot help us because, this time, the automation script has to be made specifically for the application we are testing.
There are a few blogs written by Payatu demonstrating the use of some Burp extensions that could help in making our pentesting process easier:
This blog post will discuss one such situation. What if we need to calculate a new value every time we send a request in the Burp Suite Repeater? To automate the process, we will require a custom Burp extension.
What is Checksum, and why do we need to bypass it?
Recently, during an application pentest, I encountered a situation in which the application generated a checksum on the client side and sent it as a Header value to the server.
A checksum is a value calculated by hashing a particular data set to ensure it is not tampered with. In this case, the checksum value was created by hashing the request body. This means that I could not modify the request body and replay it using the Repeater.
Yes! I could not use our beloved Repeater for this pentesting as usual. But we need to use the Repeater, right? So how would you do it?
We have created a Burp Suite extension that demonstrates how we can bypass checksum validation by creating a new checksum for our modified request using the client-side source code. The code for the Burp extension can be found here.
Process and Code to Bypass Checksum
This Burp Extension is written in Python code. It would recalculate the hash of our modified request in Repeater and add it to the header value before sending it to the server. This would validate our request, and we could proceed with our normal testing.
I have crafted a simple Node.js web application to demonstrate the use of this Burp Extension. Index.js contains the backend code, and index.html contains the frontend code.
See the index.html file. The function ‘senddata()’ contains a secret key hard-coded value used to generate the HMAC hash. We can observe that the variable ‘data’ includes the JSON body with the userID key and its value as username. This data variable is made as a string, and finally, its hash is created as saved in the variable ‘hash’. While creating the request using the ‘fetch’ method, a new header ‘X-Auth’ is added with its value as the calculated hash value from the ‘hash’ variable.
Index.html
<html>
<head>
    <title>NodeApp</title>
    <script src="https://cdnjs.cloudflare.com/ajax/libs/crypto-js/4.2.0/crypto-js.min.js" integrity="sha512-a+SUDuwNzXDvz4XrIcXHuCf089/iJAoN4lmrXJg18XnduKK6YlDHNRalv4yd1N40OKI80tFidF+rqTFKGPoWFQ==" crossorigin="anonymous" referrerpolicy="no-referrer"></script>
    <script>
        function senddata()
        {
            const secret = 'your_secret_key_here';
            var yourname = document.getElementById("yourname").value;
            console.log(yourname);
            var data = {"userId": yourname};
            const message = JSON.stringify(data);
            console.log("message="+message);
            const hash = CryptoJS.HmacSHA256(message, secret).toString();
            fetch("/display", {
            method: "POST",
            body: JSON.stringify(data),
            headers: {
                "Content-type": "application/json", "X-Auth": hash
            }
            });
        }
    </script>
</head>
<body>
    This is my new Node App.
    <br><br>
    <form>
        Enter your Name <br><br>
        <input type="text" id="yourname" name="yourname" value=""><br><br>
        <button onclick="senddata()">Submit</button>
    </form>
</body>
</html>
Index.js
var express = require('express');
var bodyParser = require("body-parser")
var path = require('path');
const crypto = require('crypto');
const secretKey = 'your_secret_key_here';
const algorithm = 'sha256';
var app = express();
app.use(
    bodyParser.urlencoded({
        extended: true
    })
);
app.use(bodyParser.json());
app.use(express.static(path.join(__dirname + '/public')));
app.get('/', function (req, res) {
	res.sendfile(path.join(__dirname + "/public/index.html"));
});

app.post('/display', function(req, res) {
	var num = req.body.userId;
	console.log("body="+JSON.stringify(req.body));
	const hmac = crypto.createHmac(algorithm, secretKey);
	hmac.update(JSON.stringify(req.body));

	const hmacDigest = hmac.digest('hex');
	console.log("calculated="+hmacDigest);
	console.log("header="+req.header('X-Auth'));

	if(hmacDigest == req.header('X-Auth'))
	{
		res.send("Successful");
	}
	else
	{
		res.send("Failed");
	}
})
app.listen(8088, function () {
	console.log('Simple Web Application running on port 8088!');
});
In the backend code, the app. post method handles the POST request to the endpoint ‘display’. An ‘hmac’ variable is created to make a hash with the same sha256 algorithm and the same secret key. `hmac.update` code is used to generate the hash for the request body, and it is then converted to the ‘hex’ value as ‘hmacDigest’. A conditional statement compares the calculated hmacDigest value with the value present in the X-Auth header in the request. The request is validated and only gives a ‘successful’ response when both values match. This verifies the integrity of the requested body data.
The extension.py file is created as a python-based extension for the burp suite. This extension calls a different file, ‘encryption.py’, from the local machine. The encryption.py script is to be loaded into the burp extension.
Extension.py
from burp import IBurpExtender
from burp import IHttpListener
import subprocess
import json
import sys
from base64 import b64decode, b64encode

class BurpExtender(IBurpExtender, IHttpListener):
    def encryption(self, p_data):
        print("encryption function")
        print("body in encryption function=",p_data.decode())
        data = subprocess.check_output(["python3", "/<path to the file>/encryption.py", p_data.decode('utf-8')])
        print("hmac received from encryption file = ", data)
        return str(data)

    def registerExtenderCallbacks(self, callbacks):
        self._helpers = callbacks.getHelpers()
        callbacks.setExtensionName("Encryption")
        callbacks.registerHttpListener(self)

    def processHttpMessage(self, toolFlag, messageIsRequest, messageInfo):
        if not messageIsRequest:
            return
        requestBytes = messageInfo.getRequest()
        requestInfo = self._helpers.analyzeRequest(requestBytes)

        headers = requestInfo.getHeaders()
        bodyBytes = requestBytes[requestInfo.getBodyOffset():]

        if bodyBytes:
            bodyJson = self._helpers.bytesToString(bodyBytes)
            print("body in main=", bodyJson)
            print("headers = ", headers)
            try:
                newhmac = self.encryption(bodyJson)
                print("newhmac=",newhmac)
                newheader = "X-Auth: "+newhmac
                print("newheader=",newheader)
                indposition=0
                for i in range(len(headers)):
                    if('X-Auth' in headers[i]):
                        indposition=i
                headers[indposition] = newheader[:-1]
                print("modified headers = ", headers)
            except Exception as e:
                # ignore request
                print(e)

        modifiedMessage = self._helpers.buildHttpMessage(headers, bodyBytes)
        messageInfo.setRequest(modifiedMessage)
        return
Encryption.py
import hmac
import hashlib
import sys

message = (sys.argv[1]).encode()
secret_key = b"your_secret_key_here"
digestmod = hashlib.sha256
h = hmac.new(secret_key, message, digestmod)
hmac_value = h.hexdigest()
print(hmac_value)
References for the code used in creating the Burp Extension
Some details of the different classes and methods are being used in the extension file. Burp Extender API documents some classes and their functions used to perform various functions through the extension.
- Public interface IBurpExtender
- All extensions must implement this interface. Implementations must be called BurpExtender in the package burp, declared public, and provide a default (public, no-argument) constructor.
- Void registerExtenderCallbacks(IBurpExtenderCallbacks callbacks)
- This method is invoked when the extension is loaded. It registers an instance of the IBurpExtenderCallbacks interface, which provides methods that the extension may invoke to perform various actions.
- Public interface IHttpListener
- Extensions can implement this interface and then call IBurpExtenderCallbacks. Register an HTTP listener () to notify the listener of requests and responses made by any Burp tool. By registering an HTTP listener, extensions can perform custom analysis or modify these messages.
- Void processHttpMessage(int toolFlag, boolean messageIsRequest, IHttpRequestResponse messageInfo)
- This method is invoked when an HTTP request is about to be issued and an HTTP response has been received.
- Public interface IHttpRequestResponse
- This interface is used to retrieve and update details about HTTP messages. Note: The setter methods generally can only be used before the message is processed, not in read-only contexts. The getter methods relating to response details can only be used after the request has been issued.
- Void registerHttpListener(IHttpListener listener)
- This method registers a listener that will be notified of requests and responses made by any Burp tool. Extensions can register an HTTP listener to perform custom analysis or modify these messages.
- Public interface IExtensionHelpers
- This interface contains several helper methods that extensions can use to assist with various common tasks that arise for Burp extensions. Extensions can call IBurpExtenderCallbacks.getHelpers to obtain an instance of this interface.
- IExtensionHelpers getHelpers()
- This method obtains an IExtensionHelpers object, which the extension can use to perform numerous useful tasks.
- byte[] getRequest()
- This method is used to retrieve the request message.
- IRequestInfo analyzeRequest(byte[] request)
- This method can analyze an HTTP request and obtain its key details. The resulting IRequestInfo object does not include the full request URL. To obtain the full URL, use one of the other overloaded analyzeRequest() methods.
- byte[] buildHttpMessage(java.util.List headers, byte[] body)
- This method builds an HTTP message containing the specified headers and message body. If applicable, the Content-Length header will be added or updated based on the length of the body.
This blog by Payatu can be referred to start writing your own Burp Extensions – Writing Your Own Burp Suite Extensions
The ‘encryption’ function creates a subprocess for Python, which executes the different ‘encryption.py’ file by passing the request body to it to be hashed. This encryption.py file prints the HMAC hash, which is returned to the parent process ‘extension.py’.
Inside the processHttpMessage function, the value of the X-Auth header is replaced with the new HMAC. Headers are extracted from the request in a list-type variable. The headers list is traversed to find the index of the ‘X-Auth’ header. Then, the value at the calculated index is overwritten by the calculated value of the X-Auth header. A new request is again built with the modified headers and body and sent to the server.
Demo
Let’s get started.
- We can see that our Burp extension is not loaded in the initial state.

- Let’s see the actual app now. It contains a text input field labelled ‘Enter your Name’ and a submit button. Click on the submit button, and a request will be generated to the backend.
- Intercept the request in Burp Suite. Observe that the name entered in the input field on the webpage is sent as a value of the ‘userId’ key in the request’s JSON body. The response shows a successful message indicating that the request is untampered and the HMAC value of the body matches the hash value present in the X-Auth header.

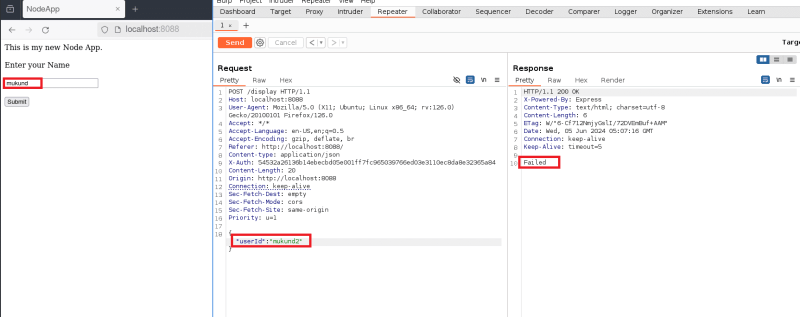
- Now, let’s tamper the request body and change the value of ‘userId’ key. Here, we have changed the initial value ‘mukund’ to modified value ‘mukund2’. Observe that the response shows failed message this time indicating that the request body has been tampered. We need to bypass this checksum validation.

- Let’s load our Burp Extension now.

- Send the modified request again from the Repeater. Observe that the response this time contains a successful message. Hence, the HMAC hash checksum restriction is bypassed, and we can use our beloved Repeater once again!

Conclusion
I hope you find this blog useful in future scenarios where you encounter a checksum in the request and find it difficult to tamper with it in Repeater. This post tries to explain the use of Python in creating a Burp Extension to recalculate the checksum value for a request header and modify it before sending. The demo uses a very simple web page that just displays whether the extension can bypass the checksum restriction on the proxy.
References:
如有侵权请联系:admin#unsafe.sh