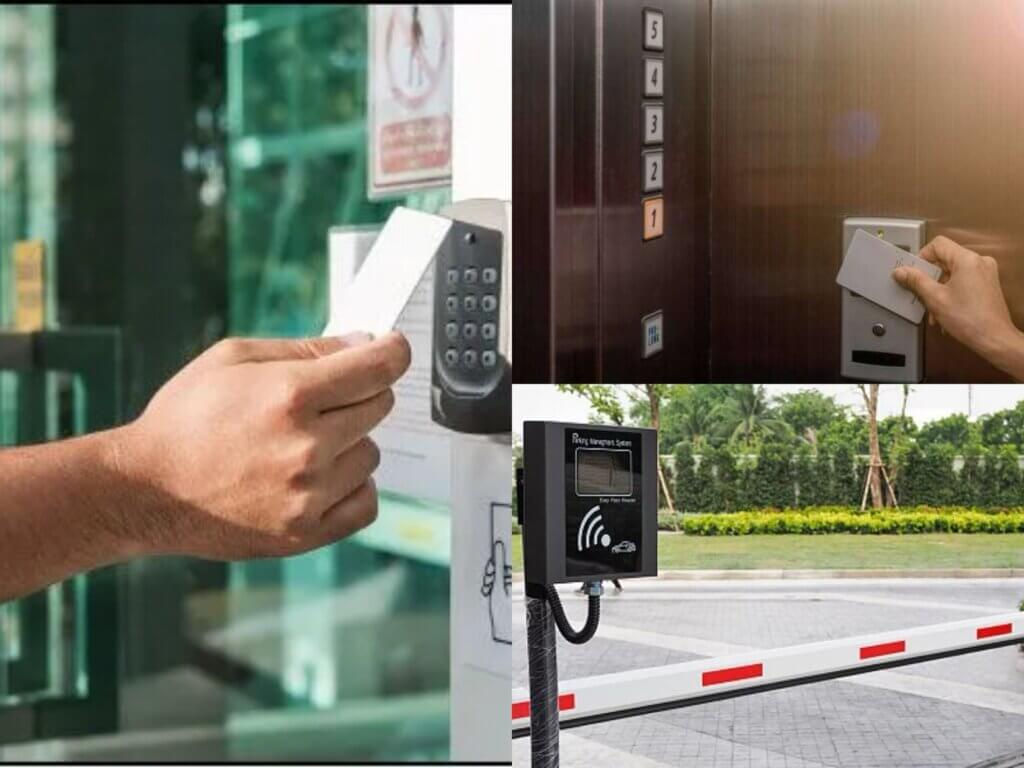
Radio Frequency Identification (RFID) cards are ubiquitously used to authenticate using a physical token. This technology is often embedded in employee ID cards, enabling physical card identification and a unique ID assigned to the card. A reading device, tied into the automatic controlled locking system, scans these cards to determine whether access should be granted. This access control technology is most often seen on exterior doors to your building (picture: left). This technology is also utilized in other areas, such as entering an employee’s parking lot (picture: bottom-right) or scanning your badge to enter restricted floors in an elevator (picture: top-right). If you wave an ID badge near a scanner and it beeps, it is likely an RFID ID badge.
If you view your enterprise security through the lens of defense-in-depth, the first layer of physical defense would be any of these entry points. These often-overlooked security checkpoints have multiple weaknesses that adversaries could exploit to gain illegitimate access to your physical environment. This post covers the technical details of two common attack methods for RFID credential theft.
This post’s target audience is penetration testing teams looking to expand their attack techniques and internal security teams looking to audit their physical security controls. Both attack techniques are covered from a technical perspective and offer some potential solutions to mitigate these attacks. I hope this blog teaches you how to approach your security vendors with the right questions to ensure your facility is secure.
Recap: Access Control
To understand both attack techniques, we must first understand how an access control system generally works. In practice, each system will be entirely unique compared to other systems. This is due to varying vendors, installation technicians, outdated/new technology, etc. Figure 1 below covers the general concept of RFID access control. From left to right, let’s outline the steps.
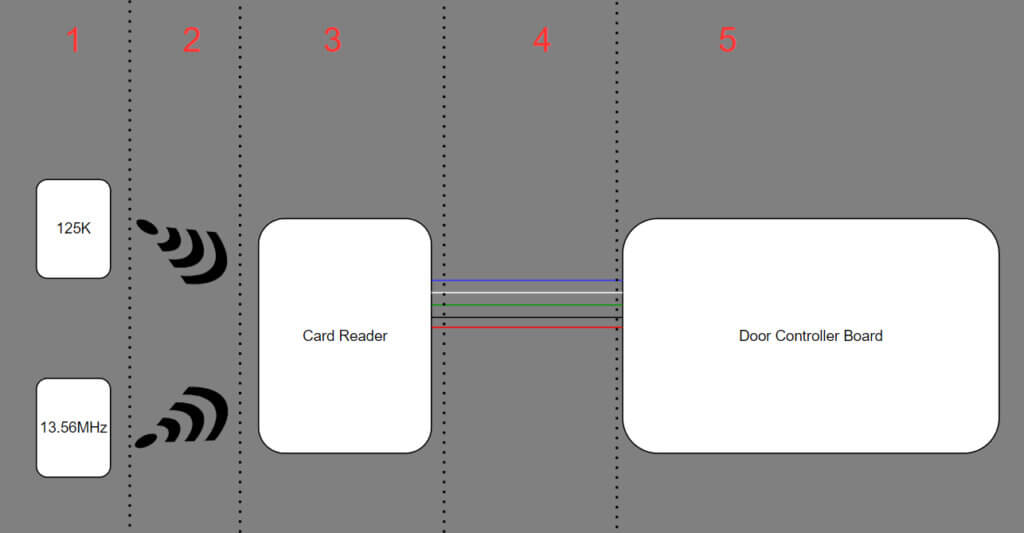
- Two main frequencies are used in common RFID cards: 125KHz and 13.56MHz. These cards are inert without an RFID reader to activate them.
- Once an RFID card is placed within the range of a card reader, it becomes activated by interacting with the reader’s electromagnetic field. This provides enough power to the card to communicate with the reader using its embedded radio antenna.
- The card reader accepts the radio signal from the card and processes the data into the Wiegand protocol (covered later).
- The card reader sends the Wiegand data using an unencrypted link.
- The door controller board/access-control hardware accepts the Wiegand data and makes the ultimate decision to grant access or not.
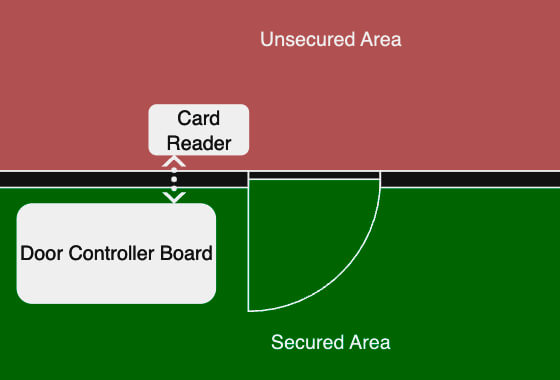
To help conceptualize the physical layout further, Figure 2 shows where each component fits regarding the secured/unsecured areas. The card reader is mounted on the door frame facing the unsecured (locked out) side. Cables extend from the back of the card reader through the door frame and building structure, eventually connecting to some controlling hardware, which in turn controls the door’s locking system.
Security Concern #1: RFID Encryption
As mentioned during the RFID overview, the two main frequencies used are 125KHz and 13.56MHz. Both offer different advantages while also having their takeaways. Generally speaking, 125KHz cards offer less security protection compared to 13.56MHz but allow for longer read ranges. This inverse is also true for 13.56MHz; it usually offers additional security protections at the cost of shorter read ranges. An additional consideration is the age of the system. 13.56MHz cards are a newer technology compared to 125KHz and not every system can accommodate both frequencies.
Notes on tooling: Two tools were used to analyze and interact with the RFID cards. The first is a Proxmark3, a dedicated hardware platform to interact with RFID technology and a Flipper Zero performing a similar function. The main difference is that the Proxmark3 offers deeper technical interactions through a command line interface while the Flipper offers a more user-friendly experience with a covert handheld device operated in the field. The Proxmark3 offers deeper technical analysis at the cost of needing command line access to access the full suite of tools. The list below contains reference material for both tools:
- Proxmark3 Command Documentation
- Proxmark3 Cheat Sheet
- Flipper Zero Documentation
- Details on HID Prox Technology
- Details on Mifare Technology
125KHz – Old Habit’s Really Do Die Hard
125KHz card technology is the older of the two frequencies. Additionally, it is commonly used in most business environments for one (or several) of many reasons: the building security staff/vendors do not know there are more secure systems available, the original system used 125KHz and does not support 13.56MHz, the system supports both frequencies, but the card technology was never switched over to using 13.56MHz cards, or any other factors involved.
For reasons outside this post’s scope, the higher a signal frequency, the more data that frequency can carry at the cost of a shorter distance. As a result, 125KHz cards can usually transfer longer distances (~1-3 ft) at the expense of less data throughput. This, along with 125KHz being the “old giant” in the industry, means that many facilities still use this card type. For this example, we will analyze an HID proximity card, one of the most commonly used cards.
To begin, we will connect our computer to the Proxmark3 and open a serial connection, which allows a more in-depth analysis of RFID cards. Using this terminal, we can confirm Proxmark3 terminal access by seeing the “pm3” prompt. Next, we will search for low-frequency devices using the “lf search” command, as depicted in Figure 3.
[usb] pm3 --> lf search
[+] HID Prox - 2005081c55 (3626) - len: 26 bit - OEM: 000 FC: 132 Card: 3626
[+] Valid HID Prox ID found!
Figure 3: Proxmark3 Low-Frequency Search
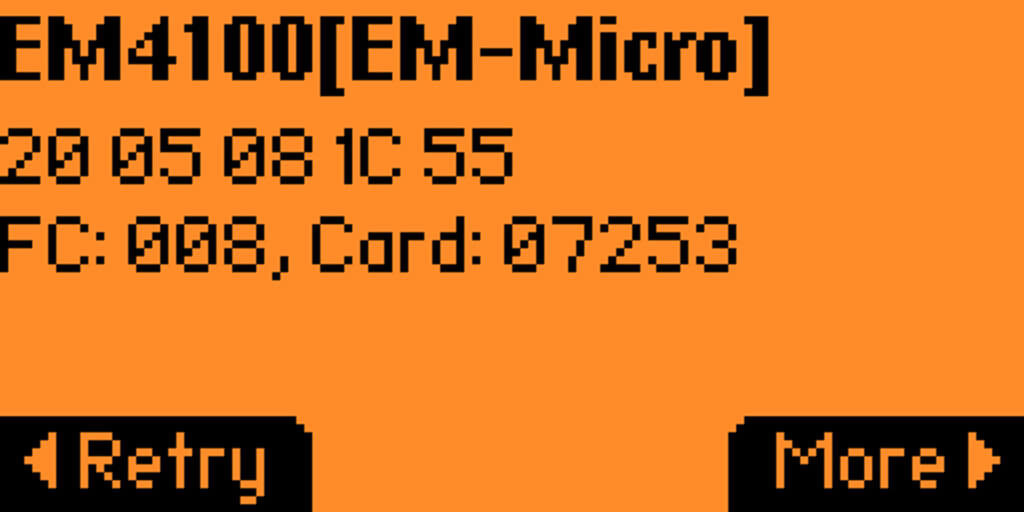
In this case, we identified the HID proximity card. We can also view the 26-bit UID associated with this card: 2005081c55. Simply scanning the card reveals the UID associated with card, which means it does not support encryption. This value can now be copied to a hacker-controlled RFID card, essentially stealing the credentials and access. Furthermore, adversaries do not need advanced tools like the Proxmark, to perform this attack. By using a timer, we identified the card’s data is retrieved in less than a second. Figure 4 displays our Flipper Zero, which reveals the facility code (FC) and card number (Card) values. Because it’s out of scope, we won’t go into detail about what these values mean. The takeaway is that they are considered sensitive information because an adversary can clone the values and use them to impersonate a user.
13.56MHz – Secure, if and only if…
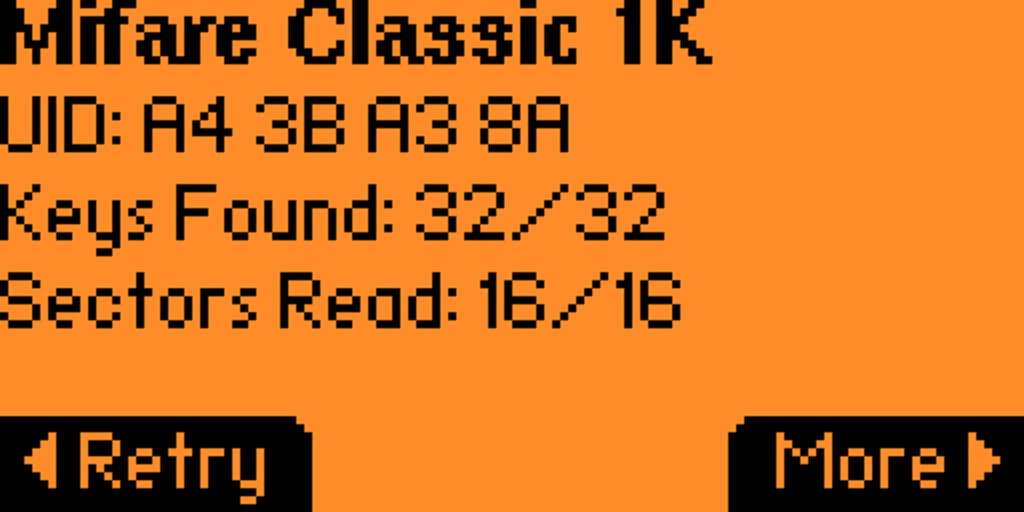
If 125KHz cards are insecure, does this mean 13.56MHz cards are secured? Only if they are configured correctly. In this scenario, an encrypted Mifare Classic 1k card will be analyzed. This card operates similarly to the 125KHz class by sending the card’s UID (unique ID) as the form of authentication.
As demonstrated in the 125KHz section, this UID can be easily retrieved, making it useless as a primary authentication token. More advanced cards offer additional memory cells (sectors) to securely communicate their data. These memory cells can be incorporated into access-control software to use the UID and any additional encrypted data. The data in these memory cells is laid out in the following format.
- Each card contains 16 sectors of 4 blocks for storage.
- Each of these sectors is encrypted with an A and B 12 hex character key.
- The last storage block in any sector contains the keys and other instructions.
Using Proxmark, we use the “hf search” command to search for high-frequency cards. The Mifare card is detected, but no extra data is immediately shown.
[usb] pm3 --> hf search
[|] Searching for ISO14443-A tag...
[+]  UID: A4 3B A3 8A
[+] ATQA: 00 04
[+]  SAK: 08 [2]
[+] Possible types:
[+]    MIFARE Classic 1K / Classic 1K CL2
[+]    MIFARE Plus 2K / Plus EV1 2K
[+]    MIFARE Plus CL2 2K / Plus CL2 EV1 2K
..SNIP..
Figure 5: Proxmark3 High-Frequency Search
The Proxmark3 can perform brute force attacks relatively quickly against each sector’s security keys. Using a list of common default keys, each sector is checked for default keys using the following command flags.
- hf – Specify high-frequency card interactions
- mf – Specify Mifare card type
- fc – Fast check against each sector security keys
- 1 – Specify 1k memory blocks
- d – Use default keys during brute force check
Running this command, each sector was unlocked due to each using the default key “0xffffffffffff”. These security keys are usually set when manufactured. So, while this card is encrypted, the encryption key is the default value, which is publicly known. Therefore, encryption can be trivially bypassed.
[usb] pm3 --> hf mf fc 1 d
..SNIP..
[+] found keys:
[+] |-----|----------------|---|----------------|---|
[+] | Sec | key A          |res| key B          |res|
[+] |-----|----------------|---|----------------|---|
[+] | 000 | ffffffffffff   | 1 | ffffffffffff   | 1 |
[+] | 001 | ffffffffffff   | 1 | ffffffffffff   | 1 |
[+] | 002 | ffffffffffff   | 1 | ffffffffffff   | 1 |
[+] | 003 | ffffffffffff   | 1 | ffffffffffff   | 1 |
[+] | 004 | ffffffffffff   | 1 | ffffffffffff   | 1 |
[+] | 005 | ffffffffffff   | 1 | ffffffffffff   | 1 |
[+] | 006 | ffffffffffff   | 1 | ffffffffffff   | 1 |
[+] | 007 | ffffffffffff   | 1 | ffffffffffff   | 1 |
[+] | 008 | ffffffffffff   | 1 | ffffffffffff   | 1 |
[+] | 009 | ffffffffffff   | 1 | ffffffffffff   | 1 |
[+] | 010 | ffffffffffff   | 1 | ffffffffffff   | 1 |
[+] | 011 | ffffffffffff   | 1 | ffffffffffff   | 1 |
[+] | 012 | ffffffffffff   | 1 | ffffffffffff   | 1 |
[+] | 013 | ffffffffffff   | 1 | ffffffffffff   | 1 |
[+] | 014 | ffffffffffff   | 1 | ffffffffffff   | 1 |
[+] | 015 | ffffffffffff   | 1 | ffffffffffff   | 1 |
[+] |-----|----------------|---|----------------|---|
Figure 6: Proxmark3 High-Frequency Mifare Sector Key Brute Force
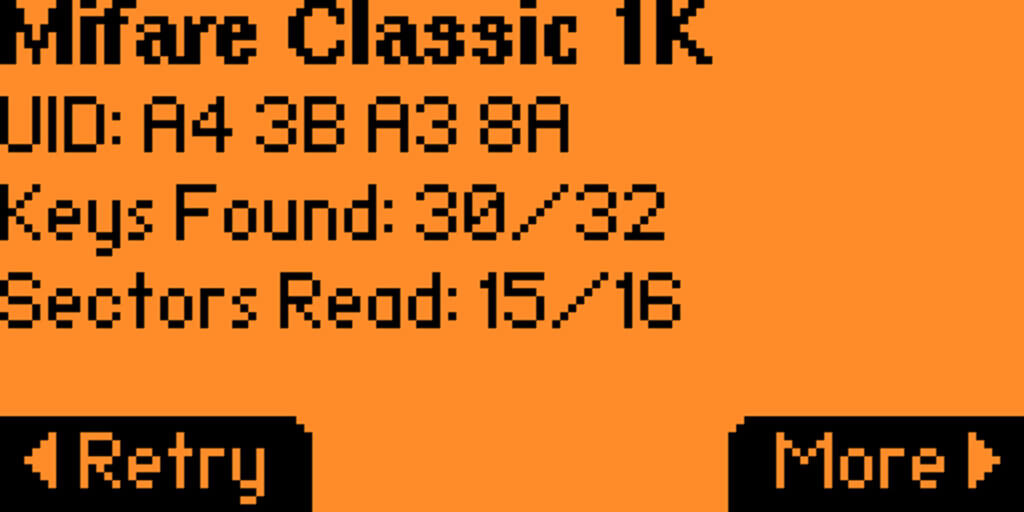
To further demonstrate this, the Mifare card was also scanned with Flipper Zero, which revealed all 16 sectors in less than one second. As a reminder, Flipper Zero is a commercially available tool that is quite easy to use. As a result, Mifare cards (or other secure cards) are easily unlocked using modern tools to defeat card encryption.

When each sector is set to a custom key, it becomes much more challenging to brute force. As previously mentioned, the last block of each sector contains the security key. Each sector contains four memory locations starting at index zero. Following this logic, the security key for sector zero is contained in the third memory cell. The two security keys are stored as a twelve hex character value at the beginning and end of this sector. For this example, sector zero’s security keys were changed to “123456781234” while retaining the remaining data in the sector. The relevant flags and their meanings are:
- hf – Specify high-frequency card interactions
- mf – Specify Mifare card type
- csetblk – Write block to card
- 3 – Write to memory block three (fourth memory block with 0 based indexing)
- <data> – The hex value that is being written to the block
[usb] pm3 --> hf mf csetblk 3 123456781234FF078069123456781234
--block number: 3 data:12 34 56 78 12 34 FF 07 80 69 12 34 56 78 12 34
[usb] pm3 --> hf mf cgetblk 3
--block number: 3
data: 12 34 56 78 12 34 FF 07 80 69 12 34 56 78 12 34

Sector trailer decoded:
----------------------------------------------
Key A      123456781234
Key B      123456781234
Access rights
  block 0  rdAB wrAB incAB dectrAB
  block 1  rdAB wrAB incAB dectrAB
  block 2  rdAB wrAB incAB dectrAB
  block 3  wrAbyA rdCbyA wrCbyA rdBbyA wrBbyA
UserData   0x69
----------------------------------------------
Figure 8: Proxmark3 Setting Mifare Sector Zero Security Keys
Using the same default-key brute force Proxmark3 attack, sector zero is not recovered as its key is no longer default!
[usb] pm3 --> hf mf fc 1 d
..SNIP..
[+] found keys:
[+] |-----|----------------|---|----------------|---|
[+] | Sec | key A          |res| key B          |res|
[+] |-----|----------------|---|----------------|---|
[+] | 000 | ------------   | 0 | ------------   | 0 |
[+] | 001 | ffffffffffff   | 1 | ffffffffffff   | 1 |
[+] | 002 | ffffffffffff   | 1 | ffffffffffff   | 1 |
[+] | 003 | ffffffffffff   | 1 | ffffffffffff   | 1 |
[+] | 004 | ffffffffffff   | 1 | ffffffffffff   | 1 |
[+] | 005 | ffffffffffff   | 1 | ffffffffffff   | 1 |
[+] | 006 | ffffffffffff   | 1 | ffffffffffff   | 1 |
[+] | 007 | ffffffffffff   | 1 | ffffffffffff   | 1 |
[+] | 008 | ffffffffffff   | 1 | ffffffffffff   | 1 |
[+] | 009 | ffffffffffff   | 1 | ffffffffffff   | 1 |
[+] | 010 | ffffffffffff   | 1 | ffffffffffff   | 1 |
[+] | 011 | ffffffffffff   | 1 | ffffffffffff   | 1 |
[+] | 012 | ffffffffffff   | 1 | ffffffffffff   | 1 |
[+] | 013 | ffffffffffff   | 1 | ffffffffffff   | 1 |
[+] | 014 | ffffffffffff   | 1 | ffffffffffff   | 1 |
[+] | 015 | ffffffffffff   | 1 | ffffffffffff   | 1 |
[+] |-----|----------------|---|----------------|---|
Figure 9: Proxmark3 Cracking Mifare Sectors Without Default Keys
As before, we scan the card using Flipper Zero to compare the results. This time, the Flipper recovers one less sector and takes a significantly longer time as it is trying to brute force the remaining sector. When using all default keys, the Flipper Zero unlocks the card in less than a second. Once sector zero’s key was changed, the Flipper Zero tried for a minute to decode the final sector before ending its brute force unsuccessfully.
Strategies To Secure Your Cards
Enough 1’s and 0’s; how does this affect my facility’s security? Card encryption does not primarily protect any of the active portions of an RFID reading system. The benefit of using card encryption is that it protects the data at rest. An employee drops it on the metro, that one employee just got their fourth badge in as many months, etc.; cards will go missing. Properly encrypted RFID cards, with custom keys for all sectors, can help resist common cloning and data retrieval exploits.
Since the security keys are most often set at the time of manufacturing, it is recommended that you contact your vendor with further questions. This guide shows several examples of Proxmark card interactions, but writing the wrong value to your card can easily render it inoperable. Your vendor should be able to provide enough guidance to allow you to properly secure your cards.
Security Concern #2: The Wiegand Protocol
Card security and encryption are only half the battle. The RFID reading device, usually located outside the door, is not the “brain” of the operation. These devices (pin pads, biometrics, card readers, etc.) send their data to the access-control platform using the Wiegand protocol. Two data lines (DO and D1) communicate without encryption using binary (0v or 5v) signals.
A Wiegand lab was created to analyze several portions of access control security concepts. It was built by sourcing commercial products and custom 3D-printed hardware. The relevant components and their uses are:
- Door controller board – The “computer” decides if the scanned card is granted access.
- Connecting wire – Wires carrying Wiegand protocol data, power supply to the card reader, and any additional features of the card reader.
- RFID Card Reader – RFID reader accessing data on RFID cards.
Note: The pictured lab contains extra components unrelated to this blog’s topic.

As mentioned before, the Wiegand protocol is not encrypted. As a result, if an adversary can reach the wires connecting the card reader to the door controller, they can be tapped to capture card data in transit. An ESPKey, a commercially available postage-stamped sized circuit board, can capture the Wiegand data. Additionally, this device produces a wireless network from which adversaries can retrieve the captured data.
It should be noted that when installed in a live setting, the connecting wires will resemble more shown in the figure below. The grey-drawn portion is the entire wire bundle carrying the individual wires. The door controller board is usually mounted on the secured side, while the card reader is mounted on the unsecured side of the door. The outer sheathing is removed to reveal the relevant wire to perform the implant.
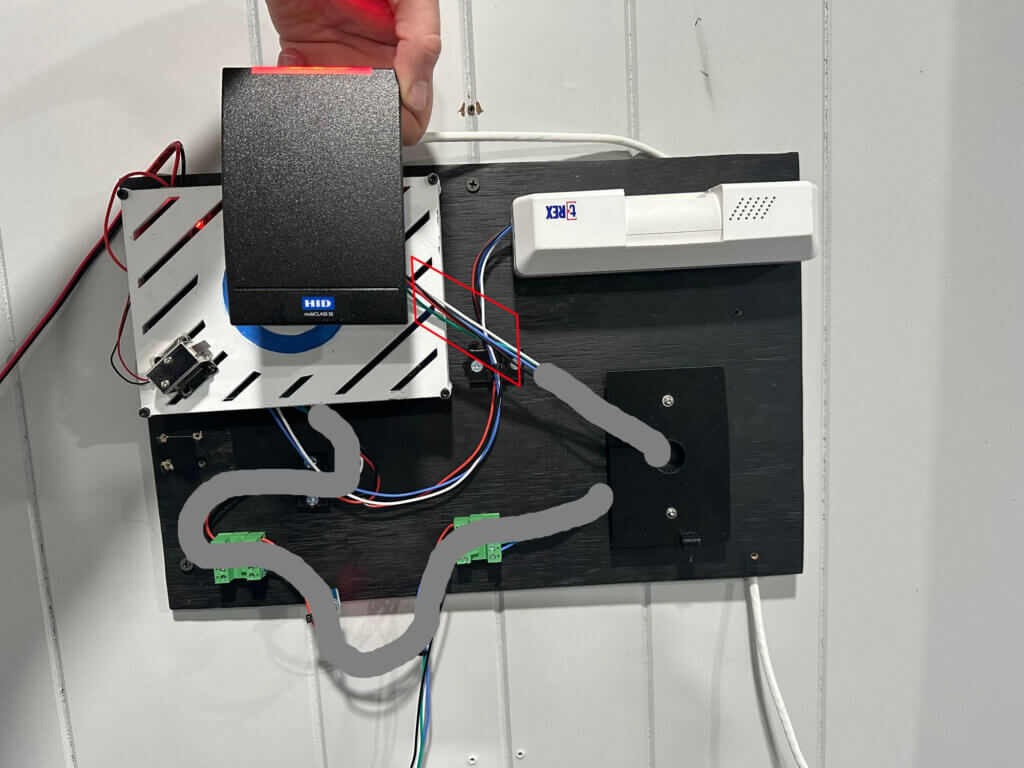
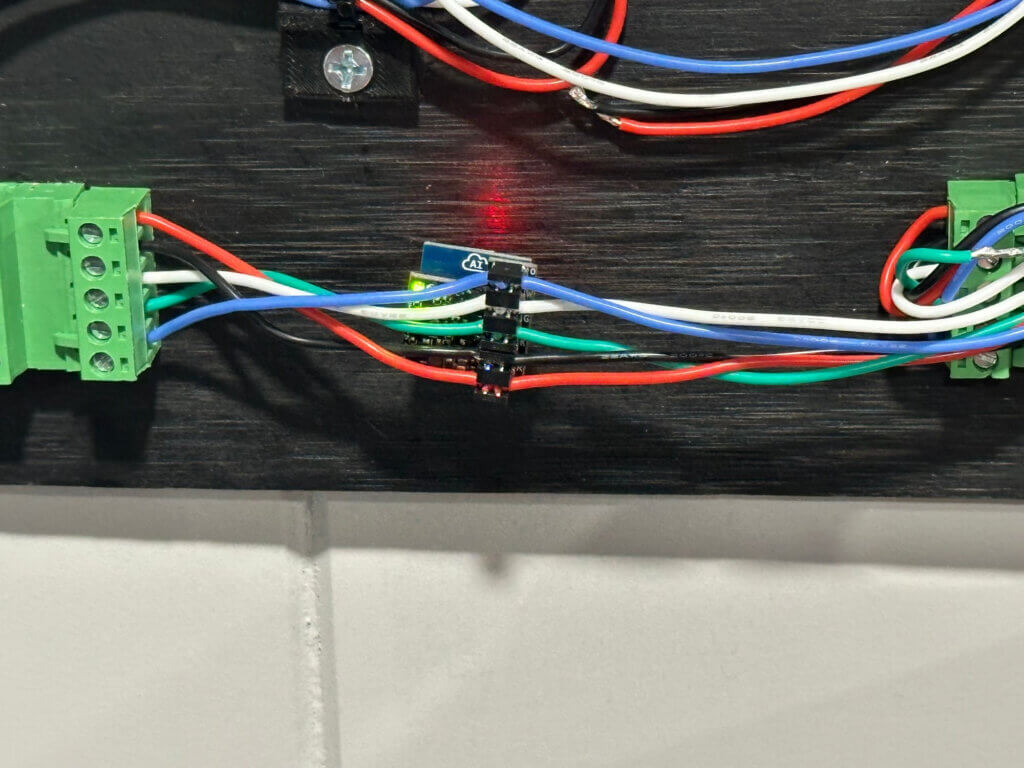
In most cases, the area within the red box is where an ESPKey would be planted. Ideally, as little outer sheathing as possible will be removed. Once the ESPKey is installed, the entire wire bundle (including the ESPKey itself) will be placed back into the door mount, and the card reader will be re-mounted. To make testing easier within this lab, there is a dedicated section where the ESPKey can be placed. Functionally, this works the same but allows more room for practice. Figure 13 depicts the ESPKey placement.
Once the ESPKey is connected, it will capture and log any traffic. Adversaries will come by occasionally to connect and retrieve new credentials. The image below is the ESPKey web interface, which shows the 13.56 MHz card discussed earlier in the blog.
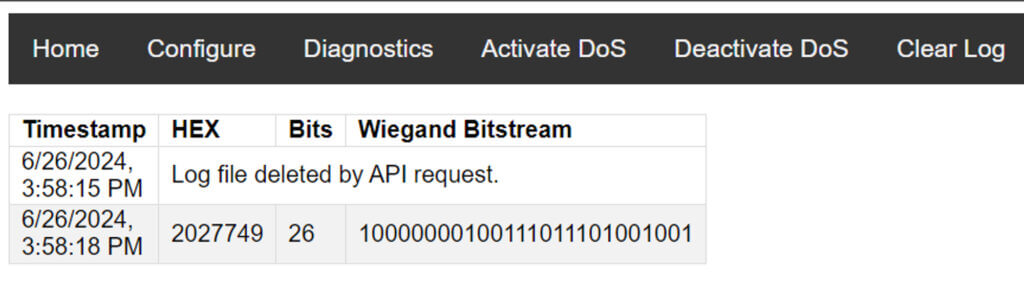
This captured data can be abused in two direct ways. First, the access code can be re-transmitted using the ESPKey’s web server. This will open the door, assuming the re-transmitted access code has access, but it will only work on that door.
The second option demonstrates the dangers of the Wiegand protocol and how effective an ESPKey attack is. Since the data is unencrypted, the collected data is identical to the card data. This allows for trivial cloning of captured cards, effectively stealing the original card. A demonstration is shown in the clip below.
To verify this conclusion, the output lines from the card reader were passed directly into a USB logic analyzer, shown below. Using a Wiegand decoder, the same binary access code was captured as was seen from the ESPKey collection.

Without Encryption, What Shall I Do?
As Wiegand is not encrypted, there are zero ways to protect the actual data in transit. However, you can protect access to that data. A little-used feature of almost all card readers is the tamper wire. There is a small light sensor on the card reader’s backside. Whenever the reader is removed from its mount, the light sensor detects this and sends a signal over the tamp wire. A demonstration is depicted in the clip below.
To further preach the tamper wire’s usefulness, there is no practical way for an adversary to defeat this security measure. The sensor’s response to light detection is much faster than the adversary’s ability to deploy countermeasures against this detection.
Before jumping with joy at the most straightforward solutions, know about integrating this feature into your current door system/SIEM/etc. It will most likely be custom. Not all systems are the same, and other concerns, such as fire safety, must be considered.
Finally, there is the Open Supervised Device Protocol (OSDP) Protocol. OSDP is the de facto solution to Wiegand. It supports advanced encryption standards and a suite of other advanced security features. However, its use is not as prolific as Wiegand’s. This blog aims to expose the security concerns of current systemic access control issues, understanding that these processes and systems are slow to evolve and change.
Recap
These two exploits, or any of their derivatives, are commonly used by pen-testers to enter your access-controlled facilities. With the ever-changing security industry, keeping up with exploits associated with your assets is challenging. Couple this with vendors offering the “newest and brightest” security that is effective in theory but pointless if misconfigured, and it is easy to feel secure when there could still be systemic issues. I hope this technical review helps you understand the underlying technologies associated with the systems protecting your assets. More so, I hope you have new questions to ask your access control vendors. They are the subject matter experts who should know the answer to these questions and ensure proper security controls are in place.
*** This is a Security Bloggers Network syndicated blog from The Guiding Point | GuidePoint Security authored by [email protected]. Read the original post at: https://www.guidepointsecurity.com/blog/how-hackers-steal-your-rfid-cards/
如有侵权请联系:admin#unsafe.sh