
Attack Path Management
Because Every Snowflake (Graph) is Unique
Introduction
On June 2nd, 2024, Snowflake released a joint statement with Crowdstrike and Mandiant addressing reports of “[an] ongoing investigation involving a targeted threat campaign against some Snowflake customer accounts.” A SpecterOps customer contacted me about their organization’s response to this campaign and mentioned that there seems to be very little security-based information related to Snowflake. In their initial statement, Snowflake recommended the following steps for organizations that may be affected (or that want to avoid being affected, for that matter!):
- Enforce Multi-Factor Authentication on all accounts;
- Set up Network Policy Rules to only allow authorized users or only allow traffic from trusted locations (VPN, Cloud workload NAT, etc.); and
- Impacted organizations should reset and rotate Snowflake credentials.
While these recommendations are a good first step, I wondered if there was anything else we could do once we better grasped Snowflake’s Access Control Model (and its associated Attack Paths) and better understood the details of the attacker’s activity on the compromised accounts. In this post, I will describe the high-level Snowflake Access Control Model, analyze the incident reporting released by Mandiant, and provide instructions on graphing the “access model” of your Snowflake deployment.
These recommendations address how organizations might address initial access to their Snowflake instance. However, I was curious about “post-exploitation” in a Snowflake environment. After a quick Google search, I realized there is very little threat research on Snowflake. My next thought was to check out Snowflake’s access control model to better understand the access landscape. I hoped that if I could understand how users are granted access to resources in a Snowflake account, I could start to understand what attackers might do once they are authenticated. I also thought we could analyze the existing attack paths to make recommendations to reduce the blast radius of a breach of the type Crowdstrike and Mandiant reported.
While we have not yet integrated Snowflake into BloodHound Community Edition (BHCE) or Enterprise (BHE), we believe there is value in taking a graph-centric approach to analyzing your deployment, as it can help you understand the impact of a campaign similar to the one described in the intro to this post.
Snowflake Access Control Model
My first step was to search for any documentation on Snowflake’s access control model. I was pleased to find a page providing a relatively comprehensive and simple-to-understand model description. They describe their model as a mix of Discretionary Access Control, where “each object has an owner, who can in turn grant access to that object,” and Role-based Access Control, where “privileges are assigned to roles, which are in turn assigned to users.” These relationships are shown in the image below:
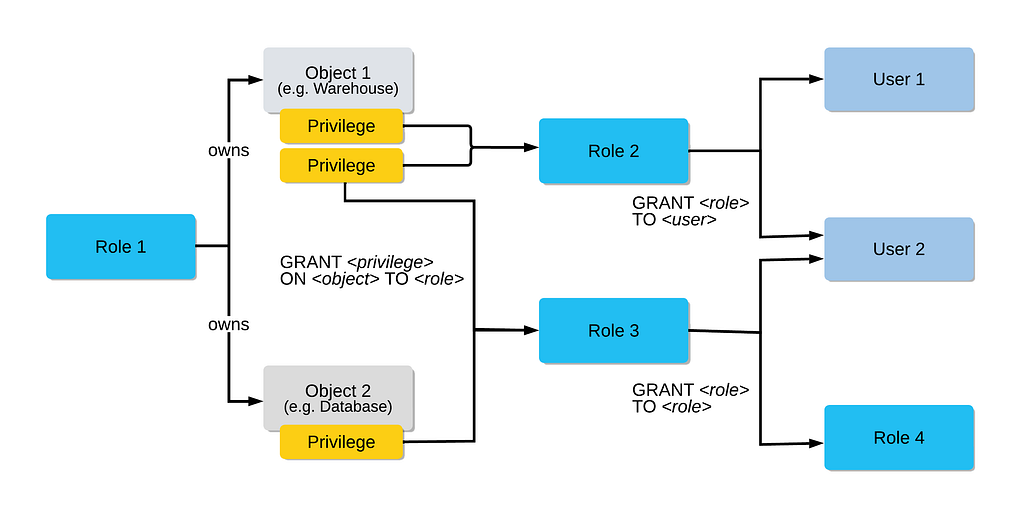
Notice that Role 1 “owns” Objects 1 and 2. Then, notice that two different privileges are granted from Object 1 to Role 2 and that Role 2 is granted to Users 1 and 2. Also, notice that Roles can be granted to other Roles, which means there is a nested hierarchy similar to groups in Active Directory. One thing that I found helpful was to flip the relationship of some of these “edges.” In this graphic, they are pointing toward the grant, but the direction of access is the opposite. Imagine that you are User 1, and you are granted Role 2, which has two Privileges on Object 1. Therefore, you have two Privileges on Object 1 through transitivity.
We have a general idea of how privileges on objects are granted, but what types of objects does Snowflake implement? They provide a graphic to show the relationship between these objects, which they describe as “hierarchical.”
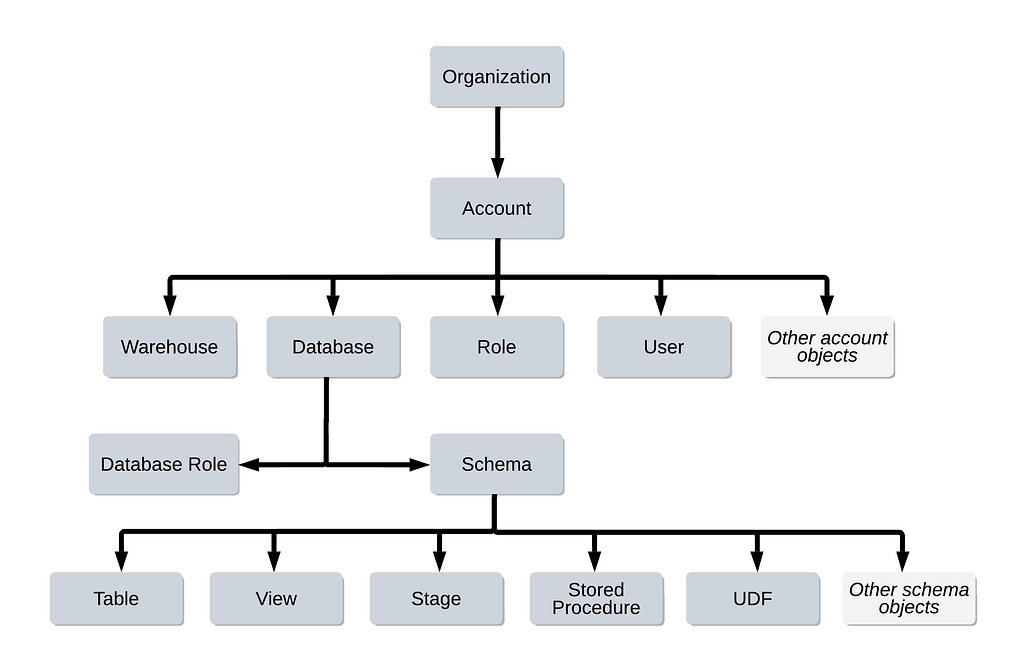
Notice that at the top of the hierarchy, there is an organization. Each organization can have one or many accounts. For example, the trial I created to do this research has only one Account, but the client that contacted me has ~10. The Account is generally considered to be the nexus of everything. It is helpful to think of an Account as the equivalent of an Active Directory Domain. Within the Account are Users, Roles (Groups), Databases, Warehouses (virtual compute resources), and many other objects, such as Security Integrations. Within the Database context is a Schema, and within the Schema context are Tables, Views, Stages (temporary stores for loading/unloading data), etc.
As I began understanding the implications of each object and the types of privileges each affords, I started to build a model showing their possible relationships. In doing so, I found it helpful to start at the top of the hierarchy (the account) and work my way down with respect to integrating entity types into the model. This is useful because access to entities often depends on access to their parent. For example, a user can only interact with a schema if the user also has access to the schema’s parent database. This allows us to abstract away details and make educated inferences about lower-level access. Below, I will describe the primary objects that I consider in my model.
Account (think Domain)
The account is the equivalent to the domain. All objects exist within the context of the account. When you log into Snowflake, you log in as a user within a specific account. Most administrative privileges are privileges to operate on the account, such as CREATE USER, MANAGE GRANTS, CREATE ROLE, CREATE DATABASE, EXECUTE TASK, etc.
Users (precisely what you think they are)
Users are your identity in the Snowflake ecosystem. When you log into the system, you do so as a particular user, and you have access to resources based on your granted roles and the role’s granted privileges.
Roles (think Groups)
Roles are the primary object to which privileges are assigned. Users can be granted “USAGE” of a role, similar to being added as group members. Roles can also be granted to other roles, which creates a nested structure that facilitates granular control of privileges. There are ~ five default admin accounts. The first is ACCOUNTADMIN, which is the Snowflake equivalent of Domain Admin. The remaining four are ORGADMIN, SYSADMIN, SECURITYADMIN, and USERADMIN.
Warehouses
A Warehouse is “a cluster of computer resources… such as CPU, memory, and temporary storage” used to perform database-related operations in a Snowflake session. Operations such as retrieving rows from tables, updating rows in tables, and loading/unloading data from tables all require a warehouse.
Databases
A database is defined as “a logical grouping of schemas.” It is the container for information that we would expect attackers to target. While the database object itself does not contain any data, a user must have access to the database to access its subordinate objects (Schemas, Tables, etc.).
Privileges (think Access Rights)
Privileges define who can perform which operation on which resources. In our context, privileges are primarily assigned to roles. Snowflake supports many privileges, some of which apply in a global or account context (e.g., CREATE USER), while others are specific to an object type (e.g., CREATE SCHEMA on a Database). Users accumulate privileges through the Roles that they have been granted recursively.
Access Graph
With this basic understanding of Snowflake’s access control model, we can create a graph model that describes the relationships between entities via privileges. For instance, we know that a user can be granted the USAGE privilege of a role. This is the equivalent of an Active Directory user being a MemberOf a group. Additionally, we find that a role can be granted USAGE of another role, similar to group nesting in AD. Eventually, we can produce this relatively complete initial model for the Snowflake “access graph.”
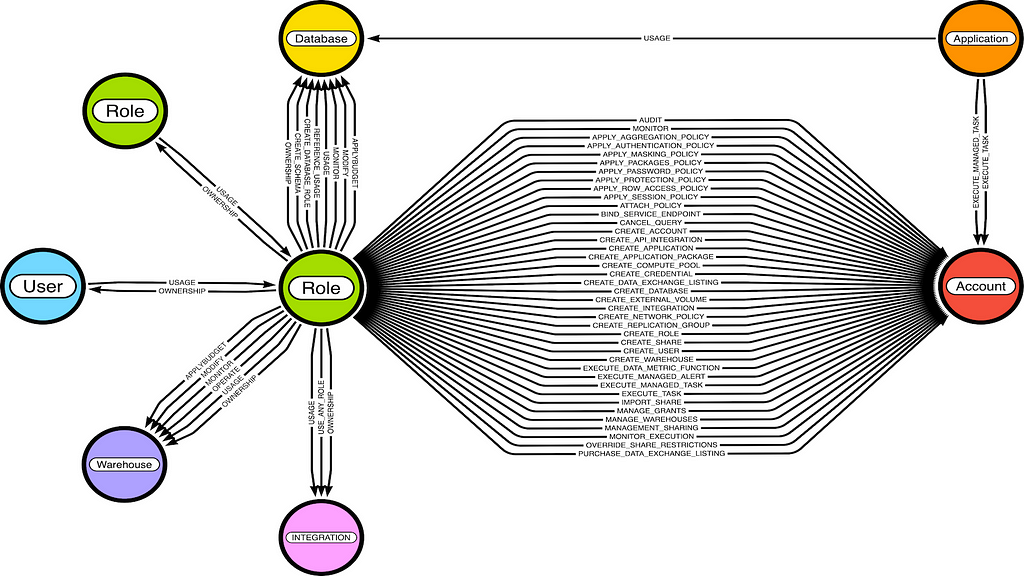
This model can help us better understand what likely happened during the incident. It can also help us better understand the access landscape of our Snowflake deployment, which can help us reduce the blast radius should an attacker gain access.
About the Incident
As more details have emerged, it has become clear that this campaign targeted customer credentials rather than Snowflake’s production environment. Later, on June 10th, Mandiant released a more detailed report describing some of the threat group’s activity discovered during the investigation.
Mandiant describes a typical scenario where threat actors compromise the computers of contractors that companies hire to build, manage, or administer their Snowflake deployment. In many cases, these contractors already have administrative privileges, so any compromise of their credentials can lead to detrimental effects. The existing administrative privileges indicate that the threat actor had no need to escalate privilege via an attack path or compromise alternative identities during this activity.
Mandiant describes the types of activity the attackers were observed to have implemented. They appear interested in enumerating database tables to find interesting information for exfiltration. An important observation is that, based on the reported activity, the compromised user seems to have admin or admin-adjacent privileges on the Snowflake account.
In this section, we will talk about each of these commands, what they do and how we can understand them in the context of our graph.

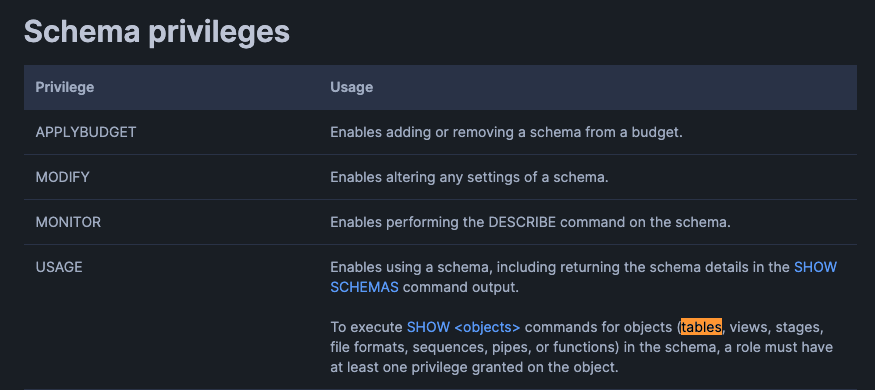
As Mandiant describes, the first command is a Discovery command meant to list all the tables available. According to the documentation, a user requires at least the USAGE privilege on the Schema object that contains the table to execute this command directly. It is common for a production Snowflake deployment to have many databases, each with many schemas, so access to tables will likely be limited to most non-admins. We can validate this in the graph, though!

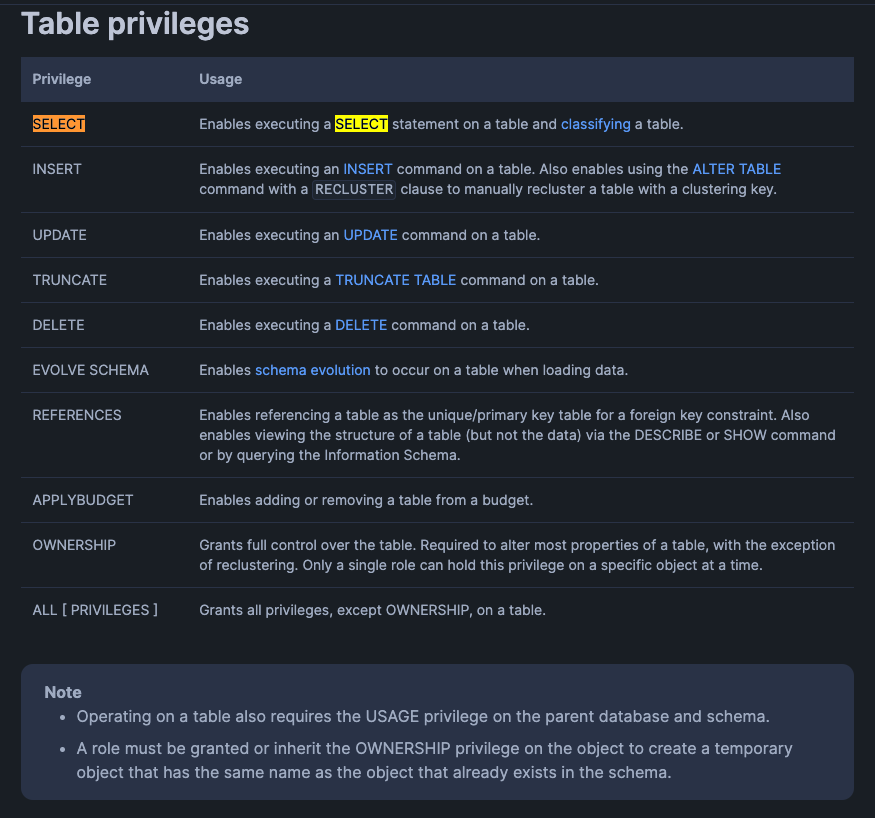
Next, we see that they run the SELECT command. This indicates that they must have found one or more tables from the previous command that interested them. This command works similarly to the SQL query and returns the rows in the table. In this case, they are dumping the entire table. The privilege documentation states that a user must have the SELECT privilege on the specified table (<Target Table>) to execute this command. Additionally, the user must have the USAGE privilege on the parent database (<Target Database>) and schema (<Target Schema>).
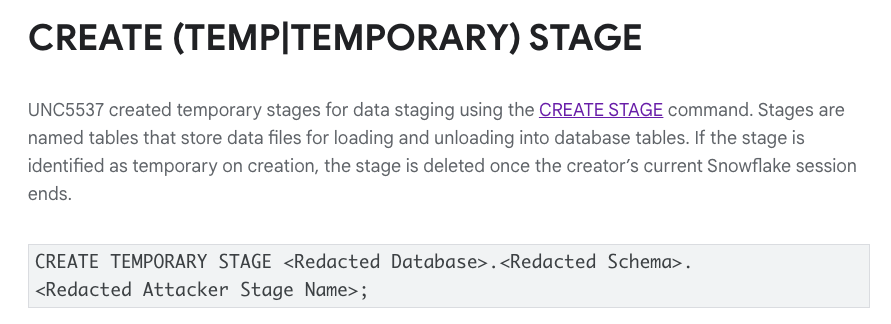
Like tables, stages exist within the schema context; thus, the requisite privilege, CREATE STAGE, exists at the schema level (aka <Redacted Schema>). The user would also require the USAGE privilege on the database (<Redacted Database>). Therefore, a user can have the ability to create a stage for one schema but not another. In general, this is a privilege that can be granted to a limited set of individuals, especially when it comes to sensitive databases/schemas.

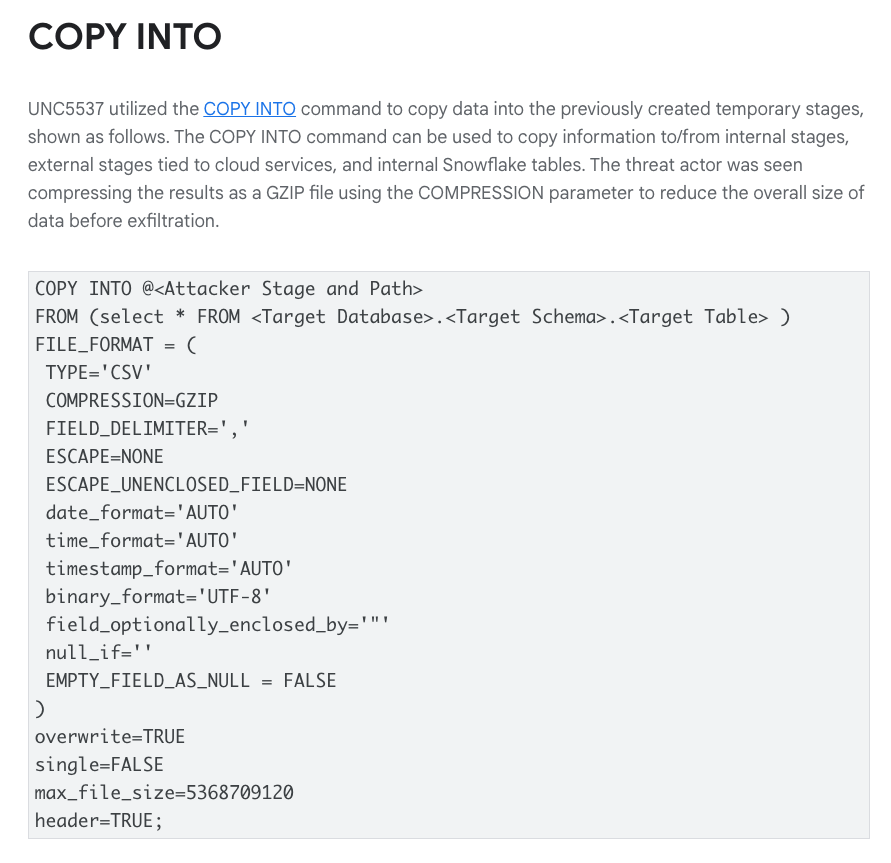
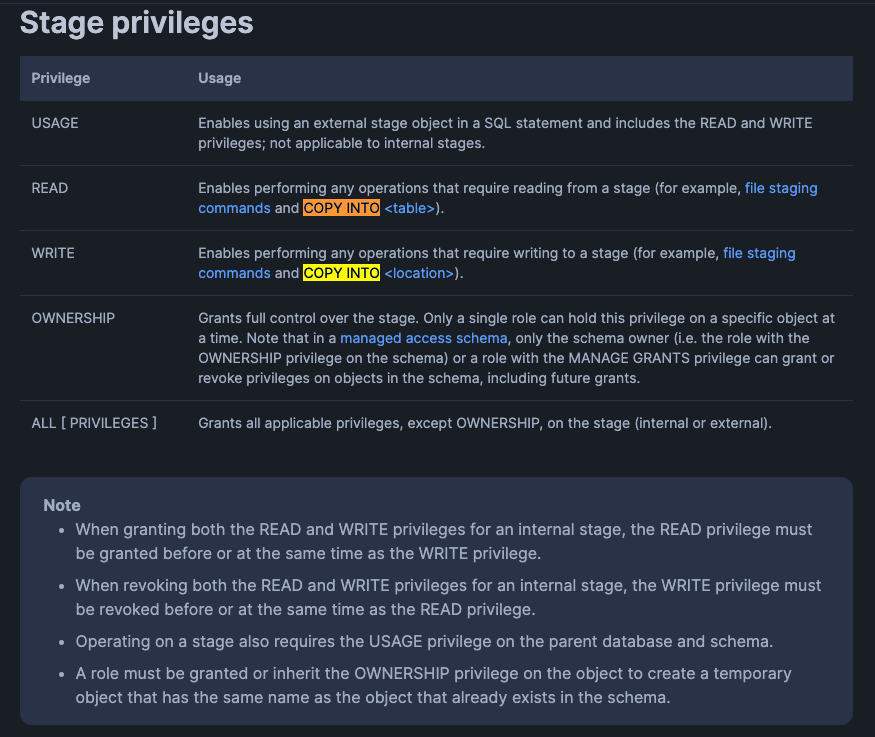
Finally, the attackers call the COPY INTO command, which is a way to extract data from the Snowflake database. Obviously, Mandiant redacted the path, but one possible example would be to use the temporary stage to copy the data to an Amazon S3 bucket. In this case, the attacker uses the COPY INTO <location> variant, which requires the WRITE privilege. Of course, the attacker created the stage resource in the previous command, so they would likely have OWNERSHIP of the stage, granting them full control of the object.
Build Your Own Graph
At this point, some of you might be interested in checking out your Snowflake Access Graph. This section walks through how to gather the necessary Snowflake data, stand up Neo4j, and build the graph. It also provides some sample Cypher queries relevant to Snowflake’s recommendations.
Collecting Data
The first step is to collect the graph-relevant data from Snowflake. The cool thing is that this is actually a relatively simple process. I’ve found that Snowflake’s default web client, Snowsight, does a fine job gathering this information. You can navigate to Snowsight once you’ve logged in by clicking on the Query data button at the top of the Home page.
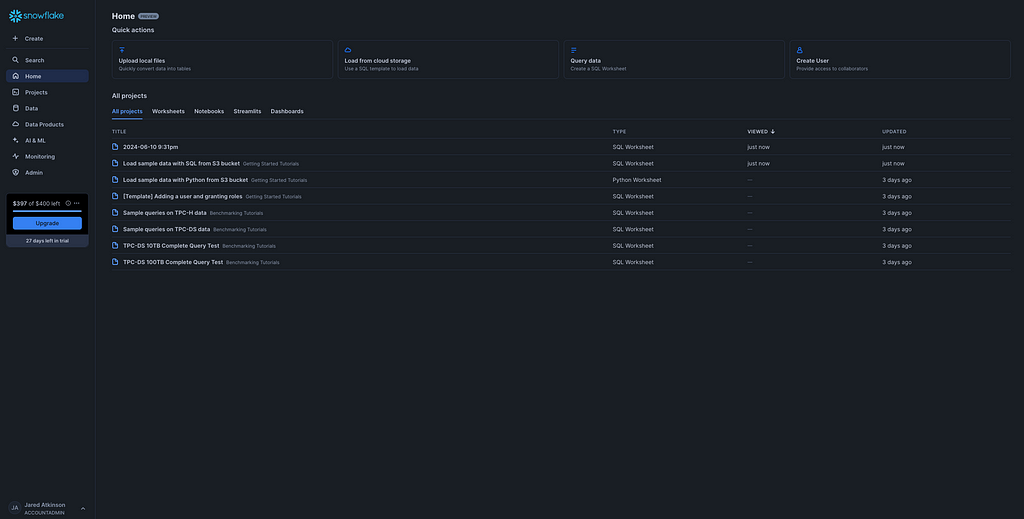
Once there, you will have the opportunity to execute commands. This section will describe the commands that collect the data necessary to build the graph. My parsing script is built for CSV files that follow a specific naming convention. Once your command has returned results, click the download button (downward pointing arrow) and select the “Download as .csv” option.

The model supports Accounts, Applications, Databases, Roles, Users, and Warehouses. This means we will have to query those entities, which will serve as the nodes in our graph. This will download the file with a name related to your account. My parsing script expects the output of certain commands to be named in a specific way. The expected name will be shared in the corresponding sections below.
I’ve found that I can query Applications, Databases, Roles, and Users as an unprivileged user. However, this is different for Accounts, which require ORGADMIN, and Warehouses, which require instance-specific access (e.g., ACCOUNTADMIN).
Applications
- Command: SHOW APPLICATIONS;
- File Name: application.csv
Databases
- Command: SHOW DATABASES;
- File Name: database.csv
Roles
- Command: SHOW ROLES;
- File Name: role.csv
Users
- Command: SHOW USERS;
- File Name: user.csv
Warehouses
- Command: SHOW WAREHOUSES;
- File Name: warehouse.csv
Note: As mentioned above, users can only enumerate warehouses for which they have been granted privileges. One way to grant a non-ACCOUNTADMIN user visibility of all warehouses is to grant the MANAGE WAREHOUSESprivilege.
Accounts
At this point, we have almost all the entity data we need. We have one final query that will allow us to gather details about our Snowflake account. This query can only be done by the ORGADMIN role. Assuming your user has been granted ORGADMIN, go to the top right corner of the browser and click on your current role. This will result in a drop-down that displays all of the roles that are effectively granted to your user. Here, you will select ORGADMIN, allowing you to run commands in the context of the ORGADMIN role.

Once complete, run the following command to list the account details.
- Command: SHOW ACCOUNTS;
- File Name: account.csv
Grants
Finally, we must gather information on privilege grants. These are maintained in the ACCOUNT_USAGE schema of the default SNOWFLAKE database. By default, these views are only available to the ACCOUNTADMIN role. Still, users not granted USAGE of the ACCOUNTADMIN role can be granted the necessary read access via the SECURITY_VIEWER database role. The following command does this (if run as ACCOUNTADMIN):
GRANT DATABASE ROLE snowflake.SECURITY_VIEWER TO <Role>
Once you have the necessary privilege, you can query the relevant views and export them to a CSV file. The first view is grants_to_users, which maintains a list of which roles have been granted to which users. You can enumerate this list using the following command. Then save it to a CSV file and rename it grants_to_users.csv.
SELECT * FROM snowflake.account_usage.grants_to_users;
The final view is grants_to_roles, which maintains a list of all the privileges granted to roles. This glue ultimately allows users to interact with the different Snowflake entities. This view can be enumerated using the following command. The results should be saved as a CSV file named grants_to_roles.csv.
SELECT * FROM snowflake.account_usage.grants_to_roles WHERE GRANTED_ON IN ('ACCOUNT', 'APPLICATION', 'DATABASE', 'INTEGRATION', 'ROLE', 'USER', 'WAREHOUSE');
Setting up Neo4j
At this point, we have a Cypher statement that we can use to generate the Snowflake graph, but before we can do that, we need a Neo4j instance. The easiest way that I know of to do this is to use the BloodHound Community Edition docker-compose deployment option.
Note: While we won’t use BHCE specifically in this demo, the overarching docker-compose setup includes a Neo4j instance configured to support this example.
To do this, you must first install Docker on your machine. Once complete, download this example docker-compose yaml file I derived from the BHCE GitHub repository. Next, open docker-compose.yaml in a text editor and edit Line 51 to point to the folder on your host machine (e.g., /Users/jared/snowflake:/var/lib/neo4j/import/) where you wrote the Snowflake data files (e.g., grants_to_roles.csv). This will create a bind mount between your host and the container. You are now ready to start the container by executing the following command:
docker-compose -f /path/to/docker-composer.yaml up -d
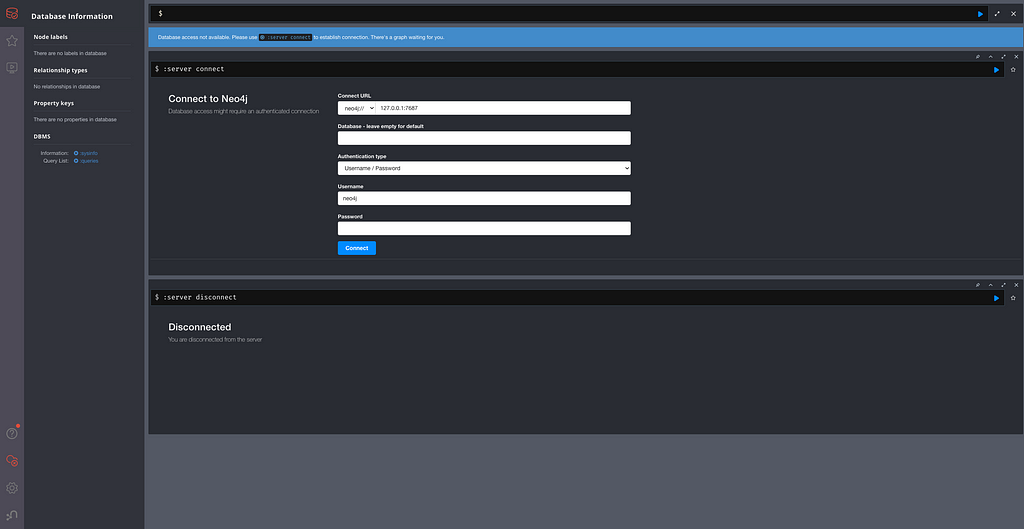
This will cause Docker to download and run the relevant Docker containers. For this Snowflake graph, we will interact directly with Neo4j as this model has not been integrated into BloodHound. You can access the Neo4j web interface by browsing to 127.0.0.1:7474 and logging in using the default credentials (neo4j:bloodhoundcommunityedition).
Data Ingest
Once you’ve authenticated to Neo4j, it is time for data ingest. I originally wrote a PowerShell script that would parse the CSV files and handcraft Cypher queries to create the corresponding nodes and edges, but SadProcessor showed me a better way to approach ingestion. He suggested using the LOAD CSV clause. According to Neo4j, “LOAD CSV is used to import data from CSV files into a Neo4j database.” This dramatically simplifies ingesting your Snowflake data AND is much more efficient than my initial PowerShell script. This section describes the Cypher queries that I use to import Snowflake data. Before you begin, knowing that each command must be run individually is essential. Additionally, these commands assume that you’ve named your files as suggested. Therefore, the file listing of the folder you specified in the Docker Volume (e.g., /Users/jared/snowflake) should look this:
-rwx------@ 1 cobbler  staff    677 Jun 12 20:17 account.csv
-rwx------@ 1 cobbler  staff    227 Jun 12 20:17 application.csv
-rwx------@ 1 cobbler  staff    409 Jun 12 20:17 database.csv
-rwx------@ 1 cobbler  staff   8362 Jun 12 20:17 grants_to_roles.csv
-rwx------@ 1 cobbler  staff    344 Jun 12 20:17 grants_to_users.csv
-rwx------@ 1 cobbler  staff    114 Jun 12 20:17 integration.csv
-rwx------@ 1 cobbler  staff    895 Jun 12 20:17 role.csv
-rwx------@ 1 cobbler  staff  12350 Jun 12 20:17 table.csv
-rwx------@ 1 cobbler  staff    917 Jun 12 20:17 user.csv
-rwx------@ 1 cobbler  staff    436 Jun 12 20:17 warehouse.csv
Note: If you don’t have a Snowflake environment, but still want to check out the graph, you can use my sample data set by replacing file:/// with https://gist.githubusercontent.com/jaredcatkinson/c5e560f7d3d0003d6e446da534a89e79/raw/c9288f20e606d236e3775b11ac60a29875b72dbc/ in each query.
Ingest Accounts
LOAD CSV WITH HEADERS FROM 'file:///account.csv' AS line
CREATE (:Account {name: line.account_locator, created_on: line.created_on, organization_name: line.organization_name, account_name: line.account_name, snowflake_region: line.snowflake_region, account_url: line.account_url, account_locator: line.account_locator, account_locator_url: line.account_locator_url})
Ingest Applications
LOAD CSV WITH HEADERS FROM 'file:///application.csv' AS line
CREATE (:Application {name: line.name, created_on: line.created_on, source_type: line.source_type, source: line.source})
Ingest Databases
LOAD CSV WITH HEADERS FROM 'file:///database.csv' AS line
CREATE (:Database {name: line.name, created_on: line.created_on, retention_time: line.retention_time, kind: line.kind})
Ingest Integrations
LOAD CSV WITH HEADERS FROM 'file:///integration.csv' AS line
CREATE (:Integration {name: line.name, created_on: line.created_on, type: line.type, category: line.category, enabled: line.enabled})
Ingest Roles
LOAD CSV WITH HEADERS FROM 'file:///role.csv' AS line
CREATE (:Role {name: line.name, created_on: line.created_on, assigned_to_users: line.assigned_to_users, granted_to_roles: line.granted_to_roles})
Ingest Users
LOAD CSV WITH HEADERS FROM 'file:///user.csv' AS line
CREATE (:User {name: line.name, created_on: line.created_on, login_name: line.login_name, first_name: line.first_name, last_name: line.last_name, email: line.email, disabled: line.disabled, ext_authn_duo: line.ext_authn_duo, last_success_login: line.last_success_login, has_password: line.has_password, has_rsa_public_key: line.has_rsa_public_key})
Ingest Warehouses
LOAD CSV WITH HEADERS FROM 'file:///warehouse.csv' AS line
CREATE (:Warehouse {name: line.name, created_on: line.created_on, state: line.state, size: line.size})
Ingest Grants to Users
LOAD CSV WITH HEADERS FROM 'file:///grants_to_users.csv' AS usergrant
CALL {
    WITH usergrant
    MATCH (u:User) WHERE u.name = usergrant.GRANTEE_NAME
    MATCH (r:Role) WHERE r.name = usergrant.ROLE
    MERGE (u)-[:USAGE]->(r)
}
Ingest Grants to Roles
:auto LOAD CSV WITH HEADERS FROM 'file:///grants_to_roles.csv' AS grant
CALL {
    WITH grant
    MATCH (src) WHERE grant.GRANTED_TO = toUpper(labels(src)[0]) AND src.name = grant.GRANTEE_NAME
    MATCH (dst) WHERE grant.GRANTED_ON = toUpper(labels(dst)[0]) AND dst.name = grant.NAME
    FOREACH (_ IN CASE WHEN grant.PRIVILEGE = 'USAGE' THEN [1] ELSE [] END | MERGE (src)-[:USAGE]->(dst))
    FOREACH (_ IN CASE WHEN grant.PRIVILEGE = 'OWNERSHIP' THEN [1] ELSE [] END | MERGE (src)-[:OWNERSHIP]->(dst))
    FOREACH (_ IN CASE WHEN grant.PRIVILEGE = 'APPLYBUDGET' THEN [1] ELSE [] END | MERGE (src)-[:APPLYBUDGET]->(dst))
    FOREACH (_ IN CASE WHEN grant.PRIVILEGE = 'AUDIT' THEN [1] ELSE [] END | MERGE (src)-[:AUDIT]->(dst))
    FOREACH (_ IN CASE WHEN grant.PRIVILEGE = 'MODIFY' THEN [1] ELSE [] END | MERGE (src)-[:MODIFY]->(dst))
    FOREACH (_ IN CASE WHEN grant.PRIVILEGE = 'MONITOR' THEN [1] ELSE [] END | MERGE (src)-[:MONITOR]->(dst))
    FOREACH (_ IN CASE WHEN grant.PRIVILEGE = 'OPERATE' THEN [1] ELSE [] END | MERGE (src)-[:OPERATE]->(dst))
    FOREACH (_ IN CASE WHEN grant.PRIVILEGE = 'APPLY AGGREGATION POLICY' THEN [1] ELSE [] END | MERGE (src)-[:APPLY_AGGREGATION_POLICY]->(dst))
    FOREACH (_ IN CASE WHEN grant.PRIVILEGE = 'APPLY AUTHENTICATION POLICY' THEN [1] ELSE [] END | MERGE (src)-[:APPLY_AUTHENTICATION_POLICY]->(dst))
    FOREACH (_ IN CASE WHEN grant.PRIVILEGE = 'APPLY MASKING POLICY' THEN [1] ELSE [] END | MERGE (src)-[:APPLY_MASKING_POLICY]->(dst))
    FOREACH (_ IN CASE WHEN grant.PRIVILEGE = 'APPLY PACKAGES POLICY' THEN [1] ELSE [] END | MERGE (src)-[:APPLY_PACKAGES_POLICY]->(dst))
    FOREACH (_ IN CASE WHEN grant.PRIVILEGE = 'APPLY PASSWORD POLICY' THEN [1] ELSE [] END | MERGE (src)-[:APPLY_PASSWORD_POLICY]->(dst))
    FOREACH (_ IN CASE WHEN grant.PRIVILEGE = 'APPLY PROTECTION POLICY' THEN [1] ELSE [] END | MERGE (src)-[:APPLY_PROTECTION_POLICY]->(dst))
    FOREACH (_ IN CASE WHEN grant.PRIVILEGE = 'APPLY ROW ACCESS POLICY' THEN [1] ELSE [] END | MERGE (src)-[:APPLY_ROW_ACCESS_POLICY]->(dst))
    FOREACH (_ IN CASE WHEN grant.PRIVILEGE = 'APPLY SESSION POLICY' THEN [1] ELSE [] END | MERGE (src)-[:APPLY_SESSION_POLICY]->(dst))
    FOREACH (_ IN CASE WHEN grant.PRIVILEGE = 'ATTACH POLICY' THEN [1] ELSE [] END | MERGE (src)-[:ATTACH_POLICY]->(dst))
    FOREACH (_ IN CASE WHEN grant.PRIVILEGE = 'BIND SERVICE ENDPOINT' THEN [1] ELSE [] END | MERGE (src)-[:BIND_SERVICE_ENDPOINT]->(dst))
    FOREACH (_ IN CASE WHEN grant.PRIVILEGE = 'CANCEL QUERY' THEN [1] ELSE [] END | MERGE (src)-[:CANCEL_QUERY]->(dst))
    FOREACH (_ IN CASE WHEN grant.PRIVILEGE = 'CREATE ACCOUNT' THEN [1] ELSE [] END | MERGE (src)-[:CREATE_ACCOUNT]->(dst))
    FOREACH (_ IN CASE WHEN grant.PRIVILEGE = 'CREATE API INTEGRATION' THEN [1] ELSE [] END | MERGE (src)-[:CREATE_API_INTEGRATION]->(dst))
    FOREACH (_ IN CASE WHEN grant.PRIVILEGE = 'CREATE APPLICATION' THEN [1] ELSE [] END | MERGE (src)-[:CREATE_APPLICATION]->(dst))
    FOREACH (_ IN CASE WHEN grant.PRIVILEGE = 'CREATE APPLICATION PACKAGE' THEN [1] ELSE [] END | MERGE (src)-[:CREATE_APPLICATION_PACKAGE]->(dst))
    FOREACH (_ IN CASE WHEN grant.PRIVILEGE = 'CREATE COMPUTE POOL' THEN [1] ELSE [] END | MERGE (src)-[:CREATE_COMPUTE_POOL]->(dst))
    FOREACH (_ IN CASE WHEN grant.PRIVILEGE = 'CREATE CREDENTIAL' THEN [1] ELSE [] END | MERGE (src)-[:CREATE_CREDENTIAL]->(dst))
    FOREACH (_ IN CASE WHEN grant.PRIVILEGE = 'CREATE DATA EXCHANGE LISTING' THEN [1] ELSE [] END | MERGE (src)-[:CREATE_DATA_EXCHANGE_LISTING]->(dst))
    FOREACH (_ IN CASE WHEN grant.PRIVILEGE = 'CREATE DATABASE' THEN [1] ELSE [] END | MERGE (src)-[:CREATE_DATABASE]->(dst))
    FOREACH (_ IN CASE WHEN grant.PRIVILEGE = 'CREATE DATABASE ROLE' THEN [1] ELSE [] END | MERGE (src)-[:CREATE_DATABASE_ROLE]->(dst))
    FOREACH (_ IN CASE WHEN grant.PRIVILEGE = 'CREATE EXTERNAL VOLUME' THEN [1] ELSE [] END | MERGE (src)-[:CREATE_EXTERNAL_VOLUME]->(dst))
    FOREACH (_ IN CASE WHEN grant.PRIVILEGE = 'CREATE INTEGRATION' THEN [1] ELSE [] END | MERGE (src)-[:CREATE_INTEGRATION]->(dst))
    FOREACH (_ IN CASE WHEN grant.PRIVILEGE = 'CREATE NETWORK POLICY' THEN [1] ELSE [] END | MERGE (src)-[:CREATE_NETWORK_POLICY]->(dst))
    FOREACH (_ IN CASE WHEN grant.PRIVILEGE = 'CREATE REPLICATION GROUP' THEN [1] ELSE [] END | MERGE (src)-[:CREATE_REPLICATION_GROUP]->(dst))
    FOREACH (_ IN CASE WHEN grant.PRIVILEGE = 'CREATE ROLE' THEN [1] ELSE [] END | MERGE (src)-[:CREATE_ROLE]->(dst))
    FOREACH (_ IN CASE WHEN grant.PRIVILEGE = 'CREATE SCHEMA' THEN [1] ELSE [] END | MERGE (src)-[:CREATE_SCHEMA]->(dst))
    FOREACH (_ IN CASE WHEN grant.PRIVILEGE = 'CREATE SHARE' THEN [1] ELSE [] END | MERGE (src)-[:CREATE_SHARE]->(dst))
    FOREACH (_ IN CASE WHEN grant.PRIVILEGE = 'CREATE USER' THEN [1] ELSE [] END | MERGE (src)-[:CREATE_USER]->(dst))
    FOREACH (_ IN CASE WHEN grant.PRIVILEGE = 'CREATE WAREHOUSE' THEN [1] ELSE [] END | MERGE (src)-[:CREATE_WAREHOUSE]->(dst))
    FOREACH (_ IN CASE WHEN grant.PRIVILEGE = 'EXECUTE DATA METRIC FUNCTION' THEN [1] ELSE [] END | MERGE (src)-[:EXECUTE_DATA_METRIC_FUNCTION]->(dst))
    FOREACH (_ IN CASE WHEN grant.PRIVILEGE = 'EXECUTE MANAGED ALERT' THEN [1] ELSE [] END | MERGE (src)-[:EXECUTE_MANAGED_ALERT]->(dst))
    FOREACH (_ IN CASE WHEN grant.PRIVILEGE = 'EXECUTE MANAGED TASK' THEN [1] ELSE [] END | MERGE (src)-[:EXECUTE_MANAGED_TASK]->(dst))
    FOREACH (_ IN CASE WHEN grant.PRIVILEGE = 'EXECUTE TASK' THEN [1] ELSE [] END | MERGE (src)-[:EXECUTE_TASK]->(dst))
    FOREACH (_ IN CASE WHEN grant.PRIVILEGE = 'IMPORT SHARE' THEN [1] ELSE [] END | MERGE (src)-[:IMPORT_SHARE]->(dst))
    FOREACH (_ IN CASE WHEN grant.PRIVILEGE = 'MANAGE GRANTS' THEN [1] ELSE [] END | MERGE (src)-[:MANAGE_GRANTS]->(dst))
    FOREACH (_ IN CASE WHEN grant.PRIVILEGE = 'MANAGE WAREHOUSES' THEN [1] ELSE [] END | MERGE (src)-[:MANAGE_WAREHOUSES]->(dst))
    FOREACH (_ IN CASE WHEN grant.PRIVILEGE = 'MANAGEMENT SHARING' THEN [1] ELSE [] END | MERGE (src)-[:MANAGEMENT_SHARING]->(dst))
    FOREACH (_ IN CASE WHEN grant.PRIVILEGE = 'MONITOR EXECUTION' THEN [1] ELSE [] END | MERGE (src)-[:MONITOR_EXECUTION]->(dst))
    FOREACH (_ IN CASE WHEN grant.PRIVILEGE = 'OVERRIDE SHARE RESTRICTIONS' THEN [1] ELSE [] END | MERGE (src)-[:OVERRIDE_SHARE_RESTRICTIONS]->(dst))
    FOREACH (_ IN CASE WHEN grant.PRIVILEGE = 'PURCHASE DATA EXCHANGE LISTING' THEN [1] ELSE [] END | MERGE (src)-[:PURCHASE_DATA_EXCHANGE_LISTING]->(dst))
    FOREACH (_ IN CASE WHEN grant.PRIVILEGE = 'REFERENCE USAGE' THEN [1] ELSE [] END | MERGE (src)-[:REFERENCE_USAGE]->(dst))
    FOREACH (_ IN CASE WHEN grant.PRIVILEGE = 'USE ANY ROLE' THEN [1] ELSE [] END | MERGE (src)-[:USE_ANY_ROLE]->(dst))
} IN TRANSACTIONS
Once you finish executing these commands you can validate that the data is in the graph by running a query. The query below returns any entity with a path to the Snowflake account.
MATCH p=()-[*1..]->(a:Account)
RETURN p
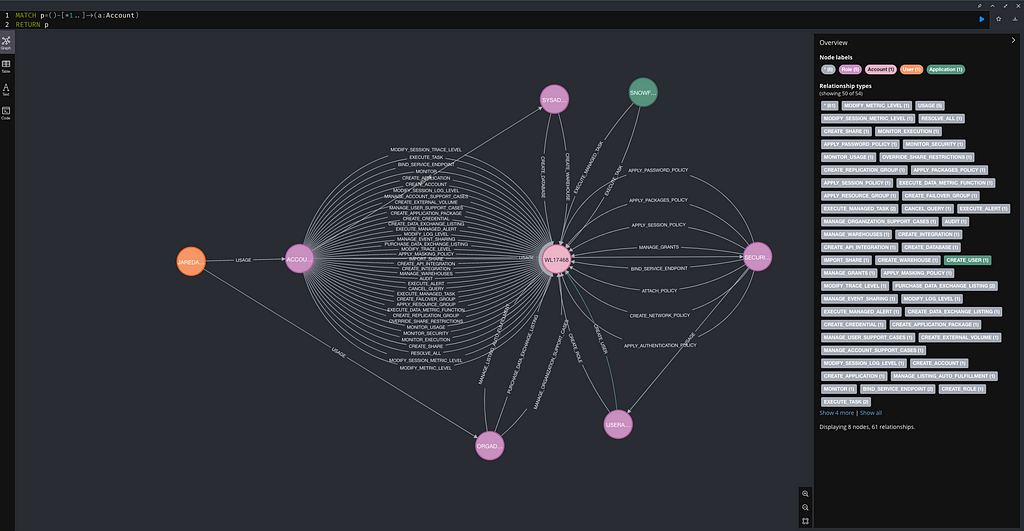
This is a common way to find admin users. While Snowflake has a few default admin Roles, such as ACCOUNTADMIN, ORGADMIN, SECURITYADMIN, SYSADMIN, and USERADMIN, granting administrative privileges to custom roles is possible.
Queries
Having a graph is great! However, the value is all about the questions you can ask. I’ve only been playing around with this Snowflake graph for a few days. Still, I created a few queries that will hopefully help you gather context around the activity reported in Mandiant’s report and your compliance with Snowflake’s recommendations.
Admins without MFA
Snowflake’s primary recommendation to reduce your exposure to this campaign and others like it is to enable MFA on all accounts. While achieving 100% coverage on all accounts may take some time, they also recommend enabling MFA on users who have been granted the ACCOUNTADMIN Role. Based on my reading of the reporting, the attackers likely compromised the credentials of admin users, so it seems reasonable to start with these highly privileged accounts first.
There are two approaches to determining which users have admin privileges. The first is to assume that admins will be granted one of the default admins roles, as shown below:
MATCH p=((n:User WHERE n.ext_authn_duo = "false")-[:USAGE*1..]->(r:Role WHERE r.name CONTAINS "ADMIN"))
RETURN p
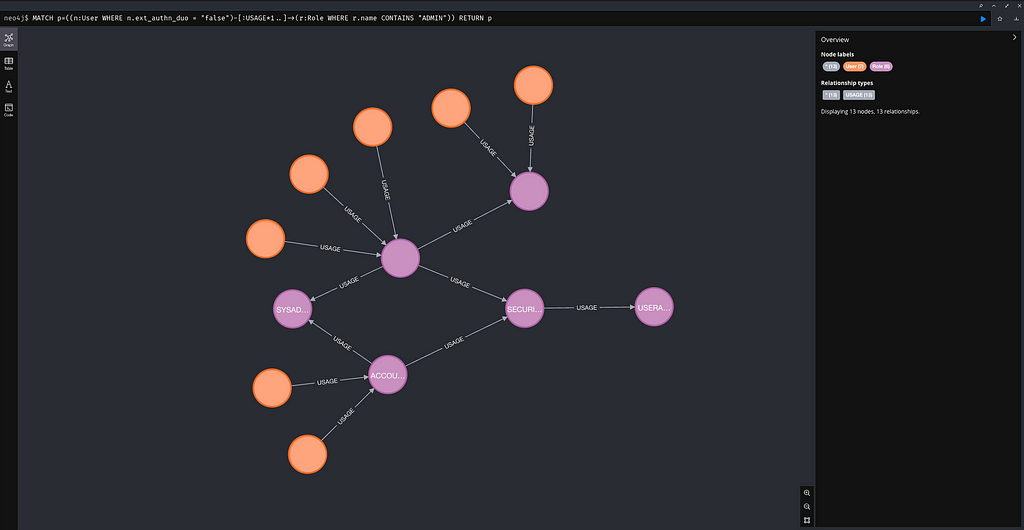
Here, we see seven users who have been granted USAGE of a role with the string “ADMIN” in its name. While this is a good start, the string “ADMIN” does not necessarily mean that the role has administrative privileges, and its absence does not mean that the role does not have administrative privileges. Instead, I recommend searching for admins based on their effective privileges.
This second query considers that admin privileges can be granted to custom roles. For example, the MANAGE_GRANTS privilege, shown below, “grants the ability to grant or revoke privileges on any object as if the invoking role were the owner of the object.” This means that if a user has this privilege, they can grant themselves or anyone access to any object they want.
MATCH p=((n:User WHERE n.ext_authn_duo = "false")-[:USAGE*1..]->(r:Role)-[:MANAGE_GRANTS]->(a:Account))
RETURN p
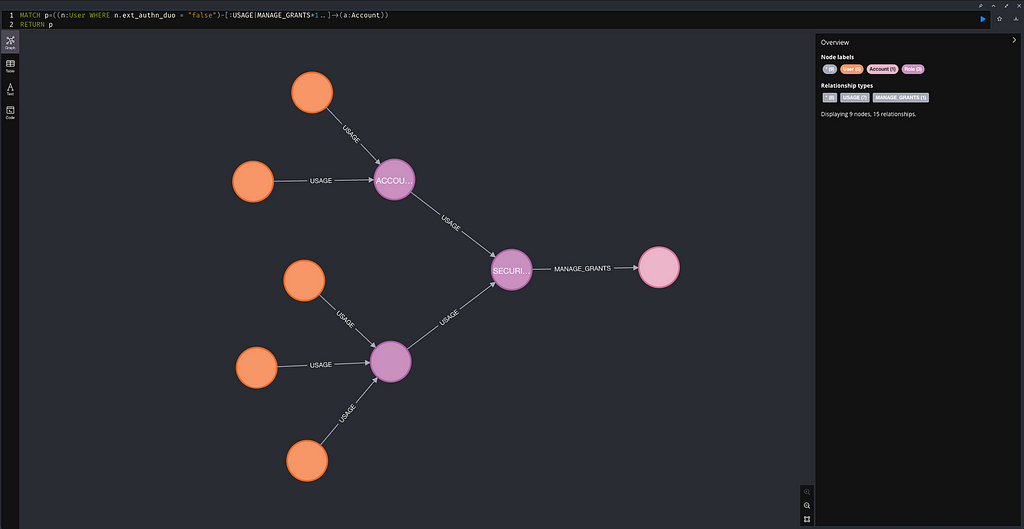
Here, we see five users not registered for MFA who have MANAGE_GRANTS over the Snowflake Account. Two users are granted USAGE of the ACCOUNTADMINS role, and the other three are granted USAGE of a custom role. Both ACCOUNTADMINS and the custom role are granted USAGE of the SECURITYADMINS role, which is granted MANAGE_GRANTS on the account.
Restated in familiar terms, two users are members of the ACCOUNTADMINS group, which is nested inside the SECURITYADMINS group, which has SetDACL right on the Domain Head.
User Access to a Database
According to Mandiant, most of the attacker’s actions focused on data contained within database tables. While my graph does not currently support schema or table entities, it is important to point out that the documentation states that “operating on a table also requires the USAGE privilege on the parent database and schema.” This means that we can use the graph to understand which users have access to which database and then infer that they likely have access to the schema and tables within the database.
MATCH p=((u:User)-[:USAGE*1..]->(r:Role)-[:OWNERSHIP]->(d:Database WHERE d.name = "<DATABASE NAME GOES HERE>"))
RETURN p

Here, the Jared and SNOWFLAKE users have OWNERSHIP of the SNOWFLAKE_SAMPLE_DATA database via the ACCOUNTADMIN role.
This query shows all users that have access to a specified databases. If you would like to check access to all databases you can run this query:
MATCH p=((u:User)-[:USAGE*1..]->(r:Role)-[]->(d:Database))
RETURN p
Stale User Accounts
Another simple example is identifying users that have never been used (logged in to). Pruning unused users might reduce the overall attack surface area.
MATCH (n:User WHERE n.last_success_login = "")
RETURN n

Conclusion
I hope you found this overview and will find this graph capability useful. I’m looking forward to your feedback regarding the graph! If you write a useful query, please share it, and I will put it in the post with credit. Additionally, if you think of extending the graph, please let me know, and I’ll do my best to facilitate it.
Before I go, I want to comment on Snowflake’s recommendations in the aftermath of this campaign. As I mentioned, Snowflake’s primary recommendation is to enable MFA on all accounts. It is worth mentioning, in their defense, that Snowflake has always (at least since before this incident) recommended that MFA be enabled on any user granted the ACCOUNTADMIN role (the equivalent of Domain Admin).
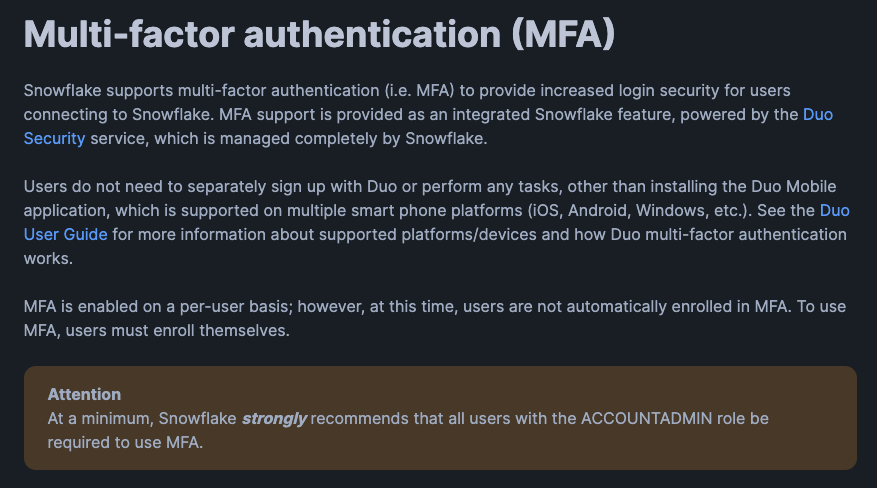
That being said, the nature of web-based platforms means that if an attacker compromises a system with a Snowflake session, they likely can steal the session token and reuse it even if the user has MFA enabled. Austin Baker, who goes by @BakedSec on Twitter, pointed this out.
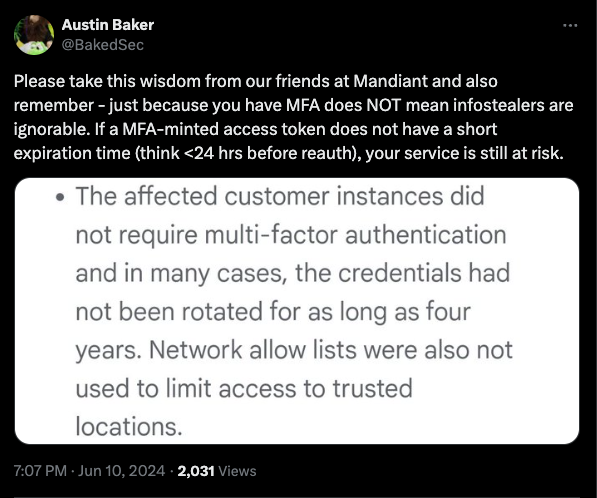
This indicates that we must look beyond how we stop attackers from getting access. We must understand the access landscape within our information systems. Ask yourself, “Can you answer which users can use the DATASCIENCE Database in your Snowflake deployment?” With this graph, that question is trivial to answer, but without one, we find that most organizations cannot answer these questions accurately. When nested groups (roles in this case) are involved, it is very easy for there to be a divergence between intended access and effective access. This only gets worse over time. I think of it as entropy.
We must use a similar approach for cloud accounts as on-prem administration. You don’t browse the web with your Domain Administrator account. No, you have two accounts, one for administration and one for day-to-day usage. You might even have a system that is dedicated to administrative tasks. These same ideas should apply to cloud solutions like Snowflake. Are you analyzing the data in a table? Great, use your Database Reader account. Now you need to grant Luke a role so he can access a warehouse? Okay, hop on your Privileged Access Workstation and use your SECURITYADMIN account. The same Tier 0 concept applies in this context. I look forward to hearing your feedback!
UPDATE: Luke Jennings from Push Security added a new technique to the SaaS Attack Matrix called Session Cookie Theft. This technique shows one way that attackers, specifically if they have access to the SaaS user’s workstation, can steal relevant browser cookies in order to bypass MFA. This does not mean that organizations should not strive to enable MFA on their users, especially admin accounts, however it does demonstrate the importance of reducing attack paths within the SaaS application’s access control model. One way to think of it is that MFA is meant to make it more difficult for attackers to get in, but once they’re in it is all about Attack Paths. The graph approach I demonstrate in this post is the first step to getting a handle of these Attack Paths to reduce the blast radius of a compromise.
Mapping Snowflake’s Access Landscape was originally published in Posts By SpecterOps Team Members on Medium, where people are continuing the conversation by highlighting and responding to this story.
*** This is a Security Bloggers Network syndicated blog from Posts By SpecterOps Team Members - Medium authored by Jared Atkinson. Read the original post at: https://posts.specterops.io/mapping-snowflakes-access-landscape-3bf232251945?source=rss----f05f8696e3cc---4
如有侵权请联系:admin#unsafe.sh