Forensic acquisition using Elcomsoft iOS Forensic T 2024-5-2 15:0:35 Author: blog.elcomsoft.com(查看原文) 阅读量:21 收藏

Forensic acquisition using Elcomsoft iOS Forensic Toolkit (EIFT) has undergone significant changes over the last few years. The earlier major branch, EIFT 7, was a carefully crafted but Windows-only script that automated the use of several bundled tools and guided the user without requiring them to know how to use each of them individually. EIFT 8 brought many new features, a more powerful interface and widespread support for new devices and host operating systems. Due to restrictions and challenges, not all features were immediately available on all platforms. There are still some minor differences in features between Windows, Linux, and macOS versions of the tool.
While the macOS version is the most complete in terms of features, not everyone has a Mac. Purchasing one (or even several) can be a stretch to one’s budget. Most experts who are not using macOS would likely consider the Windows version as the next best thing, but unfortunately the Windows edition of iOS Forensic Toolkit is the least feature-rich (at the time of writing) due to challenges in developing iOS acquisition software. Most notably, it currently does not support checkm8 acquisition as running the exploit from Windows turns out to be quite a challenging task.
Thus, when Macs are absent, the next best option would be to use the Linux edition (made for Ubuntu). That edition is currently only behind in some features regarding the usage of non-developer Apple accounts for installing the extraction agent.
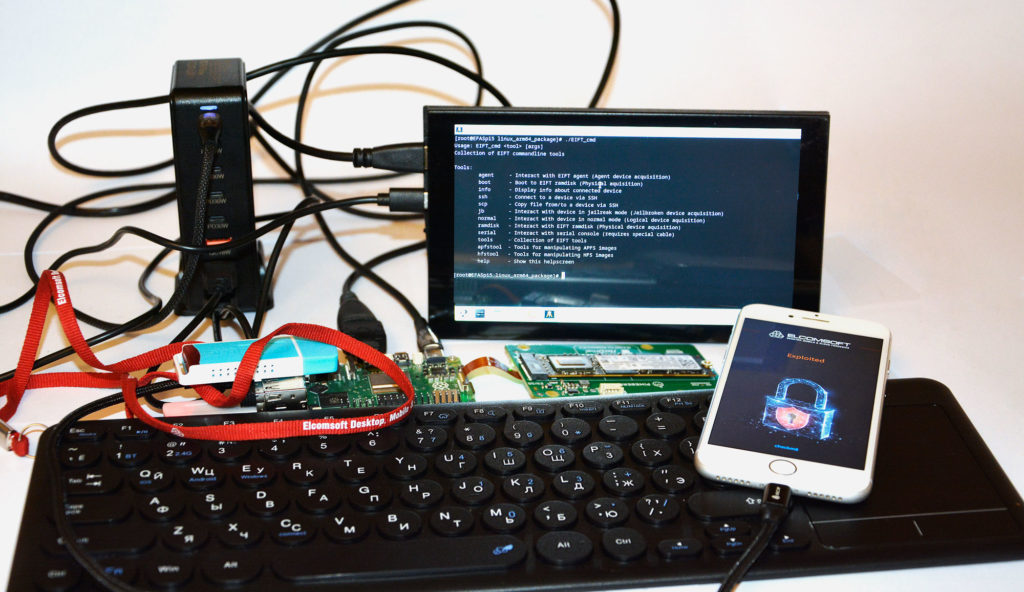
Those unfamiliar with Linux may hesitate to install it alongside the likely already-installed Windows, or perhaps company policy might prevent experts from doing so. In these circumstances, it might be tempting to consider a virtual machine; however, unfortunately, using one is not supported because the checkm8 exploit will not work inside a VM. The logical option would be purchasing dedicated hardware specifically for the purpose of performing low-level data acquisition with iOS Forensic Toolkit. Instead of wasting money on a cheap laptop, which will likely backfire as soon as one tries to use it, it would be wiser to acquire an inexpensive but still decent machine such as the Raspberry Pi 5. The Raspberry Pi 5 features a quad-core CPU, 8GB of RAM, and a PCIe 2.0 lane, which allows connecting an M.2 SSD using an appropriate third-party kit.
If you have a spare sum to spend on a decent Linux machine, our Research & Development Department can recommend the 2022 LG Gram 17″ Ultralight Notebook. However, at that price point, you might as well buy a MacBook, which will have better compatibility with iOS Forensic Toolkit to begin with.
For the purpose of running iOS Forensic Toolkit on a Raspberry Pi 5, we created a dedicated image called Elcomsoft Forensic Acquisition (Operating) System, short EFAS. It comes as a minimal environment based on Arch Linux for ARM, with dependencies pre-installed and pre-configured so that the user can jump right to performing forensic acquisition tasks with ease. For this purpose we created a dedicated iOS Forensic Toolkit build for Linux arm64 target and tested it to provide a smooth user experience on EFAS. EFAS has all the dependencies already installed and correctly configured, so that EIFT can be run and used intuitively.
Note: It is theoretically possible to run iOS Forensic Toolkit arm64 Linux build on other operating systems, however that is not officially supported because several dependencies need to be installed and configured for iOS Forensic Toolkit to run correctly.
EFAS Features
EFAS comes with SSH pre-installed and enabled. You can simply connect the Raspberry Pi to Ethernet, then ssh into it with the command ssh eift@EFASpi5 and the password Elcomsoft, then continue your workflow from your regular machine.
Note: If you don’t intend on using SSH, we recommend to disable it using the commands sudo systemctl disable sshd and sudo systemctl stop sshd to not potentially expose your acquired data to the network. If you later decide that you want to re-enable SSH, the commands are sudo systemctl enable sshd and sudo systemctl start sshd
Alternatively, you can connect a monitor over HDMI and attach a mouse and keyboard over USB, and use the Raspberry Pi as a desktop. EFAS will greet you with the GDM login screen, where you can select the eift user and login with the password Elcomsoft. You will be then welcomed by a KDE desktop environment with helpful shortcuts such as the Alacritty terminal emulator or the Nemo file viewer. Due to poor X11 compatibility with Raspberry Pi 5, we chose to go with a fully Wayland based system. This works fine for most basic applications, but unfortunatelly sometimes there are issues with non-working legacy programs (such as GParted) requiring to fall back to the terminal for some tasks.
Note: We strongly recommend to change the default password. This can be done using the terminal and the following command passwd.
Using iOS Forensic Toolkit
You can either download iOS Forensic Toolkit directly on the Raspberry Pi using Firefox, or download it on your regular computer and copy it to the RPI using a USB drive or scp.
Important: Do not unzip iOS Forensic Toolkit onto the USB drive as this is known to cause problems running EIFT later!
Instead, copy the zip file to the RPI (for example to the Desktop) and then unzip EIFT there (for example using the terminal unzip EIFT.zip). Afterwards, you can use EIFT as usual.
Using an NVME drive
Raspberry Pi 5 comes with a PCIe 2.0 lane, which can be use to connect an M2 SSD using an appropriate third-party kit. When connecting the M.2 drive for the first time, you may need to partition and format the drive. If you plan to use the M.2 drive for acquisition on the Raspberry PI, then disconnect it and connect it to a different computer for analysis using an external M.2 case, then you may want to format the M.2 drive to a filesystem that your host recognizes, such as exFAT. In all other cases we recommend formatting the drive as BTRFS. This will have advantages when dealing with Perfect Acquisition and large image dumps, as BTRFS supports features like COW (Copy On Write) and snapshots that can be useful (EIFT does use the former if the filesystem supports it).

When using iOS Forensic Toolkit, make sure to specify the output path -o <path> to be a path located on the M2 drive for improved performance.
Formatting the M2 drive
First, check that the drive is detected correctly. This can be done using lsblk. The output should look something like this:
[eift@EFASpi5 ~]$ lsblk

NAME        MAJ:MIN RM   SIZE RO TYPE MOUNTPOINTS

mmcblk0     179:0    0 119.1G  0 disk

├─mmcblk0p1 179:1    0   160M  0 part /boot

└─mmcblk0p2 179:2    0 118.9G  0 part /

nvme0n1     259:0    0 465.8G  0 disk

└─nvme0n1p1 259:1    0 465.8G  0 part

[eift@EFASpi5 ~]$
Here you can see the M.2 is detected as nvme0n1.
To partition the drive use sudo gdisk /dev/nvme0n1. Use o to delete existing partitions (may need to be confirmed with y), then use n,1,<enter>,<enter>,<enter> (all entries need to be confirmed with enter, but the last 3 can be left blank) to create a new partition and finally w,y to write changes to disk.
Next format the partition using sudo mkfs.btrfs /dev/nvme0n1p1.
When done, you can mount the drive using Nemo gui.
Obtaining EFAS
Elcomsoft Forensic Acquisition (Operating) System is fully opensource, and the scripts used to build the image are available in our GitHub repo. Head to the “Releases” section and download the latest build generated by our CI pipeline.
Trusting the operating system you use is good, but it is much better when you can actually verify that no shenanigans are happening secretly in the background. In the field of forensic we are often dealing with very sensitive data after all. Thus we want to make sure that we know the data stays safe and secure. Therefore you can not only see all the custom files that will end up on the image, but you can also inspect the scripts that install and configure the software so that you know what is going to be on the image you install.
Even better, the full log of the CI runner that build the image is publicly visible on github so you can trace exactly how the image was built. If all that is still not enough, you can clone the repo and build the image yourself locally without needing to turst anyone but you!
Note: Building the image locally requires a Linux host and several dependencies installed and correctly configured such as systemd-binfmt and qemu. We recommend downloading the pre-built image.
At the time of writing EFAS is still in its early stages, so there may be some initial hiccups, which will be smoothed out in later revisions. Feedback, suggestions for improvement and contributions are welcome, so please open an issue on GitHub if you run into problems!
Conclusion
When macOS computers are unavailable and Linux cannot be co-installed on a desktop, or perhaps a portable solution is desired, a Raspberry Pi 5 is a great option. For such cases, Elcomsoft Forensic Acquisition System (EFAS) provides a pre-configured environment optimized to work seamlessly with Elcomsoft iOS Forensic Toolkit (EIFT). Just head to our GitHub, download EFAS, flash it to a microSD card, acquire the data using EIFT, and move on to the crucial analysis part of your work.

REFERENCES:

Elcomsoft iOS Forensic Toolkit
Extract critical evidence from Apple iOS devices in real time. Gain access to phone secrets including passwords and encryption keys, and decrypt the file system image with or without the original passcode. Physical and logical acquisition options for all 64-bit devices running all versions of iOS.
Elcomsoft iOS Forensic Toolkit official web page & downloads »
如有侵权请联系:admin#unsafe.sh