
介绍
MiniCPM 是面壁智能发布的一款模型,只有2B大小。官方介绍说只需要一张1080/2080可实现高效参数微调,所以我尝试按官方的步骤进行微调,给自己用。
准备
环境
根据官方介绍
LORA 微调: 1张显卡,占用 10619MiB 显存。
我的卡是2060s,只有8G的VRAM,所以我换了一张有12G VRAM的3060来测试。
同时在测试途中,发现训练中使用的FlashAttention2.0库,只有图灵架构之后的显卡支持bf16格式,也就是尽量使用30系之后的显卡。
测试途中发现win平台环境搭建机器困难(主要是deepspeed),我这里直接使用了ubuntu22.04系统
我安装了目前deepspeed支持的最高版本CUDA 12.1.1
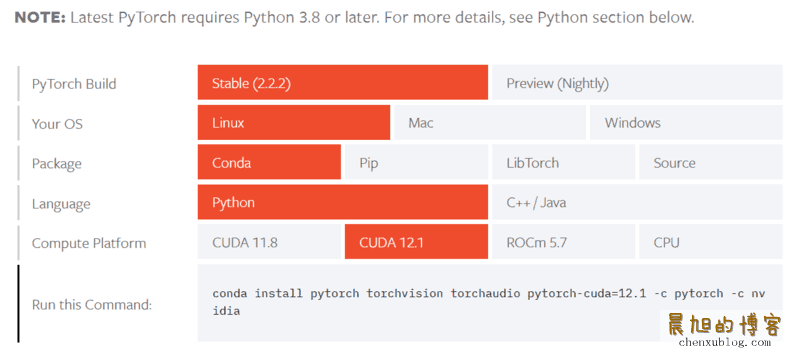
使用conda(miniconda)开了一个3.10的python环境,并安装最新版本的torch

仓库和基底模型
需要确保装上了git的lfs组件,以免模型没下载
克隆MiniCPM官方的git仓库,切到微调目录
git clone https://github.com/OpenBMB/MiniCPM.git
cd MiniCPM/finetune
克隆基底模型到目录,这里看自己网络环境,可以去huggingface也可以去魔搭社区
#huggingface,sft和pdo看你需求二选一
git clone https://huggingface.co/openbmb/MiniCPM-2B-sft-bf16
git clone https://huggingface.co/openbmb/MiniCPM-2B-dpo-bf16
#魔搭社区,国内可以用这个,更快,sft和pdo看你需求二选一
git clone https://www.modelscope.cn/OpenBMB/miniCPM-bf16.git MiniCPM-2B-sft-bf16
git clone https://www.modelscope.cn/OpenBMB/MiniCPM-2B-dpo-bf16.git
这里我用的是sft模型
装上环境
还是在前面新建好的conda环境里把依赖装上,时间会比较久
pip install -r requirements.txt
准备数据
训练需要train.json微调数据集和eval.json验证数据集,两种数据格式一样的,参考官方文档的说明
更改训练参数,并跑起来
这里的参数看自己需求来调整,我只描述一个大概
我们要编辑lora_finetune.sh的部分参数,以便在12G显存的前提下进行训练。
--include localhost:0显卡的编号,一张卡就写0--model_name_or_path MiniCPM-2B-sft-bf16模型路径--output_dir output/test/$formatted_time/lora输出路径,看着改--train_data_path data/test/train.json训练数据集--eval_data_path data/test/dev.json测试数据集--per_device_train_batch_size 3212G显存只能用1或者2,用不了32--per_device_eval_batch_size 64,同上,只能用1或者2--max_steps 3000看你想训练的轮次,总数 = 数据条数 / batch_size * 训练轮次--save_steps 500多少步保存一次,看你需求改,硬盘空间要够--deepspeed configs/ds_config_zero3_offload.json我用的ds_config_zero2_offload.json,看自己需求
改完之后直接跑,如果跑不起来,多改几次试试
bash lora_finetune.sh
测试lora结果
我用的下面的代码测试的,看自己需求来修改
# -*- coding: utf-8 -*-
import torch
from tqdm import tqdm
from transformers import AutoModelForCausalLM, AutoTokenizer

path = "output/test/20240421175530/checkpoint-110000"
tokenizer = AutoTokenizer.from_pretrained(path)
model = AutoModelForCausalLM.from_pretrained(
    path, torch_dtype=torch.bfloat16, device_map="cuda", trust_remote_code=True
)

tests = [
    "为什么陨石正好会落入陨石坑里",
    "演示一下什么叫做复读机",
    "论述一下地球人和火星人的区别",
]

for t in tests:
    print(t)
    res, history = model.chat(tokenizer, query=t, max_length=80, top_p=0.5)
    print(res)
    print("================================")

while True:
    s = input("手动输入:")
    res, history = model.chat(tokenizer, query=s, max_length=80, top_p=0.5)
    print(res)
如果测试没问题,可以进行合并模型操作
合并模型
使用下面的代码,看自己需求来修改
# -*- coding: utf-8 -*-
import torch
from peft import PeftModel
from transformers import AutoTokenizer, AutoModelForCausalLM


path = "output/test/20240421175530/checkpoint-110000"
base_path = "MiniCPM-2B-sft-bf16"
output_path = "output/test/marge"

tokenizer = AutoTokenizer.from_pretrained(path)
base_model = AutoModelForCausalLM.from_pretrained(
    base_path, torch_dtype=torch.bfloat16, device_map="cuda", trust_remote_code=True
)
lora_model = PeftModel.from_pretrained(
    base_model,
    path,
    torch_dtype=torch.bfloat16,
)

print("Applying the LoRA")
model = lora_model.merge_and_unload()

print(f"Saving the target model to {output_path}")
model.save_pretrained(output_path)
tokenizer.save_pretrained(output_path)
合并后是safetensor格式的hf模型
转成llama.cpp格式
准备好llama.cpp
git clone https://github.com/ggerganov/llama.cpp.git
cd llama.cpp
make
pip install -r requirements.txt
转换hf模型到gguf
根据自己的实际路径修改
python convert-hf-to-gguf.py ../output/test/marge/
量化模型
我这里量化到Q4_K_M,根据自己的需求来修改
./quantize ../output/test/marge/ggml-model-f16.gguf ../output/test/marge/ggml-model-q4km.gguf Q4_K_M
测试llama量化效果
./main -m ../output/test/marge/ggml-model-q4km.gguf -ngl 100 -c 4096 -t 30 --temp 0.5 --top_k 40 --top_p 0.9 --repeat_penalty 1.1 --in-prefix-bos -f "<用户>你的prompt<AI>"