
2024-4-19 12:30:0 Author: securityboulevard.com(查看原文) 阅读量:5 收藏
Endpoint detection and response (EDR) solutions have become a key component of many enterprise endpoint security strategies, resulting in a forecasted market value close to $17 billion by 2030. This is due in no small part to the increase in remote work following the COVID-19 pandemic, the resulting bring-your-own-device (BYOD) trend in which employees use personal devices for work-related activities, and the constant evolution of cyber threats.
EDR solutions are designed to monitor end-user devices—like laptops, desktops, and servers—to help organizations better detect and address threats like ransomware and malware. As noted by Gartner, EDR solutions “record and store endpoint-system-level behaviors, use various data analytics techniques to detect suspicious system behavior, provide contextual information, block malicious activity, and provide remediation suggestions to restore affected systems.” To carry out these activities, EDRs often run with the highest privileges, while being “tamper proof” and persistent.
As a security researcher and former malware researcher, I have consistently observed the ongoing race between EDR solutions and ever-evolving malware strains—as one gets more sophisticated, so too does the other. My most recent research project, which I first presented at Black Hat Asia 2024, set out to explore how I could manipulate this relationship between the two to make an EDR a malicious offensive tool. Specifically, I wanted to see if I could create malware that was part of the EDR itself—not just able to bypass it—while remaining persistent, stealthy, and with high privileges. I set my sights on one of the most widely used solutions on the market: Palo Alto Networks Cortex extended detection and response (XDR) platform.
Below, I’ll first provide a high-level overview of the key findings and takeaways from this research. Next, I’ll dive into the details about the content files that are made available as part of the Cortex XDR installation process and, specifically, the information I uncovered within these files about the functionality of its ransomware protection feature. I’ll provide examples and demonstrations about how I used that information to develop multiple techniques to bypass the XDR. Then, I will explain how my research process identified ways to further exploit the XDR’s behavior, allowing me to develop another bypass and even insert my own malware to run from within one of the XDR’s processes. Finally, I will highlight the vendor response and explain how we are sharing this information with the broader security community to help organizations protect themselves.
Overview
Key Findings
As part of the installation process, Cortex XDR includes Lua-based content files containing the underlying logic for its detection mechanisms. It utilizes information from these files to enforce its protection features. By analyzing these content files, I gained insight into the logic behind some of the XDR’s protections. This enabled me to devise methods to evade certain protections, such as:
- Encrypting files within a specified folder while leaving honeypot files unaffected to avoid detection.
- Conducting a memory dump of the lsass.exe process, which holds sensitive data like user credentials and security tokens.
Throughout my research, I also identified ways to exploit Cortex XDR’s behavior, including:
- Bypassing Cortex’s file anti-tampering protection, ultimately enabling me to load a vulnerable driver (bring-your-own-vulnerable-driver [BYOVD]) and patch Cortex XDR’s management password verification within one of its drivers. This allowed me to change Cortex’s logic to deny any administrator password, thus preventing the administrator the ability to remove the XDR by using the admin’s uninstall password from the Cortex management server or with physical access to the infected machine. I believe a full disk format and reinstall of the operating system and Cortex XDR would be required to remove the malicious code.
- Inserting malicious code into one of its processes, granting me high privileges and allowing me to remain undetected and persistent.
Takeaways
We believe the implications of this research—which have the potential to create significant security risks for millions of users—suggest several important takeaways:
- Proactive research to identify security risks in endpoint products may be more valuable than researching security risks in operating systems (OSs). Attackers that exploit risks in the OS must still contend with another guardian: the EDR. However, if attackers breach the highest guardian (i.e., the EDR), they stand to gain unfettered access to a large set of powerful capabilities without having to face any guardian at all.
- The logic behind the detection processes of a security product should be closely guarded. This research has proven that, by giving attackers access to this sensitive detection logic via the solution’s content files, they are much more likely to be able to engineer a way around it. We believe endpoint security vendors must ensure that:
- Content files are encrypted while on the disk. While these files will be decrypted in memory at some point, it will make it more difficult to analyze the files and develop bypasses.
- Content files must be digitally signed/verified and are not dependent on an external anti-tampering layer that could be bypassed as a single point of failure.
- The addition of processes or actions on an “allowlist” or “blocklist” should be based on multiple parameters. More specifically, the parameters should not have the ability to be manipulated by attackers. Adding a process to an “allowlist” based only on its name, which can be easily modified by an attacker, or detecting a process dump based on a command Regex, for instance, is not enough.
Background
Cortex XDR Installation Process
The Palo Alto Cortex XDR platform offers support for Windows, Mac operating system (OS), and Linux environments. I decided to focus solely on the Windows agent and set out to first understand how it worked. As a starting point, I explored what files were written to the disk during the installation process and noticed there were a number of additional files and folders related to the XDR under the C:\ProgramData\Cyvera folder.
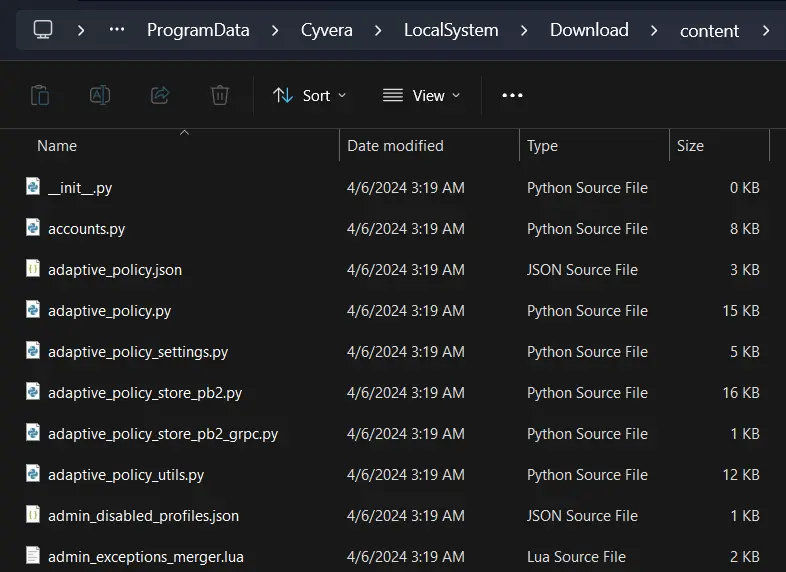
Within that folder, I discovered another folder called content. It seemed to include policy rules and both Lua and Python files that were text-based and easily understood.
Cortex XDR Ransomware Protection
Upon further inspection of the content folder, I noticed a file called ransom.lua, which gave me a pretty good understanding of how Cortex’s ransomware protections works. Essentially, Cortex hides honeypot files in various locations on a machine to assist with ransomware detection. If a process tries to modify those files, the XDR identifies it as probable ransomware and the process is terminated.
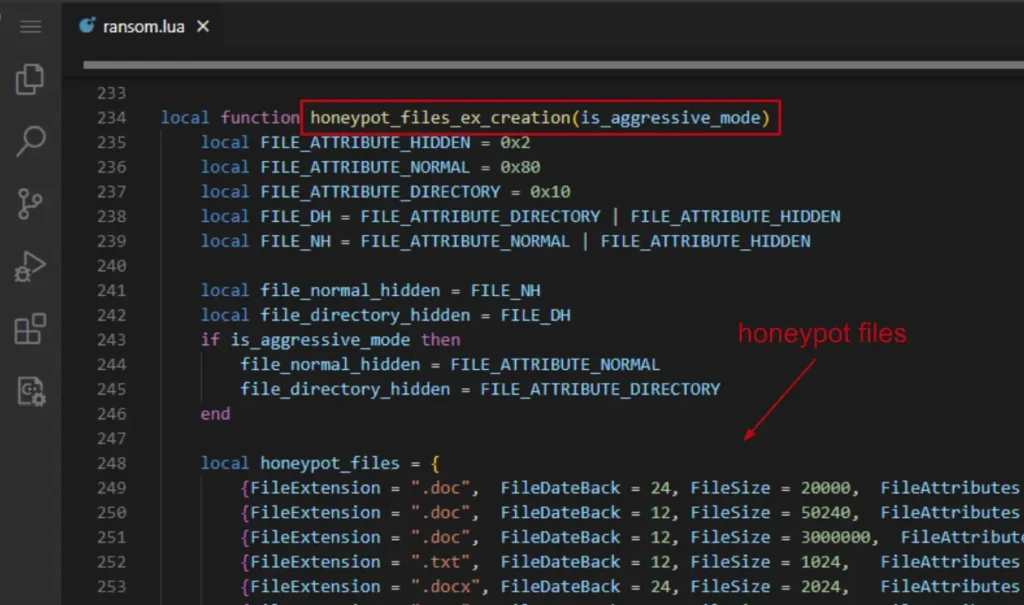
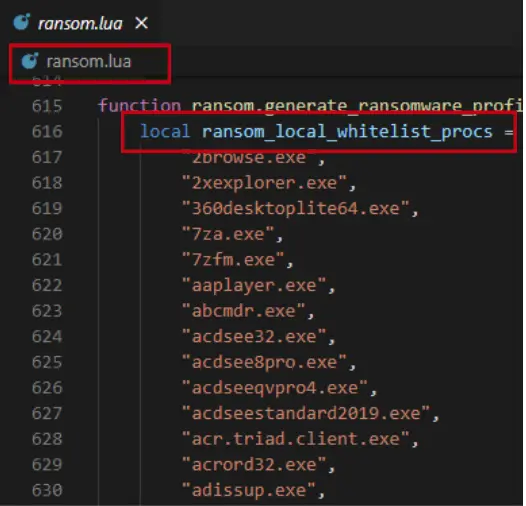
Cortex also wants to prevent most legitimate processes from seeing the honeypot files—this is done to prevent them from accidentally modifying the decoy files, resulting in a false alert or termination of the process. To do this, Cortex:
- Holds a list of the legitimate processes that should not be able to see the honeypot files in the ransom.lua file
- Uses a mini-filter driver to make the honeypot files invisible to those processes
The Research Process
With the information I’d learned about how Cortex XDR’s ransomware protection worked, my research goals were established. I wanted to:
- First, see if I could bypass the XDR’s ransomware protection by abusing the knowledge I gained from reading the ransom.lua file.
- Second, see what other malicious actions I could complete using the detection logic within the content files.
- Third, identify a technique that would allow me to actually run malware inside the XDR itself, not just bypass it.
Bypass Techniques
Cortex XDR Ransomware Protection Bypass
To begin, I verified that the Cortex XDR was up and running with all of the services and protections enabled. I wrote a very simple ransomware with the name ransom.exe that would encrypt all the files in a given folder for the first test. I ran it on the Documents folder, which contained important files. As expected, Cortex detected this malicious action with its ransomware protection and the files were not encrypted.
For the real test, I picked one of the names of the white listed programs in the ransom.lua file—aaplayer.exe—and renamed the ransomware accordingly. I ran it on the Documents folder again and this time it worked. I was able to encrypt all files there, successfully bypassing Cortex XDR’s ransomware protection.
Why? When ransomware is executed on a specific folder, it lists all of the files within the folder and then encrypts them. By giving my ransomware the same name as one of the white listed processes, I was able to prevent it from seeing/listing the honeypot files within the Documents folder. As a result, it only encrypted the legitimate files in the folder, leaving the honeypot files untouched and allowing it to remain undetected by the XDR.
To see this process in action, check out the demo below.
ProcDump Bypass
After the successful ransomware protection bypass, I wanted to try more malicious attacks to see how the Cortex XDR would respond. My next test was to try to dump the memory of the lsass.exe process, which holds very sensitive data about the machine it runs on (e.g., data like user credentials and security tokens).
To begin, I used ProcDump to dump the lsass memory into a file called lsass.dmp. ProcDump is a Windows command-line utility that can be used to create process dump files that capture memory snapshots of running processes.

As expected I received a prevention alert from the XDR. And, it was kind enough to tell me that it was the Regex detection that caught me.
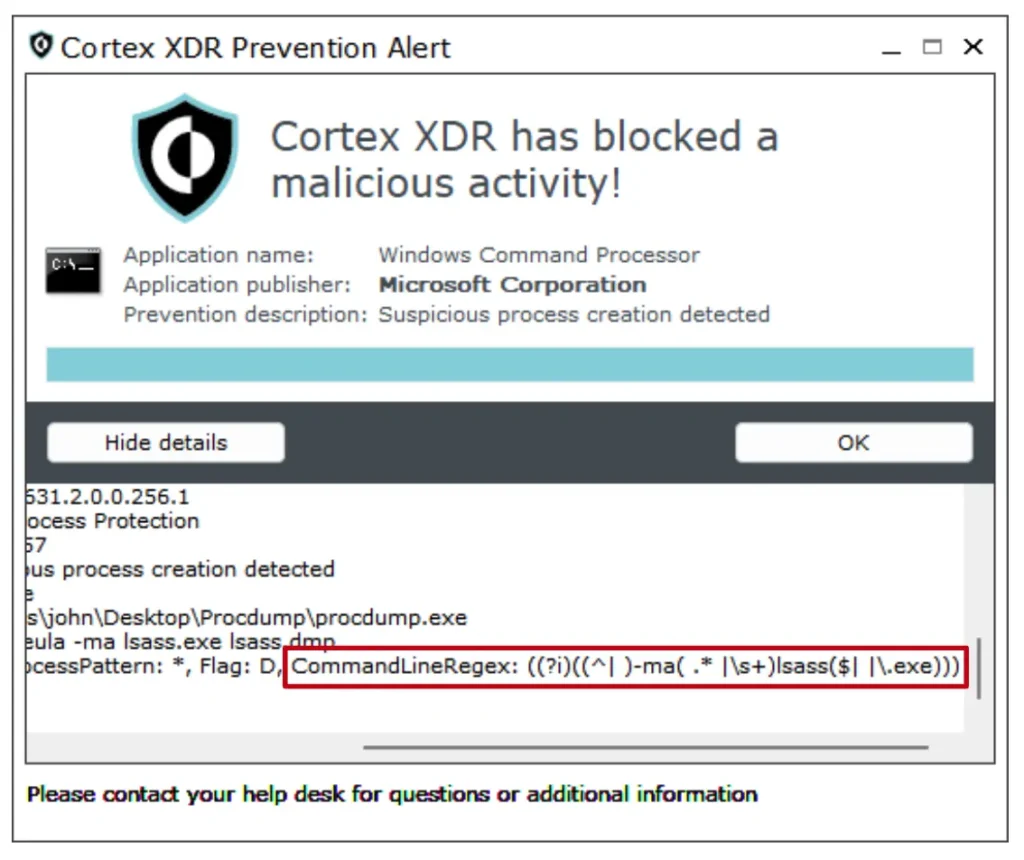
I needed a way to run this command without being caught with the Regex test, so I inserted two quotes into the middle of the command and executed it again. This wouldn’t change the command results, but I hoped it would bypass the Regex detection.

This successfully bypassed the “suspicious process creation” rule caused by the Regex detection that prevented me before I modified the command line. However, I received four alerts from a different Cortex prevention module, all of which were related to the mini-dump-write-dump function.
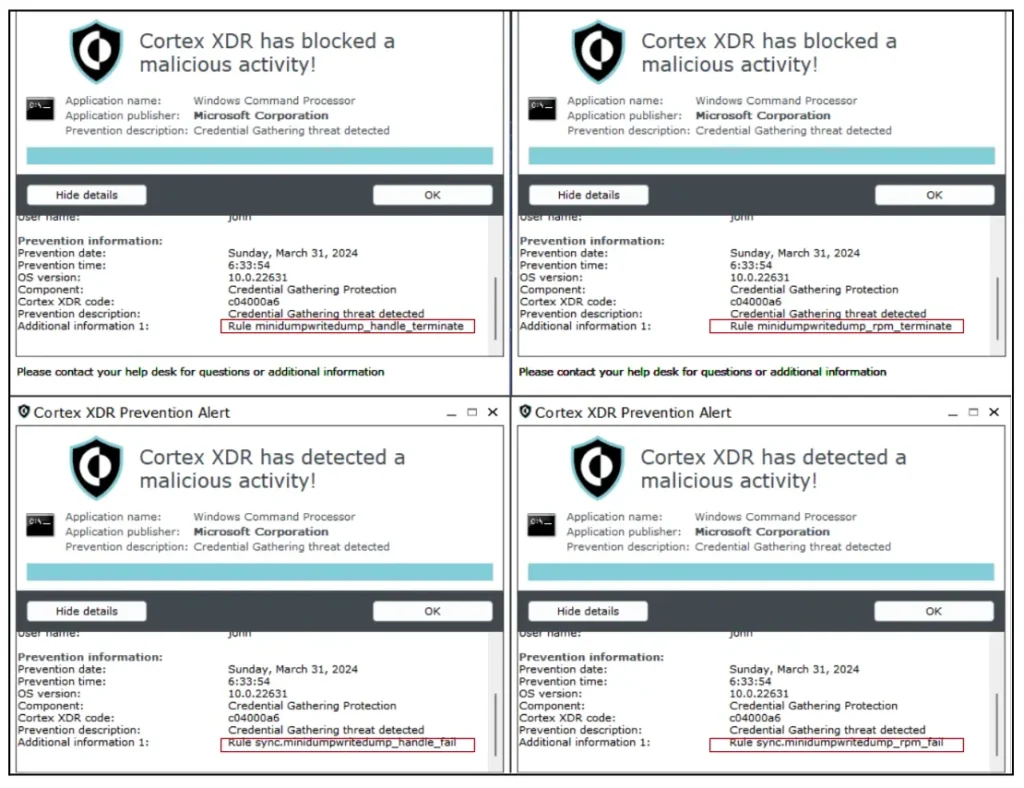
So, I went back to the content files and searched for those prevention rules. I found all of them in a file called dse_rules_config.lua. An example of one of the prevention rules below shows it is called mini-dump-write-dump rpm terminate and the action is to block it.

At first, it looked like a dead end and there was nothing I could do to bypass it. However, upon closer inspection, I noticed a list called mimikatz_rpm_process_whitelist within the dse_rules_config.lua file. Since it included the term rpm, which was also included in the prevention rule naming (e.g., mini-dump-write-dump_rpm_terminate), I thought there might be some relation between them.
I tried to rename the ProcDump program to listdlls, which was one of the white-listed programs from the mimikatz_rpm_process_whitelist. I executed the command again and it worked—I was able to dump lsass memory.
To see this process in action, check out the demo below.
Anti-Tampering Bypass
As a starting point, I began to consider what might happen if I added/removed my own rules to the content files. To figure this out, I needed to understand how Cortex protects its files from file tampering. When I tried to modify the files, even as an administrator, I was blocked with a “File Access Denied” error message.
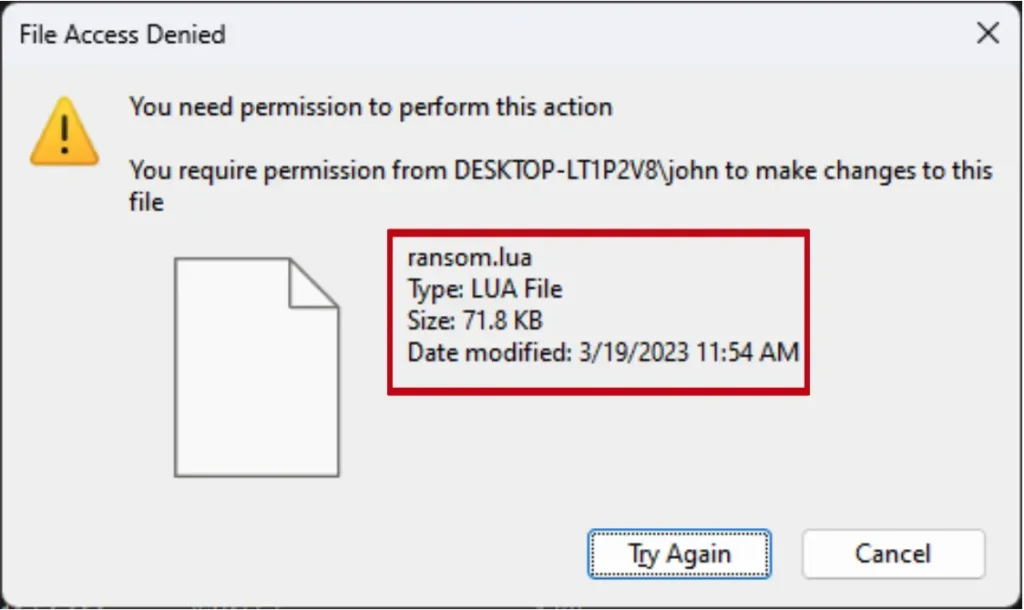
This behavior led me to believe that Cortex was probably using a mini-filter driver to enable this type of protection. A mini-filter driver is a known way to intercept—and even block—I\O requests.
Armed with this knowledge, I started to reverse engineer Cortex’s drivers. I found it had multiple drivers running on the system, but one named cyvrfsfd caught my attention. Since fsfd is a known shortcut for file system filter driver, it appeared as though it might be the driver responsible for protecting files on the system. Indeed, I was able to find in this driver a list of the files and folders that this mini-filter was protecting from modification.
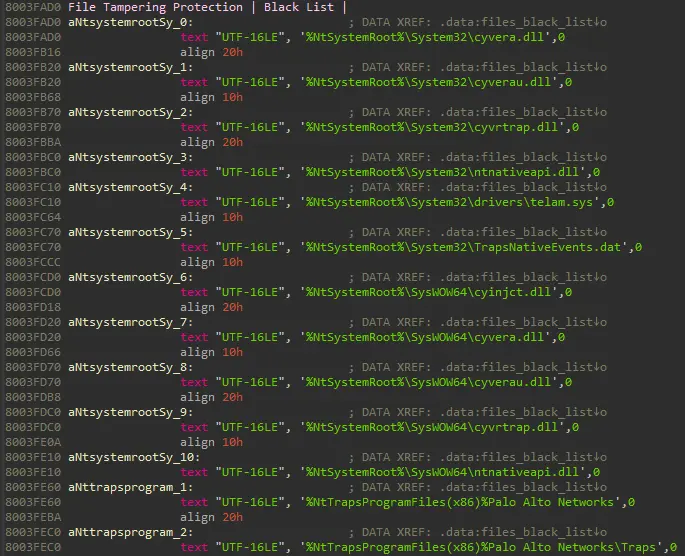
A snippet from IDA while reverse engineering cyvrfsfd driver, showing the list of files and folders that should be protected from tampering.
But how was it protecting those files? After a bit more reverse engineering, I found the implementation of the mini-filter that was responsible for file modifications and deduced that it basically compares path names with those of its protected files when someone tries to open a file with write permissions.

So, how could I bypass this protection? The protection is carried out with a path check, which isn’t sufficient to check all the ways a file could be changed. There are other methods to change a file and I settled on the idea of linking. Hard links allow the creation of what appears to be a distinct file, but in reality, it’s just another reference to the same data on the disk. This means that when you make changes to a hard-linked file, it directly modifies the original file on the disk.
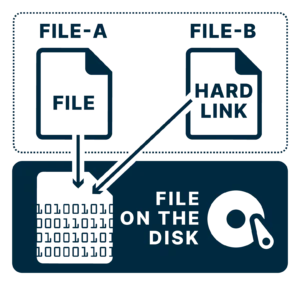
I attempted to use the Windows built-in utility mklink to create this hard link—this action required admin privileges. Unfortunately, this was also blocked by the mini-filter. But why? Creating a hardlink requires write permission to the destination file, which the mini-filter blocks us from doing.
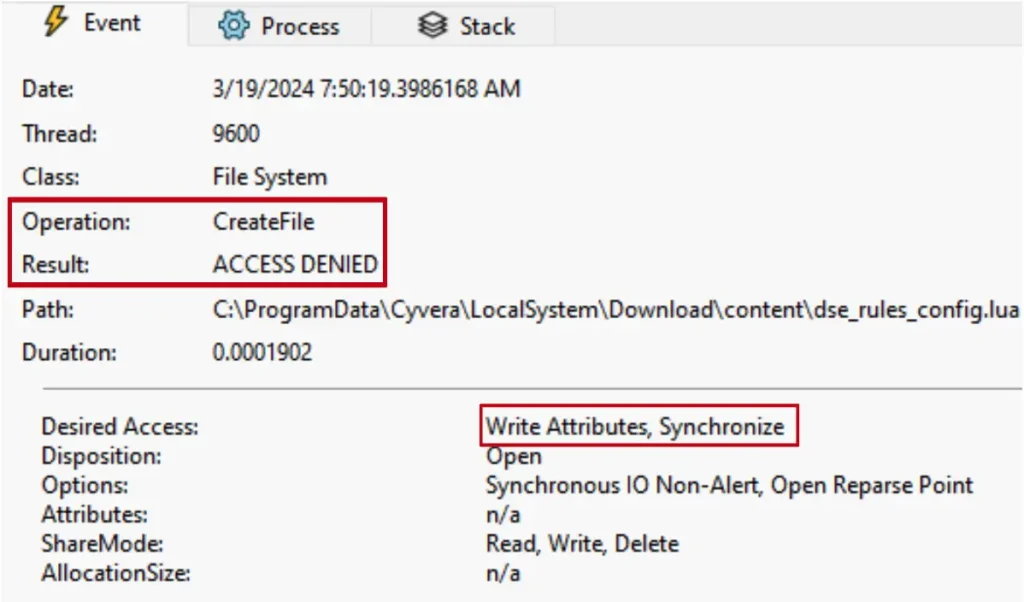
I wondered whether creating a link with mklink was the only way to do it. After searching for an alternative way, I stumbled upon a google-project-zero repository called symboliclink-testing-tools. I saw they implemented hardlinking in a different way than mklink—they were not requesting for write permissions on the target file. When I tested their tool, it worked. I was able to hard-link the files.

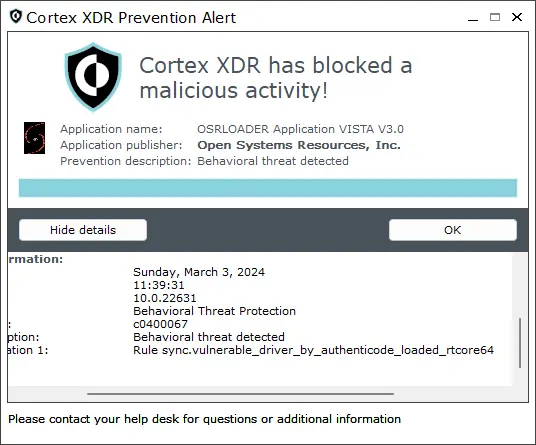
To see what I could accomplish with these write privileges, I tried to remove one of the security rules from the dse_rules_config file: the detection for loading a vulnerable driver (rtcore64.sys driver). If successful, this would allow me to execute a form of bring-your-own-vulnerable-driver (BYOVD) attack, which could be very powerful.
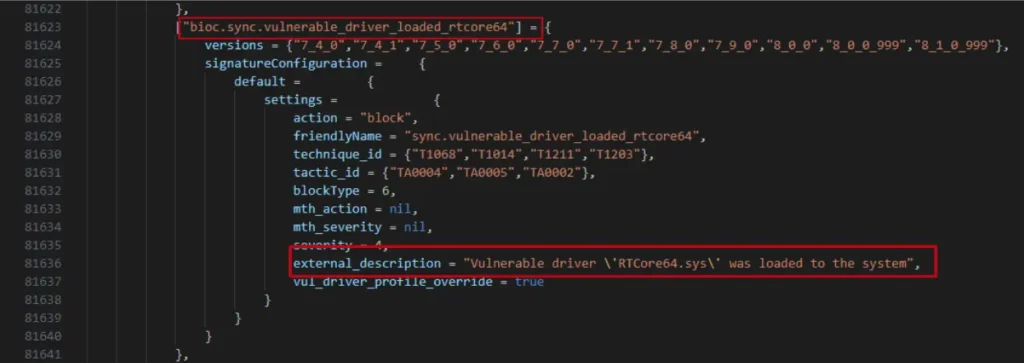
After removing this rule, I immediately tried to load the rtcore64 vulnerable driver to the system. Unfortunately this was still prevented by the XDR, because it had already loaded the rules when it started up.
I now needed to figure out a way to force the XDR to load the rules again, after I modified them. When I looked at the agent command line interface (CLI) tool called cytool.exe, I noticed there was an option to do something called “check-in,” which is basically to query the management server for new updates (including policy updates).
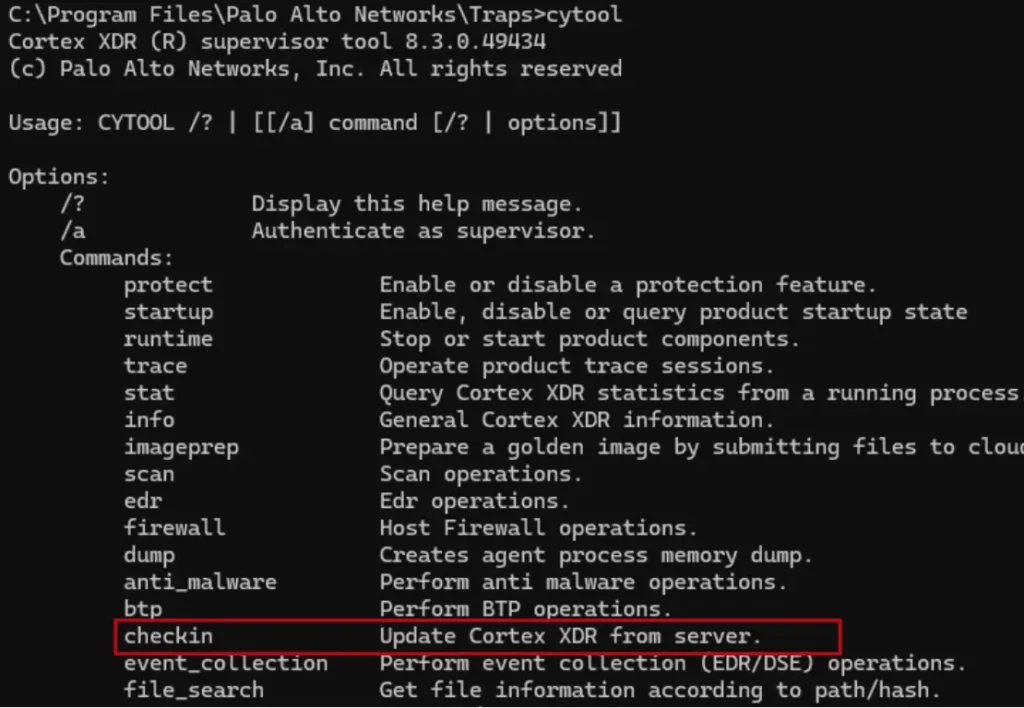
But, when I tried to run a check-in, the content files were downloaded again from the management server, so the changes that I made were overwritten.
My solution for that was simply to redirect all traffic from the XDR to localhost by using the hosts file, which is not something that the XDR stops. And, it worked. After running a check-in, my new policy was loaded and the XDR didn’t detect the load of the rtcore64 driver.
Next, I exploited a known vulnerability in the rtcore64 driver (CVE-2019-16098), which allows a user-mode process to read/write into kernel memory and, as a result, achieve privilege elevation. I used this vulnerability to patch the management password verification in one of the drivers used by Cortex XDR. I patched it in such a way that any password would work in order to accomplish any task with the XDR. It was also possible to patch it so that no password would work, ever. This would mean that no user—even the most powerful user like the Domain Admin—would be able to remove the XDR from the computer because the XDR was disconnected from the management-server (because of my change in the hosts file) and physical uninstallation would require a password. Since we just patched the driver, no password would work. To make sure we kept the XDR disconnected from the management server, we could even leverage the XDR’s protected file list to protect the hosts file from any modifications.
To see this process in action, check out the demo below.
Running the XDR as a Malware
The bypasses I uncovered were significant, as they would allow me to do all sorts of malicious things inside the victim computer. But, they didn’t serve the real goal of running malware inside the EDR itself. So, I continued to consider what an advanced persistent threat (APT) group might do in this situation. Most APT groups are after stealth, persistence, and high privilege.
I began to consider the fact that I could modify the Lua rules. Since Lua is actually a programming language, maybe I could insert my own malicious code to run inside the XDR instead of simply changing the rules. For a sanity test, I tried to insert a very simple piece of code that creates a file on the desktop. After adding the code and running a check-in, it worked.
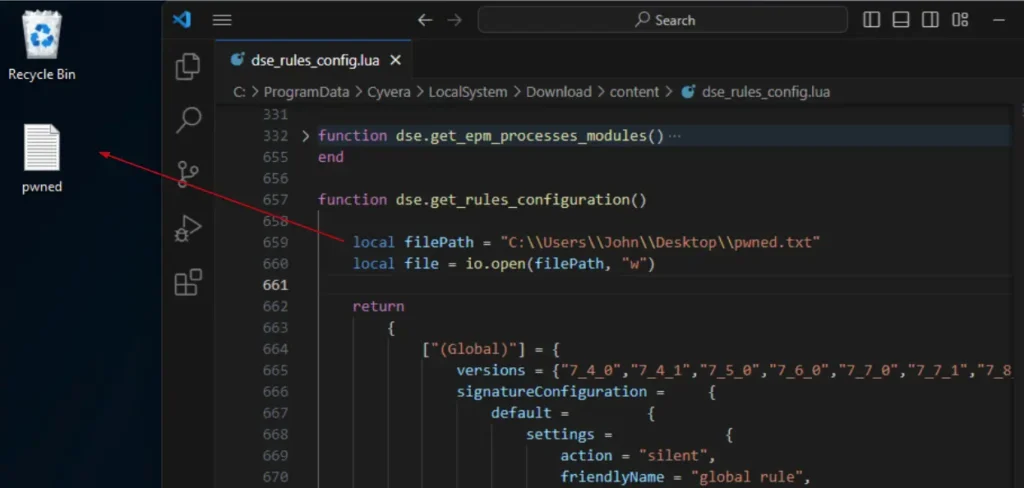
Next, I wrote a simple function that would execute my commands. The goal was to see if I could run my own commands within the cyserver process.
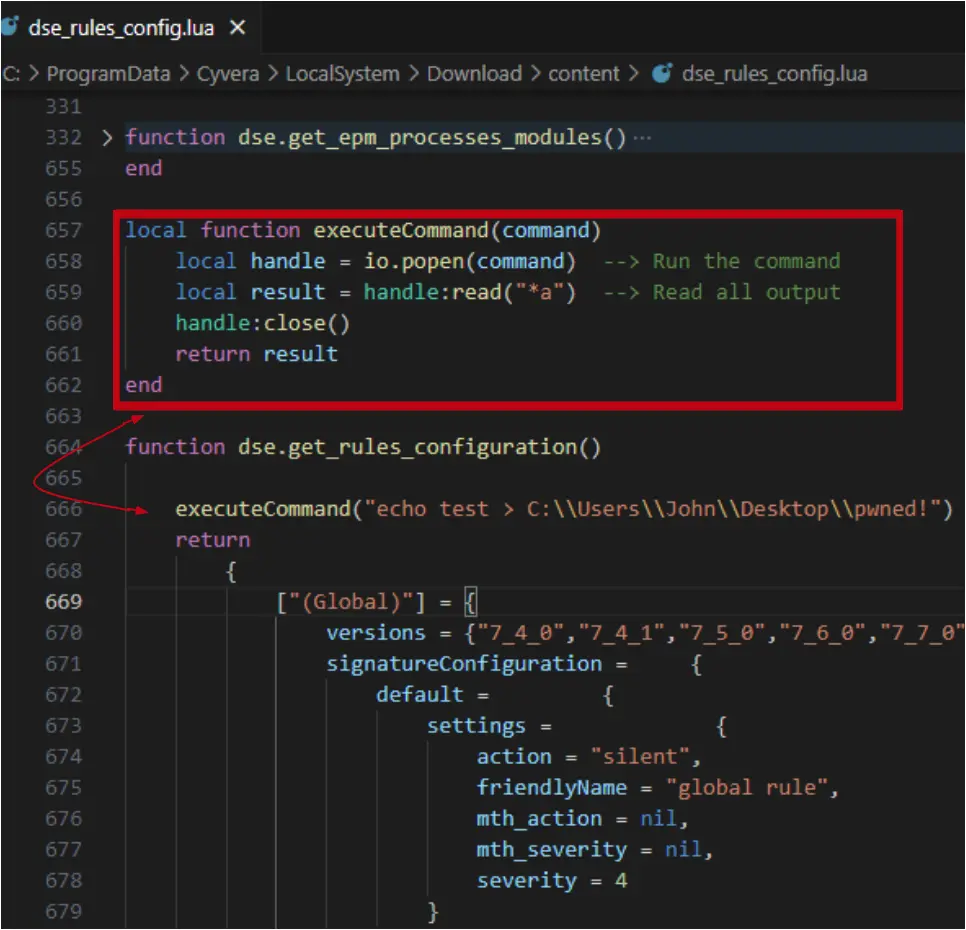
But this time something very strange happened—when I tried to run this code, cyserver.exe, which is the main XDR process, crashed completely. The io.popen function is the line that caused that behavior. My assumption was that the code I added invoked an unhandled exception and it caused cyserver.exe to crash.
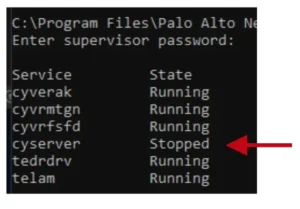
I tried many more techniques to run my code using LUA, including loading a malicious dynamic link library (DLL) and using other Lua commands to run my code. Unfortunately, none of those worked. But, this behavior of cyserver crashing would soon come in handy.
During my earlier exploration of the content files, I encountered some Python files as well and wondered where they were being used.
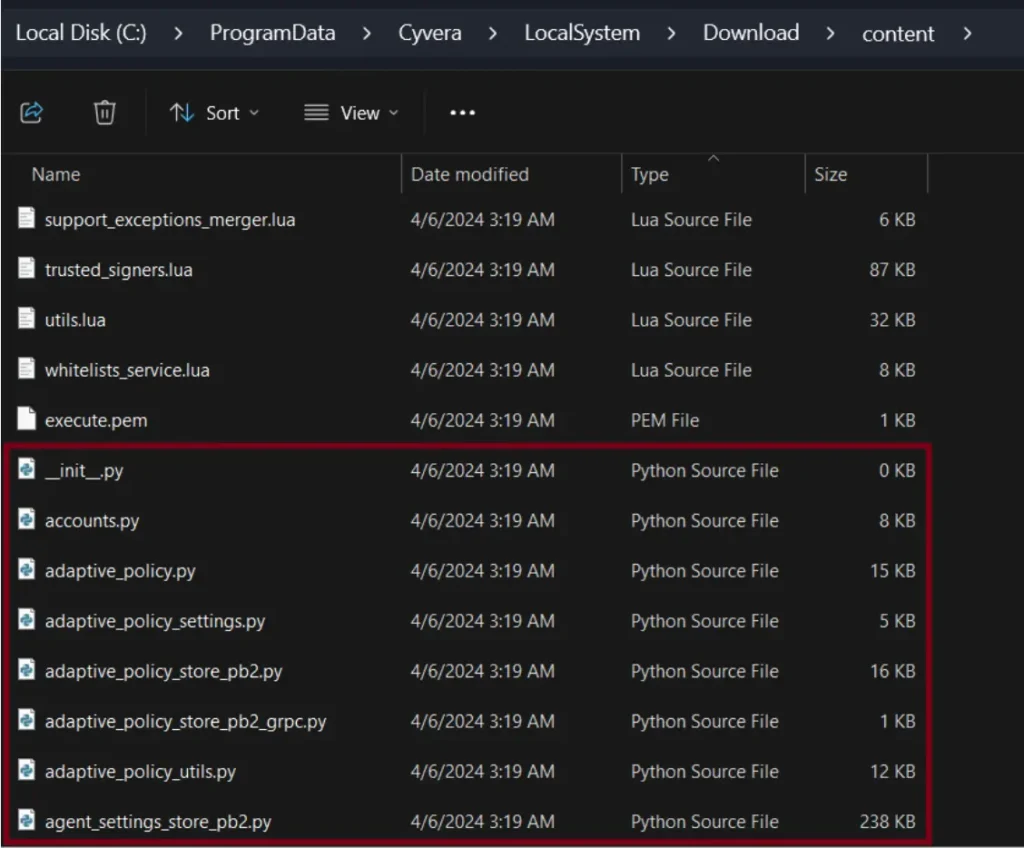
I knew that I could modify all the content files, including those Python files. If Cortex would run those files, maybe I could manipulate Cortex to run my Python script. I started by taking a look at the processes being run by Cortex. We can see that all of the processes are running with the highest privileges.

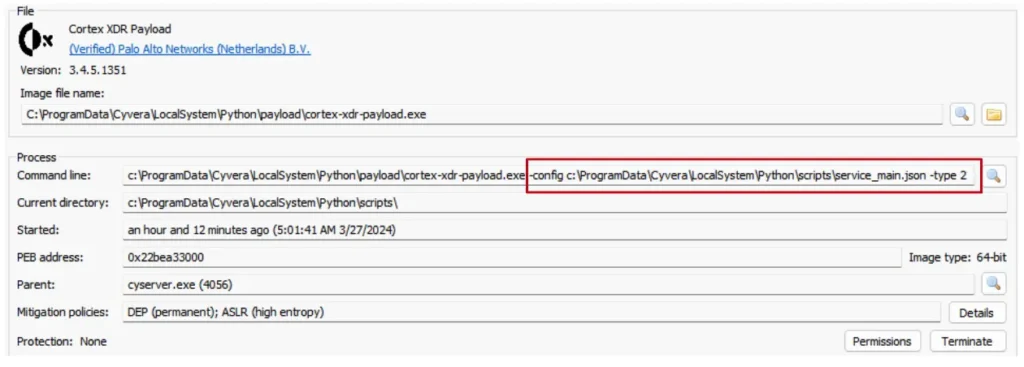
I saw the main cyserver process, with some workers under it, and another process with a very interesting name: cortex-xdr-payload.exe. When I looked at the process’s properties, there appeared to be a command line for it, which led me to believe it might be some sort of configuration file. I also noticed that the name contained “service_main.json,” which seemed interesting.
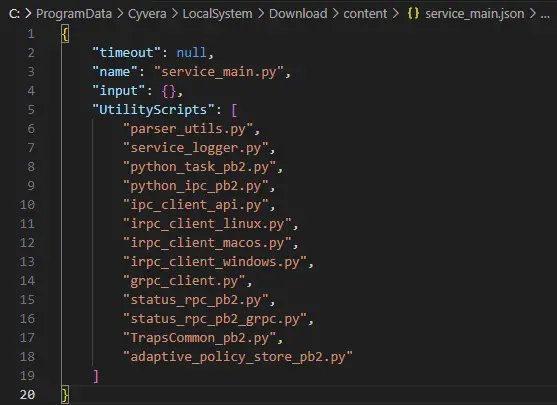
When I opened the file to see what it contained, it appeared to be a configuration file that described the running arguments for a service called service_main.py.
This script looks like a service that is running in a loop and tries to get pending tasks from some other service and execute them.
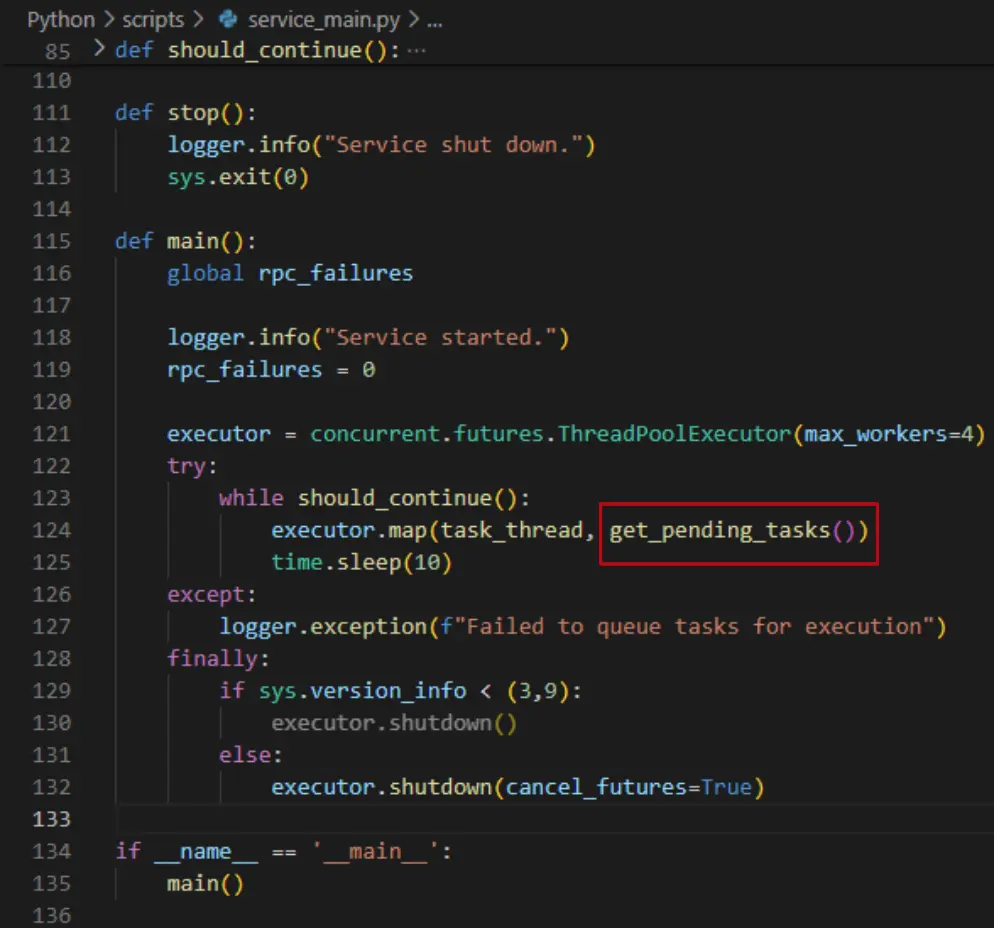
The good news was that I knew I could change the content of the file and insert my own malicious code to it. The bad news was that this Python script was already loaded into the cortex-xdr-payload process, meaning that even if I modified this script, it wouldn’t actually affect the cortex-xdr-payload process.
In order to cause the cortex-xdr-payload process to reload this python file, I tried to run the check-in trick that I used earlier, hoping it might cause the process to load the modified Python files again. But it didn’t work; the process stayed alive during check-in and didn’t load the new Python files.
Thinking back to how the io.popen function had previously caused cyserver to crash, I thought I might be able to use that behavior. I modified the Python main service script, caused cyserver to crash, then immediately turn it back on. This caused my code to run, giving me backdoor access to the machine with NT/system permissions—one of the highest privileges possible. Because my malware was inside cyserver and would run from one of its processes, it was undetectable, stealthy, persistent, and high-privileged.
To see this process in action, check out the demo below.
Vendor Response
All issues were reported to Palo Alto Networks in 2023 and we received the following response in February 2024:
“Security is our highest priority. SafeBreach notified us of its research [10] months ago and at that time we addressed the feature bypasses through automatic content updates to our customers.”
Conclusion
This research has explored the potential security implications of making the sensitive detection logic of an EDR solution easily accessible. We have shown how malicious actors could exploit this information to reverse engineer a way around the EDR, creating significant security risks for millions of users. To help mitigate the potential impact of the vulnerabilities identified by this research, we have:
- Responsibly disclosed our research findings to Palo Alto Networks and met with them to discuss possible fixes for the issues we found. As noted above, they released a fix. We would strongly encourage all users of the Cortex XDR to ensure their software version is up to date to prevent any vulnerability to this type of attack. We would also strongly encourage other endpoint security vendors to ensure that:
- Content files are encrypted while on the disk. While these files will be decrypted in memory at some point, it will make it more difficult to analyze the files and develop bypasses.
- Content files must be digitally signed/verified and are not dependent on an external anti-tampering layer that could be bypassed as a single point of failure.
- Shared our research openly with the broader security community here and at our recent Black Hat Asia 2024 presentation to raise awareness about these issues.
- Provided a research repository that includes tools that enable the verification of these vulnerabilities and serve as a basis for further research and development.
- Added original attack content to the SafeBreach platform that enables our customers to validate their environment against the vulnerabilities outlined in this research to significantly mitigate their risk.
For more in-depth information about this research, please:
- Contact your customer success representative if you are a current SafeBreach customer
- Schedule a one-on-one discussion with a SafeBreach expert
- Contact Kesselring PR for media inquiries
About the Researcher
Shmuel Cohen is a cybersecurity professional with a diverse background. After serving in the Israel Defense Force (IDF) for three years, he pursued a bachelor of science degree in computer science. He had the privilege of working at CheckPoint, where he developed software and worked as a malware security researcher. As his interest grew in vulnerability research, he joined the SafeBreach team, where he has been able to focus his energies on exploring and addressing vulnerabilities in cybersecurity. Since joining SafeBreach Labs, he has had the opportunity to present original research three times at Black Hat and two times at CONfidence.
如有侵权请联系:admin#unsafe.sh
