
2024-1-8 16:45:14 Author: securityboulevard.com(查看原文) 阅读量:8 收藏
Introduction
Remember the alluring “million bucks!” email that nearly compromised your savings? Or the urgent “your bank account is compromised!” alert that nearly tricked you into surrendering your PIN? Step into the complex ecosystem of phishing. Here, emails serve as instruments of deception, and inboxes become contested territories. You might be a cybersecurity expert who deflects spear-phishing attacks like a boss. But what about your organization? Are your employees well-trained, or ready to fall for the first cleverly disguised email? Phishing audits or pentests reveal your organization’s true vulnerability to inbox infiltration.
Think of it like an elite security team storming your email defenses, uncovering vulnerabilities, and exposing weaknesses no spam filter can catch. This blog is your battle plan, your guide to conducting a kick-ass phishing audit or pentest.
*Note- Phishing is conducted based on customers’ authorization and we do not perform any harmful action
Step-by-step Guide to Conducting Phishing Tests

Step 1: Preparation
Domain Acquisition:
- Select Phishing Domains: In selecting phishing domains for audit purposes, it’s essential to apply several technical criteria with diligence. Start by conducting a detailed examination of domain names, looking for minor spelling variations that suggest typosquatting efforts. Next, assess the domain’s Top-Level Domain (TLD) for unconventional extensions that differ from standard ones like .com or .net. Verifying SSL/TLS security through the HTTPS protocol is critical in establishing a domain’s authenticity. Avoid purchasing domains featuring an overuse of non-alphanumeric characters, like hyphens and numerals, as these are often employed in deceptive practices.
- Use a Reputable Domain Registrar: Purchase your domain from a well-known and reputable registrar such as Godaddy. This can help in establishing initial trust.
- Steps to follow to make sure search engines don’t detect the phishing domain:
- SSL Certificate: Secure your website with an SSL certificate. This not only protects your visitors’ data but also improves your site’s trustworthiness and search engine ranking.
- Hosting Content: Avoid using templates or content that mimics the look and feel of well-known brands or services. Ensure all text, images, and other content are hosted on your server and fetch from the same.
- Illegitimate Traffic Generation: Utilizing deceptive methods to boost website traffic can ultimately damage your site’s reputation. This approach is risky and can lead to negative consequences.
Client-Side Coordination
- To ensure that the phishing emails reach the employee’s inboxes during the phishing campaign, follow these steps:
- Identify Phishing Domain and SendGrid IP: Confirm the exact phishing domain you’ll be using and the IP address of SendGrid, the email service provider.
- Client Collaboration: Reach out to the client with a request to whitelist both your phishing domain and the SendGrid IP. Provide them with the specific domain and IP address.
Step 2: Reconnaissance
- Passive Reconnaissance: In this initial stage, you gather publicly available information about the company and its employees, but without direct interaction with the systems. This includes reviewing the company’s website for business details, exploring social media for employee profiles, and analyzing job postings for insights into their technology and software. A key part of this reconnaissance is also identifying employee email addresses. These email addresses are essential because they are used later to send out phishing emails as part of the audit. This information gathering is done discreetly to maintain the integrity of the audit.
- Choosing a Login Page: After collecting information, including employee emails, the next step is selecting an internal login page commonly used by employees. This could be the login page for their company email, the HR portal, or any other internal system that requires a login. The choice of this page is critical as it should be one that employees regularly access and are familiar with. This helps in creating a realistic phishing scenario, to effectively test the employee’s ability to recognize and respond to a phishing attempt.
Step 3: Technical Setup
SMTP SERVER:
SendGrid, primarily an email delivery service, can be utilized for phishing simulations as part of cybersecurity audits. In this context, SendGrid’s robust email-sending capabilities and analytics are used to dispatch simulated phishing emails to employees. These emails, designed to mimic actual phishing attempts, are sent to test and educate employees about the dangers and signs of phishing.
- Setting up an SMTP server is a crucial part of conducting a phishing audit, especially when using a service like SendGrid. Here’s a breakdown of the steps involved in authenticating the sender, ensuring that the emails sent as part of the phishing simulation are delivered effectively and appear legitimate:
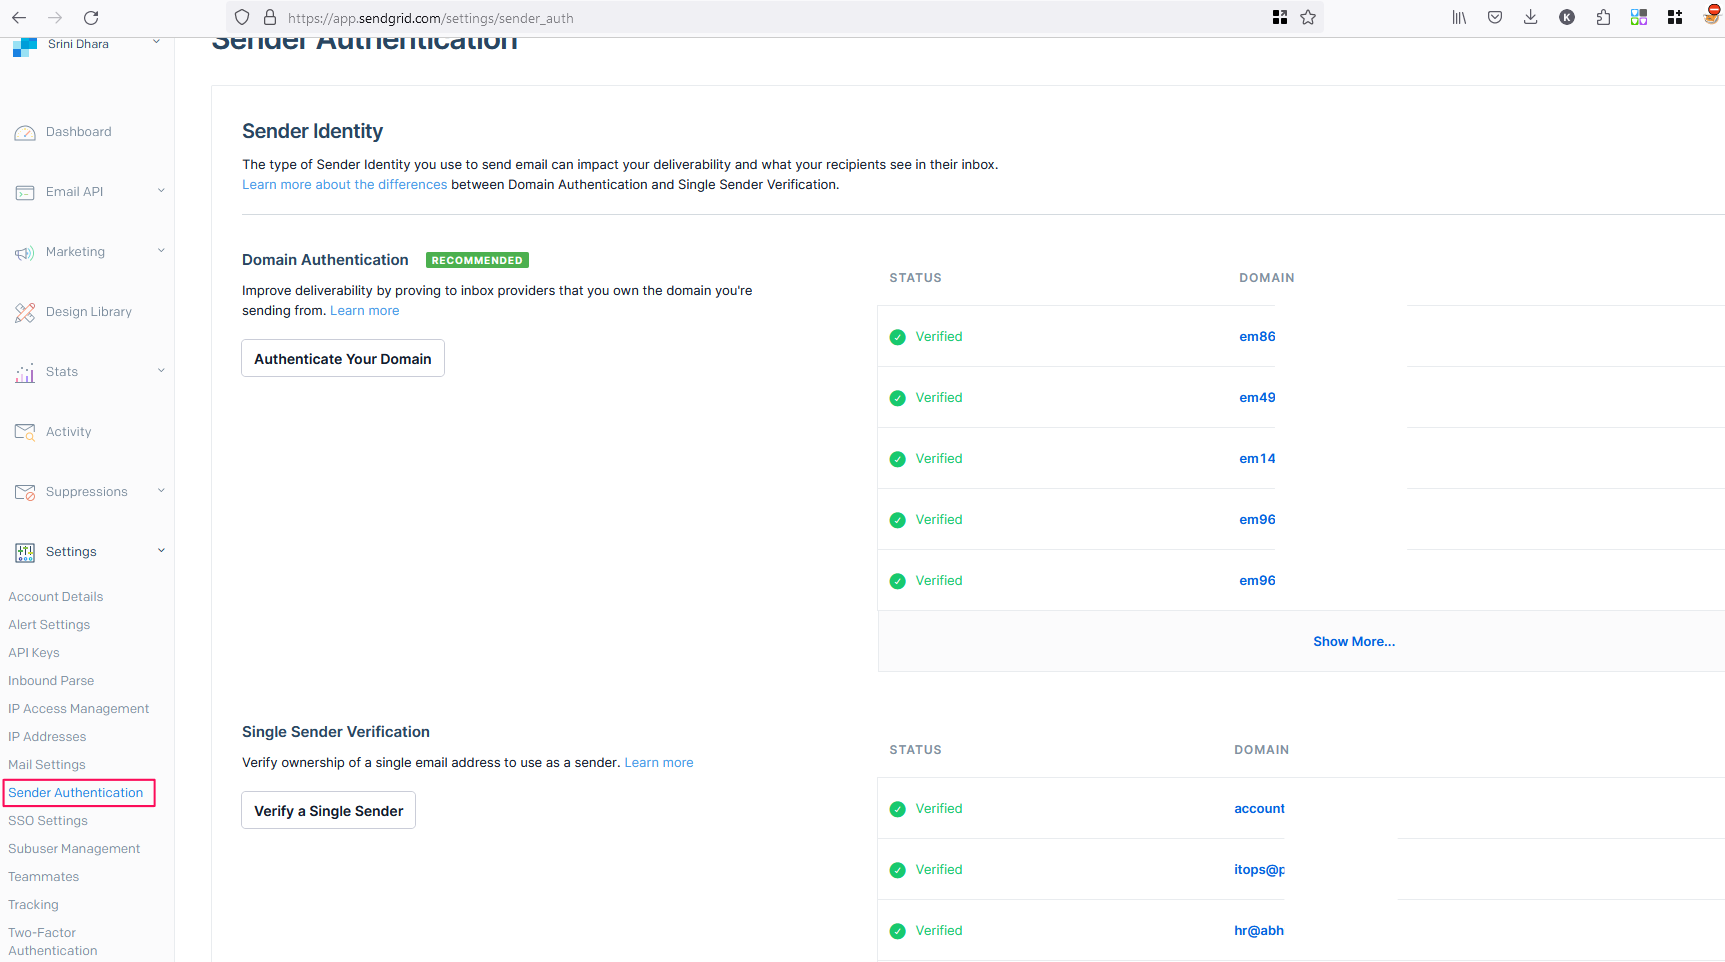
Login into SendGrid click on Sender Authentication as shown in the above image and follow the steps to complete the authentication for the phishing domain that we have purchased.
1. Domain Authentication: This involves proving ownership of the domain from which the emails will be sent. By authenticating your domain, you improve email deliverability and credibility. It typically involves adding DNS records provided by SendGrid to your domain’s DNS settings. These records include SPF (Sender Policy Framework) and DKIM (DomainKeys Identified Mail) records, which help in verifying that the emails sent from your domain are legitimate and not spam
Before Domain Authentication:

After Domain Authentication:
2. Single Sender Authentication: If you are not using a domain and prefer to authenticate a single email address, this step is for you. Single-sender authentication is simpler than domain authentication but is less flexible. You validate a specific email address that you will use to send out the phishing emails. This is done by configuring the email settings in SendGrid to recognize and authenticate emails from that specific address.
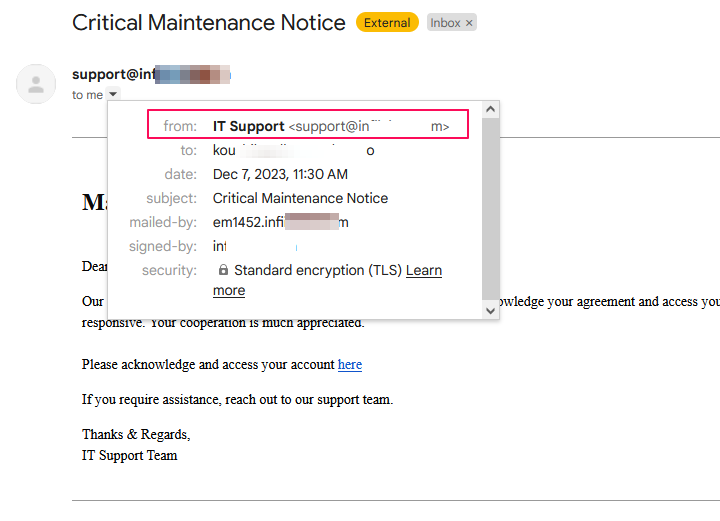
3. Link Branding: This step involves customizing the links in your emails to reflect your domain, enhancing the legitimacy of your phishing simulation emails. By default, links in emails sent through SendGrid use their domain. With link branding, you change this so that the links appear to come from your domain, making the phishing emails more convincing.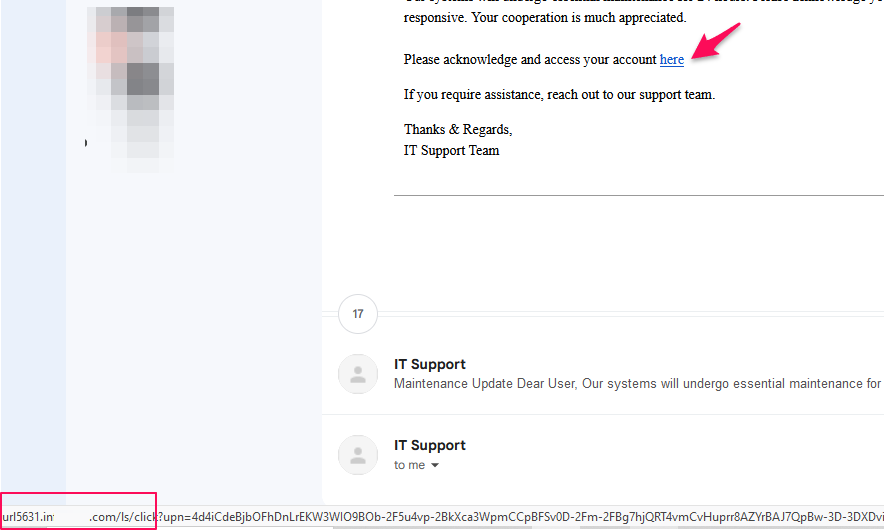
Once the link branding is completed and when an employee hovers over the link in the email, they will notice that the URL domain is of the phishing site, not SendGrid’s domain.
Without link branding, the URL in the email will appear in the following format: http://url5631.sendgrid.net/ls/click?upn=[…id]
4. API Key: The final step is to generate an API key in SendGrid. This key is essential for integrating your phishing simulation tool, like GoPhish, with SendGrid’s SMTP server. By using the API key, you securely authenticate your connection to SendGrid. This ensures that your phishing audit emails are dispatched through SendGrid’s infrastructure. Additionally, the API key allows you to track these emails in GoPhish, providing insights into the effectiveness of your phishing simulation without compromising your account credentials.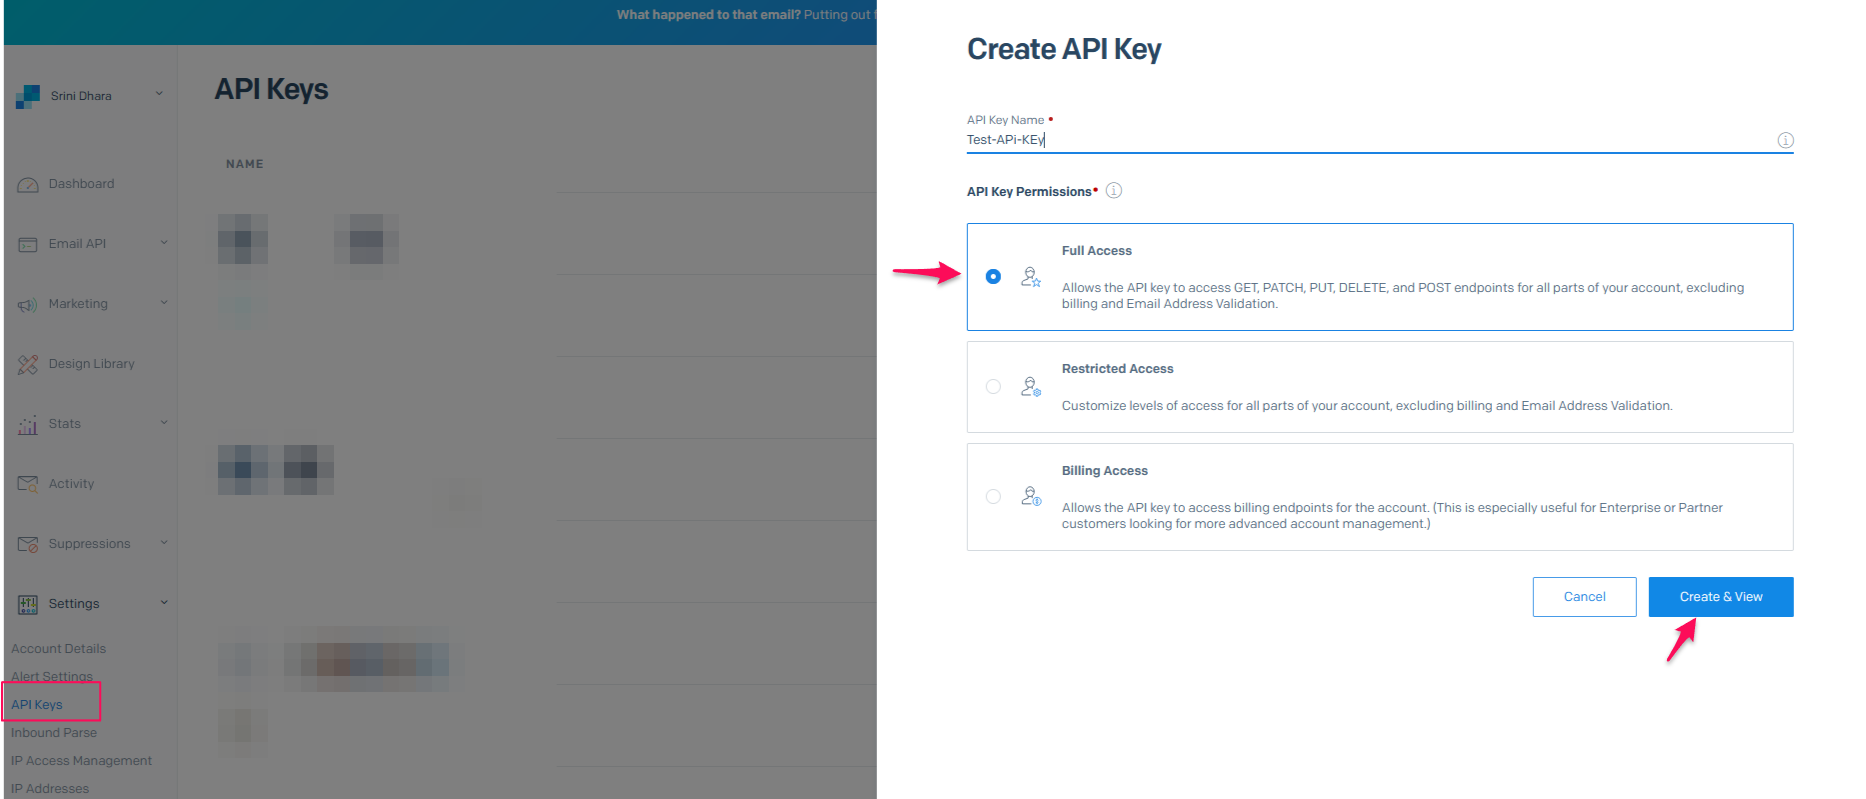
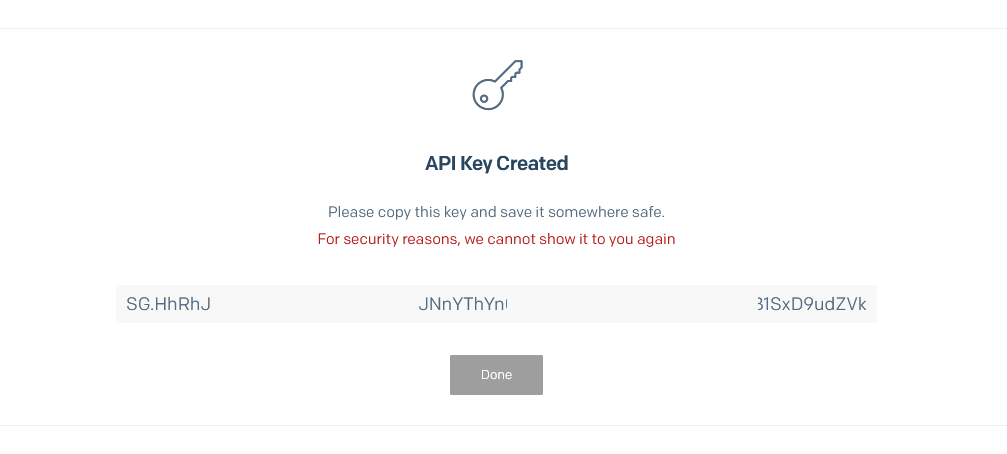
- Provide full access and click on “Create and View”.
- Make sure to copy the API key as the key is visible only once.
Tracking:
GoPhish is a powerful open-source phishing toolkit designed for businesses and security professionals to test and improve the phishing awareness of their employees. It allows organizations to create and conduct simulated phishing attacks in a controlled environment. The tool provides features for crafting realistic phishing emails, designing fake web pages (landing pages), and tracking how recipients respond to these simulated attacks. This includes whether they open the emails, click on links, or submit information on a landing page. By using GoPhish, companies can identify potential vulnerabilities in their workforce’s ability to recognize phishing attempts and use the insights gained to enhance their cybersecurity audits and protocols.
Setting up GoPhish to use SendGrid’s API for sending and tracking emails involves several mandatory steps. Here’s a breakdown of these steps:
- Users & Groups: First, you need to create and manage users and groups within GoPhish. This involves defining who the targets of your phishing simulation will be. You can categorize employees into different groups based on departments, roles, or any other relevant criteria. This step is crucial for organizing your phishing campaign and ensuring that the right emails go to the intended recipients.
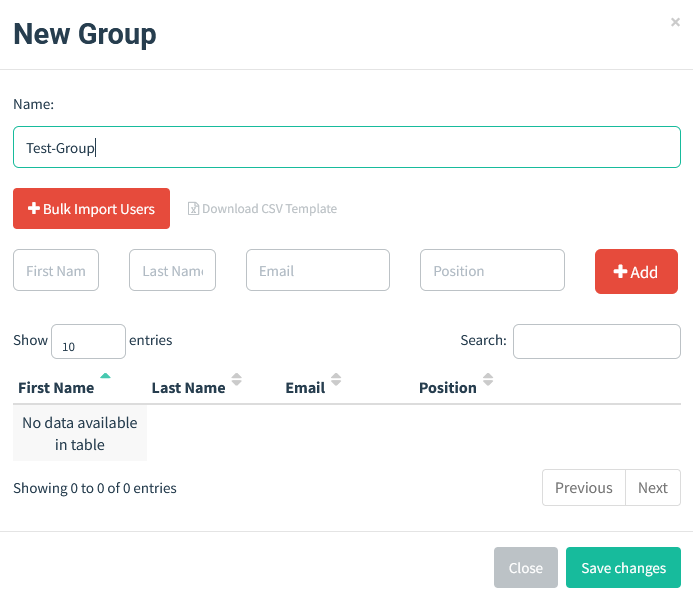
We can add a single user or import multiple users using the CSV template. - Email Templates: Next, you create email templates that will be used for the phishing campaign. These templates should mimic the style and tone of legitimate emails that your employees are likely to receive. The aim is to make these emails as realistic as possible to effectively test the employees’ ability to spot phishing attempts.
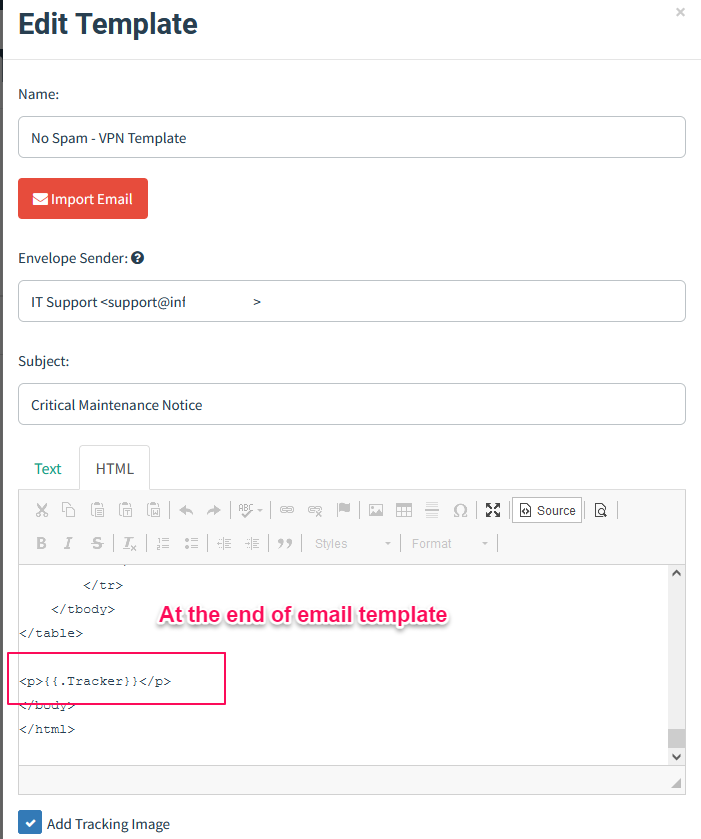
Including {{.Tracker}} at the end of an email adds a tiny, invisible image. When the email is opened, this image sends a GET request to the GoPhish server, signaling that the email has been viewed.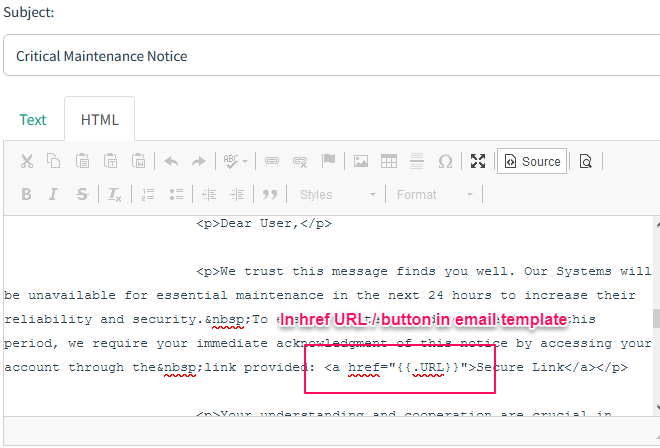
In the email template, placing {{.URL}} within the href attribute of a button will track when the email recipient clicks on that button. This action sends a signal back to indicate the email has been actively engaged with. - Landing Pages: Then, you design landing pages that users will be directed to when they click on the links in your phishing emails. These pages can mimic a login page or any other relevant page that you want to test your employees against. The landing page design is critical as it adds to the realism of the phishing attempt and can be used to gather data on user interactions.
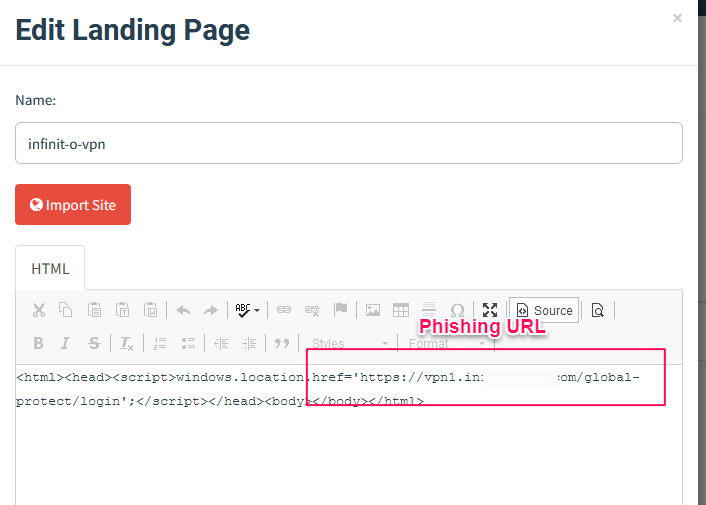
We will be executing this script which will redirect the user to a phishing domain.Script:
<script>windows.location.href=’https://vpn1.example.com/global-protect/login‘;</script> - Sending Profiles: Finally, you set up sending profiles in GoPhish. This involves configuring the details of how emails will be sent, including integrating with SendGrid using the API key. In the sending profile, you specify the email server (SMTP server) settings and use the API key for authentication. This ensures that emails are sent through SendGrid’s infrastructure, allowing for effective delivery and tracking of the emails sent as part of your phishing audit.
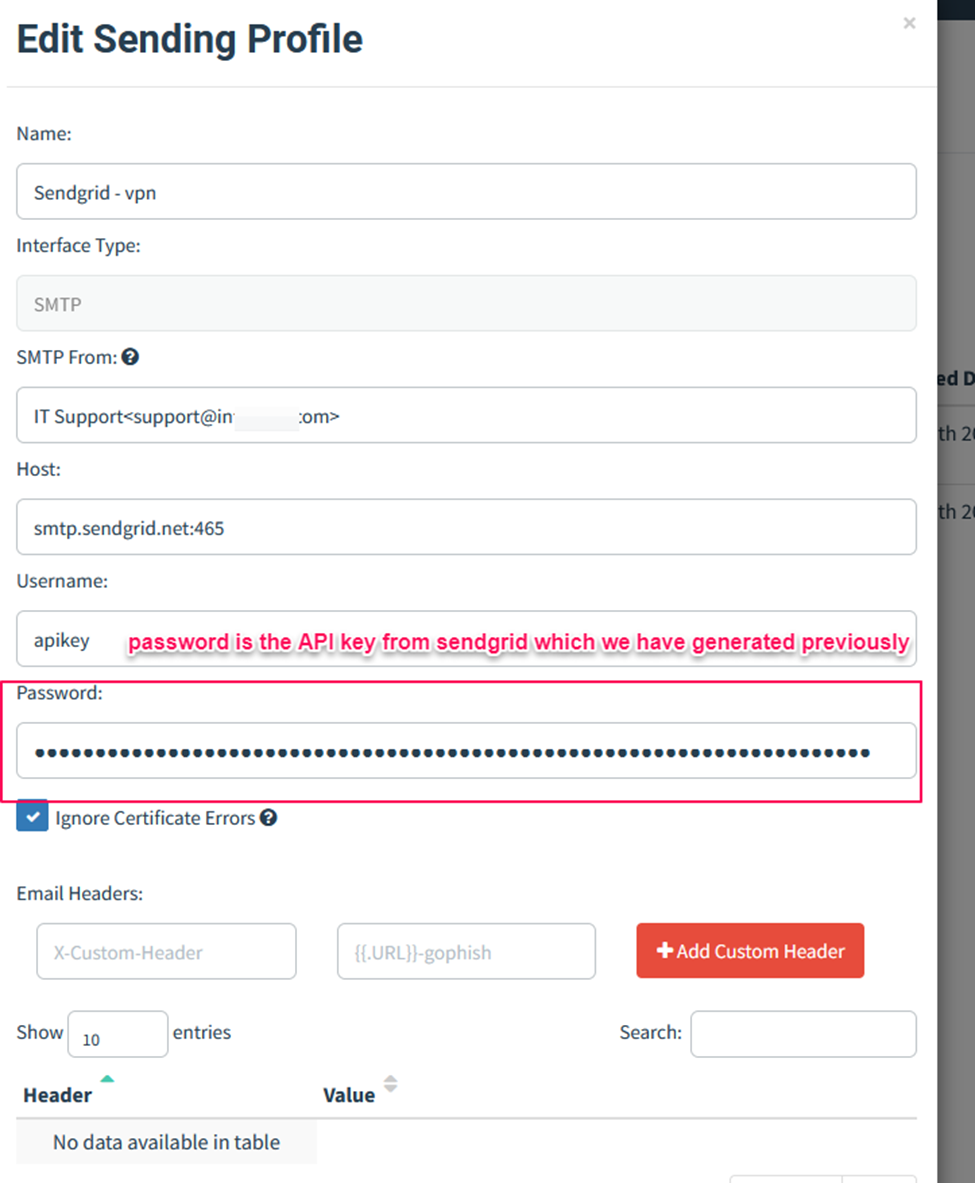
Host: smtp.sendgrid.net:465
Username: apikey
API: Api key which we have generated in SendGrid.Once the above setup is done, we have to launch our campaign. Before that, it is highly recommended to host our Gophish server in a valid domin and add the dns records accordingly.
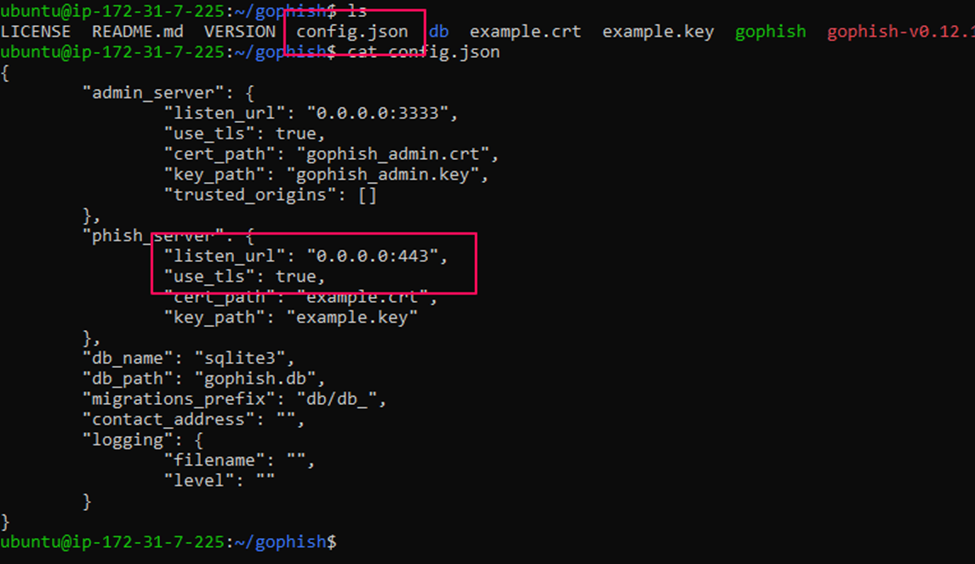
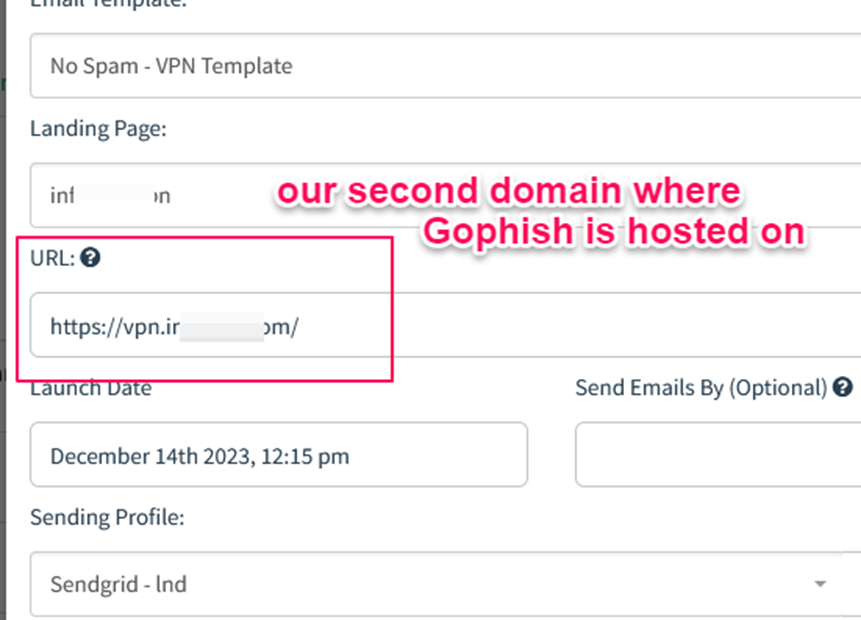
Change the configuration of the server as shown in the above image to run the server in HTTP. - Launch Campaign: Finally, initiate the phishing simulation by launching the campaign in GoPhish. This involves selecting your targets, choosing the email template, and landing page, and sending the profile you’ve set up. Once launched, GoPhish sends out the emails and begins tracking the interactions of the recipients, such as email opens, link clicks, and data submission on landing pages. This step is crucial as it puts everything into action and starts the actual simulation process, allowing you to assess the effectiveness of your phishing audits.
And finally, once all the above steps are completed, it is recommended to send a test email to make sure everything is working as planned and emails are landing in inboxes, not spam.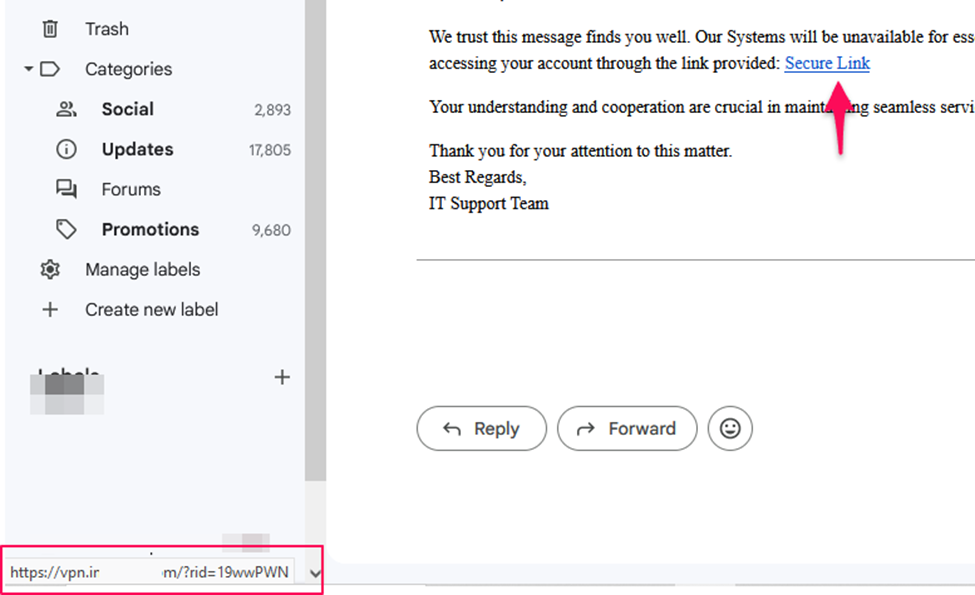
Inbox:
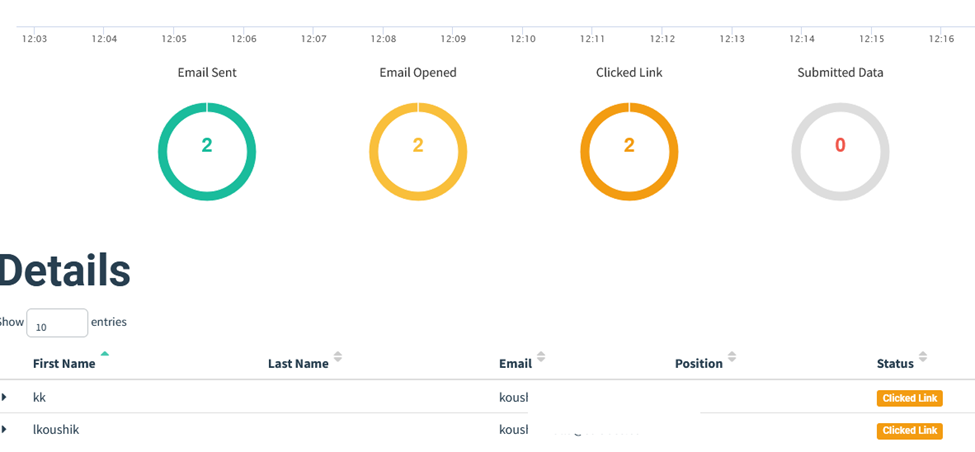
We can observe that when a user hovers over a URL in the phishing email, they will first see the domain of the GoPhish server. Upon clicking, GoPhish initially redirects the user to this server, and then subsequently to the designated URL specified in the landing page setup.Tracking users, Gophish dashboard.
 Note: Logging has been configured on the server hosting our phishing page. As a result, any data submitted there will be recorded on our server. This information will not be visible in the GoPhish dashboard. To enhance the authenticity of the phishing URL, follow these guidelines:
- Ensure that the phishing URL closely resembles the actual URL. For instance, if the real URL is https://vpn1.example.com/global-protect/login.esp, the phishing URL could be https://vpn1.examplee.com/global-protect/login.esp, with subtle changes that are hard to notice.
- In the email, keep the content straightforward. Avoid using multiple buttons, fancy font, or content that might appear suspicious.
- To evaluate the email’s legitimacy, use the following spam checker tool: Mailmeteor’s Spam Checker. This tool will assess your email content and confirm if it is classified as “Great”, indicating a low likelihood of being marked as spam.
Step 4: Conducting the Audit
- Launching the Campaign: This step involves initiating the actual phishing simulation. In GoPhish, you select your previously defined user groups as the campaign targets. Then, you choose the email template and landing page you’ve created, along with the sending profile that’s linked to SendGrid. Once everything is set up, you launch the campaign. This action triggers the sending of your crafted phishing emails to the selected recipients. It’s the critical point where all your preparation is put into practice, and the effectiveness of your phishing test begins to unfold.
- Monitoring: After the campaign launch, the monitoring phase starts. In this phase, you track and observe how the recipients interact with the phishing emails. This includes monitoring who opens the emails, who clicks on the links, and who submits information on the landing pages. GoPhish provides real-time data and analytics that help in understanding the engagement level of the campaign. Monitoring is vital as it provides insights into the effectiveness of the phishing simulation, highlighting areas of vulnerability and success. It’s through this analysis that you can gauge the awareness level of your employees and identify key areas for further cybersecurity audits.
Step 5: Analysis and Reporting
- In-Detail Analysis of Data: After the phishing campaign concludes, the focus shifts to a thorough examination of the data collected. This involves analyzing various metrics such as the rate of email opens, clicks on links, and data entered on the landing pages. The purpose is to deeply understand how the recipients interacted with the phishing emails. This analysis helps in identifying patterns, such as which types of emails were most effective, and which employee groups were more susceptible to the phishing attempt. It also sheds light on the overall cybersecurity awareness among the employees.
- Detailed Report: Based on the analysis, a comprehensive report is prepared. This report should include key findings, such as the percentage of employees who fell for the phishing attempt, and areas where employees performed well. It will also provide recommendations for improving the organization’s cybersecurity training and protocols. This report will be crucial for stakeholders to understand the effectiveness of current security measures and for planning future cybersecurity strategies. It acts as a documented reflection of the organization’s readiness to tackle real-world phishing threats.
Conclusion
At WeSecureApp, a leading cybersecurity firm with a strong presence in Texas, USA, and India, we prioritize data security and adopt secure practices for every client. Our commitment to integrity, efficiency, and adherence to industry benchmarks drives our services, including phishing audits. WeSecureApp’s phishing audits are not just a service but a commitment to exceeding client expectations and delivering more than promised. Our approach ensures clients are well-prepared against phishing threats, reinforcing their cybersecurity posture – Get a Free Assessment Report.
Recommended Reading:
The Major Types of Phishing Attacks & How to Identify Them: The Definitive Guide
Top 7 Penetration Testing Companies in the USA
The post How to Conduct an Effective Phishing Audit? appeared first on WeSecureApp :: Simplifying Enterprise Security.
*** This is a Security Bloggers Network syndicated blog from WeSecureApp :: Simplifying Enterprise Security authored by Koushik Malla. Read the original post at: https://wesecureapp.com/blog/how-to-conduct-an-effective-phishing-audit/
如有侵权请联系:admin#unsafe.sh