In this blog post, I will guide you through the step-by-step process of creating a simple ap 2024-1-3 19:26:31 Author: blogs.sap.com(查看原文) 阅读量:30 收藏
In this blog post, I will guide you through the step-by-step process of creating a simple application using SAP Core Data Services (CDS) and Fiori Elements with a specific focus on utilizing CDS annotations. This guide is tailored for beginners in SAP application development, providing a comprehensive, step-by-step walkthrough for a simple application enhanced by CDS annotations.
I’ll start by creating an ABAP project, move on to data modeling with CDS, and finally focus on crafting a user interface with Fiori Elements.
Pre-Requisites:
-Should be able to download the Eclipse IDE and add the ABAP Development Tools (ADT) Plugin. This link https://developers.sap.com/tutorials/abap-install-adt.html can help you to download the Eclipse IDE and add the ABAP Development Tools (ADT) Plugin.
-Should be able to set up SAP fiori tools in Your Development Environment. This link https://developers.sap.com/tutorials/fiori-tools-vscode-setup.html can help you set up SAP fiori tools in Your Development Environment.
Let’s Start
Please follow the steps below.
Step 1:Create an ABAP Project in ABAP Development Tools (ADT).
Before creating an end-to-end application, your first step is to create an ABAP project in Eclipse IDE. This link https://developers.sap.com/tutorials/abap-create-project.html can help you to create a new ABAP project.
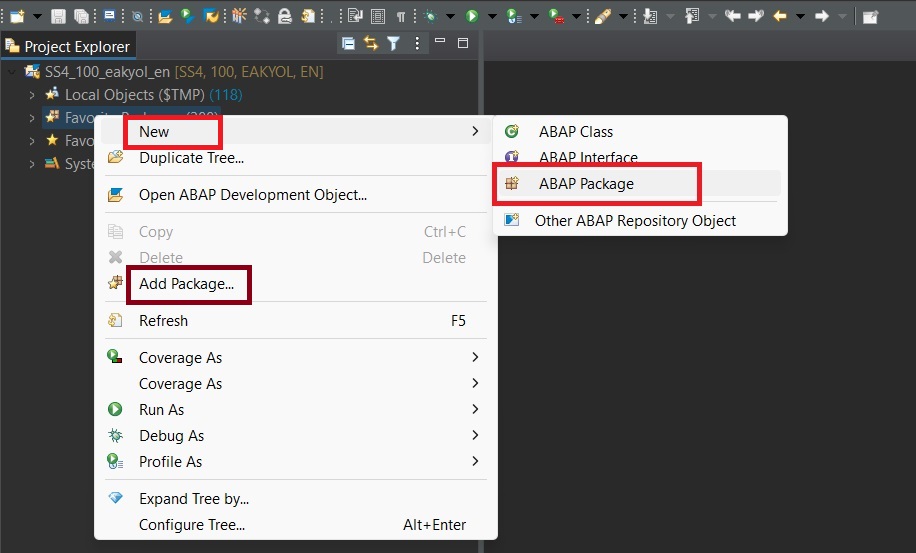
Step 2: Create a new package or add an existing package.

Step 3: Create a CDS View Data Definition.
After adding your package, right-click on the package, then select ‘New’ and then click on ‘Other ABAP Repository Object’.

After clicking on “Other ABAP Repository Object”, a popup window will appear, and within that window, you should search for “Data Definition”. Select the “Data Definition” object and then click on next.

Provide a name and description for your data definition, ensuring that the name begins with “Z.”

Once you have defined your view name, create a new request or select an existing one.

After selecting the request, choose a CDS View template. I select “Define View”.
Now you have a CDS View Data Definition. Provide a name for “sqlViewName”, ensuring that the name begins with “Z.”

Step 4: Fetch data from the database.
Write your CDS View code.

After writing your code, activate it by pressing CTRL+F3 and preview it by pressing F8.

Step 5: Expose CDS View as OData.
Add the annotation @OData.publish: true to your CDS View.
When you activate your code, you will see this warning. Now you should activate that service.
Step 6: Activate the OData Service.
Enable OData in the backend using transaction code: /N/IWFND/MAINT_SERVICE then choose Add Service.
Later, in the filter section, search for your own service name. Then click on Get Services. Then select your service and click on Add Selected Services.
Then write your package name.
Your service is now active.
Step 7: Create a List Report Page in Visual Studio Code.
Open Visual Studio Code and press Ctrl+Shift+P. Then select “Fiori: Open Application Generator” from the options.
Select the application type as “Fiori Elements” and choose “List Report Page” from the options that appear.
Then choose Connect to a System.
Then choose the system and your service.
Then choose the main entity.
Then give your project a name.
After creating your project, when you run the project you will see your application similar to the one below.
Step 8: Visualize your application using CDS annotations.
To enhance the user interface of your application, consider incorporating the @UI.lineItem: [{ position: 10, label: ‘Airline Company No’ }] annotation. This annotation customizes the display of a specific column in your ABAP CDS (Core Data Services) view or table. In this case, the designated column will be positioned at 10 and labeled as ‘Airline Company No’.
After using this CDS annotation, you will see your application similar to the one below:
To add a selection field to a specific column in a CDS view or table, consider incorporating the @UI.selectionField: [{ position: ’10’ }] annotation. It allows the user to choose or filter values for that column. In this case, it adds a selection field for the “Airline Company No” column.
After using this CDS annotation, you will see your application similar to the one below:
By using @Consumption.filter.selectionType: #INTERVAL, you enable the interval-based selection for the corresponding field in the user interface, providing more flexibility for the end user to filter data based on a range of values.
After using this CDS annotation, you will see your application similar to the one below:
Note: If your application does not have a detail page, you can hide the navigation arrows on table by deleting the “pages” section in your manifest.json file.
The final version of the application:
如有侵权请联系:admin#unsafe.sh