很久没有写文章了,最近看大家讨论前端的rpc比较火热,这里分享几个我之前的笔记案例,做记录,也为了让更多的师傅能够方便地使用RPC工具进行测试(PS:也可以配合autoDecoder食用,测试更方便! 2023-12-30 08:37:29 Author: 格格巫和蓝精灵(查看原文) 阅读量:21 收藏
很久没有写文章了,最近看大家讨论前端的rpc比较火热,这里分享几个我之前的笔记案例,做记录,也为了让更多的师傅能够方便地使用RPC工具进行测试(PS:也可以配合autoDecoder食用,测试更方便!)
主要通过四个案例来讲解rpc
0x001 使用chrome-remote-interface进行加解密 0x002 使用puppeteer进行加解密 0x003 使用sekiro进行加解密 0x004 代码混淆情况下使用sekiro进行加解密
在数据安全越来越重视的情况下,请求包、响应包中有明文字段的应用越来越少了,不管是app还是web,金融、通信,民生以及其他比较重要的行业,都用到了加解密。不同应用的加密的程度也有不同,小到一个登录口的账号密码,大到整个数据包的所有字段;加密的方式也有所不同,有些只是加密字符串,而有些还要校验sign,还有在具体加解密的不同,不一一列举。
针对简单的加解密,可以直接通过关键字,搜路由、参数,找到具体的代码逻辑,通过还原加密算法,找到加密、解密的逻辑;但是如果一些复杂加上混淆的加解密,就没办法快速找到加密部分的代码了,更没办法去还原加密、解密逻辑,本文提到的rpc,在还原加密、解密逻辑的时候会提供很大的帮助
笔者理解的rpc是通过远程去调用函数、方法,比如之前文章写过app的frida、objection的rpc,这里通过案例说一下web的rpc
0x001 使用chrome-remote-interface进行加解密
调试模式启动Chrome浏览器
sudo /Applications/Google\ Chrome.app/Contents/MacOS/Google\ Chrome --remote-debugging-port=9222 --remote-allow-origins=*
打开需要进行加解密的站点,这里的站点是下文箭头所指的打码处
访问http://0.0.0.0:9222/json
获取目标站点的devtoolsFrontendUrl,访问
http://0.0.0.0:9222/devtools/inspector.html?ws=127.0.0.1:9222/devtools/page/4779DB4178A462562E0755341B5ECB69
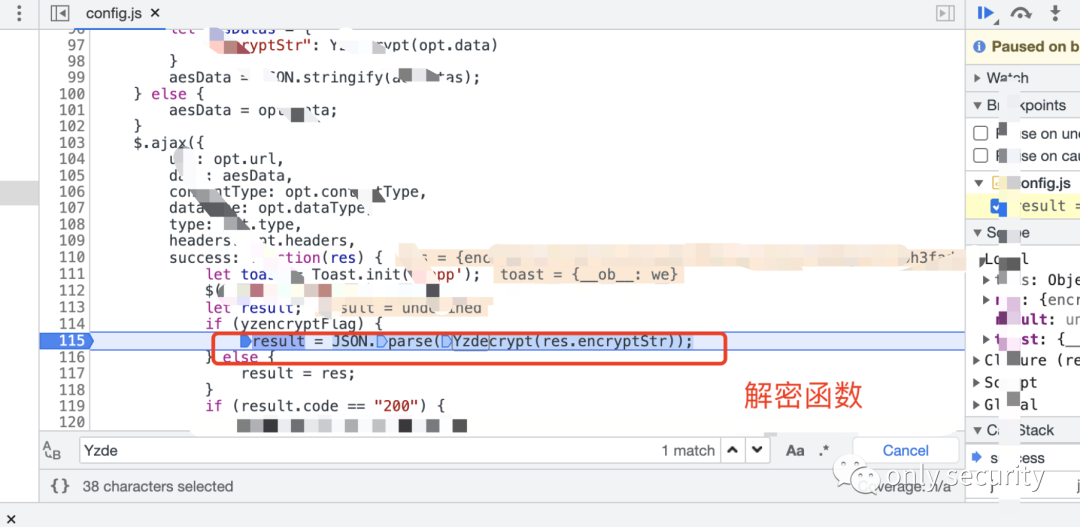
可以得到目标站点的页面,通过在js中搜索关键字,在加密处打下断点
运行代码
nodejs代码如下
const CDP = require("chrome-remote-interface");

const target = { port: '9200', ws: 'ws://127.0.0.1:9222/devtools/page/4779DB4178A462562E0755341B5ECB69' };
(async () => {
  const client = await CDP({
    port: target.port,
    target: target.ws,
    local: true
  });
  client.on('event', (message) => {
    // console.log(message);
  });
  const {Runtime, Page, Debugger} = client;
  Runtime.enable();
  Page.enable();
  Debugger.enable();

  const b = await Debugger.paused()
  const frameid = b.callFrames[0].callFrameId
  // console.log(b.callFrames[0].callFrameId) // 获取callFrameId

    const data = await Debugger.evaluateOnCallFrame({
    expression: "Yzencrypt(opt.data)",callFrameId:frameid
  });

  console.log(data.result.value);
  })();
直接调用Yzencrypt(opt.data)函数即可,可以通过运行代码获得密文
延伸一下,如果要进行实战加解密,那么直接在解密那里打个断点
代码如下
const CDP = require("chrome-remote-interface");

const target = { port: '9200', ws: 'ws://127.0.0.1:9222/devtools/page/4779DB4178A462562E0755341B5ECB69' };
(async () => {
  const client = await CDP({
    port: target.port,
    target: target.ws,
    local: true
  });
  client.on('event', (message) => {
    // console.log(message);
  });
  const {Runtime, Page, Debugger} = client;
  Runtime.enable();
  Page.enable();
  Debugger.enable();

  const b = await Debugger.paused()
  const frameid = b.callFrames[0].callFrameId
  // console.log(b.callFrames[0].callFrameId) // 获取callFrameId

    const data_decry = await Debugger.evaluateOnCallFrame({
    expression: "Yzdecrypt(res.encryptStr)",callFrameId:frameid
  });

  console.log(data_decry);

  const data = await Debugger.evaluateOnCallFrame({
    expression: "Yzencrypt(opt.data)",callFrameId:frameid
  });

  console.log(data.result.value);
  })();
上面调用解密,下面调用解密
配合autoDecoder使用的话,需要自行修改成接口模式即可
0x002 使用puppeteer进行加解密
调试模式启动chrome
sudo /Applications/Google\ Chrome.app/Contents/MacOS/Google\ Chrome --remote-debugging-port=9222
访问 http://localhost:9222/json/version 获取ws链接
通过在js中搜索关键字,在页面打断点,进行函数拦截
nodejs代码如下
const puppeteer = require('puppeteer');

(async () => {
      const browser = await puppeteer.launch();
    try {

  const browserWSEndpoint = "ws://127.0.0.1:9222/devtools/browser/2182f732-6cd5-40e1-b77e-0f8422f0d48b";

  const browser = await puppeteer.connect({
      browserWSEndpoint:browserWSEndpoint,
      defaultViewport: null
  });
  const pages = await browser.pages();
  const page = pages[0];
  const a= await page.evaluate( () =>{
      return HzCrypto.Encrypt("admin||123456");
  })

        console.log(a)
  } catch (err) {
    console.error(err.message);
  } finally {
    await browser.close();
  }
})();
运行js代码
获取到一样的密文,成功
这里有个坑点: 这里需要在调试的chrome浏览器中拦截住以后再刷新一次才可以得到密文,否则执行js代码无返回
0x003 使用sekiro进行加解密
首先要安装sekiro 执行命令:
curl https://oss.iinti.cn/sekiro/quickstart.sh | bash
访问网站:http://127.0.0.1:5612/,首次打开网站请注册账户,第一个注册账户将会成为管理员,然后创建用户分组,即可启用apitoken
安装使用的教程可以参看sekiro的官方教程
打断点,debug到当前函数Yzencrypt()然后直接在控制台加入以下代码(sekiro的客户端)
function SekiroClient(e){if(this.wsURL=e,this.handlers={},this.socket={},!e)throw new Error("wsURL can not be empty!!");this.webSocketFactory=this.resolveWebSocketFactory(),this.connect()}SekiroClient.prototype.resolveWebSocketFactory=function(){if("object"==typeof window){var e=window.WebSocket?window.WebSocket:window.MozWebSocket;return function(o){function t(o){this.mSocket=new e(o)}return t.prototype.close=function(){this.mSocket.close()},t.prototype.onmessage=function(e){this.mSocket.onmessage=e},t.prototype.onopen=function(e){this.mSocket.onopen=e},t.prototype.onclose=function(e){this.mSocket.onclose=e},t.prototype.send=function(e){this.mSocket.send(e)},new t(o)}}if("object"==typeof weex)try{console.log("test webSocket for weex");var o=weex.requireModule("webSocket");return console.log("find webSocket for weex:"+o),function(e){try{o.close()}catch(e){}return o.WebSocket(e,""),o}}catch(e){console.log(e)}if("object"==typeof WebSocket)return function(o){return new e(o)};throw new Error("the js environment do not support websocket")},SekiroClient.prototype.connect=function(){console.log("sekiro: begin of connect to wsURL: "+this.wsURL);var e=this;try{this.socket=this.webSocketFactory(this.wsURL)}catch(o){return console.log("sekiro: create connection failed,reconnect after 2s:"+o),void setTimeout(function(){e.connect()},2e3)}this.socket.onmessage(function(o){e.handleSekiroRequest(o.data)}),this.socket.onopen(function(e){console.log("sekiro: open a sekiro client connection")}),this.socket.onclose(function(o){console.log("sekiro: disconnected ,reconnection after 2s"),setTimeout(function(){e.connect()},2e3)})},SekiroClient.prototype.handleSekiroRequest=function(e){console.log("receive sekiro request: "+e);var o=JSON.parse(e),t=o.__sekiro_seq__;if(o.action){var n=o.action;if(this.handlers[n]){var s=this.handlers[n],i=this;try{s(o,function(e){try{i.sendSuccess(t,e)}catch(e){i.sendFailed(t,"e:"+e)}},function(e){i.sendFailed(t,e)})}catch(e){console.log("error: "+e),i.sendFailed(t,":"+e)}}else this.sendFailed(t,"no action handler: "+n+" defined")}else this.sendFailed(t,"need request param {action}")},SekiroClient.prototype.sendSuccess=function(e,o){var t;if("string"==typeof o)try{t=JSON.parse(o)}catch(e){(t={}).data=o}else"object"==typeof o?t=o:(t={}).data=o;(Array.isArray(t)||"string"==typeof t)&&(t={data:t,code:0}),t.code?t.code=0:(t.status,t.status=0),t.__sekiro_seq__=e;var n=JSON.stringify(t);console.log("response :"+n),this.socket.send(n)},SekiroClient.prototype.sendFailed=function(e,o){"string"!=typeof o&&(o=JSON.stringify(o));var t={};t.message=o,t.status=-1,t.__sekiro_seq__=e;var n=JSON.stringify(t);console.log("sekiro: response :"+n),this.socket.send(n)},SekiroClient.prototype.registerAction=function(e,o){if("string"!=typeof e)throw new Error("an action must be string");if("function"!=typeof o)throw new Error("a handler must be function");return console.log("sekiro: register action: "+e),this.handlers[e]=o,this};// http站点用ws,https站点用wss
var client = new SekiroClient("ws://x.x.x.x:5612/business/register?group=business-domo&clientId="+Math.random());
client.registerAction("Yzencrypt",function(request, resolve,reject ){
            resolve(Yzencrypt(request['data']));
})
这里由于笔者部署在公网服务器上,所以需要去除跨域的问题
Access-Control-Allow.*
Content-Security-Policy.*
通过访问
http://x.x.x.x:5612/business/invoke?group=demo-ws&clientId=1&action=Yzencrypt&data=18812341233&sekiro_token=5392f1be-0c15-480d-8b68-804d0e9bd0f2
和web端直接调用一样
能通过http去调用加密、解密,那么怎么结合到autoDecoder也就是加几行请求代码的事了
0x004 代码混淆情况下使用sekiro进行加解密
这个案例是之前绕过又绕过的案例,原本的加密已经被逆了,后续混淆了前段js代码、关键字、参数等等,逆向js代码花了好几天,找到了加解密的逻辑
找到混淆的函数(由于敏感的原因,需要厚码)
通过前段调试发现没问题,进而全局函数提升
这里说说为什么要使用全局函数提升,因为很多时候我们无法直接调用js里的函数,比如vue打包的那种,又或者需要各种各样的对象去调用,没法直接去调用,那么提升为全局函数是一种很好的办法
注册sekiro路由,大致与上面的案例3类似,不同的是调用的函数
在burp中进行请求加密,得到加密后的字段
与原始请求体中的加密字段进行对比,发现是一样的,说明逆向正确
这里通过autoDecoder做到了自动化,放上代码
# -*- coding: utf-8 -*-
# @Software: f0ng

from flask import Flask, Response, request
from pyDes import *
import re, binascii, requests, json
from urllib.parse import unquote, quote  app = Flask(__name__)

@app.route('/encode', methods=["POST"])
def encrypt():
    try:
        param = request.form.get('dataBody')  # 获取  post 参数
        json_total = json.loads(param)
        param_sign = json_total["sign"]
        print(param_sign)

        resp = requests.get("http://127.0.0.1:5612/business/invoke?group=business-demo&clientId=1&action=O&data=" + (
            param)  + "&sekiro_token=bd3c11c3-b78f-41a1-b911-92fc681f6b9a")

        param = param.replace(param_sign, json.loads(resp.text)["data"])
        print(param)
    except:
        param = ""

    return param


@app.route('/decode', methods=["POST"])  # 不解密
def decrypt():
    param = request.form.get('dataBody')  # 获取  post 参数
    return param


if __name__ == '__main__':
    app.debug = True  # 设置调试模式,生产模式的时候要关掉debug
    app.run(host="0.0.0.0", port="8888")
针对不同情况还是要不同的对待,多一个方式进行rpc为了后面能有更好的组合使用 sekiro是笔者在有需要进行加解密的逆向时候,目前还在用的,调用起来很方便,所以相对于其他两个rpc来说,写的比较详细一点,有与autoDecoder的结合 其实一般的登录口加解密是用不着上rpc的,笔者也有自己的方法,谈不上多好,但是用起来比较顺手,后面有机会写一下
https://zhaomenghuan.js.org/blog/chrome-devtools.html#chrome-devtools-protocol 【chrome-devtools】
https://chromedevtools.github.io/devtools-protocol/tot/Debugger/ 【chrome-devtools】
https://sekiro.iinti.cn/sekiro-doc/01_manual/1.quickstart.html 【sekiro教程】
https://github.com/yint-tech/sekiro-open 【sekiro官方地址】
如有侵权请联系:admin#unsafe.sh