来自:CSDN,作者:YF云飞链接:https://blog.csdn.net/flyTie/article/details/126146332[漏洞扫描]是一种安全检测行为,更是一类重要的网络安全技 2023-12-24 08:32:29 Author: 菜鸟学信安(查看原文) 阅读量:28 收藏
来自:CSDN,作者:YF云飞
链接:https://blog.csdn.net/flyTie/article/details/126146332
[漏洞扫描]是一种安全检测行为,更是一类重要的网络安全技术,它能够有效提高网络的安全性,而且漏洞扫描属于主动的防范措施,可以很好地避免黑客攻击行为,做到防患于未然。那么好用的漏洞扫描工具有哪些?
本文仅供技术学习。
5 款工具,打包带走吧!
第一款:Trivy
概述
Trivy 是一个开源漏洞扫描程序,能够检测开源软件中的 CVE。这款工具针对风险提供了及时的解释,开发人员可自行决定是否在容器或应用程序中使用该组件。常规的容器安全协议使用的是静态镜像扫描来发现漏洞,Trivy 则是将漏洞扫描工具无缝合并到集成开发环境当中。
项目地址:https://github.com/aquasecurity/trivy
另外,由于背靠庞大的开源社区,许多的集成及附加组件都支持 Trivy,例如使用 Helm 图表能够将 Trivy 安装到 Kubernetes 集群,借助 Prometheus 导出器能够提取漏洞指标。
安装
Trivy 安装:
非常简单,如果有 Golang 环境的可以 Clone 源码仓自己编译构建。或者使用发行版的包安装器安装,比如 CentOS:
sudo apt-get install wget apt-transport-https gnupg lsb-release

wget -qO - aquasecurity.github.io/trivy-repo/deb/public.key | sudo apt-key add -

echo deb aquasecurity.github.io/trivy-repo/deb $(lsb_release -sc) main | sudo tee -a /etc/apt/sources.list.d/trivy.list

sudo apt-get update

sudo apt-get install trivy
Ubuntu 安装:
sudo apt-get install wget apt-transport-https gnupg lsb-release

wget -qO - aquasecurity.github.io/trivy-repo/deb/public.key | sudo apt-key add -

echo deb aquasecurity.github.io/trivy-repo/deb $(lsb_release -sc) main | sudo tee -a /etc/apt/sources.list.d/trivy.list

sudo apt-get update

sudo apt-get install trivy
Trivy 也支持容器方式部署:
docker pull aquasec/trivy:0.20.2
然后直接启动容器:
docker run --rm -v [YOUR_CACHE_DIR]:/root/.cache/ aquasec/trivy:0.20.2 [YOUR_IMAGE_NAME]
如果想要扫主机上的镜像,可能需要挂载 docker.sock,例如:
docker run --rm -v /var/run/docker.sock:/var/run/docker.sock \

-v $HOME/Library/Caches:/root/.cache/ aquasec/trivy:0.20.2 python:3.4-alpine
第二款:OpenVAS
概述
OpenVAS 是一款功能全面的免费开源漏洞扫描器和管理系统。它得到了 GNU 通用公开许可证授权许可,支持包括多个 Linux 发行版在内的不同操作系统。OpenVAS 利用了可自动更新的社区来源的漏洞数据库,涵盖 5 万多个已知网络漏洞测试。也就是说,它能非常细致地查看整个系统,并对已经或未经身份验证的协议进行测试。而实施过的漏洞测试也相当细致,会深入分析计算机及服务器受保护的程度。
安装
1、前提条件
①. 虚拟机配置静态 ip,桥接模式,设置 IPADDR,其中 GATEWAY,NETMASK,DNS 需要设置与 右键网络–更改适配器–以太网状态–详细信息保持一致
②. 设置虚拟机代理,通过图形化界面给虚拟机设置代理,可以访问网络,但是不能使用 yum 源。安装 openvas 需要使用 yum 源,做如下修改。在/etc/yum.conf 中加入下面几句
proxy=http://10.4.200.228:8080
proxy_username=bmcc60000
proxy_password=pl,12345
③./root/.bashrc(/etc/profile) 中加入(或者在命令行中输入,终端中是暂时的)
export http_proxy=“http://username:[email protected]:808”
④. 如果是通过 ip 或者是网卡的认证,可以忽略所有的 user,password 等。停止使用代理的的时候,需要将环境变量,yum 配置文件恢复:unset http_proxy(去除环境变量),输入 env 可以查看环境变量
2、配置步骤
①. 禁用 selinux,重启生效
(#SELINUX=enforcing,
#SELINUXTYPE=targeted)
yum 在线装
[root@localhost ~]#vi /etc/selinux/config
SELINUX=disabled
[root@localhost ~]#reboot
②. 关闭防火墙
systemctl stop firewalld
③.yum 更新
yum update -y
④. 安装依赖:
yum install -y wget bzip2 texlive net-tools alien gnutls-utils
⑤. 添加仓库
wget -q -O - http://www.atomicorp.com/installer/atomic | sh
⑥. 安装 openvas
yum install openvas -y
第三款:Clair
概述
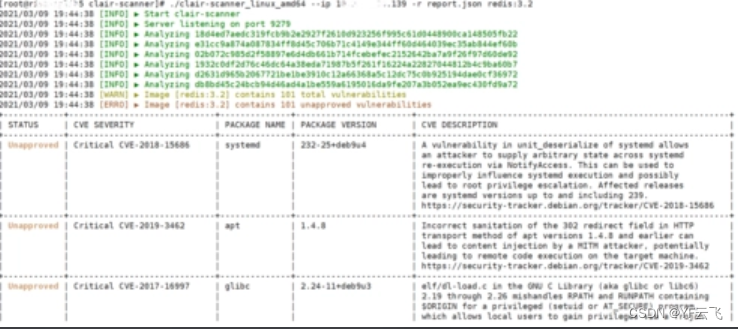
Clair 是基于 API 的漏洞扫描程序,可对开源容器层的任何已知安全漏洞进行检测,更加便于创建持续监控容器并查找安全漏洞的服务。Clair 能定期从各个来源收集漏洞元数据,对容器镜像索引,并提供用于检索镜像发现的特征的 API。漏洞元数据一旦更新,用户就会收到提醒,这样就能从之前扫描的镜像中及时发现新的漏洞。另外,Clair 还提供了可用于查询特定容器镜像漏洞的 API。
安装
1、在 OpenShift 安装 Clair 环境
创建项目 创建 clairv4-postgres.yaml 文件,内容如下: 执行命令,根据 clairv4-postgres.yaml 创建对象 创建 config.yaml 文件,内容如下: 执行命令,根据 config.yaml 文件创建 secret 创建 clair-combo.yaml 文件,内容如下: 执行命令,根据 clair-combo.yaml 文件创建对象 查看部署的资源
步骤详细命令如下:
$ oc new-project quay-enterprise
---
apiVersion: apps/v1
kind: Deployment
metadata:
  name: clairv4-postgres
  namespace: quay-enterprise
  labels:
    quay-component: clairv4-postgres
spec:
  replicas: 1
  selector:
    matchLabels:
      quay-component: clairv4-postgres
  template:
    metadata:
      labels:
        quay-component: clairv4-postgres
    spec:
      volumes:
        - name: postgres-data
          persistentVolumeClaim:
            claimName: clairv4-postgres
      containers:
        - name: postgres
          image: postgres:11.5
          imagePullPolicy: "IfNotPresent"
          resources:
            limits:
              cpu: '2'
              memory: 6Gi
            requests:
              cpu: '1'
              memory: 4Gi
          ports:
            - containerPort: 5432
          env:
            - name: POSTGRES_USER
              value: "postgres"
            - name: POSTGRES_DB
              value: "clair"
            - name: POSTGRES_PASSWORD
              value: "postgres"
            - name: PGDATA
              value: "/etc/postgres/data"
          volumeMounts:
            - name: postgres-data
              mountPath: "/etc/postgres"
---
apiVersion: v1
kind: PersistentVolumeClaim
metadata:
  name: clairv4-postgres
  labels:
    quay-component: clairv4-postgres
spec:
  accessModes:
    - "ReadWriteOnce"
  resources:
    requests:
      storage: "10Gi"
    volumeName: "clairv4-postgres"
$ oc create -f clairv4-postgres.yaml
$ oc expose deployment/clairv4-postgres
introspection_addr: :8089
http_listen_addr: :8080
log_level: debug
indexer:
  connstring: host=clairv4-postgres port=5432 dbname=clair user=postgres password=postgres sslmode=disable
  scanlock_retry: 10
  layer_scan_concurrency: 5
  migrations: true
matcher:
  connstring: host=clairv4-postgres port=5432 dbname=clair user=postgres password=postgres sslmode=disable
  max_conn_pool: 100
  run: ""
  migrations: true
  indexer_addr: clair-indexer
notifier:
  connstring: host=clairv4-postgres port=5432 dbname=clair user=postgres password=postgres sslmode=disable
  delivery: 1m
  poll_interval: 5m
  migrations: true
$ oc create secret generic clairv4-config-secret --from-file=./config.yaml
---
apiVersion: apps/v1
kind: Deployment
metadata:
  labels:
    quay-component: clair-combo
  name: clair-combo
spec:
  replicas: 1
  selector:
    matchLabels:
      quay-component: clair-combo
  template:
    metadata:
      labels:
        quay-component: clair-combo
    spec:
      containers:
        - image: quay.io/projectquay/clair:4.1.0
          imagePullPolicy: IfNotPresent
          name: clair-combo
          env:
            - name: CLAIR_CONF
              value: /clair/config.yaml
            - name: CLAIR_MODE
              value: combo
          ports:
            - containerPort: 8080
              name: clair-http
              protocol: TCP
            - containerPort: 8089
              name: clair-intro
              protocol: TCP
          volumeMounts:
            - mountPath: /clair/
              name: config
      imagePullSecrets:
        - name: redhat-pull-secret
      restartPolicy: Always
      volumes:
        - name: config
          secret:
            secretName: clairv4-config-secret
---
apiVersion: v1
kind: Service
metadata:
  name: clairv4
  labels:
    quay-component: clair-combo
spec:
  ports:
    - name: clair-http
      port: 80
      protocol: TCP
      targetPort: 8080
    - name: clair-introspection
      port: 8089
      protocol: TCP
      targetPort: 8089
  selector:
    quay-component: clair-combo
  type: ClusterIP
$ oc apply -f clair-combo.yaml
$ oc expose svc/clairv4
$ oc get all
NAME                                   READY   STATUS    RESTARTS   AGE
pod/clair-combo-6754dcfd75-wwbt9       1/1     Running   0          34s
pod/clairv4-postgres-b9f679dc6-fhmcs   1/1     Running   0          2m51s

NAME                       TYPE        CLUSTER-IP     EXTERNAL-IP   PORT(S)           AGE
service/clairv4            ClusterIP   10.217.4.159           80/TCP,8089/TCP   34s
service/clairv4-postgres   ClusterIP   10.217.5.64            5432/TCP          119s

NAME                               READY   UP-TO-DATE   AVAILABLE   AGE
deployment.apps/clair-combo        1/1     1            1           34s
deployment.apps/clairv4-postgres   1/1     1            1           2m51s

NAME                                         DESIRED   CURRENT   READY   AGE
replicaset.apps/clair-combo-6754dcfd75       1         1         1       34s
replicaset.apps/clairv4-postgres-b9f679dc6   1         1         1       2m51s

NAME                               HOST/PORT                                                                 PATH   SERVICES   PORT         TERMINATION   WILDCARD
route.route.openshift.io/clairv4   clairv4-quay-enterprise.crc-dzk9v-master-0.crc.fa7bdknrdb3y.instruqt.io          clairv4    clair-http                 None
安装 Clair 客户端
从 https://github.com/quay/clair/releases 下载 Clair 客户端。
$ curl -L https://github.com/quay/clair/releases/download/v4.3.5/clairctl-linux-amd64 -o ~/clairctl
$ chmod +x clairctl
$ PATH=$PATH:~/
第四款:Anchore
概述
Anchore 是一款开源 Docker 容器策略合规与静态分析的工具。激活之后,Anchore 会自动执行容器内容的镜像扫描、分析及评估。最终结果会针对每个镜像进行策略评估,并判定是否符合业务要求。Anchore 主要是通过分析容器镜像的内容,发现隐藏的漏洞。同时,它也会扫描已知漏洞并确保镜像遵循了最佳安全标准与最佳行业实践。最重要的是,Anchore 集成了容器注册表和 CI/CD 工具。
安装
https://github.com/anchore/anchore.git[1]
锚的架构
过去,设置 Anchore 需要专门安装 Anchore Engine,该引擎独立于您的映像构建环境运行。单独的 CLI 可让您与引擎交互。
此模型需要使用一系列 CLI 命令来向 Anchore 注册图像、开始扫描并访问结果。这些步骤通过从注册表中提取图像、生成报告并使其可供使用来推进锚定。
Anchore 现在也提供内联扫描。这些为您提供了一个命令来扫描图像并在终端中获取结果。我们将在本文中重点介绍此功能。
运行内联脚本
内联扫描由托管在 Anchore 服务器上的 Bash 脚本提供。将脚本下载到您的机器上并使其可执行:
curl -s https://ci-tools.anchore.io/inline_scan-latest -o anchore.shchmod +x anchore.sh
现在您可以使用内联脚本开始扫描容器映像:
./anchore.sh -r alpine:latest
第一次扫描可能需要一段时间。该脚本将拉取 Anchore Engine Docker 镜像,启动一个新的 Anchore 实例,并配置 PostgreSQL 和一个 Docker 注册表实例。然后它会等待锚定引擎启动。
一旦引擎运行,目标 Docker 镜像将被拉取和分析。然后,您将看到终端中显示的安全报告。该脚本将通过清理环境并停止 Anchore Engine Docker 容器来完成。
第五款:[Sqlmap]
概述
Sqlmap 属于渗透[测试工具],但具有自动检测和评估漏洞的功能。该工具不只是简单地发现安全漏洞及利用漏洞的情况,它还针对发现结果创建了详细的报告。Sqlmap 利用 Python 进行开发,支持任何安装了 Python 解释器的操作系统。它能自动识别密码哈希,并使用六种不同方法来利用 SQL 注入漏洞。此外,Sqlmap 的数据库非常全面,支持 oracle、PostgreSQL、MySQL、SqlServer 和 access。
安装
1、环境要求
Python2.7(python3 不支持)
2、安装步骤
在 sqlmap 官网 http://sqlmap.org/[2] 下载最新版本的 sqlmap 安装包。当前展示版本为 1.3.2-25,如下图所示:
将下载下来的安装包 sqlmapproject-sqlmap-1.3.2-25-gaf890d6.zip 解压到自己想存放的目录并重命名,这里以 D 盘为例,并将解压后的文件重命名为 sqlmap。解压后的目录结构如下图所示:
验证 sqlmap 是否安装完成,可进行如下操作进行验证:
打开 cmd 窗口,进入到 python 的安装目录(这里如果配置了 python 环境变量,则不需要进入到此目录):
执行如下命令:
python D:\sqlmap\sqlmap.py --version
若显示 sqlmap 版本号,则安装成功。如下图所示:
参考资料
https://github.com/anchore/anchore.git: https://github.com/anchore/anchore.git
[2]http://sqlmap.org/: http://sqlmap.org/
如有侵权请联系:admin#unsafe.sh