2023-12-5 05:57:25 Author: blogs.sap.com(查看原文) 阅读量:17 收藏
In the realm of database management, the need to seamlessly transfer data from one platform to another often arises. This guide outlines the essential steps to import a PostgreSQL database hosted on SAP Business Technology Platform (BTP) into pgAdmin, a popular database management tool. To ensure a secure connection, we’ll establish an SSH tunnel, facilitating the secure transfer of data from the BTP database to your local pgAdmin instance. With this process, you can efficiently manage and analyze your BTP database locally, unlocking new possibilities for data-driven decision-making within your Cloud Foundry environment.
Summary:
This guide walks you through importing a PostgreSQL database from SAP Business Technology Platform into pgAdmin and for local access. Follow the steps to connect both seamlessly, enabling easier management and analysis of your database in a familiar local environment.
Pre-requisites:
- BTP Account (can be trial)
- pgAdmin
- CF Sample App in BTP (if you don’t have you can clone from here https://github.com/alimert801/cf-sample-python-app/ )
- Cloud Foundry CLI
Steps:
- Step 1 – Create PostgreSQL database instance on BTP
- Step 2 – Create service key for PostgreSQL
- Step 3 – Log-in on CF CLI
- Step 4 – Deploy sample app
- Step 5 – Bind PostgreSQL to app
- Step 6 – Open SSH Tunnel to access PostgreSQL locally
- Step 7 – Configure pgAdmin to access BTP PostgreSQL Database
Step 1 – Create PostgreSQL database instance on BTP
In this initial step, we’ll set up a PostgreSQL database instance on SAP Business Technology Platform (BTP). This database will serve as the source of the data we want to import into pgAdmin. Creating this database is the foundation of the entire data transfer process.
Login BTP Cockpit https://account.hana.ondemand.com/cockpit and create PostgreSQL Instance


Step 2 – Create service key for PostgreSQL
To establish a connection between our PostgreSQL database on BTP and our local pgAdmin instance, we’ll create a service key. This key will provide the necessary credentials and access information to securely link the two environments.
Go to ‘Instances and Subscriptions’ and create service key


Keep information below for further steps

Step 3 – Log-in on CF CLI
Before we can proceed with deploying our sample app and facilitating data transfer, it’s imperative to ensure access to SAP’s Cloud Foundry environment. In this step, we’ll log in to the Cloud Foundry Command Line Interface (CF CLI). This login process will grant us the credentials and permissions needed to effectively manage applications and services within our Cloud Foundry environment.
Specify your Cloud Foundry Environment API Endpoint
foo@bar:~$ cf api <--CF API ENDPOINT LINK-->Output:
Setting API endpoint to <--CF API ENDPOINT LINK-->...
OK

API endpoint:   <--CF API ENDPOINT LINK-->
API version:    3.144.0

Not logged in. Use 'cf8 login' or 'cf8 login --sso' to log in.
Run command below and enter your email and password to login
foo@bar:~$ cf loginOutput:
API endpoint: <--CF API ENDPOINT LINK-->

Email: <--YOUR EMAIL-->
Password:

Authenticating...
OK

Targeted org e89e824678851232.

Targeted space dev.

API endpoint: <--CF API ENDPOINT LINK-->
API version: 3.144.0
user: <--YOUR EMAIL-->
org: e89e824671231232
space: dev
Step 4 – Deploy sample app
With access to the Cloud Foundry environment secured, we’re ready to deploy a sample app that will act as an intermediary in our data transfer process. This app is a crucial component that will enable communication between our BTP PostgreSQL database and our local setup.
Clone repository that is shared beginning of this article if you don’t have your own and push with below command
foo@bar:~$ cf push


Check the app status with below pictures steps

Step 5 – Bind PostgreSQL to app
To enable data retrieval and interaction between the sample app and the PostgreSQL database, we’ll bind the database to the app. This binding process ensures that the app has the necessary permissions and access rights to the database, enabling seamless data access.
Go to ‘Instances and Subscriptions’ and bind app that is deployed


Step 6 – Open SSH Tunnel to access PostgreSQL locally
To ensure secure access to the BTP PostgreSQL database from our local pgAdmin instance, we’ll set up an SSH tunnel. This tunnel establishes a secure pathway for data transfer and management, preserving the confidentiality and integrity of our database interactions.
Enable SSH and restage app
foo@bar:~$ cf enable-ssh <--YOUR APP NAME-->
foo@bar:~$ cf restage <--YOUR APP NAME-->
Get needed information which is done in STEP 2 from BTP

Open SSH Tunnel after edit below code by yours and leave command terminal open
foo@bar:~$ cf ssh -L localhost:<--localport-->:<--remotehost-ip-->:<--remoteport--> <--app name--> -N
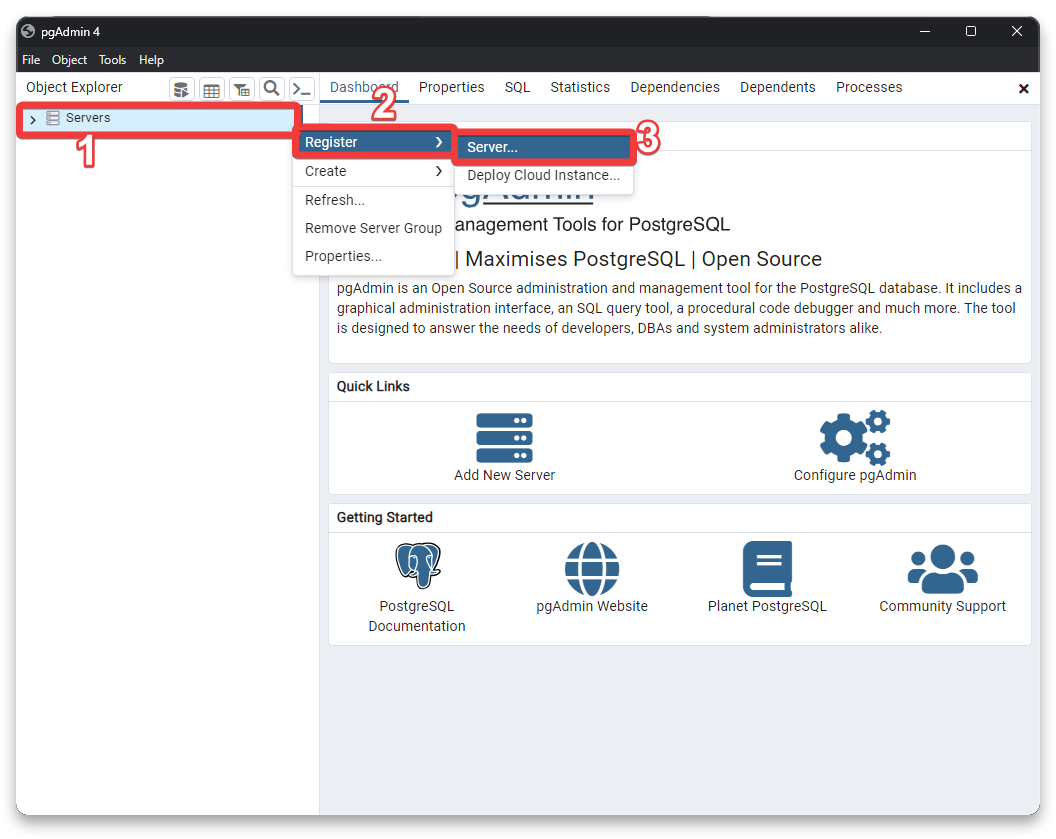
Step 7 – Configure pgAdmin to access BTP PostgreSQL Database
In this final step, we’ll configure pgAdmin to establish a connection with the BTP PostgreSQL database via the established SSH tunnel. This configuration will allow us to effectively manage and analyze our BTP database locally using pgAdmin, empowering us with the necessary tools for data-driven decision-making within our Cloud Foundry environment.
Please note that: instead of localhost, we need to use ‘127.0.0.1’ to access our database due to pgAdmin.


Get needed information which is done in STEP 2 from BTP


And Finally we can access our database locally and from pgAdmin

Conclusion
By following these steps, you’ve successfully connected a PostgreSQL database from SAP Business Technology Platform to pgAdmin and for local access. Share your experiences in the comments and stay tuned for more tech insights. Let’s keep learning and innovating together as we navigate the world of seamless database integration.
如有侵权请联系:admin#unsafe.sh