2023-11-30 23:34:32 Author: blogs.sap.com(查看原文) 阅读量:6 收藏
Use Case:
In this blog post, I will explain how to dynamically export Simple Form contents and Table data to a spreadsheet dynamically using OData Service. Additionally, I have covered the process of applying CSS styles to the table data dynamically.
With the provided code, you will learn how to add colors to each column in the spreadsheet and apply styles to particular cells in Excel.
Furthermore, I have included a detailed explanation of exporting the Simple Form contents dynamically to an Excel file using HTML tags.
The “xlsx” library is a JavaScript library that allows you to read, write, and manipulate Microsoft Excel files in the XLSX format.
Steps includes:
1. Creating a table and simple form in a View
2. Declaring 3rd party libraries in controller
3. Export functionality
4. Output
1.Creating a table and simple form in a XML View.
<content>
                <l:SimpleForm id="simpleid" editable="true" layout="ResponsiveGridLayout">
                    <Label text="Country" design="Bold" required="true">
                            <layoutData>
                                <f:GridData span="XL4 L1 M2 S4"/>
                            </layoutData>
                        </Label>
                        <ComboBox items="{path:'duplicatedModel>/'}" placeholder="Country" id="comboid" value="{tabmodel>/count}"
                             change="onCombochange" valueStateText="Please Provide Correct Input">
                            <layoutData>
                                <f:GridData span="XL1 L2 M2 S4"/>
                            </layoutData>
                            <items>
                                <core:ListItem text="{duplicatedModel>}"></core:ListItem>
                            </items>
                        </ComboBox>
                        <Label text="Product Name" design="Bold" required="true">
                            <layoutData>
                                <f:GridData span="XL1 L2 M2 S4"/>
                            </layoutData>
                        </Label>
                        <Input showValueHelp="true" valueHelpRequest="onProdhelp" placeholder="Product" id="mtlid" value="{tabmodel>/prod}">
                            <layoutData>
                                <f:GridData span="XL1 L2 M2 S4"/>
                            </layoutData>
                        </Input>
                        <Label text="Customer Name" design="Bold" required="true">
                            <layoutData>
                                <f:GridData span="XL1 L2 M2 S4"/>
                            </layoutData>
                        </Label>
                        <Input showValueHelp="true" id="customerId" valueHelpRequest="onCusthelp" value="{tabmodel>/cust}" placeholder="Customer">
                            <layoutData>
                                <f:GridData span="XL1 L2 M2 S4"/>
                            </layoutData>
                        </Input>
                        <Button text="Search" press="onSearch" type="Emphasized">
                            <layoutData>
                                <f:GridData span="XL1 L1 M2 S4"/>
                            </layoutData>
                        </Button>
                    </l:SimpleForm>
                    <l:SimpleForm editable="true" id="formid" visible="{visible>/form}">
                        <l:content>
                            <Label text="Country" design="Bold"></Label>
                            <Text text="{sModel>/count}" width="30%"></Text>
                            <Label text="Product Name" design="Bold"></Label>
                            <Text text="{sModel>/prod}" width="30%"></Text>
                            <Label text="Customer Name" design="Bold"></Label>
                            <Text text="{sModel>/cust}" width="30%"></Text>
                        </l:content>
                    </l:SimpleForm>
                    <Table items="{path:'tabmodel>/Invoices'}" id="table" growing="false" growingDirection="Downwards" growingThreshold="20"
                        growingTriggerText="Next" visible="{visible>/table}">
                        <columns>
                            <Column>
                                <Label text="Country" design="Bold"></Label>
                            </Column>
                            <Column>
                                <Label text="Product" design="Bold"></Label>
                            </Column>
                            <Column>
                                <Label text="Customer" design="Bold"></Label>
                            </Column>
                        </columns>
                        <ColumnListItem type="Navigation" press="onPress">
                            <cells >
                                <Text text="{tabmodel>Country}"></Text>
                                <Text text="{tabmodel>ProductName}"></Text>
                                <Text text="{tabmodel>CustomerName}"></Text>
                            </cells>
                        </ColumnListItem>
                    </Table>
                </content>
                <footer>
                    <OverflowToolbar>
                        <ToolbarSpacer/>
                        <Button text="Export" type="Accept" press="onExport" icon="sap-icon://print"></Button>
                    </OverflowToolbar>
                </footer>
2.Declaring 3rd party library in controller.
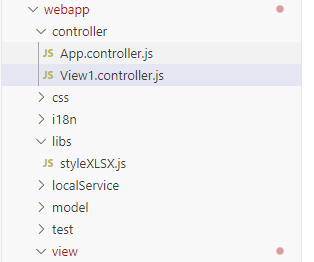
· For this I created libs folder in my project with .js file with name styleXLSX

· Copy code from given below link and paste into js file
“https://github.com/gitbrent/xlsx-js-style/blob/master/dist/xlsx.bundle.js”
We must paste below library in html file
<script src=”https://cdnjs.cloudflare.com/ajax/libs/exceljs/4.3.0/exceljs.min.js”></script>
We must declare 3rd part library in controller
"$.sap.require(exportdynamically/exportdynamically/libs/styleXLSX”);";
sap.ui.define([
    "sap/ui/core/mvc/Controller",
    "sap/ui/model/json/JSONModel",
    "sap/ui/model/Filter",
    "sap/ui/model/FilterOperator",
    "sap/m/MessageBox",
    "exportdynamically/exportdynamically/libs/styleXLSX"
],
3.Export Functionality Code:
To get the simple form content and table data
onExport: function () {
                var that = this;
                var col_length = [];
                //simple form data
                var Form2contents = that.getView().byId("formid").getContent();
                //table data
                var data = [];
                var index = that.byId("table").getBinding("items").getCurrentContexts();
                index.forEach(function (item) {
                    var sPath = item.sPath.split("/")[2];
                    data.push(that.getView().getModel("tabmodel").getData().Invoices[sPath]);
                });
                var html = "";
                // Add header row to the table
                html += "<tr><th colspan='4'>SimpleForm</th></tr>";
                // Loop through Form2contents and populate form rows dynamically
                for (var i = 0; i < Form2contents.length; i += 2) {
                    html += "<tr>";
                    html += "<td colspan='2'>" + Form2contents[i].getText() + "</td>";
                    // Check if there is another cell in the row (i.e., Form2contents[i+1])
                    if (Form2contents[i + 1]) {
                        html += "<td colspan='1'>" + Form2contents[i + 1].getText() + "</td>";
                    }
                    html += "</tr>";

                }
                //Adding header
                html += "<tr><th colspan='3'>Table Data</th></tr>";
                //Adding the columns to table
                html += "<tr><td>Country</td><td>Product Name</td><td>Customer Name</td></tr>";
                //adding the data dynamically
                for (var k = 0; k < data.length; k++) {
                    html += "<tr>";
                    html += "<td>" + data[k].Country + "</td>";
                    html += "<td>" + data[k].ProductName + "</td>";
                    html += "<td>" + data[k].CustomerName + "</td>";
                    html += "</tr>";
                }
                // jQuery to set the HTML content of the element with the ID "tableHtml"
                $("#tableHtml").html(html);
                var Table = "<table>" + html + "</table>";
                //A new HTML <div> element is created
                var Sheet = document.createElement("div");
                //The innerHTML property of the Sheet div element is set to the value of the Table
                Sheet.innerHTML = Table;
                //Create a work sheet
                var worksheet = XLSX.utils.table_to_sheet(Sheet, {
                    cellStyles: true
                });
                var header_styles = {
                    fill: {
                        fgColor: {
                            rgb: "E9E9E9"
                        }
                    },
                    font: {
                        bold: true,
                        sz: 14
                    },
                    alignment: {
                        horizontal: "center"
                    }
                };
                var label_styles = {
                    font: {
                        bold: true,
                        sz: 11,
                        color: {
                            rgb: "800000"
                        }
                    },
                    alignment: {
                        horizontal: "center"
                    }
                };
                //applying styles to particular cells
                worksheet["A1"].s = header_styles;
                worksheet["A5"].s = header_styles;
                worksheet["A2"].s = label_styles;
                worksheet["A3"].s = label_styles;
                worksheet["A4"].s = label_styles;
                worksheet["A6"].s = label_styles;
                worksheet["B6"].s = label_styles;
                worksheet["C6"].s = label_styles;
                // This line decodes the range of the worksheet, represented by worksheet['!ref'].
                var totalSheetrange = XLSX.utils.decode_range(worksheet['!ref']);
                var Tablerange = {
                    s: {
                        c: 0,

                        r: 0
                    },
                    e: {
                        c: totalSheetrange.e.c,
                        r: totalSheetrange.e.r
                    }
                };
                for (var R1 = Tablerange.s.r; R1 <= Tablerange.e.r; ++R1) {//loop continue from starting cell(s) ends to R1 is less or equal to ending cell(e)
                    for (var C1 = Tablerange.s.c; C1 <= Tablerange.e.c; ++C1) {//loop continue from starting cells(s) and to ending cell(e)
                        col_length.push({
                            wch: 20 //width for cell
                        });
                         // Now, you are encoding the cell reference based on the current row (R1) and column (C1).
                        var cellRef = XLSX.utils.encode_cell({
                            c: C1,
                            r: R1
                        });
                        if (R1 > 5) {
                            if (C1 === 0) {//for column 1
                                worksheet[cellRef].s = {
                                    font: {
                                        color: {
                                            rgb: "A52A2A"
                                        }
                                    }
                                };
                            } else if (C1 === 1) {//for column 2
                                worksheet[cellRef].s = {
                                    font: {
                                        color: {
                                            rgb: "FF0000"
                                        }
                                    }
                                };
                            } else if (C1 === 2) {//for column 3
                                worksheet[cellRef].s = {
                                    font: {
                                        color: {
                                            rgb: "00FF00"
                                        }
                                    }
                                };
                            }
                        }
                    }
                }
                /* for auto fit column Width */
                worksheet['!cols'] = col_length;
                //crearing a new workbook
                var workbook = XLSX.utils.book_new();
                /* Append work sheet to work book */
                XLSX.utils.book_append_sheet(workbook, worksheet, "Sheet1", {
                    widths: "auto"
                });
                //for print data and donload to excel
                XLSX.writeFile(workbook, "Report.xlsx", {
                    bookType: 'xlsx',
                    bookSST: false,
                    type: 'binary'
                });
            }
Output:

Conclusion:
When you click on the ‘Export’ button located in the footer, the Excel file will be downloaded.

Conclusion
如有侵权请联系:admin#unsafe.sh