2023-11-9 21:47:3 Author: blogs.sap.com(查看原文) 阅读量:14 收藏
In almost all SAP Commerce Cloud projects you have different teams working together across different environments. Having the right data in the right environment is critical to ensuring your solution is working correctly. In this article we outline ways for you to configure and to manage loading data, to ensure your data is properly separated and you don’t end up with conflicts. You will also learn practices around anonymizing data and the various options for importing data from legacy systems as part of a migration.
By default, in SAP Commerce Cloud when you run ant initialize or ant updatesystem, it will import coredata and sampledata via ImpEx. With this setup there is no clear notion of production data. In the context of a project you will often need to manage three different types of data:
- core / common / essential data: currency, catalog, languages, etc.
- testing / sample data: sample category, sample product, sample store, testing users, representative content, etc.
- initial / update / production data: full product catalog, initial website content, etc.
For loading this data you can use the convention over configuration approach.
Consider the core / common / essential data will be imported whatever the use case: init / update and dev / prod
Recommended Practices for Loading Data

It is a recommended practice to deploy sample data in you Local and DEV environment, in order to have a quickly working SAP Commerce Cloud solution. The data being loaded should account for the possibility to perform automatic smoke/non-regression tests faster.
Production data should be deployed in your STAGE and PROD environments for:
- initial load
- deployment testing
- performance testing
- for updating data
Sample Data
Sample data should not depend on Product data. This data has to be as “light” as possible. The purpose is to capture essential web-store content in order to test key features present into the solution. For example, Website/CMS content does not have to be exactly the same–often editorial content is not relevant for developer/tester teams.
User Acceptance Test (UAT) Data
By definition, UAT data is similar as sample data. Acceptance tests will be based on sample data provided by developer team.
In the case where your business team wants to contribute to the solution before the go-live, the development team should be involved. Indeed, during your project, contributions by the business team must be considered as development task, because the solution has not been stabilized and one or more deep changes could be introduced.
After the go-live, the business team will contribute on the solution directly in PROD. So they should not interfere with UAT data.
No direct business team contribution should be allowed before first go-live
Production Data
By definition, production data is volatile and updated by multiple sources. It cannot be used as a base for testing a new release.
Moreover, when you deploy a new release which embeds data, you should pay attention that it can be applicable just for specific time. Indeed, production data has to be aligned with data change introduced by the release itself. Best way to ensure that release data change is compatible with current production data is to test it in STAGE. For that, you can use Snapshot/Restore Cloud Portal capability.
Refactoring
When you start your project you should include time to refactor the *SystemSetup java code that is called out of the box as well as generated during modulegen. You have to remove explicit sample data import. Later, sample data will be imported by ImpExSystemSetup.java and the “AutoImpEx” feature. After refactoring, it should look like this following example
@SystemSetup(extension = DataloadingConstants.EXTENSIONNAME)
public class DataloadingSystemSetup
{
	private final DataloadingService dataloadingService;

	public DataloadingSystemSetup(final DataloadingService dataloadingService)
	{
		this.dataloadingService = dataloadingService;
	}

	@SystemSetup(process = SystemSetup.Process.ALL, type = SystemSetup.Type.ESSENTIAL)
	public void createEssentialData()
	{
		dataloadingService.createLogo(PLATFORM_LOGO_CODE);
	}
}
If project time constraint doesn’t allow you to refactor data loading strategy, CCv2 is still supporting legacy JSON approach (configuration over convention) which is described in help documentation : Configuring Commerce Update Parameters. This approach is not recommended for medium/long term. It complicates your solution and maintenance.
Review existing Folders and Files Organization
By default, in each extension you could have resources/ext/import/coredata and resources/ext/import/sampledata folders.
You need to add two more folders to manage all the use cases:
- resources/ext/import/initdata
- resources/ext/import/updatedata
Then, you need to review subfolders and files naming in order to be sure they will be imported in right order. Indeed, ImpExSystemSetup is using alphanumeric sorting.
ImpExSystemSetup.java
private List<String> scanDir(final ExtensionInfo extension, final String path, final String regex)
{
  [...]
    java.util.Arrays.sort(files);
  [...]
}
Extensions ImpEx Loading Order
Between the extensions, you need to ensure they’re loading the ImpEx files in the right order. For that, you just have to declare the dependency in extensioninfo.xml. When ImpEx of a specific extension (A) should be loaded before another one (B), you just have to set in extension (B) the dependency of extension (A).
<extension ... name="extensionA">
 <!-- use to force impex loading order across the extensions. Impex extensionB will be loaded before extensionA -->
 <requires-extension name="extensionB"/>
</extension>
Settings
Local and DEV
In this environment, you should import only sample data. For that, you just have to point on the right folder by setting the following properties.
local.properties

#NOTE: replace ext by your custom extension name
update.executeProjectData.extensionName.list=ext
ext.projectdata-impex-pattern=ext/import/sampledata/**/*.impex
Locally, you can run ant initialize/updatesystem to import this data set.
When configuring your deployment to DEV , you can use either Initialize database or Migrate data data migration modes to import this data set.

STAGE and PROD
In your STAGE or PROD environments you should import only production data. For that, you just have to point on the right folder.
Initialize
#NOTE: replace ext by your custom extension name
ext.projectdata-impex-pattern=ext/import/initdata/**/*.impex
In STAGE/PROD, you should use migration mode Initialize database for your initial deployment. Once you have loaded your data and have gone live, you should not initialize the database.
Update
update.executeProjectData.extensionName.list=ext
ext.projectdata-impex-pattern=ext/import/updatedata/01/**/*.impex
Note : 01 represents the release number. Each release could have different data set for updating procedure.
In STAGE/PROD, you should use migration mode: Migrate data
In more complex development/release organization, Patches approach could be more suitable.
Example to create extension to load data by convention
- create a new extension (ant extgen / [yempty] / dataloading)
- create new folder in extension training resources/dataloading/import/sampledata
- set in local.properties
- update.executeProjectData.extensionName.list=dataloading
- dataloading.projectdata-impex-pattern=dataloading/import/sampledata/**/*.impex
- create two ImpEx for adding products in electronics catalog : 001-products.impex and 002-products.impex
- add in extensioninfo.xml <requires-extension name=”electronicsstore”/>
- run a new init (ant initialize -Dtenant=master) or an update (ant updatesystem)
Extension folder structure should look like

Then you should see this kind of trace in console.log
[java] INFO  [main] [ImpExSystemSetup] AutoImpEx for extension 'dataloading' will use userdefined filepattern 'resources/training/import/sampledata/**/*.impex' for creating the project data...
[java] INFO  [main] [ImpExSystemSetup] importing resource : /dataloading/import/sampledata/001-products.impex
[java] INFO  [main] [ImpExSystemSetup] importing resource : /dataloading/import/sampledata/002-products.impex
First Load (Initial Go-live)
Ensure that data folder resources/ext/import/initdata/ contains all the data required for go-live.
Update STAGE/PROD local.properties to point to the right ImpEx folder
Check migration mode: Initialize database
Next Load
Each new release deployment will demand to
- create a new data folder resources/ext/import/updatedata/RXX/
- update STAGE/PROD local.properties to point on the right ImpEx folder
- check migration mode: Migrate data
updatedata must be tested on STAGE within latest production data
After Load
When updatedata has been pushed correctly in PROD, it could be suitable to update sampledata in order to include essential content (CMS, Product, Customer). That’s required for testing critical features.
Please remember, sampledata is not (won’t never be) the exact copy of production data
Then, resources/ext/import/updatedata/RXX/ of previous release should be removed. Indeed, this group of ImpExes should not be used anymore.
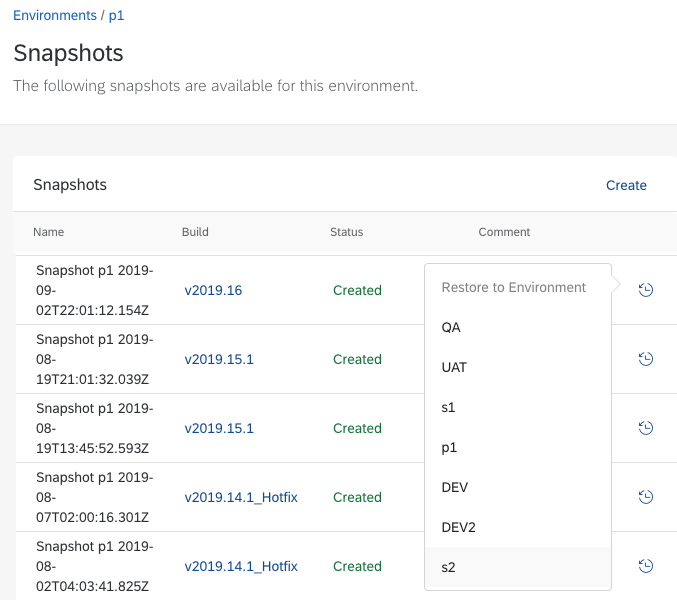
Once your project is live, your STAGE environment should be used for acceptance and regression testing. Having prod-like data in your STAGE environment will ensure you can identify bugs that may come from data issues before you deploy your build to production. It is recommended that you should periodically sync your STAGE environment with latest data from PROD. To accomplish this you can use the Snapshot/Restore Cloud Portal capability:

- Take a snapshot of your PROD environment
- Follow the steps in Restore with Anonymized Production data to restore the snapshot to your STAGE environment. You should create your own job to anonymize data that meets your requirements for data privacy, but you can use the code below as an example of anonymizer job
public class AnonymizerJob extends AbstractJobPerformable<CronJobModel> {

    private CustomCustomerService customerSerivce;
    private ModelService modelService;

    @Override
    public PerformResult perform(CronJobModel cronJobModel) {

        // All users attached to UserGroup="customergroup";
        Set<CustomerModel> customers = customerSerivce.getAllCustomers();
        for (CustomerModel customer : customers) {
            // we cannot be used customer.code which contains email address sometime.
            String anonymizedUser = "REPLACED_" + customer.getPk();
            customer.setCustomerID(anonymizedUser);
            customer.setName(anonymizedUser);
            customer.setDescription(anonymizedUser);
            customer.setOriginalUid(anonymizedUser);
            customer.setUid(anonymizedUser);
            modelService.save(customer);

            for (OrderModel order: customer.getOrders()) {
                anonymisedAddress(order.getPaymentAddress());
                anonymisedAddress(order.getDeliveryAddress());
                anonymisedFrauds(order.getFraudReports());
                anonymisedPaymentInfo(order.getPaymentInfo());
            }

            for (AddressModel address: customer.getAddresses()) {
                anonymisedAddress(address);
            }
        }
        return new PerformResult(CronJobResult.SUCCESS, CronJobStatus.FINISHED);
    }

    private void anonymisedPaymentInfo(PaymentInfoModel paymentInfo) {
        anonymisedAddress(paymentInfo.getBillingAddress());
        anonymisedComments(paymentInfo.getComments());
    }

    private void anonymisedComments(List<CommentModel> comments) {
        for (CommentModel comment: comments) {
            String anonymizedComment = "REPLACED_" + comment.getCode();
            comment.setSubject(anonymizedComment);
            comment.setText(anonymizedComment);
            modelService.save(comment);
        }
    }

    private void anonymisedFrauds(Set<FraudReportModel> fraudReports) {

        for (FraudReportModel fraud: fraudReports) {
            String anonymizedFraud = "REPLACED_" + fraud.getCode();
            fraud.setExplanation(anonymizedFraud);
            anonymisedComments(fraud.getComments());
            modelService.save(fraud);
        }
    }

    private void anonymisedAddress(AddressModel address) {
        // address.code doesn't exist. we have to use pk instead of.
        String anonymizedAddr = "REPLACED_" + address.getPk();
        address.setAppartment(anonymizedAddr);
        address.setBuilding(anonymizedAddr);
        address.setCellphone(anonymizedAddr);
        address.setCompany(anonymizedAddr);
        address.setDepartment(anonymizedAddr);
        address.setDistrict(anonymizedAddr);
        address.setEmail(anonymizedAddr);
        address.setFax(anonymizedAddr);
        address.setFirstname(anonymizedAddr);
        address.setLastname(anonymizedAddr);
        address.setLine1(anonymizedAddr);
        address.setLine2(anonymizedAddr);
        address.setMiddlename(anonymizedAddr);
        address.setMiddlename2(anonymizedAddr);
        address.setTown(anonymizedAddr);
        address.setPostalcode(anonymizedAddr);
        address.setPhone1(anonymizedAddr);
        address.setPhone2(anonymizedAddr);
        address.setPobox(anonymizedAddr);
        address.setPublicKey(anonymizedAddr);
        modelService.save(address);
    }
}
For more example, you can take a look on article Data Protection In SAP Commerce Cloud accessible in https://learninghub.sap.com/
Dump Cloud PROD to Local
When incident in PROD happens and it is related to complex data setup, it could be needed to export Cloud Prod to local OnPrem dev environment for deeper analysis. For this specific use case, SAP provides a open source HAC extension: https://github.com/SAP/sap-commerce-db-sync
This tooling is capable to do table to table data sync when both systems are sharing the database schema.
CMS data extraction for Sample Data
One of big challenge for developer team is to maintain sampledata according what the webmasters are updated directly in PROD for the Content Catalog (CMS data).
A good idea is to export specific website content page though HAC by using export ImpEx script. Then, this content should be reviewed manually in order to fit with existing sampledata
INSERT_UPDATE ContentPage;catalogVersion(version, catalog(id))[unique=true];uid[unique=true];name;masterTemplate(uid);label;defaultPage;approvalStatus(code);homepage
"#% impex.exportItems( ""ContentPage"" , false );"
Data loading strategy is one of the often overlooked elements to delivering a successful project. Having the right data loaded in the right environment can help with all aspects of development and testing. This article explained you how to load your data properly and when and how to leverage the standard functionality that comes with SAP Commerce Cloud.
In summary, you should now be comfortable with:
- Splitting data set for each interested parties: developer, tester, and business team
- Deployment this data in different environments: local, DEV, STAGE, and PROD
- Migrating data from legacy systems to SAP Commerce Cloud
如有侵权请联系:admin#unsafe.sh