
A gradio web UI for running Large Language Models like LLaMA, llama.cpp, GPT-J, Pythia, OPT, and GALACTICA.
Its goal is to become the AUTOMATIC1111/stable-diffusion-webui of text generation.
 |
 |
|---|---|
 |
 |
Features
- Dropdown menu for switching between models
- Notebook mode that resembles OpenAI's playground
- Chat mode for conversation and role playing
- Instruct mode compatible with Alpaca, Vicuna, Open Assistant, Dolly, Koala, and ChatGLM formats
- Nice HTML output for GPT-4chan
- Markdown output for GALACTICA, including LaTeX rendering
- Custom chat characters
- Advanced chat features (send images, get audio responses with TTS)
- Very efficient text streaming
- Parameter presets
- 8-bit mode
- Layers splitting across GPU(s), CPU, and disk
- CPU mode
- FlexGen
- DeepSpeed ZeRO-3
- API with streaming and without streaming
- LLaMA model
- 4-bit GPTQ mode
- llama.cpp
- RWKV model
- LoRA (loading and training)
- Softprompts
- Extensions - see the user extensions list
Installation
One-click installers
| Windows | Linux | macOS |
|---|---|---|
| oobabooga-windows.zip | oobabooga-linux.zip | oobabooga-macos.zip |
Just download the zip above, extract it, and double click on "start". The web UI and all its dependencies will be installed in the same folder.
- The source codes are here: https://github.com/oobabooga/one-click-installers
- Huge thanks to @jllllll, @ClayShoaf, and @xNul for their contributions to these installers.
- There is no need to run the installers as admin.
Manual installation using Conda
Recommended if you have some experience with the command-line.
On Windows, I additionally recommend carrying out the installation on WSL instead of the base system: WSL installation guide.
0. Install Conda
https://docs.conda.io/en/latest/miniconda.html
On Linux or WSL, it can be automatically installed with these two commands:
curl -sL "https://repo.anaconda.com/miniconda/Miniconda3-latest-Linux-x86_64.sh" > "Miniconda3.sh"
bash Miniconda3.sh
Source: https://educe-ubc.github.io/conda.html
0.1 (Ubuntu/WSL) Install build tools
sudo apt install build-essential
1. Create a new conda environment
conda create -n textgen python=3.10.9
conda activate textgen
2. Install Pytorch
| System | GPU | Command |
|---|---|---|
| Linux/WSL | NVIDIA | pip3 install torch torchvision torchaudio |
| Linux | AMD | pip3 install torch torchvision torchaudio --index-url https://download.pytorch.org/whl/rocm5.4.2 |
| MacOS + MPS (untested) | Any | pip3 install torch torchvision torchaudio |
The up to date commands can be found here: https://pytorch.org/get-started/locally/.
2.1 Special instructions
- MacOS users: #393
- AMD users: https://rentry.org/eq3hg
3. Install the web UI
git clone https://github.com/oobabooga/text-generation-webui
cd text-generation-webui
pip install -r requirements.txt
Alternative: manual Windows installation
As an alternative to the recommended WSL method, you can install the web UI natively on Windows using this guide. It will be a lot harder and the performance may be slower: Windows installation guide.
Alternative: Docker
ln -s docker/{Dockerfile,docker-compose.yml,.dockerignore} .
cp docker/.env.example .env
# Edit .env and set TORCH_CUDA_ARCH_LIST based on your GPU model
docker compose up --build
You need to have docker compose v2.17 or higher installed in your system. To see how to install docker compose itself, see the guide in here.
Contributed by @loeken in #633
Updating the requirements
From time to time, the requirements.txt changes. To update, use this command:
conda activate textgen
cd text-generation-webui
pip install -r requirements.txt --upgrade
Downloading models
Models should be placed inside the models folder.
Hugging Face is the main place to download models. These are some examples:
You can automatically download a model from HF using the script download-model.py:
python download-model.py organization/model
For example:
python download-model.py facebook/opt-1.3b
If you want to download a model manually, note that all you need are the json, txt, and pytorch*.bin (or model*.safetensors) files. The remaining files are not necessary.
GPT-4chan
GPT-4chan has been shut down from Hugging Face, so you need to download it elsewhere. You have two options:
The 32-bit version is only relevant if you intend to run the model in CPU mode. Otherwise, you should use the 16-bit version.
After downloading the model, follow these steps:
- Place the files under
models/gpt4chan_model_float16ormodels/gpt4chan_model. - Place GPT-J 6B's config.json file in that same folder: config.json.
- Download GPT-J 6B's tokenizer files (they will be automatically detected when you attempt to load GPT-4chan):
python download-model.py EleutherAI/gpt-j-6B --text-only
Starting the web UI
conda activate textgen
cd text-generation-webui
python server.py
Then browse to
http://localhost:7860/?__theme=dark
Optionally, you can use the following command-line flags:
Basic settings
| Flag | Description |
|---|---|
-h, --help |
Show this help message and exit. |
--notebook |
Launch the web UI in notebook mode, where the output is written to the same text box as the input. |
--chat |
Launch the web UI in chat mode. |
--character CHARACTER |
The name of the character to load in chat mode by default. |
--model MODEL |
Name of the model to load by default. |
--lora LORA [LORA ...] |
The list of LoRAs to load. If you want to load more than one LoRA, write the names separated by spaces. |
--model-dir MODEL_DIR |
Path to directory with all the models. |
--lora-dir LORA_DIR |
Path to directory with all the loras. |
--model-menu |
Show a model menu in the terminal when the web UI is first launched. |
--no-stream |
Don't stream the text output in real time. |
--settings SETTINGS_FILE |
Load the default interface settings from this json file. See settings-template.json for an example. If you create a file called settings.json, this file will be loaded by default without the need to use the --settings flag. |
--extensions EXTENSIONS [EXTENSIONS ...] |
The list of extensions to load. If you want to load more than one extension, write the names separated by spaces. |
--verbose |
Print the prompts to the terminal. |
Accelerate/transformers
| Flag | Description |
|---|---|
--cpu |
Use the CPU to generate text. Warning: Training on CPU is extremely slow. |
--auto-devices |
Automatically split the model across the available GPU(s) and CPU. |
--gpu-memory GPU_MEMORY [GPU_MEMORY ...] |
Maxmimum GPU memory in GiB to be allocated per GPU. Example: --gpu-memory 10 for a single GPU, --gpu-memory 10 5 for two GPUs. You can also set values in MiB like --gpu-memory 3500MiB. |
--cpu-memory CPU_MEMORY |
Maximum CPU memory in GiB to allocate for offloaded weights. Same as above. |
--disk |
If the model is too large for your GPU(s) and CPU combined, send the remaining layers to the disk. |
--disk-cache-dir DISK_CACHE_DIR |
Directory to save the disk cache to. Defaults to cache/. |
--load-in-8bit |
Load the model with 8-bit precision. |
--bf16 |
Load the model with bfloat16 precision. Requires NVIDIA Ampere GPU. |
--no-cache |
Set use_cache to False while generating text. This reduces the VRAM usage a bit with a performance cost. |
--xformers |
Use xformer's memory efficient attention. This should increase your tokens/s. |
--sdp-attention |
Use torch 2.0's sdp attention. |
--trust-remote-code |
Set trust_remote_code=True while loading a model. Necessary for ChatGLM. |
llama.cpp
| Flag | Description |
|---|---|
--threads |
Number of threads to use in llama.cpp. |
--n_batch |
Processing batch size for llama.cpp. |
GPTQ
| Flag | Description |
|---|---|
--wbits WBITS |
Load a pre-quantized model with specified precision in bits. 2, 3, 4 and 8 are supported. |
--model_type MODEL_TYPE |
Model type of pre-quantized model. Currently LLaMA, OPT, and GPT-J are supported. |
--groupsize GROUPSIZE |
Group size. |
--pre_layer PRE_LAYER |
The number of layers to allocate to the GPU. Setting this parameter enables CPU offloading for 4-bit models. |
--monkey-patch |
Apply the monkey patch for using LoRAs with quantized models. |
--quant_attn |
(triton) Enable quant attention. |
--warmup_autotune |
(triton) Enable warmup autotune. |
--fused_mlp |
(triton) Enable fused mlp. |
FlexGen
| Flag | Description |
|---|---|
--flexgen |
Enable the use of FlexGen offloading. |
--percent PERCENT [PERCENT ...] |
FlexGen: allocation percentages. Must be 6 numbers separated by spaces (default: 0, 100, 100, 0, 100, 0). |
--compress-weight |
FlexGen: Whether to compress weight (default: False). |
--pin-weight [PIN_WEIGHT] |
FlexGen: whether to pin weights (setting this to False reduces CPU memory by 20%). |
DeepSpeed
| Flag | Description |
|---|---|
--deepspeed |
Enable the use of DeepSpeed ZeRO-3 for inference via the Transformers integration. |
--nvme-offload-dir NVME_OFFLOAD_DIR |
DeepSpeed: Directory to use for ZeRO-3 NVME offloading. |
--local_rank LOCAL_RANK |
DeepSpeed: Optional argument for distributed setups. |
RWKV
| Flag | Description |
|---|---|
--rwkv-strategy RWKV_STRATEGY |
RWKV: The strategy to use while loading the model. Examples: "cpu fp32", "cuda fp16", "cuda fp16i8". |
--rwkv-cuda-on |
RWKV: Compile the CUDA kernel for better performance. |
Gradio
| Flag | Description |
|---|---|
--listen |
Make the web UI reachable from your local network. |
--listen-host LISTEN_HOST |
The hostname that the server will use. |
--listen-port LISTEN_PORT |
The listening port that the server will use. |
--share |
Create a public URL. This is useful for running the web UI on Google Colab or similar. |
--auto-launch |
Open the web UI in the default browser upon launch. |
--gradio-auth-path GRADIO_AUTH_PATH |
Set the gradio authentication file path. The file should contain one or more user:password pairs in this format: "u1:p1,u2:p2,u3:p3" |
API
| Flag | Description |
|---|---|
--api |
Enable the API extension. |
--public-api |
Create a public URL for the API using Cloudfare. |
Out of memory errors? Check the low VRAM guide.
Presets
Inference settings presets can be created under presets/ as text files. These files are detected automatically at startup.
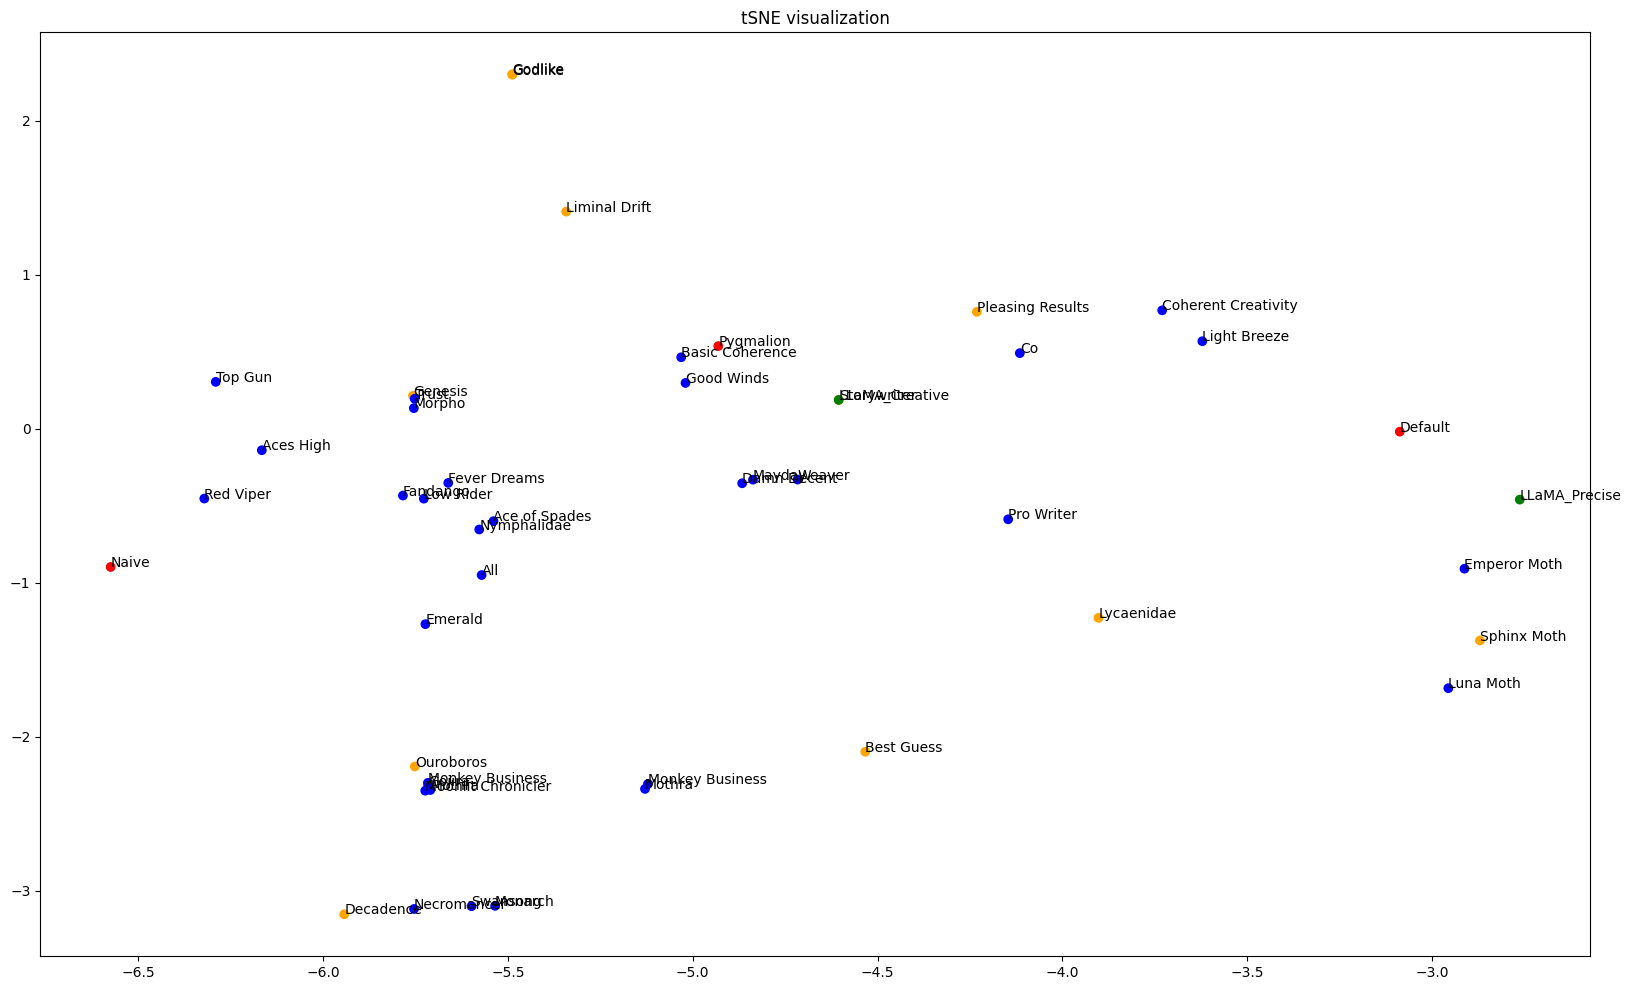
By default, 10 presets by NovelAI and KoboldAI are included. These were selected out of a sample of 43 presets after applying a K-Means clustering algorithm and selecting the elements closest to the average of each cluster.
System requirements
Check the wiki for some examples of VRAM and RAM usage in both GPU and CPU mode.
Contributing
Pull requests, suggestions, and issue reports are welcome.
You are also welcome to review open pull requests.
Before reporting a bug, make sure that you have:
- Created a conda environment and installed the dependencies exactly as in the Installation section above.
- Searched to see if an issue already exists for the issue you encountered.
Credits
- Gradio dropdown menu refresh button, code for reloading the interface: https://github.com/AUTOMATIC1111/stable-diffusion-webui
- Verbose preset: Anonymous 4chan user.
- NovelAI and KoboldAI presets: https://github.com/KoboldAI/KoboldAI-Client/wiki/Settings-Presets
- Code for early stopping in chat mode, code for some of the sliders: https://github.com/PygmalionAI/gradio-ui/