前几天在社区投稿了GOAD靶场的writeup:域渗透GOAD(Game Of Active Directory) v2(一)域渗透GOAD(Game Of Ac 2023-2-17 17:1:0 Author: xz.aliyun.com(查看原文) 阅读量:605 收藏
前几天在社区投稿了GOAD靶场的writeup:
域渗透GOAD(Game Of Active Directory) v2(一)
域渗透GOAD(Game Of Active Directory) v2(二)
域渗透GOAD(Game Of Active Directory) v2(三)
域渗透GOAD(Game Of Active Directory) v2(四)
应师傅们的留言要求,在这里把靶场的搭建过程详细写一下
按照README中的说法,整个搭建过程分两步:
- providing : it is made with vagrant, it download and run empty windows box.
- provisioning : it is made with ansible, it will install all the stuff to make the lab running like an active directory network
翻译一下就是,使用vagrant来创建各个虚拟机(虚拟化平台可以选择VirtualBox和VMware),使用ansible自动化配置各虚拟机内的环境
vagrant阶段比较简单,创建虚拟机就行了,而ansible阶段需要与windows虚拟机进行大量的交互,很容易失败
官方是推荐在Linux搭建的,考虑到很多师傅只有Windows的物理机,我把在两个平台搭建的方法都写详细一些
如果准备在Windows上搭建的师傅,建议也看一下Linux的部分,有些对步骤和命令的说明
在Linux上搭建
我的环境:
- Ubuntu 16.04
- Intel Xeon Silver 4210R CPU @ 2.40GHz
- 64G 内存
在Linux上没有安装VMware的经验,所以这里的虚拟化平台我就选择VirtualBox。
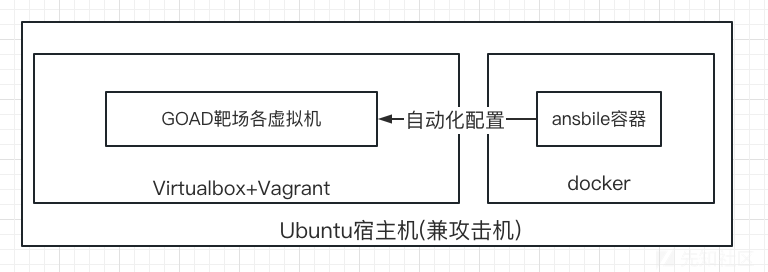
架构如下,需要在宿主机安装virtualbox+vagrant(管理靶机)和docker(安装ansible):
1.安装virtualbox
官方文档:https://www.virtualbox.org/wiki/Linux_Downloads
sudo apt install virtualbox virtualbox-ext-pack

2.安装vagrant
官方文档:https://developer.hashicorp.com/vagrant/downloads
不要直接sudo apt install vagrant 因为ubuntu默认源里的vagrant是1.8.1版本 太旧了 最新版已经是2.3.4了

可以添加vagrant的源然后安装
wget -O- https://apt.releases.hashicorp.com/gpg | gpg --dearmor | sudo tee /usr/share/keyrings/hashicorp-archive-keyring.gpg
echo "deb [signed-by=/usr/share/keyrings/hashicorp-archive-keyring.gpg] https://apt.releases.hashicorp.com $(lsb_release -cs) main" | sudo tee /etc/apt/sources.list.d/hashicorp.list
sudo apt update && sudo apt install vagrant
也可以直接下载安装包
wget https://releases.hashicorp.com/vagrant/2.3.4/vagrant_2.3.4-1_amd64.deb
sudo dpkg -i vagrant_2.3.4-1_amd64.deb

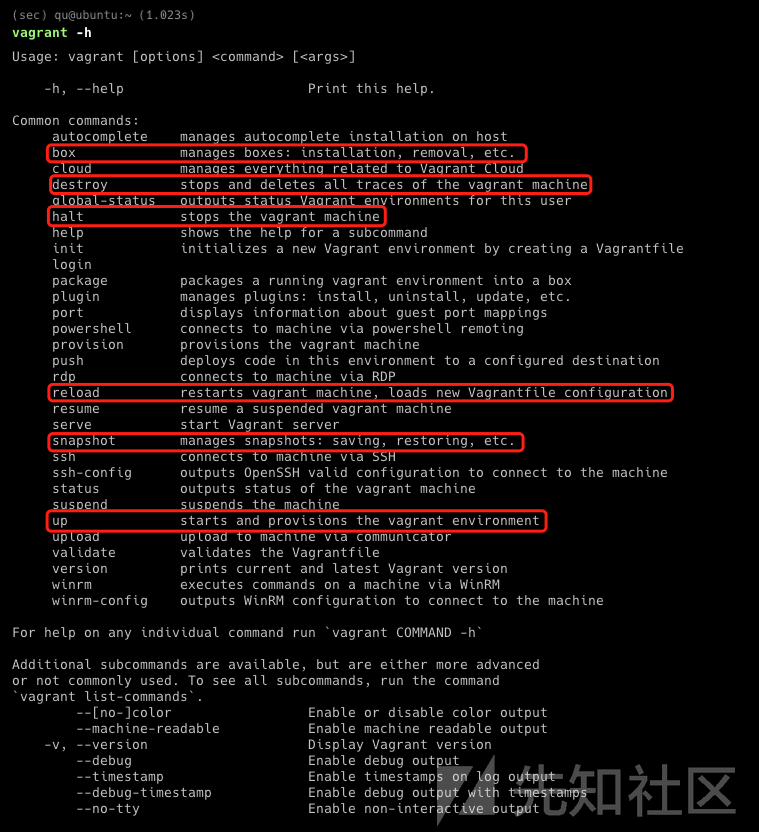
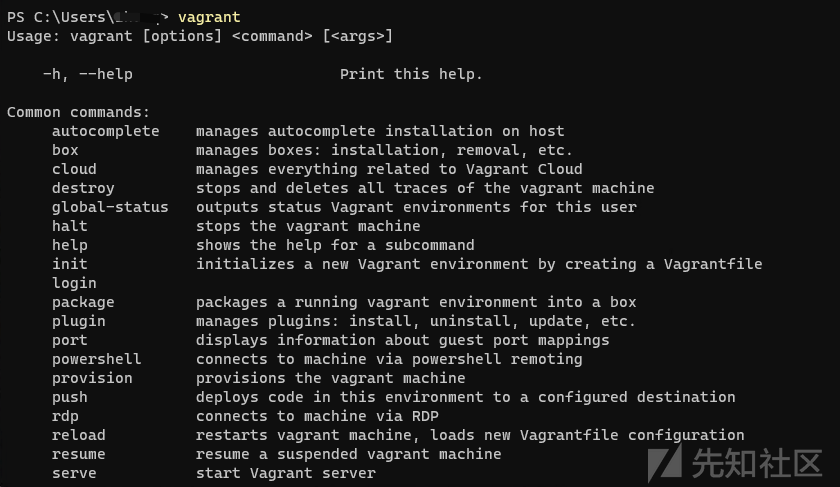
这里顺便说几个vagrant的常用命令
- vagrant box 查看/管理下载的各个虚拟机镜像
- vagrant up/halt/reload/destroy 按照vagrantfile 启动/关闭/重启/删除 虚拟机环境
- vagrant snapshot 查看/管理各个虚拟机的快照
3.克隆GOAD仓库
git clone https://github.com/Orange-Cyberdefense/GOAD.git

# 嫌慢的话可以用加速地址,这个加速地址也支持IPV6,还是很爽的
git clone https://proxy.zyun.vip/https://github.com/Orange-Cyberdefense/GOAD.git
4.修改Vagrantfile配置文件
切换到GOAD目录下,有一个Vagrantfile文件,下边是最新版的默认配置内容:
Vagrant.configure("2") do |config|

# Uncomment this depending on the provider you want to use
ENV['VAGRANT_DEFAULT_PROVIDER'] = 'virtualbox'
# ENV['VAGRANT_DEFAULT_PROVIDER'] = 'vmware_desktop'

boxes = [
  # windows server 2022 : don't work for now
  #{ :name => "DC01",  :ip => "192.168.56.10", :box => "StefanScherer/windows_2022", :box_version => "2021.08.23", :os => "windows"},
  # windows server 2019
  { :name => "DC01",  :ip => "192.168.56.10", :box => "StefanScherer/windows_2019", :box_version => "2021.05.15", :os => "windows"},
  # windows server 2019
  { :name => "DC02",  :ip => "192.168.56.11", :box => "StefanScherer/windows_2019", :box_version => "2021.05.15", :os => "windows"},
  # windows server 2016
  { :name => "DC03",  :ip => "192.168.56.12", :box => "StefanScherer/windows_2016", :box_version => "2017.12.14", :os => "windows"},
  # windows server 2019
  #{ :name => "SRV01", :ip => "192.168.56.21", :box => "StefanScherer/windows_2019", :box_version => "2020.07.17", :os => "windows"},
  # windows server 2019
  { :name => "SRV02", :ip => "192.168.56.22", :box => "StefanScherer/windows_2019", :box_version => "2020.07.17", :os => "windows"},
  # windows server 2016
  { :name => "SRV03", :ip => "192.168.56.23", :box => "StefanScherer/windows_2016", :box_version => "2019.02.14", :os => "windows"}
  # ELK
# { :name => "elk", :ip => "192.168.56.50", :box => "bento/ubuntu-18.04", :os => "linux",
#   :forwarded_port => [
#     {:guest => 22, :host => 2210, :id => "ssh"}
#   ]
# }
]

# BUILD with a full up to date vm if you don't want version with old vulns
# ansible versions boxes : https://app.vagrantup.com/jborean93
# boxes = [
#   # windows server 2019
#   { :name => "DC01",  :ip => "192.168.56.10", :box => "jborean93/WindowsServer2019", :os => "windows"},
#   # windows server 2019
#   { :name => "DC02",  :ip => "192.168.56.11", :box => "jborean93/WindowsServer2019", :os => "windows"},
#   # windows server 2016
#   { :name => "DC03",  :ip => "192.168.56.12", :box => "jborean93/WindowsServer2016", :os => "windows"},
#   # windows server 2019
#   { :name => "SRV02", :ip => "192.168.56.22", :box => "jborean93/WindowsServer2019", :os => "windows"},
#   # windows server 2016
#   { :name => "SRV03", :ip => "192.168.56.23", :box => "jborean93/WindowsServer2016", :os => "windows"}
# ]

  config.vm.provider "virtualbox" do |v|
    v.memory = 4000
    v.cpus = 2
  end

  config.vm.provider "vmware_desktop" do |v|
    v.vmx["memsize"] = "4000"
    v.vmx["numvcpus"] = "2"
  end

  # disable rdp forwarded port inherited from StefanScherer box
  config.vm.network :forwarded_port, guest: 3389, host: 3389, id: "rdp", auto_correct: true, disabled: true

  # no autoupdate if vagrant-vbguest is installed
  if Vagrant.has_plugin?("vagrant-vbguest") then
    config.vbguest.auto_update = false
  end

  config.vm.boot_timeout = 600
  config.vm.graceful_halt_timeout = 600
  config.winrm.retry_limit = 30
  config.winrm.retry_delay = 10

  boxes.each do |box|
    config.vm.define box[:name] do |target|
      # BOX
      target.vm.provider "virtualbox" do |v|
        v.name = box[:name]
      end
      target.vm.box_download_insecure = box[:box]
      target.vm.box = box[:box]
      if box.has_key?(:box_version)
        target.vm.box_version = box[:box_version]
      end

      # issues/49
      target.vm.synced_folder '.', '/vagrant', disabled: true

      # IP
      target.vm.network :private_network, ip: box[:ip]

      # OS specific
      if box[:os] == "windows"
        target.vm.guest = :windows
        target.vm.communicator = "winrm"
        target.vm.provision :shell, :path => "vagrant/Install-WMF3Hotfix.ps1", privileged: false
        target.vm.provision :shell, :path => "vagrant/ConfigureRemotingForAnsible.ps1", privileged: false

        # fix ip for vmware
        if ENV['VAGRANT_DEFAULT_PROVIDER'] == "vmware_desktop"
          target.vm.provision :shell, :path => "vagrant/fix_ip.ps1", privileged: false, args: box[:ip]
        end

      else
        target.vm.communicator = "ssh"
      end

      if box.has_key?(:forwarded_port)
        # forwarded port explicit
        box[:forwarded_port] do |forwarded_port|
          target.vm.network :forwarded_port, guest: forwarded_port[:guest], host: forwarded_port[:host], host_ip: "127.0.0.1", id: forwarded_port[:id]
        end
      end

    end
  end
end
- 如果需要开启ELK虚拟机看一下采集的日志的话,需要将23-27行取消注释(别忘了再21行最后加逗号)
- 重点是改一下46、47行的配置,如果你的宿主机硬件条件一般的话,每个虚拟机1C2G就可以了
- 其他的不用修改
5.创建虚拟机
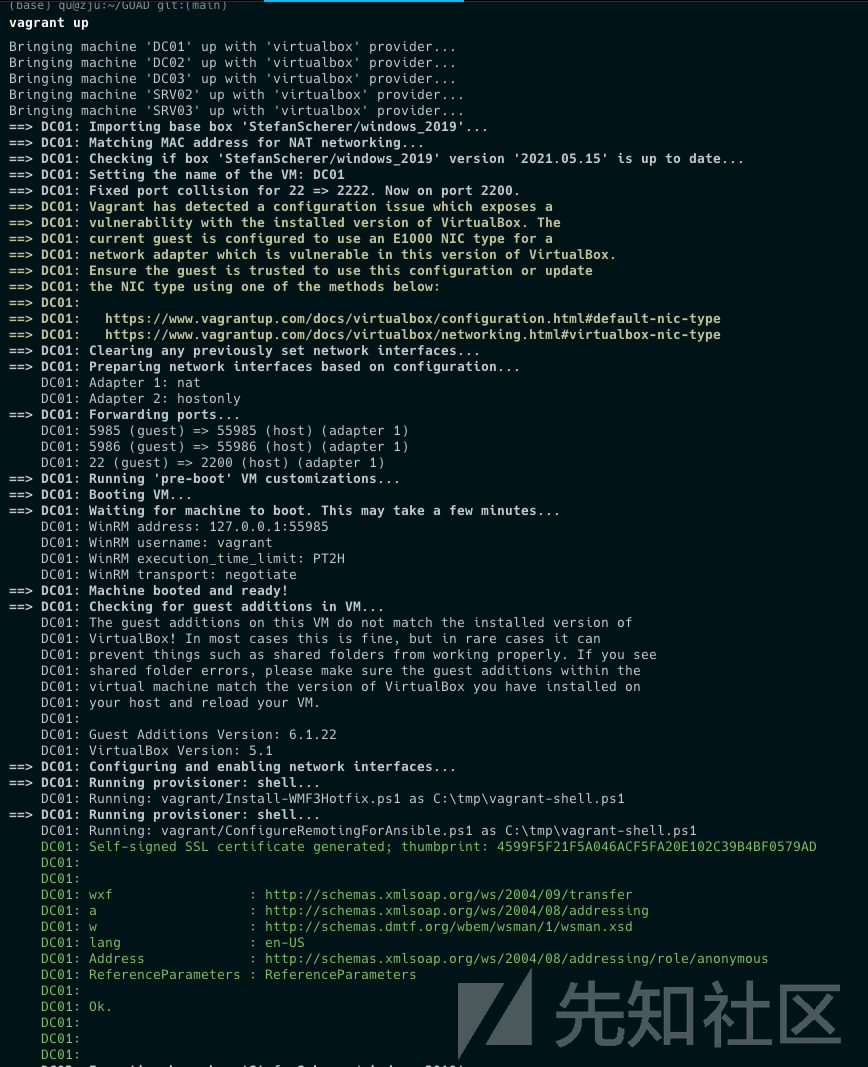
切换到GOAD目录下,执行该命令即可。
如果是第一次搭建的话,会自动下载镜像文件,如果网速比较慢,建议挂screen/tmux来执行。

最终如下,五个虚拟机已经创建完成:

可以通过如下命令查看下载的镜像,当然你想修改的话把list换成remove等,具体看帮助手册

这里我安装过多次,可能有旧版本的,跟我不一样也没关系,缺的镜像会自动下载的。
6.构建ansible的docker镜像
这一步可能也比较慢,可以跟上一步同时弄。
前边说过了,ansible是用于自动化配置各虚拟机内的环境的,这里我推荐用docker的形式来搭建ansible
直接build即可:
# 没有docker的话先安装:https://developer.aliyun.com/article/110806
docker build -t goadansible .
如果嫌慢的话提前修改Dockerfile,换成清华或者其他的源
RUN sed -i 's/http:\/\/archive\.ubuntu\.com\/ubuntu\//http:\/\/mirrors\.tuna\.tsinghua\.edu\.cn\/ubuntu\//g' /etc/apt/sources.list
RUN sed -i 's/http:\/\/security\.ubuntu\.com\/ubuntu\//http:\/\/mirrors\.tuna\.tsinghua\.edu\.cn\/ubuntu\//g' /etc/apt/sources.list

RUN pip config set global.index-url https://pypi.tuna.tsinghua.edu.cn/simple

当然也可以直接拉取我的镜像:
docker pull registry.cn-hangzhou.aliyuncs.com/u21h2/goadansible
docker tag registry.cn-hangzhou.aliyuncs.com/u21h2/goadansible ansible
7.使用ansible配置虚拟机内环境
- 首先尝试执行ansible-playbook main.yml
- 错误较少的话重复执行ansible-playbook main.yml
- 错误较多的话逐一执行main.yml中的各个yml
- 仍然不成功的话,重启/重装虚拟机,检查计算资源
- 直到最终输出只有ok和changed
ansible目录的main.yml内容如下:
---
# Prepare servers
- import_playbook: build.yml
# Add monitoring
#- import_playbook: elk.yml # 如果开启ELK虚拟机的话这个得取消注释掉
# --------------------------------------------------------------------
# VM ready - start insert specific scenario
# --------------------------------------------------------------------
# Turn server into DC and load active directory data (users/groups/ou)
#- import_playbook: ad.yml
# create main domains, child domain and enroll servers

## AD ----------
- import_playbook: ad-servers.yml
# create the trust relationships
- import_playbook: ad-trusts.yml
# import the ad datas : users/groups...
- import_playbook: ad-data.yml
# install LAPS
- import_playbook: laps.yml
## MSSQL + IIS  ----------
# configure servers vulns (done in the middle of ad install to let time before install relations and acl)
#- import_playbook: servers.yml
## AD - servers localgroup + rdp + inter domain relations & acl
# set the rights and the group domains relations
- import_playbook: ad-relations.yml
# set adcs
- import_playbook: adcs.yml
# set the ACL
- import_playbook: ad-acl.yml

## SERVERS ---------
### MSSQL + IIS  ----------
# configure servers vulns (done in the midle of ad install to let time before install relations and acl)
- import_playbook: servers.yml

## SECURITY -----
# --------------------------------------------------------------------
# specifics security linked to the scenario are here
- import_playbook: security.yml
# --------------------------------------------------------------------
# specifics vulns linked to the scenario are here
- import_playbook: vulnerabilities.yml
官方给的命令如下,也就是执行所有的yml,我们直接在GOAD目录下这么执行即可
docker run -ti --rm --network host -h goadansible -v $(pwd):/goad -w /goad/ansible goadansible ansible-playbook main.yml
这是比较顺利的情况:

这是失败后又自动重试成功的:

这是失败的样子:


所以,不出意外的话,等一段时间之后,会出现一些失败项,重新执行该ansible命令即可
直到最后全都是ok和changed

如果还没出现最终结果,你就已经看到大量的失败输出了,也可以提前中止并重新运行。
前边说到我们有DC01-03、SRC02-03共五个虚拟机,这个ansible运行的逻辑是:假设在最开始的build.yml过程中DC01出现了错误,那么后面所有的yml都会忽略DC01。所以如果你配置的时候,反复执行还有一直有错误的话,就得将main.yml中的文件按顺序逐个执行了。
Or you can run playbooks one by one (mostly for debug or if you get trouble during install)
The main.yml playbook is build in multiples parts. each parts can be re-run independently but the play order must be keep in cas you want to play one by one
docker run -ti --rm --network host -h goadansible -v $(pwd):/goad -w /goad/ansible goadansible ansible-playbook build.yml        # Install stuff and prepare vm
docker run -ti --rm --network host -h goadansible -v $(pwd):/goad -w /goad/ansible goadansible ansible-playbook ad-servers.yml   # create main domains, child domain and enroll servers
docker run -ti --rm --network host -h goadansible -v $(pwd):/goad -w /goad/ansible goadansible ansible-playbook ad-trusts.yml    # create the trust relationships
docker run -ti --rm --network host -h goadansible -v $(pwd):/goad -w /goad/ansible goadansible ansible-playbook ad-data.yml      # import the ad datas : users/groups...
docker run -ti --rm --network host -h goadansible -v $(pwd):/goad -w /goad/ansible goadansible ansible-playbook laps.yml
docker run -ti --rm --network host -h goadansible -v $(pwd):/goad -w /goad/ansible goadansible ansible-playbook ad-relations.yml # set the rights and the group domains relations
docker run -ti --rm --network host -h goadansible -v $(pwd):/goad -w /goad/ansible goadansible ansible-playbook adcs.yml         # Install ADCS on essos
docker run -ti --rm --network host -h goadansible -v $(pwd):/goad -w /goad/ansible goadansible ansible-playbook ad-acl.yml       # set the ACE/ACL
docker run -ti --rm --network host -h goadansible -v $(pwd):/goad -w /goad/ansible goadansible ansible-playbook servers.yml      # Install IIS and MSSQL
docker run -ti --rm --network host -h goadansible -v $(pwd):/goad -w /goad/ansible goadansible ansible-playbook security.yml     # Configure some securities (adjust av enable/disable)
docker run -ti --rm --network host -h goadansible -v $(pwd):/goad -w /goad/ansible goadansible ansible-playbook vulnerabilities.yml        # Configure some vulnerabilities
如果逐个执行还有问题的话:
- 考虑使用vagrant命令将虚拟机重启/删除重装
- 检查计算资源是否不足(参见本文最后面)
8.测试
我个人更习惯在Linux下发起渗透测试,所以就在宿主机上进行,当然也可以另外创建虚拟机或者socks代理到别的机器上搞。
!!!不管在哪执行渗透测试 记得参考我写的Writeup 设置各机器的hosts
部署完成之后 可以使用nmap、cme、fscan等工具来检查一下(上一步如果都是ok和changed话,一般问题不大)
参考https://xz.aliyun.com/t/12137 0x01 Reconnaissance and Scan 侦查和扫描
nmap -Pn -p- -sC -sV -oA full_scan_goad 192.168.56.10-12,22-23

9.创建快照
刚部署完成可以创建一份快照,避免后边把靶场打坏了,重新部署又很费劲,有了快照就可以直接恢复
在Windows上搭建
我的环境:
- Windows 11
- Intel Core i5-12490f CPU @ 3.00GHz
- 32G 内存
我也选择用免费且轻量的virtualbox来部署,如果用VMWare的话可以按README来探索一下(额外安装VMware Utility等)
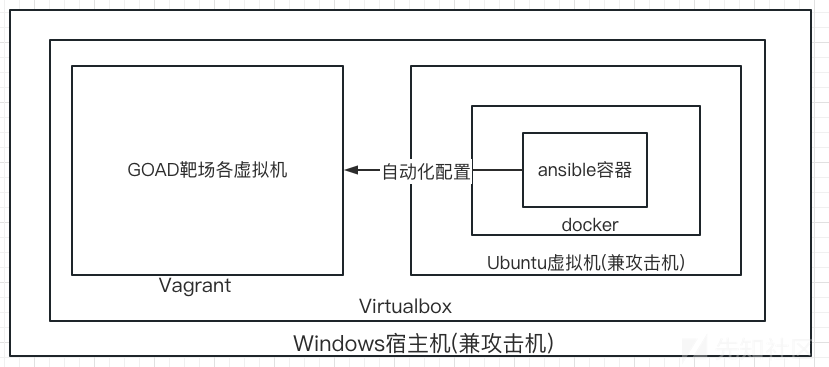
在windows上我会额外创建一个虚拟机,用于安装ansible并作为攻击机
这个图是有些套娃的意思了:
1.安装virtualbox
官网:https://www.virtualbox.org/wiki/Downloads
下载最新版安装:https://download.virtualbox.org/virtualbox/7.0.6/VirtualBox-7.0.6-155176-Win.exe
安装后修改虚拟机安装位置,不然会安装到C盘:

2.安装vagrant
官网:https://developer.hashicorp.com/vagrant/downloads
下载最新版安装:https://releases.hashicorp.com/vagrant/2.3.4/vagrant_2.3.4_windows_amd64.msi
在Vagrant中添加box时,加载目录默认在 ~/.vagrant.d/,具体的目录结构是C:\Users\YourUsername.vagrant.d\
所以也需要修改vagrant的工作目录(存放镜像):
setx VAGRANT_HOME "/your/path" # 用户
setx VAGRANT_HOME "/your/path" /M # 系统
可以看到我这设置到了G盘
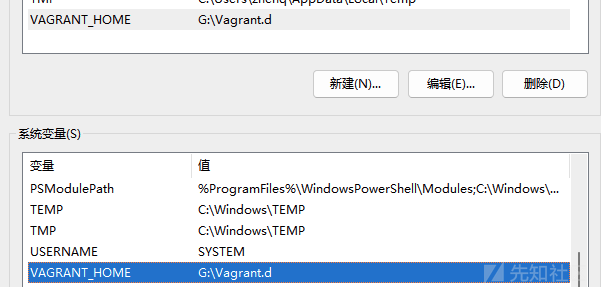
如果之前已经设定且下载了一些镜像,需要迁移的话参考这篇文章:https://blog.csdn.net/li_xue_zhao/article/details/100095040
3.克隆GOAD仓库
在windows下安装git就不说了,也可以直接下载zip包
git clone https://github.com/Orange-Cyberdefense/GOAD.git

# 嫌慢的话可以用加速地址,这个加速地址也支持IPV6,还是很爽的
git clone https://proxy.zyun.vip/https://github.com/Orange-Cyberdefense/GOAD.git
4.修改Vagrantfile配置文件
完全同Linux,按实际计算资源来调整
5.创建虚拟机
完全同Linux 直接vagrant up

可以看到虚拟机和镜像都在我们设定的目录下:


6.(不推荐)在宿主机构建ansible的docker镜像并配置靶场环境
可以在宿主机安装docker-desktop 然后构建ansible镜像
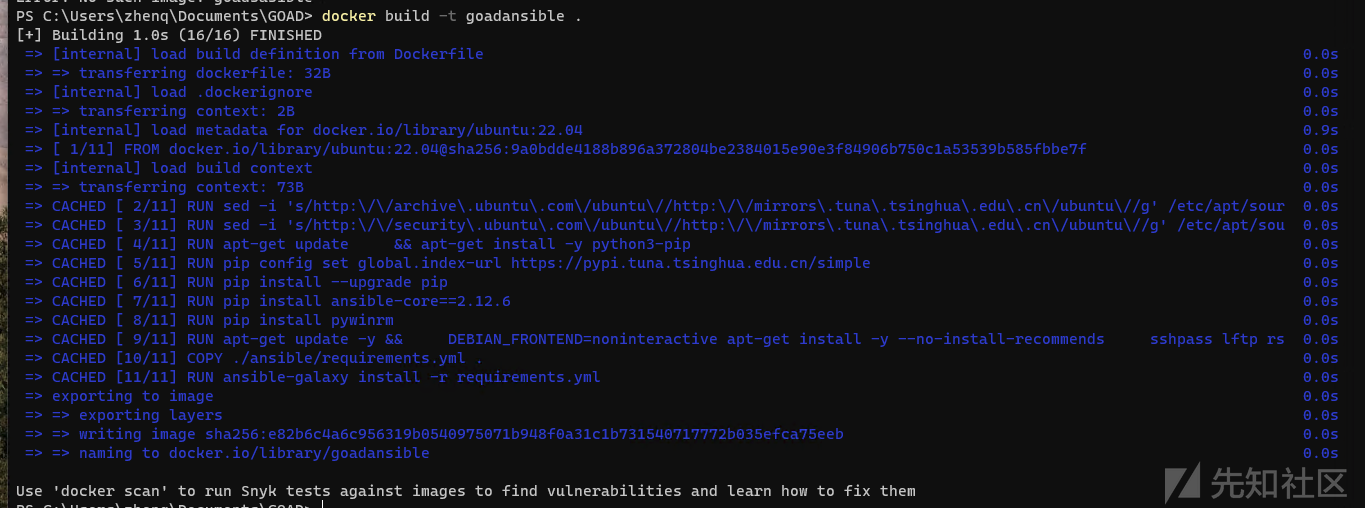
或者直接拉取我的镜像:
docker pull registry.cn-hangzhou.aliyuncs.com/u21h2/goadansible
docker tag registry.cn-hangzhou.aliyuncs.com/u21h2/goadansible ansible
在linux下我们可以使用$(pwd)来将当前目录挂载进容器内
docker run -ti --rm --network host -h goadansible -v $(pwd):/goad -w /goad/ansible goadansible ansible-playbook main.yml
在windows下需要写绝对路径,而且要注意格式,如C:\Users\YourUsername\Documents\GOAD → /c/Users/YourUsername/Documents/GOAD
docker run -ti --rm --network host -h goadansible -v /c/Users/YourUsername/Documents/GOAD:/goad -w /goad/ansible goadansible ansible-playbook main.yml
(如果使用旧版本的docker-desktop可能还需要在docker控制台提前设置共享目录
这时候惊奇地发现docker创建的ansible实例与virtualbox启动的虚拟机的网络并不连通

同样选择host模式,为什么在ubuntu宿主机上的docker可以把所有网卡都挂进容器,而windows上的docker并没有?
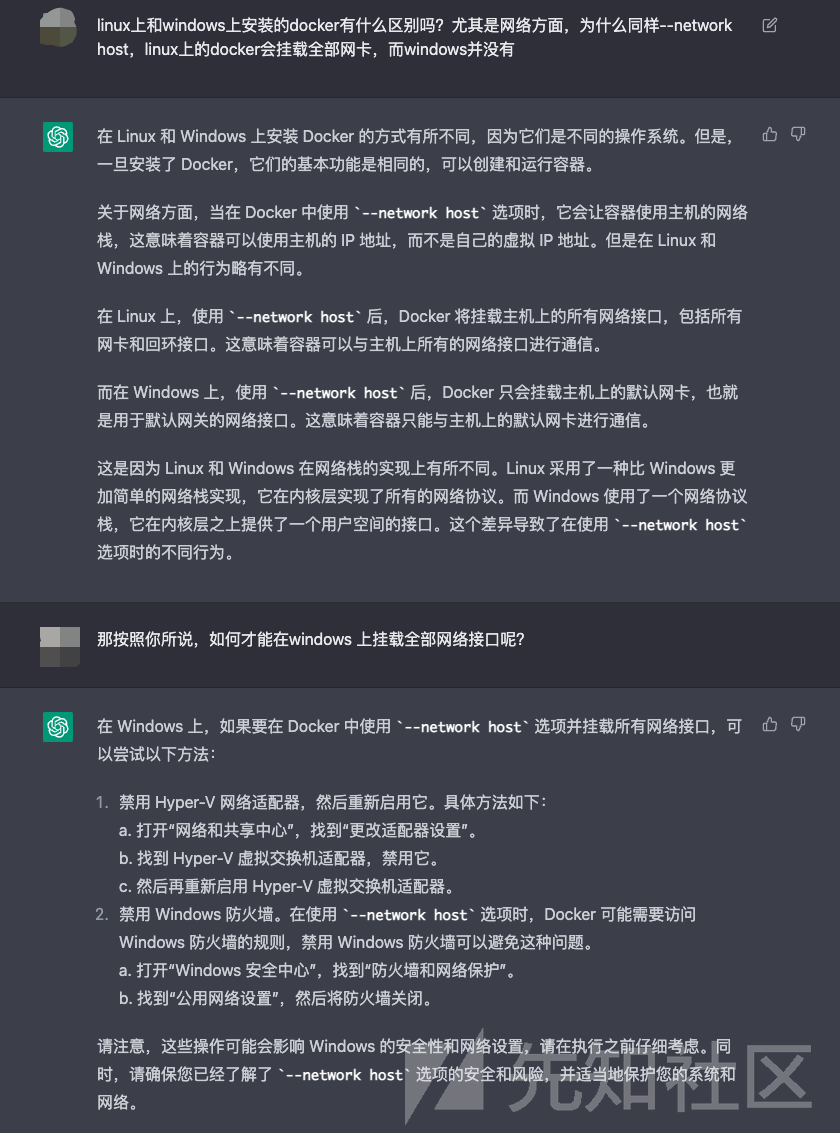
chatgpt给了原因和一个潜在的方案,不过我没有试
我猜可以直接给docker挂上virtualbox的网卡?
~~docker run --net=host-only-network-of-virtualbox ... ...~~
不过我更喜欢”简单粗暴”的办法:
使用virtualbox创建一个ubuntu虚拟机,在虚拟机内安装ansible并完成对靶场的自动化配置;更令我心动的是,该ubuntu虚拟机后续也可以当做攻击机
7.(推荐)创建ubuntu虚拟机(安装ansible)并配置靶场环境
(1)创建ubuntu虚拟机 跟windows靶机一样挂载上网卡
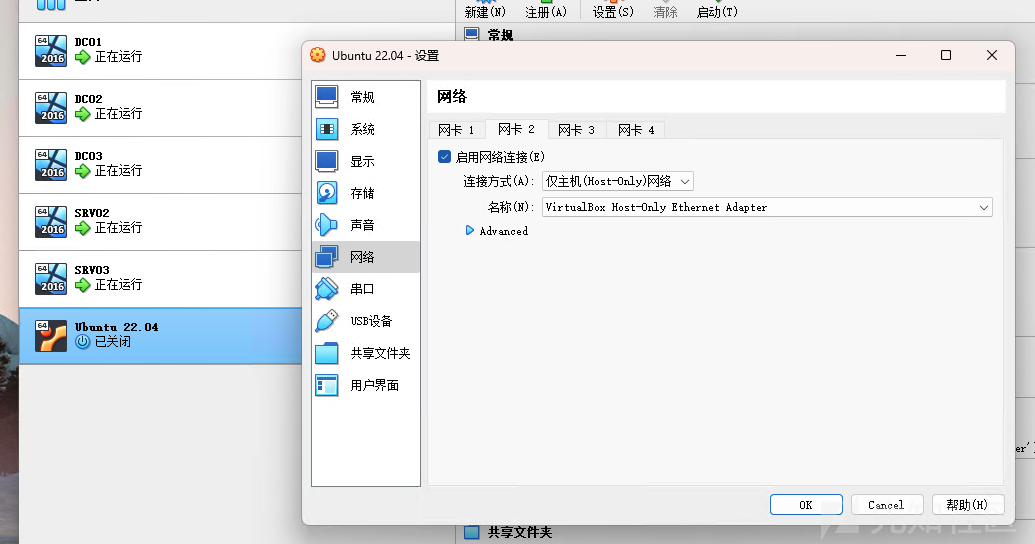
(2)在虚拟机内安装docker
https://developer.aliyun.com/article/110806
curl -fsSL https://get.docker.com | bash -s docker --mirror Aliyun

(3)克隆GOAD仓库并构建goadansible
git clone https://github.com/Orange-Cyberdefense/GOAD.git
cd GOAD
docker build -t goadansible .
或者直接拉取我的镜像
docker pull registry.cn-hangzhou.aliyuncs.com/u21h2/goadansible
docker tag registry.cn-hangzhou.aliyuncs.com/u21h2/goadansible ansible

(4)使用ansible配置虚拟机内环境
这里步骤跟Linux下的相同
- 首先尝试执行ansible-playbook main.yml
- 错误较少的话重复执行ansible-playbook main.yml
- 错误较多的话逐一执行main.yml中的各个yml
- 仍然不成功的话,重启/重装虚拟机,检查计算资源
- 直到最终输出只有ok和changed

8.测试
后续在windows宿主机和ubuntu虚拟机内展开攻击都可以
可以在windows上用rdp测测连通性

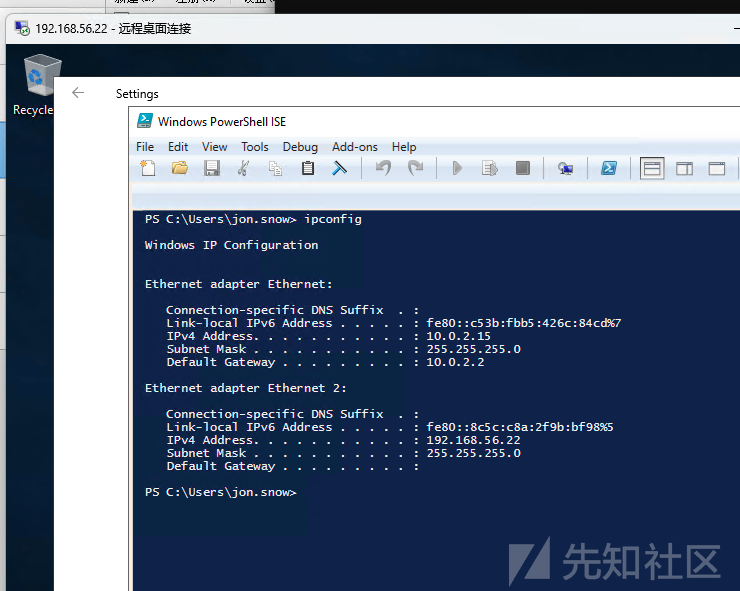
也可以在ubuntu攻击机内测一下各种命令
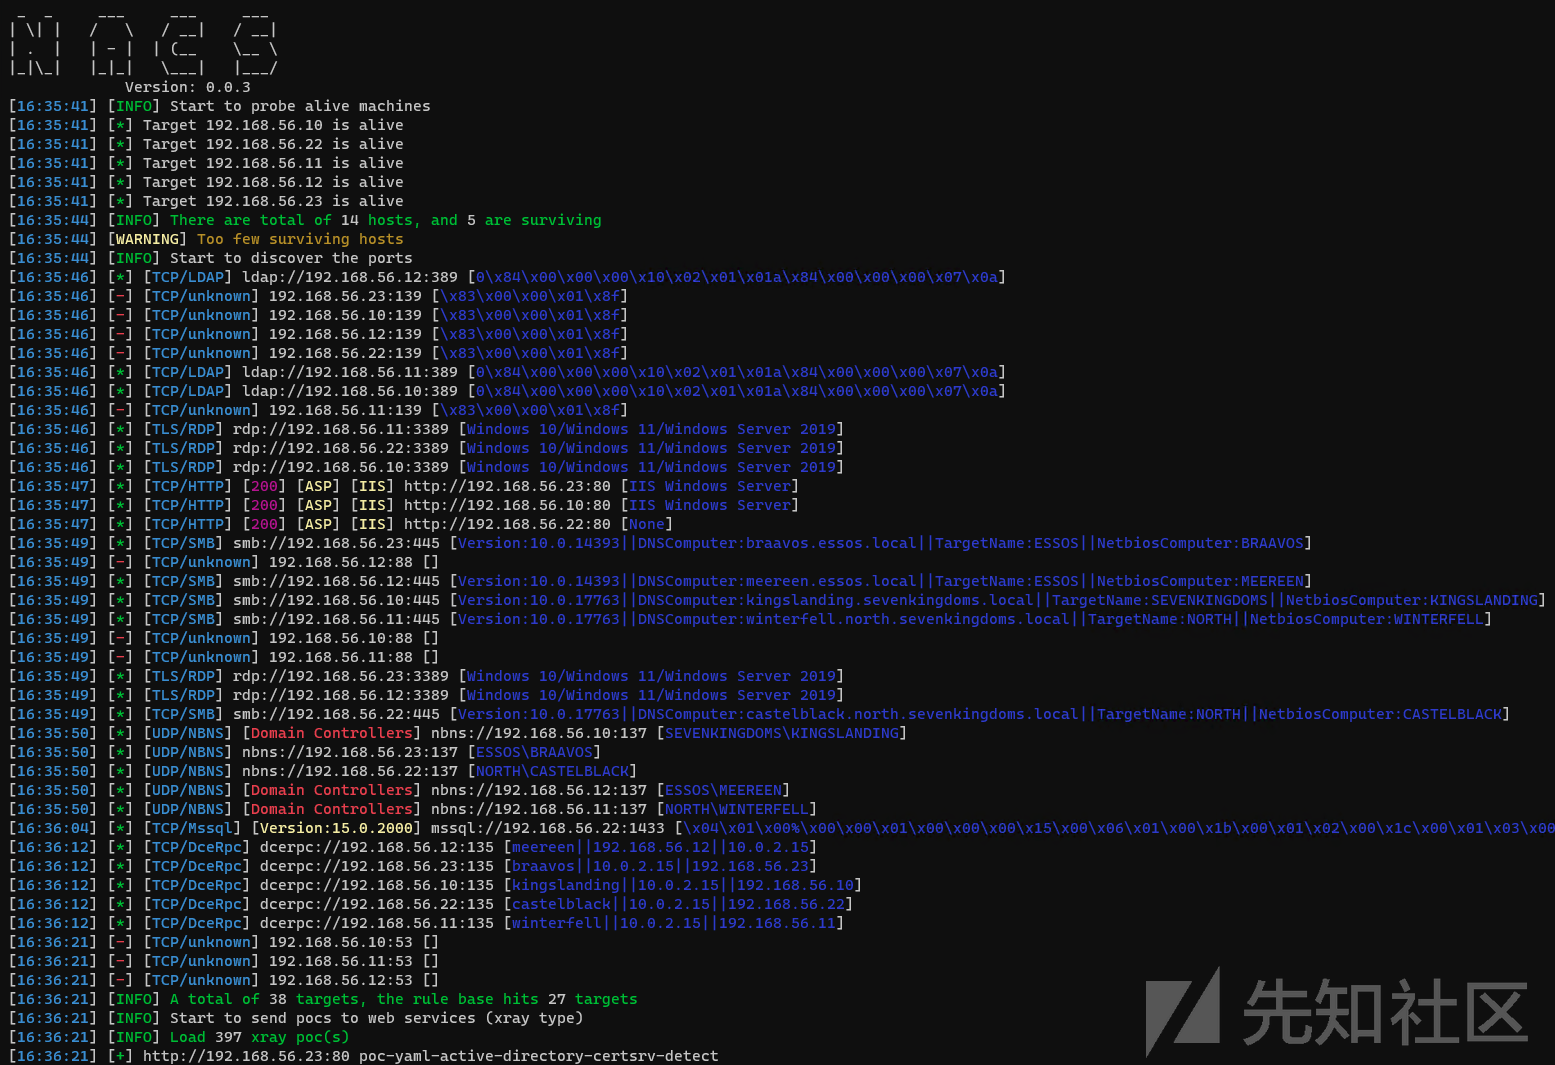
9.创建快照
刚部署完成可以创建一份快照,避免后边把靶场打坏了,重新部署又很费劲,有了快照就可以直接恢复
当然也可以使用virtualbox直接导出备份

搭建失败可能原因
TL;DR: 可能不是计算资源分配少了,而是分多了
我刚开始是在实验室的Linux服务器上搭建的靶场,ansible配置阶段比较顺利,执行一两次main.yml就完成了
后来学校的服务器宕机了而且寒假没法修理,我就被迫在windows小主机上重新搭建环境
在windows上我给每个虚拟机分配的资源是2C4G,我的windows小主机是12C32G,我觉地一共开五个虚拟机的话,资源也是够用的(在资源管理器也没有发现CPU和内存占用一直非常高的情况)
但是在ansible阶段我一直遇到问题,最频繁的就是卡在了Gathing Facts阶段,我将main.yml中的各个yml逐一执行也是不行(后来甚至对每个虚拟机逐一执行,如DC01),中间反复重启/重置虚拟机,挣扎了几天仍然没有解决问题

后来我通过virtualbox的控制台留意到虚拟机内的时间不一致,最离谱的情况能差两分钟
比如DC01现在是7:45
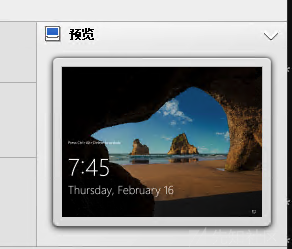
而DC02却是

这给我一定的启发:会不会是我给每个虚拟机分配的资源太多了,各个虚拟机在竞争超额分配的计算资源?时间都不同步了,这么离谱的吗??

我将每个虚拟机分配的资源由2C4G调整到了1C2G,之后各虚拟机的时间就都同步了,而且ansible配置阶段也非常顺利了
可以看一下我提的issue: https://github.com/Orange-Cyberdefense/GOAD/issues/79
总结
我在中文互联网上没有找到GOAD靶场的其他Writeup,估计就是它比较难搭的问题吧。。。祝各位师傅搭建顺利,有问题可以留言交流下~
如有侵权请联系:admin#unsafe.sh