介绍
使用 Telegram 提供的 Bot Webhook 将消息数据传递至托管在 Google Apps Script 的 Javascript 脚本处理,实现一些简单的功能。
Webhook: 向 Telegram 设置回调 url,机器人察觉到任何行为,Telegram 就会把行为 Json 数据 Post 到你设定的 url 。
Google Apps Script: https://script.google.com
Telegram Bot API:https://core.telegram.org/bots/api/
提前准备
-
Telegram 账号
-
Google 账号
-
Javascript 的基础知识
创建机器人
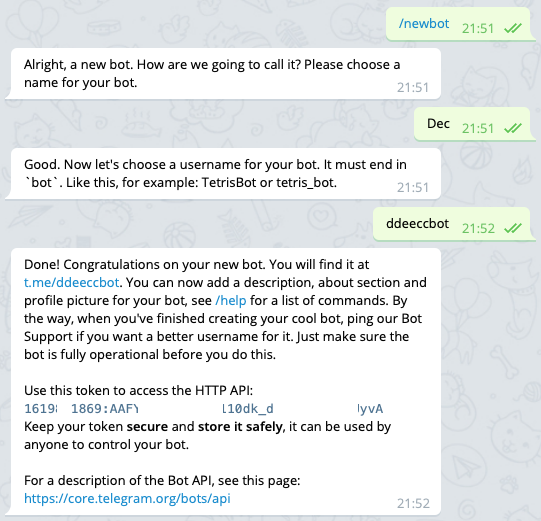
打开 Telegram 向 @botfather 发送 /newbot 命令
依次发送机器人名称、机器人用户名(一旦确认无法修改)
机器人就创建成功了,你会得到机器人的 token (后面要用到)

新建脚本
打开 Google Apps Script 新建项目,复制以下代码到新建项目中
var token = '机器人token';
// only need to run once
function setWebhook() {
// only to create permission
let drive = DriveApp.getRootFolder();let Bot = new TelegramBot();
let result = Bot.request('setWebhook', {
url: 'script.google部署链接'
});
Logger.log(result);
}// Global variable to store post data from telegram
var TelegramData;
function doPost(e) {
// check valid request
if (!validRequest_(e)) return;let Bot = new TelegramBot();
let Cmd = TelegramData.message.text;// Start process request
if (Cmd == '/start') {
Bot.sendMessage("Congratulations! It works!\nPlease run command /help to start using bot.");
}
else if (Cmd == '/help') {
let text =
'<b>Available Command</b>\n' +
'/start - Bot Info\n' +
'/help - This manual\n' +
'/whoami - Show your telegram ID and name\n\n' +
'/sendlocation - Send map\n' +
'/senddice - Send dice\n\n' +
'/replykeyboard - Message with keyboard\n' +
'/removereplykeyboard - Remove keyboard\n'
;
Bot.sendMessage(text, 'HTML');
}
else if (Cmd == '/whoami') {
let text =
'Your ID :\n<b>' + TelegramData.message.from.id + '</b>\n\n' +
'Your Name :\n<b>' + TelegramData.message.from.first_name + '</b>\n\n' +
'⚠ Note :\n<u><i>Your id is like your phone number. keep it a secret</i></u>'
;
Bot.sendMessage(text, 'HTML');
}
else if (Cmd == '/sendlocation') {
Bot.sendLocation('-6.088319', '106.997827');
}
else if (Cmd == '/senddice') {
Bot.sendDice();
}
else if (Cmd == '/replykeyboard') {
let keyboard = [
[{ 'text': 'Yes' }, { 'text': 'No' }],
[{ 'text': "/removereplykeyboard" }]
];
Bot.sendMessageKeyboard('Do you like this bot?', keyboard);
}
else if (Cmd == '/removereplykeyboard') {
Bot.sendMessageKeyboard('Reply keyboard removed!', false);
}
else if (Cmd == 'Yes') {
Bot.sendMessage("Thank's");
}
else if (Cmd == 'No') {
Bot.sendMessage('Oh no!');
}
else {
let text =
`Hi ` + TelegramData.message.from.first_name + '!' +
'\nYour response text : ' + TelegramData.message.text +
`\nPlease run command /help to start using bot.`;
Bot.sendMessage(text);
}
}
function validRequest_(e) {
// Only response if type is text message
try {
if (e.postData.type == 'application/json') {
TelegramData = JSON.parse(e.postData.contents);
return typeof TelegramData.message.text != 'undefined';
}
else return false;
}
catch (e) {
return false;
}
}/**
* Telegram Bot function
* ******************************************
*/
class TelegramBot {
request(method, data) {
let options = {
'method': 'post',
'contentType': 'application/json',
'payload': JSON.stringify(data)
};
let response = UrlFetchApp.fetch('https://api.telegram.org/bot' + token + '/' + method, options);
if (response.getResponseCode() == 200) {
return JSON.parse(response.getContentText());
}
return false;
}
sendMessage(text, mode) {
// mode (string): HTML, Markdown, MarkdownV2
// https://core.telegram.org/bots/api#formatting-options
mode = mode || 'None';
return this.request('sendMessage', {
'chat_id': TelegramData.message.from.id,
'text': text,
'parse_mode': mode
});
}
sendLocation(latitude, longitude) {
return this.request('sendLocation', {
'chat_id': TelegramData.message.from.id,
'latitude': latitude,
'longitude': longitude
});
}
sendDice() {
return this.request('sendDice', {
'chat_id': TelegramData.message.from.id,
});
}
sendMessageKeyboard(text, keyboard, mode) {
mode = mode || 'None';
keyboard = keyboard ?
{ 'keyboard': keyboard } :
{ 'remove_keyboard': true };
return this.request('sendMessage', {
'chat_id': TelegramData.message.from.id,
'text': text,
'parse_mode': mode,
'reply_markup': JSON.stringify(keyboard)
});
}
}
点击保存图标,点击 部署 中的 新建部署,点击 选择类型 的 ⚙️ 选择 Web 应用
有访问权限的人员 改为 任何人,点击 部署
首次部署需要授予访问权限,显示 此应用未经 Google 验证 时点击 高级,点击 转至未命名项目(不安全),点击 允许
部署成功后复制 Web 应用网址(下一步用到)
设置 Webhook
修改以下 url 的 (token) 与 (Web 应用网址) ,并复制至浏览器打开
https://api.telegram.org/bot(token)/setwebhook?url= (拼接Script谷歌部署地址)
显示如下内容就是设置成功啦,按道理机器人已经搭建好了!
{“ok”:true,“result”:true,“description”:“Webhook was set”}
测试一下

大功告成!!
向我们的机器人发送 /start 即可得到脚本中所设定的回应。
更多的功能就等各位自己利用 API 去开发实现啦!
如有侵权请联系:admin#unsafe.sh