上一期内容中完成OpenSource EDR安装,选择Wazuh server实现,接下来需要对Wazuh server进行配置调优以及基础的agent部署。
调优一:默认情况下所有的agent都允许向Wazuh server(Wazuh manager)进行注册,注册完成之后进行发送日志。为了安全起见,需要对agent注册使用密码进行验证。
编辑配置文件,开启agent密码验证
vi /var/ossec/etc/ossec.conf配置agent注册使用的密码,使用adminsoc
echo "adminsoc" > /var/ossec/etc/authd.pass修改文件权限
chmod 640 /var/ossec/etc/authd.passchown root:wazuh /var/ossec/etc/authd.pass
调优二:开启漏洞扫描,终端安装agent之后自动进行漏洞扫描,自定义扫描周期。
编辑配置文件,开启漏洞扫描模块
vi /var/ossec/etc/ossec.conf在漏洞扫描模块中对所有的系统都设置开启漏洞扫描模块,将<enabled>no</enabled>改成<enabled>yes</enabled>
调优三:对于不同系统不同业务agent分配不同组,开启不同检测策略。Wazuh server提供统一管理agent能力,便于远程管理策略下发,通过对不同分组配置不同检测策略实现精细化管理。
通过浏览器登录Wazuh dashboard进行配置
点击右上角Add new group按钮
分别配置Windows以及Linux两个组
点击对应组右侧🖊形状按钮配置对应组agent检测策略
将Windows组agent配置修改成如下所示
<agent_config><client_buffer><!-- Agent buffer options --><disabled>no</disabled><queue_size>5000</queue_size><events_per_second>500</events_per_second></client_buffer><!-- Policy monitoring --><rootcheck><disabled>no</disabled><windows_apps>./shared/win_applications_rcl.txt</windows_apps><windows_malware>./shared/win_malware_rcl.txt</windows_malware></rootcheck><sca><enabled>yes</enabled><scan_on_start>yes</scan_on_start><interval>12h</interval><skip_nfs>yes</skip_nfs></sca><!-- File integrity monitoring --><syscheck><disabled>no</disabled><!-- Frequency that syscheck is executed default every 12 hours --><frequency>43200</frequency><!-- Default files to be monitored. --><directories recursion_level="0" restrict="regedit.exe$|system.ini$|win.ini$">%WINDIR%</directories><directories recursion_level="0" restrict="at.exe$|attrib.exe$|cacls.exe$|cmd.exe$|eventcreate.exe$|ftp.exe$|lsass.exe$|net.exe$|net1.exe$|netsh.exe$|reg.exe$|regedt32.exe|regsvr32.exe|runas.exe|sc.exe|schtasks.exe|sethc.exe|subst.exe$">%WINDIR%\SysNative</directories><directories recursion_level="0">%WINDIR%\SysNative\drivers\etc</directories><directories recursion_level="0" restrict="WMIC.exe$">%WINDIR%\SysNative\wbem</directories><directories recursion_level="0" restrict="powershell.exe$">%WINDIR%\SysNative\WindowsPowerShell\v1.0</directories><directories recursion_level="0" restrict="winrm.vbs$">%WINDIR%\SysNative</directories><!-- 32-bit programs. --><directories recursion_level="0" restrict="at.exe$|attrib.exe$|cacls.exe$|cmd.exe$|eventcreate.exe$|ftp.exe$|lsass.exe$|net.exe$|net1.exe$|netsh.exe$|reg.exe$|regedit.exe$|regedt32.exe$|regsvr32.exe$|runas.exe$|sc.exe$|schtasks.exe$|sethc.exe$|subst.exe$">%WINDIR%\System32</directories><directories recursion_level="0">%WINDIR%\System32\drivers\etc</directories><directories recursion_level="0" restrict="WMIC.exe$">%WINDIR%\System32\wbem</directories><directories recursion_level="0" restrict="powershell.exe$">%WINDIR%\System32\WindowsPowerShell\v1.0</directories><directories recursion_level="0" restrict="winrm.vbs$">%WINDIR%\System32</directories><directories realtime="yes">%PROGRAMDATA%\Microsoft\Windows\Start Menu\Programs\Startup</directories><ignore>%PROGRAMDATA%\Microsoft\Windows\Start Menu\Programs\Startup\desktop.ini</ignore><ignore type="sregex">.log$|.htm$|.jpg$|.png$|.chm$|.pnf$|.evtx$</ignore><!-- Windows registry entries to monitor. --><windows_registry>HKEY_LOCAL_MACHINE\Software\Classes\batfile</windows_registry><windows_registry>HKEY_LOCAL_MACHINE\Software\Classes\cmdfile</windows_registry><windows_registry>HKEY_LOCAL_MACHINE\Software\Classes\comfile</windows_registry><windows_registry>HKEY_LOCAL_MACHINE\Software\Classes\exefile</windows_registry><windows_registry>HKEY_LOCAL_MACHINE\Software\Classes\piffile</windows_registry><windows_registry>HKEY_LOCAL_MACHINE\Software\Classes\AllFilesystemObjects</windows_registry><windows_registry>HKEY_LOCAL_MACHINE\Software\Classes\Directory</windows_registry><windows_registry>HKEY_LOCAL_MACHINE\Software\Classes\Folder</windows_registry><windows_registry arch="both">HKEY_LOCAL_MACHINE\Software\Classes\Protocols</windows_registry><windows_registry arch="both">HKEY_LOCAL_MACHINE\Software\Policies</windows_registry><windows_registry>HKEY_LOCAL_MACHINE\Security</windows_registry><windows_registry arch="both">HKEY_LOCAL_MACHINE\Software\Microsoft\Internet Explorer</windows_registry><windows_registry>HKEY_LOCAL_MACHINE\System\CurrentControlSet\Services</windows_registry><windows_registry>HKEY_LOCAL_MACHINE\System\CurrentControlSet\Control\Session Manager\KnownDLLs</windows_registry><windows_registry>HKEY_LOCAL_MACHINE\System\CurrentControlSet\Control\SecurePipeServers\winreg</windows_registry><windows_registry arch="both">HKEY_LOCAL_MACHINE\Software\Microsoft\Windows\CurrentVersion\Run</windows_registry><windows_registry arch="both">HKEY_LOCAL_MACHINE\Software\Microsoft\Windows\CurrentVersion\RunOnce</windows_registry><windows_registry>HKEY_LOCAL_MACHINE\Software\Microsoft\Windows\CurrentVersion\RunOnceEx</windows_registry><windows_registry arch="both">HKEY_LOCAL_MACHINE\Software\Microsoft\Windows\CurrentVersion\URL</windows_registry><windows_registry arch="both">HKEY_LOCAL_MACHINE\Software\Microsoft\Windows\CurrentVersion\Policies</windows_registry><windows_registry arch="both">HKEY_LOCAL_MACHINE\Software\Microsoft\Windows NT\CurrentVersion\Windows</windows_registry><windows_registry arch="both">HKEY_LOCAL_MACHINE\Software\Microsoft\Windows NT\CurrentVersion\Winlogon</windows_registry><windows_registry arch="both">HKEY_LOCAL_MACHINE\Software\Microsoft\Active Setup\Installed Components</windows_registry><!-- Windows registry entries to ignore. --><registry_ignore>HKEY_LOCAL_MACHINE\Security\Policy\Secrets</registry_ignore><registry_ignore>HKEY_LOCAL_MACHINE\Security\SAM\Domains\Account\Users</registry_ignore><registry_ignore type="sregex">\Enum$</registry_ignore><registry_ignore>HKEY_LOCAL_MACHINE\System\CurrentControlSet\Services\MpsSvc\Parameters\AppCs</registry_ignore><registry_ignore>HKEY_LOCAL_MACHINE\System\CurrentControlSet\Services\MpsSvc\Parameters\PortKeywords\DHCP</registry_ignore><registry_ignore>HKEY_LOCAL_MACHINE\System\CurrentControlSet\Services\MpsSvc\Parameters\PortKeywords\IPTLSIn</registry_ignore><registry_ignore>HKEY_LOCAL_MACHINE\System\CurrentControlSet\Services\MpsSvc\Parameters\PortKeywords\IPTLSOut</registry_ignore><registry_ignore>HKEY_LOCAL_MACHINE\System\CurrentControlSet\Services\MpsSvc\Parameters\PortKeywords\RPC-EPMap</registry_ignore><registry_ignore>HKEY_LOCAL_MACHINE\System\CurrentControlSet\Services\MpsSvc\Parameters\PortKeywords\Teredo</registry_ignore><registry_ignore>HKEY_LOCAL_MACHINE\System\CurrentControlSet\Services\PolicyAgent\Parameters\Cache</registry_ignore><registry_ignore>HKEY_LOCAL_MACHINE\Software\Microsoft\Windows\CurrentVersion\RunOnceEx</registry_ignore><registry_ignore>HKEY_LOCAL_MACHINE\System\CurrentControlSet\Services\ADOVMPPackage\Final</registry_ignore><!-- Frequency for ACL checking (seconds) --><windows_audit_interval>60</windows_audit_interval><!-- Nice value for Syscheck module --><process_priority>10</process_priority><!-- Maximum output throughput --><max_eps>100</max_eps><!-- Database synchronization settings --><synchronization><enabled>yes</enabled><interval>5m</interval><max_interval>1h</max_interval><max_eps>10</max_eps></synchronization></syscheck><!-- System inventory --><wodle name="syscollector"><disabled>no</disabled><interval>1h</interval><scan_on_start>yes</scan_on_start><hardware>yes</hardware><os>yes</os><network>yes</network><packages>yes</packages><ports all="no">yes</ports><processes>yes</processes><!-- Database synchronization settings --><synchronization><max_eps>10</max_eps></synchronization></wodle><!-- CIS policies evaluation --><wodle name="cis-cat"><disabled>yes</disabled><timeout>1800</timeout><interval>1d</interval><scan-on-start>yes</scan-on-start><java_path>\\server\jre\bin\java.exe</java_path><ciscat_path>C:\cis-cat</ciscat_path></wodle><!-- Osquery integration --><wodle name="osquery"><disabled>yes</disabled><run_daemon>yes</run_daemon><bin_path>C:\Program Files\osquery\osqueryd</bin_path><log_path>C:\Program Files\osquery\log\osqueryd.results.log</log_path><config_path>C:\Program Files\osquery\osquery.conf</config_path><add_labels>yes</add_labels></wodle><!-- Active response --><active-response><disabled>no</disabled><ca_store>wpk_root.pem</ca_store><ca_verification>yes</ca_verification></active-response><!-- Log analysis --><localfile><location>Microsoft-Windows-Sysmon/Operational</location><log_format>eventchannel</log_format></localfile><localfile><location>Windows PowerShell</location><log_format>eventchannel</log_format></localfile><localfile><location>Microsoft-Windows-CodeIntegrity/Operational</location><log_format>eventchannel</log_format></localfile><localfile><location>Microsoft-Windows-TaskScheduler/Operational</location><log_format>eventchannel</log_format></localfile><localfile><location>Microsoft-Windows-PowerShell/Operational</location><log_format>eventchannel</log_format></localfile><localfile><location>Microsoft-Windows-Windows Firewall With Advanced Security/Firewall</location><log_format>eventchannel</log_format></localfile><localfile><location>Microsoft-Windows-Windows Defender/Operational</location><log_format>eventchannel</log_format></localfile></agent_config>
将Linux组agent配置修改成如下所示
<agent_config><client_buffer><!-- Agent buffer options --><disabled>no</disabled><queue_size>5000</queue_size><events_per_second>500</events_per_second></client_buffer><!-- Policy monitoring --><rootcheck><disabled>no</disabled><!-- Frequency that rootcheck is executed - every 12 hours --><frequency>43200</frequency><rootkit_files>/var/ossec/etc/shared/rootkit_files.txt</rootkit_files><rootkit_trojans>/var/ossec/etc/shared/rootkit_trojans.txt</rootkit_trojans><system_audit>/var/ossec/etc/shared/system_audit_rcl.txt</system_audit><system_audit>/var/ossec/etc/shared/system_audit_ssh.txt</system_audit><system_audit>/var/ossec/etc/shared/cis_debian_linux_rcl.txt</system_audit><skip_nfs>yes</skip_nfs></rootcheck><wodle name="open-scap"><disabled>yes</disabled><timeout>1800</timeout><interval>1d</interval><scan-on-start>yes</scan-on-start><content type="xccdf" path="ssg-debian-8-ds.xml"><profile>xccdf_org.ssgproject.content_profile_common</profile></content><content type="oval" path="cve-debian-oval.xml"/></wodle><!-- File integrity monitoring --><syscheck><disabled>no</disabled><!-- Frequency that syscheck is executed default every 12 hours --><frequency>43200</frequency><scan_on_start>yes</scan_on_start><!-- Directories to check (perform all possible verifications) --><directories>/etc,/usr/bin,/usr/sbin</directories><directories>/bin,/sbin,/boot</directories><!-- Files/directories to ignore --><ignore>/etc/mtab</ignore><ignore>/etc/hosts.deny</ignore><ignore>/etc/mail/statistics</ignore><ignore>/etc/random-seed</ignore><ignore>/etc/random.seed</ignore><ignore>/etc/adjtime</ignore><ignore>/etc/httpd/logs</ignore><ignore>/etc/utmpx</ignore><ignore>/etc/wtmpx</ignore><ignore>/etc/cups/certs</ignore><ignore>/etc/dumpdates</ignore><ignore>/etc/svc/volatile</ignore><ignore>/sys/kernel/security</ignore><ignore>/sys/kernel/debug</ignore><!-- File types to ignore --><ignore type="sregex">.log$|.swp$</ignore><!-- Check the file, but never compute the diff --><nodiff>/etc/ssl/private.key</nodiff><skip_nfs>yes</skip_nfs><skip_dev>yes</skip_dev><skip_proc>yes</skip_proc><skip_sys>yes</skip_sys><!-- Nice value for Syscheck process --><process_priority>10</process_priority><!-- Maximum output throughput --><max_eps>100</max_eps><!-- Database synchronization settings --><synchronization><enabled>yes</enabled><interval>5m</interval><response_timeout>30</response_timeout><queue_size>16384</queue_size><max_eps>10</max_eps></synchronization></syscheck><!-- Log analysis --><localfile><log_format>syslog</log_format><location>/var/ossec/logs/active-responses.log</location></localfile><localfile><log_format>syslog</log_format><location>/var/log/messages</location></localfile><localfile><log_format>syslog</log_format><location>/var/log/auth.log</location></localfile><localfile><log_format>syslog</log_format><location>/var/log/syslog</location></localfile><localfile><log_format>command</log_format><command>df -P</command><frequency>360</frequency></localfile><localfile><log_format>full_command</log_format><command>netstat -tan |grep LISTEN |grep -v 127.0.0.1 | sort</command><frequency>360</frequency></localfile><localfile><log_format>full_command</log_format><command>last -n 5</command><frequency>360</frequency></localfile><wodle name="osquery"><disabled>yes</disabled><run_daemon>yes</run_daemon><log_path>/var/log/osquery/osqueryd.results.log</log_path><config_path>/etc/osquery/osquery.conf</config_path><add_labels>yes</add_labels></wodle><wodle name="syscollector"><disabled>no</disabled><interval>24h</interval><scan_on_start>yes</scan_on_start><packages>yes</packages><os>yes</os><hotfixes>yes</hotfixes><ports all="no">yes</ports><processes>yes</processes></wodle></agent_config>
配置完之后对应组agent将具备上述配置,最后需要将wazuh-manager服务重启。
systemctl restart wazuh-manager调优四:添加高级检测规则,Wazuh server允许自定义检测规则,在GitHub平台上由SOCFortress Team开源对应检测规则,提升检测效果。
项目地址:https://github.com/socfortress/Wazuh-Rules
安装git
yum install git切换成root用户,执行该命令一件添加自定义检测规则(如果无法下载,需要配置终端代理,脚本也会使用git去clone仓库)
su rootcurl -so ~/wazuh_socfortress_rules.sh https://raw.githubusercontent.com/socfortress/Wazuh-Rules/main/wazuh_socfortress_rules.sh && bash ~/wazuh_socfortress_rules.sh
脚本运行完成如下图所示
查看添加自定义规则
ls /var/ossec/etc/rules/Web控制台通过以下路径查看
这样就完成Wazuh server配置调优。
接着需要在需要监控的终端上安装agent,安装的过程比较简单,在安装之前一起来看看整个安装过程中比较重要的内容。
注册。注册的意思代表该agent需要向Wazuh server进行认证(调调优中配置的密码),表明这是一个合法终端需要安装agent,Wazuh server需要做一个登记。注册的过程通过TCP1515端口传输认证信息。
日志转发。Wazuh server会生成对称密钥传递给agent,用于后续日志传输加解密。传输日志使用TCP1514端口。
接下来进项安装agent
1.Linux主机安装agent。登录Wazuh控制台,点击Agent
根据查看需要安装agent终端操作系统信息
cat /etc/os-release选择操作系统为Debian/Ubuntu,x86_64架构,Wazuh server address为192.168.116.201,选择agent安装完处于Linux分组
复制安装命令到Linux终端上执行
curl -so wazuh-agent-4.3.10.deb https://packages.wazuh.com/4.x/apt/pool/main/w/wazuh-agent/wazuh-agent_4.3.10-1_amd64.deb && sudo WAZUH_MANAGER='192.168.116.201' WAZUH_REGISTRATION_PASSWORD='adminsoc' WAZUH_AGENT_GROUP='Linux' dpkg -i ./wazuh-agent-4.3.10.deb安装完成后启动agent
sudo systemctl daemon-reloadsudo systemctl enable wazuh-agentsudo systemctl start wazuh-agent
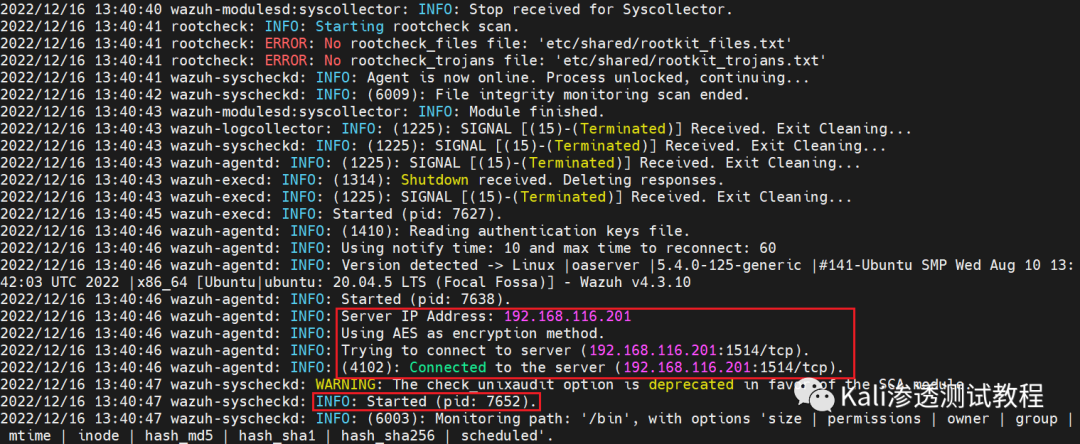
查看终端上agent相关日志,回溯agent注册过程
sudo more /var/ossec/logs/ossec.log回到Wazuh控制台,可以看到已经上线的agent信息
2.Windows主机安装agent。已经有安装其他agent情况下,点击右上角Deploy new agent按钮部署新agent
选择操作系统为Windows,Wazuh server address为192.168.116.201,选择agent安装完处于Windows分组
复制安装命令到Windows终端上使用PowerShell执行
Invoke-WebRequest -Uri https://packages.wazuh.com/4.x/windows/wazuh-agent-4.3.10-1.msi -OutFile ${env:tmp}\wazuh-agent-4.3.10.msi; msiexec.exe /i ${env:tmp}\wazuh-agent-4.3.10.msi /q WAZUH_MANAGER='192.168.116.201' WAZUH_REGISTRATION_SERVER='192.168.116.201' WAZUH_REGISTRATION_PASSWORD='adminsoc' WAZUH_AGENT_GROUP='Windows' 安装完成后启动agent
NET START WazuhSvc回到Wazuh控制台,可以看到已经上线的agent信息
完成agent安装之后还需要对Wazuh server目前已经具备的终端日志采集能力做补充,由于其并未采集网络连接,进程创建、PowerShell命令执行,用户创建等日志,并不具体True EDR能力,使用Sysmon以及Packetbeat进行能力补充,并且通过agent统一回传到Wazuh server进行分析。
1.安装Sysmon。在C盘C:\Program Files目录创建文件夹名为sysinternals,在官网中下载Sysmon,将压缩包中内容复制进sysinternals中,如下图所示
https://learn.microsoft.com/en-us/sysinternals/downloads/sysmon
下载GitHub上开源Sysmon配置文件
https://raw.githubusercontent.com/olafhartong/sysmon-modular/master/sysmonconfig.xml
根据官方提供语法安装Sysmon
https://learn.microsoft.com/en-us/sysinternals/downloads/sysmon
Sysmon64.exe -i sysmonconfig.xml点击Agree继续进行安装,如下图所示代表安装完成
到这边手动完成Sysmon,如果可以科学上网,下面脚本存为sysmon.ps1文件,通过PowerShell快速安装。
$sysinternals_repo = 'download.sysinternals.com'$sysinternals_downloadlink = 'https://download.sysinternals.com/files/SysinternalsSuite.zip'$sysinternals_folder = 'C:\Program Files\sysinternals'$sysinternals_zip = 'SysinternalsSuite.zip'$sysmonconfig_downloadlink = 'https://raw.githubusercontent.com/olafhartong/sysmon-modular/master/sysmonconfig.xml'$sysmonconfig_file = 'sysmonconfig-export.xml'[Net.ServicePointManager]::SecurityProtocol = [Net.SecurityProtocolType]::Tls12if (Test-Path -Path $sysinternals_folder) {write-host ('Sysinternals folder already exists')} else {$OutPath = $env:TMP$output = $sysinternals_zipNew-Item -Path "C:\Program Files" -Name "sysinternals" -ItemType "directory"$X = 0do {Write-Output "Waiting for network"Start-Sleep -s 5$X += 1} until(($connectreult = Test-NetConnection $sysinternals_repo -Port 443 | ? { $_.TcpTestSucceeded }) -or $X -eq 3)if ($connectreult.TcpTestSucceeded -eq $true){Try{write-host ('Downloading and copying Sysinternals Tools to C:\Program Files\sysinternals...')Invoke-WebRequest -Uri $sysinternals_downloadlink -OutFile $OutPath\$outputExpand-Archive -path $OutPath\$output -destinationpath $sysinternals_folderStart-Sleep -s 10Invoke-WebRequest -Uri $sysmonconfig_downloadlink -OutFile $OutPath\$sysmonconfig_file$serviceName = 'Sysmon64'If (Get-Service $serviceName -ErrorAction SilentlyContinue) {write-host ('Sysmon Is Already Installed')} else {Invoke-Command {reg.exe ADD HKCU\Software\Sysinternals /v EulaAccepted /t REG_DWORD /d 1 /f}Invoke-Command {reg.exe ADD HKU\.DEFAULT\Software\Sysinternals /v EulaAccepted /t REG_DWORD /d 1 /f}Start-Process -FilePath $sysinternals_folder\Sysmon64.exe -Argumentlist @("-i", "$OutPath\$sysmonconfig_file")}}Catch{$ErrorMessage = $_.Exception.Message$FailedItem = $_.Exception.ItemNameWrite-Error -Message "$ErrorMessage $FailedItem"exit 1}Finally{Remove-Item -Path $OutPath\$output}} else {Write-Output "Unable to connect to Sysinternals Repo"}}
在PowerShell窗口中执行以下命令安装(如果报错无法将“Expand-Archive”项识别为 cmdlet、函数、脚本文件或可运行程序的名称,需要更新PowerShell至5.1版本)
https://www.microsoft.com/en-us/download/confirmation.aspx?id=54616
.\sysmon/ps1完成Sysmon安装之后,Win+R打开运行窗口
eventvwr.msc打开日志查看器
在下列路径中找到Sysmon采集到日志
应用程序和服务日志-Windows-Sysmon-Operation日志名称为Microsoft-Windows-Sysmon/Operational
找到Sysmon采集日志位置后需要让agent转发该位置日志给Wazuh server进行分析。
登录Wazuh控制台,点击Management-Groups
点击🖊形状按钮,编辑组配置文件
确保Sysmon日志已经被转发,如果没有,把下面语句添加到对应位置保存即可。
<localfile><location>Microsoft-Windows-Sysmon/Operational</location><log_format>eventchannel</log_format></localfile>
接下来在Linux安装Packetbeat用于实时监控Linux终端网络连接,通过脚本安装(终端需要科学上网)
vi packetbeat.shchmod +x packetbeat.sh
脚本内容如下
#!/bin/bashPATH=/usr/local/sbin:/usr/local/bin:/usr/sbin:/usr/bin:/sbin:/binPACKETBEAT_YAML="https://raw.githubusercontent.com/socfortress/Wazuh-Rules/main/Packetbeat/packetbeat.yml"logger() {now=$(date +'%m/%d/%Y %H:%M:%S')case $1 in"-e")mtype="ERROR:"message="$2";;"-w")mtype="WARNING:"message="$2";;*)mtype="INFO:"message="$1";;esacecho $now $mtype $message}if [ -n "$(command -v yum)" ]; thensys_type="yum"sep="-"elif [ -n "$(command -v zypper)" ]; thensys_type="zypper"sep="-"elif [ -n "$(command -v apt-get)" ]; thensys_type="apt-get"sep="="fiDIR="/etc/packetbeat"if [ -d "$DIR" ]; thenlogger "Packetbeat found. Not Installing"exit 0elselogger "Installing Packetbeat"if [ ${sys_type} == "yum" ]; theneval "curl -L -O https://artifacts.elastic.co/downloads/beats/packetbeat/packetbeat-7.16.3-x86_64.rpm ${debug}"eval "rpm -vi packetbeat-7.16.3-x86_64.rpm ${debug}"eval "wget ${PACKETBEAT_YAML} -O /etc/packetbeat/packetbeat.yml ${debug}"elif [ ${sys_type} == "apt-get" ]; theneval "curl -L -O https://artifacts.elastic.co/downloads/beats/packetbeat/packetbeat-7.16.3-amd64.deb ${debug}"eval "dpkg -i packetbeat-7.16.3-amd64.deb ${debug}"eval "wget ${PACKETBEAT_YAML} -O /etc/packetbeat/packetbeat.yml ${debug}"fifiservice packetbeat restart
运行脚本开始安装
sudo ./packetbeat.sh查看packetbeat服务状态
systemctl status packetbeat.service查看packetbeat流量监控日志
cat /tmp/packetbeat/packetbeat找到Packetbeat采集日志位置后需要让agent转发该位置日志给Wazuh server进行分析。
登录Wazuh控制台,点击Management-Groups
点击🖊形状按钮,编辑组配置文件
把下面语句添加到对应位置,点击保存,确保Packetbeat日志已经被转发
<localfile><log_format>json</log_format><location>/tmp/packetbeat/packetbeat</location></localfile>
这样子就完成终端上agent安装,通过Wazuh server本身强大的agent功能结合Sysmon以及Packetbeat让终端的可见性变得更加全面。欢迎订阅收看开源SOC实现(五)-SIEM日志处理
如有侵权请联系:admin#unsafe.sh