
This post is also available i 2022-12-15 22:0:21 Author: unit42.paloaltonetworks.com(查看原文) 阅读量:33 收藏
This post is also available in: 日本語 (Japanese)
Executive Summary
Unit 42 researchers investigated Azure’s serverless architecture and found that we were able to break out of the serverless function to the underlying host. We also discovered that our host was actually a HyperV virtual machine that hosted several other serverless functions.
Azure serverless functions (commonly referred to as Azure Functions) is a serverless compute service that enables users to run event-triggered code without having to provision or manage the infrastructure. Being a trigger-based service, it runs code in response to a variety of events. In the case of our research, this event was a web page request.
We found out that for each function, a new container is generated by the host. Each container will be terminated and deleted after several minutes, to differentiate serverless function from traditional containers as a service.
The host in question hosted only functions that our Azure user had access to anyway, so no real damage could be done. It is clear Microsoft went to great lengths to stop people from getting to the host, so it is possible there are other findings yet to be uncovered there. There could be important information on the virtual machine that shouldn’t be visible, which could be discovered by a sufficiently motivated attacker.
Microsoft often uses containers to strengthen security but – because containers inherently aren’t as secure as virtual machines – they usually do not treat them as a security boundary. In this case, they implemented additional layers of security, which proved to be effective.
Prisma’s serverless solution has function discovery and vulnerability scanning for most cloud providers. These features effectively put another set of eyes on the organization’s serverless functions, alerting you in case known vulnerabilities are observed in those functions.
Table of Contents
Technical Overview
What Are Serverless Functions
The Internals of Serverless Functions
The Container
Escalating Privileges
Escaping the Container: I Am Root
Possible Impact and Conclusions
Appendix: Prisma’s Solution
Technical Overview
What Are Serverless Functions
Serverless functions are a feature of serverless computing (commonly shortened to ”serverless”), where the cloud provider supplies all computing resources for its customers on demand and manages all architectures, including cloud infrastructure.
A great example of an ideal application for serverless is a chatbot. Slack, for instance, uses a serverless application called marbot to send notifications to DevOps teams through Slack.
The name “serverless” is a bit misleading. Despite what its name implies, serverless computing still requires physical servers to execute the code. The major difference from traditional computing is that serverless abstracts away anything that isn’t directly related to the code itself, from the operating system the code runs on to the hardware of the machine actually running the code.
The Internals of Serverless Functions
The first question you might be asking yourself is how one starts to research a serverless platform. Anyone who has ever used Azure Serverless Functions knows that there are not many places to poke around. You can upload some code or change a few settings, as shown in Figure 1, but that’s about it.
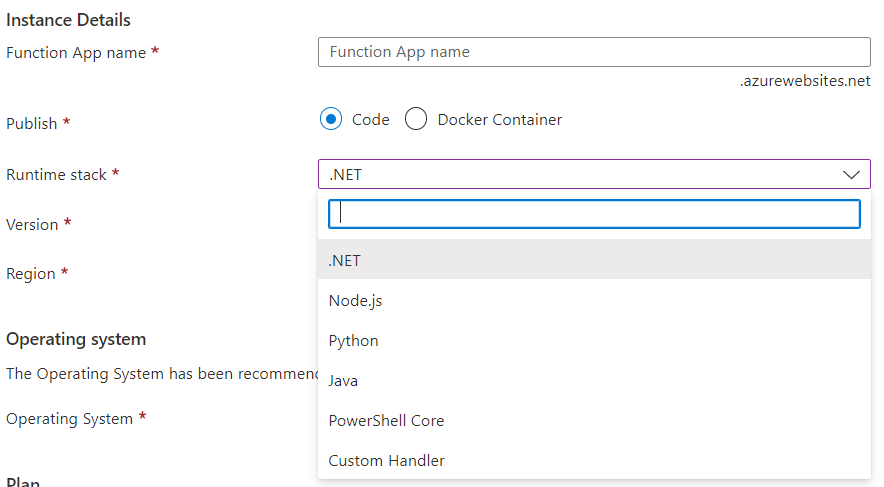
We decided to start our research with a Python function over Linux, triggered by an HTTP request. (As a side note: For some runtimes, Windows is also available.)
Our next step was to get a working interactive shell inside the function, to better understand what we are dealing with, and to get some information about the machine running our code. We decided to go with a reverse shell for ease of use. We also decided to use the data transfer tool socat (shown in Figure 2) rather than netcat, as it supports a wider range of the protocols we deemed necessary for the rest of our research.
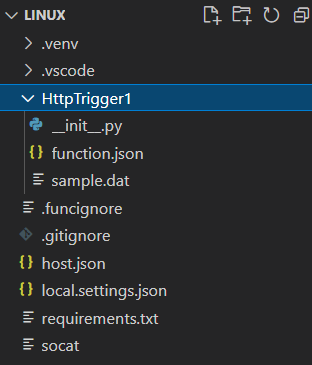
We simply dropped the socat binary in our project directory in Visual Studio Code and deployed the entire thing into the serverless function that we created earlier. The code to actually launch the reverse shell was very simple, as the entire logic lies in the socat application, as shown in Figure 3.

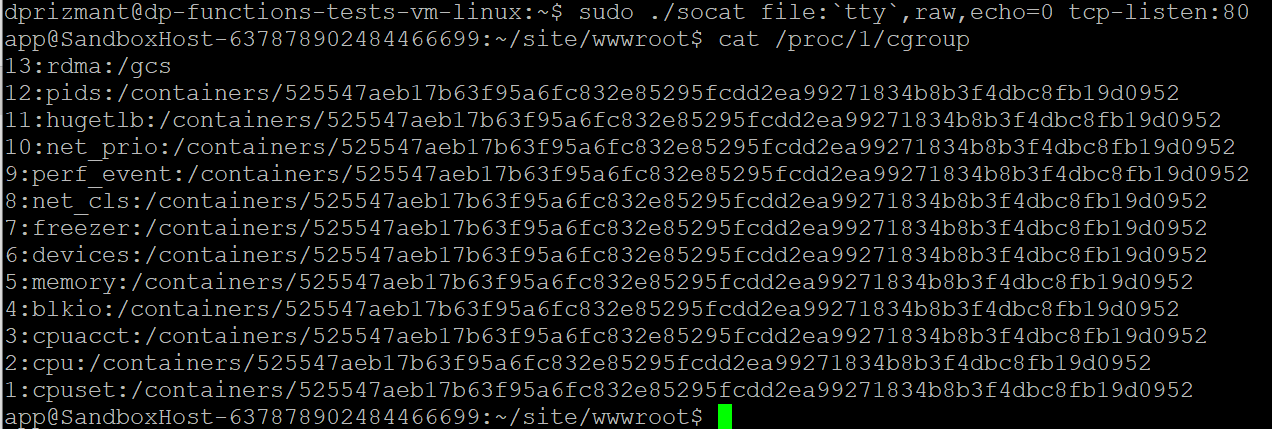
Executing our reverse shell landed us inside the function directory under a user-named app. We immediately found out we were running inside a container by using the
cat /proc/1/cgroupp_last_cap |
command. The machine hostname, which started with SandboxHost (shown in Figure 4), also hinted at that.
There was nothing too interesting in the working directory we landed in. This directory included all the files we uploaded plus one additional lib folder, which contained the necessary libraries for Python to communicate with Azure.
The Container
This research started without a specific goal in mind, other than to improve Prisma serverless protections. However, after learning more about the architecture, we were eager to break out of the container and see how deep the rabbit hole goes.
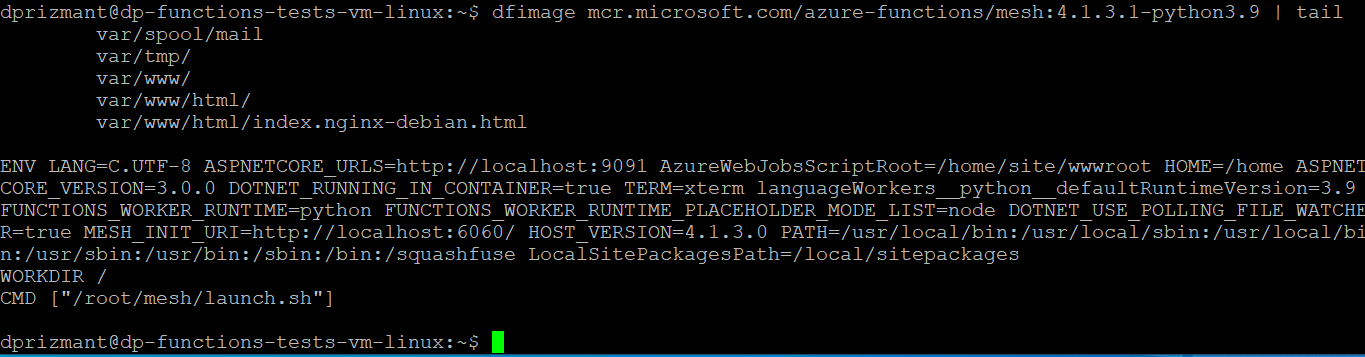
After familiarizing ourselves with the container and its files, as well as our user permissions and such, we decided to check the environment variables because they often include interesting pieces of information. This time was no different. Among other interesting things, we noted the environment variables gave away the image name (shown in Figure 5).

Searching this image name in Google led us to a Microsoft official catalog that listed image names, which led to an official repository that provided all of Microsoft images, including the one we were looking at.
Having the image and being able to research it locally made our life much easier. We were eager to pull the image to our local machine and start investigating it.
Our first approach was to get the image “source code” (or Dockerfile, if you’re using Docker). Surprisingly, this appeared not to be a trivial task. After some searching, we found out there is a handy utility tool called Whaler that is designed to reverse engineer Docker images into the Dockerfile that created them. Figure 6 illustrates this process.

There are plenty of images that wrap Whaler, resulting in a one-line command that is easy to use. Using this method, we managed to generate a good-enough version of the Dockerfile, as shown in Figure 7. The most interesting part of that file was the last line.
It seems like the mesh folder contains some interesting files, in particular, the launch.sh script, which seems to be the first thing executed inside the container. At this point, we simply copied the entire mesh folder from inside the image to investigate it further.
There were some more scripts in there that called some other scripts in different scenarios. The interesting part of that folder was a binary called init, which runs in the background of every Azure serverless container. Lucky for us, this binary also came packed with symbols, so reverse engineering it was a breeze.
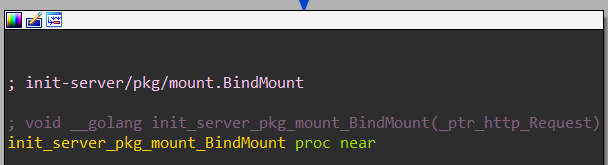
After investigating the functions and strings lists, one function was particularly interesting: init_server_pkg_mount_BindMount (shown in Figures 8a and 8b). After reverse engineering it, we discovered that this function binds a path inside the container to another path, which is also inside the container. This function also doesn’t require the user to be privileged, but it runs in the context of root! All you would need to do to bind one file to any other file, is to perform an HTTP query inside the container on the correct port, with the correct arguments.

In the process of this part of the investigation, we also discovered a lot of information about how Azure serverless architecture works behind the scenes. While this is outside the scope of this article, it would be possible to explore this matter in depth in its own article.
Escalating Privileges
To quickly recap, at this point in the research we were inside a container with an unprivileged user, but we had the ability to bind any one file to any other file as root. Our goal at this point was to escalate privileges to root, inside the container. There are probably several ways to achieve this, but we chose to replace the /etc/shadow file with the one we generated (shown in Figure 9), and then to change the user to root.

To accomplish this, we performed the following steps (also shown in Figure 10):
- Generated an /etc/shadow file with a known password for the root user.
- Uploaded said file to our local directory in the Function container.
- Used the running init service and the BindMount function to bind our local shadow file to the actual /etc/shadow file by querying http://localhost:6060.
- Changed user to root using the su - root command.

Escaping the Container: I Am Root
The next step in our escape was to leverage our newly achieved root access to break out of the container. We chose to use an old exploit that was discovered by Felix Wilhelm years ago.
Figure 11. Breaking out of the container PoC.
Using this exploit is not trivial, and there are several requirements that need to be met in order for it to work:
- We must be running as root inside the container.
- The container needs to have SYS_ADMIN capability.
- The container must either not have an AppArmor profile or allow the mount syscall.
- The cgroup v1 virtual filesystem must be mounted read-write inside the container.
We had already achieved the first requirement earlier. Surprisingly, the rest of the requirements were also available in our container. This was surprising because, by default, Docker containers are launched with a restricted set of capabilities and do not have the SYS_ADMIN capability enabled. Furthermore, Docker usually starts containers with AppArmor policy by default, which prevents the use of the mount syscall even when the container is run with SYS_ADMIN. We confirmed we have all the necessary capabilities by running the capsh command on our shell status file under /proc/PID/status, as shown in Figure 12.

As a detailed explanation of this exploit is slightly outside the scope of this blog, we recommend reading "Digging into cgroups Escape" to get a better understanding of this technique. In short, we’ll describe the exploit with the following steps:
- Find or create access to a cgroup controller (most versions of the exploit use RDMA).
- Create a new cgroup within that controller.
- Set notify_on_release for that cgroup to 1.
- Set the release agent to a file accessible from both the container and host.
- Start a quickly completing process within that cgroup that will trigger execution of the release agent on termination.
We decided to demonstrate achieving host execution context by running ps aux and comparing it to the container’s ps aux. In the video at the beginning of this section, you can see the entire exploit from start to finish in action. It is important to note that the machine hosting our container was a HyperV virtual machine and not a physical server.
Possible Impact and Conclusions
All the resources the virtual machine hosted were accessible by our Azure’s user regardless, so in that regard this escape had no actual immediate impact. This is an example of cloud providers' mitigations working as intended. In this case, their choice of not relying on the container as a security boundary plus implementing another line of defense proved to be a smart move.
However, this issue could have a huge impact if (for example) another vulnerability in the virtual machine itself is found. Furthermore, Microsoft is known to have fixed similar issues in the past, even if they’ve not called them vulnerabilities per se.
We felt like this was a good place to stop the research and post our findings, rather than investigating the virtual machine thoroughly. It is possible that the virtual machine contains important information or secrets that shouldn’t be visible to the serverless function user, or to a possible attacker. We are certain that other researchers in the cloud community would take it from here and investigate further, until Microsoft patches this issue.
After sharing our findings with Microsoft, they have taken the following defense-in-depth measures into consideration to better protect customers:
- Additional validation for bind mount APIs to prevent mounting over.
- Removing symbols from binaries where possible.
Appendix: Prisma’s Solution
Prisma’s serverless solution has function discovery and vulnerability scanning for most cloud providers. These features implement another set of eyes for the organization’s serverless functions, and they will alert in case of known vulnerabilities in those functions.
For AWS specifically, Prisma also offers deep visibility with Prisma’s Serverless Radar, compliance and detection of over-privileged roles, and serverless WAAS.
Furthermore, Prisma’s Serverless Defender also protects serverless functions at runtime. It monitors the customer’s functions to ensure they execute as designed. Per-function policies let the customer control the following:
- Process activity – Enables verification of launched subprocesses against policy.
- Network connections – Enables verification of inbound and outbound connections and permits outbound connections to explicitly allowed domains.
- File system activity – Controls which parts of the file system functions can access.
Currently, Prisma Cloud supports AWS Lambda functions (Linux) and Azure Functions (Windows only).
The following runtimes are supported for AWS Lambda:
- C# (.NET Core) 3.1
- Java 8, 11
- Node.js 12.x, 14.x
- Python 3.6, 3.7, 3.8, 3.9
- Ruby 2.7
The following runtimes are supported for Azure Functions (Windows only):
- v3 - C# (.NET Core) 3.1, 5.0
- v4 - C# (.NET Core) 4.8, 6.0
Get updates from
Palo Alto
Networks!
Sign up to receive the latest news, cyber threat intelligence and research from us
如有侵权请联系:admin#unsafe.sh