Malcom is a tool designed to analyze a system's network communication using graphical representations of network traffic, and cross-reference them with known malware sources. This comes handy when analyzing how certain malware species try to communicate with the outside world.
What is Malcom?
Malcom can help you:
- detect central command and control (C&C) servers
- understand peer-to-peer networks
- observe DNS fast-flux infrastructures
- quickly determine if a network artifact is 'known-bad'
The aim of Malcom is to make malware analysis and intel gathering faster by providing a human-readable version of network traffic originating from a given host or network. Convert network traffic information to actionable intelligence faster.
Check the wiki for a Quickstart with some nice screenshots and a tutorial on how to add your own feeds.
If you need some help, or want to contribute, feel free to join the mailing list or try to grab someone on IRC (#malcom on freenode.net, it's pretty quiet but there's always someone around). You can also hit up on twitter @tomchop_
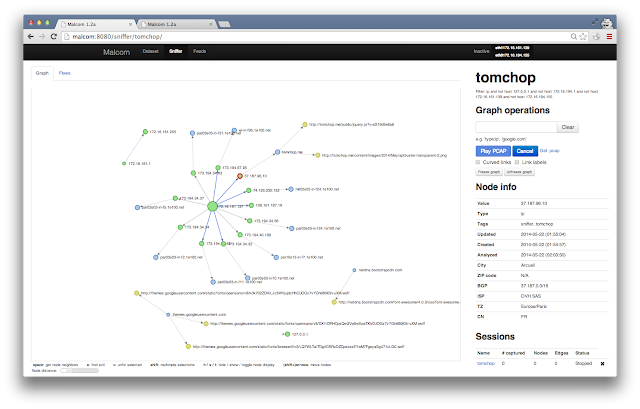
Here's an example graph for host tomchop.me
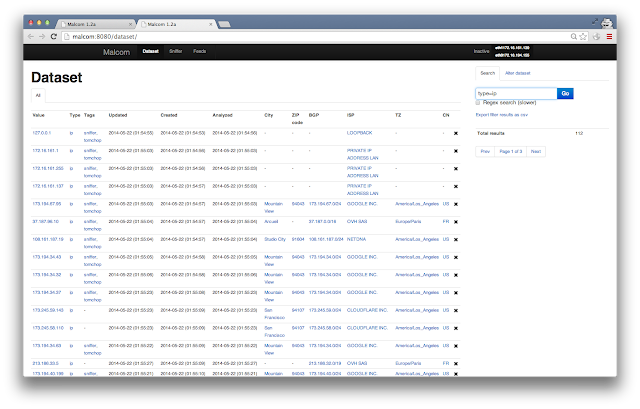
Dataset view (filtered to only show IPs)
Quick how-to
- Install
- Make sure
mongodbandredis-serverare running - Elevate your privileges to root (yeah, I know, see disclaimer)
- Start the webserver using the default configuration with
./malcom.py -c malcom.conf(or see options with./malcom.py --help) ** For an example configuration file, you can copymalcom.conf.exampletomalcom.conf** Default port is 8080 ** Alternatively, run the feeds fromcelery. See the feeds section for details on how to to this.
Installation
Malcom is written in python. Provided you have the necessary libraries, you should be able to run it on any platform. I highly recommend the use of python virtual environments (virtualenv) so as not to mess up your system libraries.
The following was tested on Ubuntu server 14.04 LTS:
- Install
git,pythonandlibeventlibs,mongodb,redis, and other dependencies
$ sudo apt-get install build-essential git python-dev libevent-dev mongodb libxml2-dev libxslt-dev zlib1g-dev redis-server libffi-dev libssl-dev python-virtualenv - Clone the Git repo:
$ git clone https://github.com/tomchop/malcom.git malcom - Create your virtualenv and activate it:
$ cd malcom $ virtualenv env-malcom $ source env-malcom/bin/activate - Get and install
scapy:
$ cd .. $ wget http://www.secdev.org/projects/scapy/files/scapy-latest.tar.gz $ tar xvzf scapy-latest.tar.gz $ cd scapy-2.1.0 $ python setup.py install - Still from your virtualenv, install necessary python packages from the
requirements.txtfile:
$ cd ../malcom $ pip install -r requirements.txt - For IP geolocation to work, you need to download the Maxmind database and extract the file to the
malcom/Malcom/auxiliary/geoIPdirectory. You can get Maxmind's free (and thus more or less accurate) database from the following link: http://dev.maxmind.com/geoip/geoip2/geolite2/:
$ cd Malcom/auxiliary/geoIP $ wget http://geolite.maxmind.com/download/geoip/database/GeoLite2-City.mmdb.gz $ gunzip -d GeoLite2-City.mmdb.gz $ mv GeoLite2-City.mmdb GeoIP2-City.mmdb - Launch the webserver from the
malcomdirectory using./malcom.py. Check./malcom.py --helpfor listen interface and ports.
- For starters, you can copy the
malcom.conf.examplefile tomalcom.confand run./malcom.py -c malcom.conf
- For starters, you can copy the
Configuration options
Database
By default, Malcom will try to connect to a local mongodb instance and create its own database, named malcom. If this is OK for you, you may skip the following steps. Otherwise, you need to edit the database section of your malcom.conf file.
Set an other name for your Malcom database
By default, Malcom will use a database named malcom. You can change this behavior by editing the malcom.conf file and setting the name directive from the database section to your liking.
    [database]
    ...
    name = my_malcom_database
    ...
Remote database(s)
By default, Malcom will try to connect to localhost, but your database may be on another server. To change this, just set the hosts directive. You may use hostnames or IPv4/v6 addresses (just keep in mind to enclose your IPv6 addresses between [ and ], e.g. [::1]).
If you'd like to use a standalone database on host my.mongo.server, just set:
    [database]
    ...
    hosts = my.mongo.server
    ...
You can also specify the port mongod is listening on by specifying it after the name/address of your server, separated with a :
    [database]
    ...
    hosts = localhost:27008
    ...
And if you're using a ReplicaSet regrouping my.mongo1.server and my.mongo2.server, just set:
    [database]
    ...
    hosts = my.mongo1.server,my.mongo2.server
    ...
Use authentication
You may have configured your mongod instances to enforce authenticated connections. In that case, you have to set the username the driver will have to use to connect to your mongod instance. To do this, just add a username directive to the database section in the malcom.conf file. You may also have to set the password with the password directive. If the user does not have a password, just ignore (i.e. comment out) the password directive.
    [database]
    ...
    username = my_user
    password = change_me
    ...
If the user is not linked to the malcom database but to another one (for example the admin database for a admin user), you will have to set the authentication_database directive with the name of that database.
    [database]
    ...
    authentication_database = some_other_database
    ...
Case of a replica set
When using a replica set, you may need to ensure you are connected to the right one. For that, just add the replset directive to force the mongo driver to check the name of the replicaset
    [database]
    ...
    replset = my_mongo_replica
    ...
By default, Malcom will try to connect to the primary node of th replica set. You may need/want to change that. In order to change that behaviour, just set the read_preference directive. See the mongo documentation for more information.
    [database]
    ...
    read_preference = NEAREST
    ...
Supported read preferences are:
- PRIMARY
- PRIMARY_PREFERRED
- SECONDARY
- SECONDARY_PREFERRED
- NEAREST
Docker instance
The quickest way to get you started is to pull the Docker image from the public docker repo. To pull older, more stable Docker builds, use tomchop/malcom instead of tomchop/malcom-automatic.
    $ sudo docker pull tomchop/malcom-automatic
    $ sudo docker run -p 8080:8080 -d --name malcom tomchop/malcom-automatic
Connecting to http://<docker_host>:8080/ should get you started.
Quick note on TLS interception
Malcom now supports TLS interception. For this to work, you need to generate some keys in Malcom/networking/tlsproxy/keys. See the KEYS.md file there for more information on how to do this.
Make sure you also have IPtables (you already should) and permissions to do some port forwarding with it (you usually need to be root for that). You can to this using the convenient forward_port.sh script. For example, to intercept all TLS communications towards port 443, use forward_port.sh 443 9999. You'll then have to tell malcom to run an interception proxy on port 9999.
Expect this process to be automated in future releases.
Environment
Malcom was designed and tested on a Ubuntu Server 14.04 LTS VM.
If you're used to doing malware analysis, you probably already have tons of virtual machines running on a host OS. Just install Malcom on a new VM, and route your other VM's connections through Malcom. Use enable_routing.sh to activate routing / NATing on the VM Malcom is running on. You'll need to add an extra network card to the guest OS.
As long as it's getting layer-3 network data, Malcom can be deployed anywhere. Although it's not recommended to use it on high-availability networks (it wasn't designed to be fast, see disclaimer), you can have it running at the end of your switch's mirror port or on your gateway.
Feeds
To launch an instance of Malcom that ONLY fetches information from feeds, run Malcom with the --feeds option or tweak the configuration file.
Your database should be populated automatically. If you can dig into the code, adding feeds is pretty straightforward (assuming you're generating Evil objects). You can find an example feed in /feeds/zeustracker. A more detailed tutorial is available here.
You can also use celery to run feeds. Make sure celery is installed by running $ pip install celery from your virtualenv. You can then use celery worker -E --config=celeryconfig --loglevel=DEBUG --concurrency=12 to launch the feeding process with 12 simultaneous workers.
Technical specs
Malcom was written mostly from scratch, in Python. It uses the following frameworks to work:
- flask - a lightweight python web framework
- mongodb - a NoSQL database. It interfaces to python with pymongo
- redis - An advanced in-memory key-value store
- d3js - a JavaScript library that produces awesome force-directed graphs (https://github.com/mbostock/d3/wiki/Gallery)
- bootstrap - a CSS framework that will eventually kill webdesign, but makes it extremely easy to quickly "webize" applications that would only work through a command prompt.


